
(一)搭建自己的SpringBoot后台框架整合MyBatis
一:通过idea工具构建基础框架
1. 打开idea,左上角File→New→Project,
2. 点击Next
3. 点击Next,配置如下图,这里我们选择数据库MySQL和持久层框架MyBatis
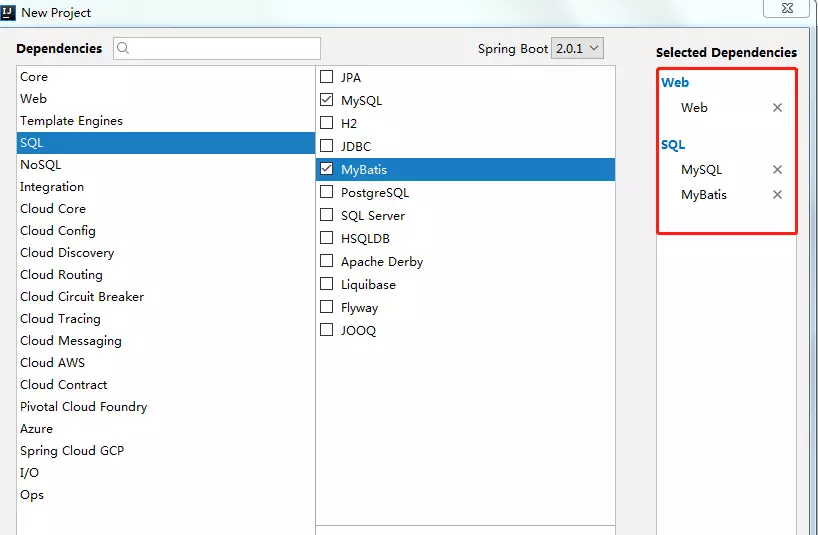
4. 点击Next,选择工作目录,点击Finish,开始构建
5. 创建完成后,项目目录结构如下
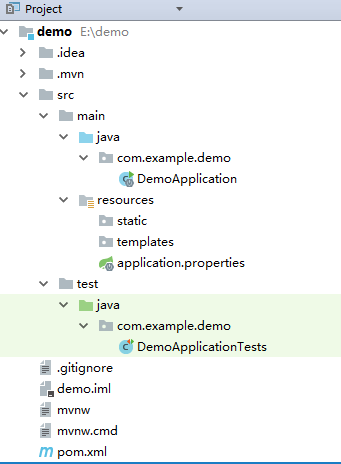
二:配置数据库信息
在application.properties文件中添加如下数据库配置
spring.datasource.url=jdbc:mysql://localhost:3306/demo?useSSL=false&useUnicode=true&characterEncoding=utf-8&zeroDateTimeBehavior=convertToNull&transformedBitIsBoolean=true&autoReconnect=true&failOverReadOnly=false

spring.datasource.username=数据库用户名

spring.datasource.password=数据库密码

spring.datasource.driverClassName=com.mysql.jdbc.Driver
三:创建数据库UserInfo表
CREATE TABLE `user_info` (

  `id` int(32) NOT NULL AUTO_INCREMENT,

  `user_name` varchar(255) DEFAULT NULL,

  PRIMARY KEY (`id`)

) ENGINE=InnoDB AUTO_INCREMENT=2 DEFAULT CHARSET=utf8;
四:创建项目基本目录结构

Model 存放实体类
package com.example.demo.model;

import javax.persistence.Column;

import javax.persistence.Id;

/**

 * @author

 * @Description:

 * @time 2018/4/18 11:55

 */

public class UserInfo {

    /**

     * 主键

     */

    @Id

    private String id;

    /**

     * 用户名

     */

    @Column(name = "user_name")

    private String userName;

    private String password;

    public String getId() {

        return id;

    }

    public void setId(String id) {

        this.id = id;

    }

    public String getUserName() {

        return userName;

    }

    public void setUserName(String userName) {

        this.userName = userName;

    }

    public String getPassword() {

        return password;

    }

    public void setPassword(String password) {

        this.password = password;

    }

}
Mapper
<?xml version="1.0" encoding="UTF-8"?>

<!DOCTYPE mapper PUBLIC "-//mybatis.org//DTD Mapper 3.0//EN" "http://mybatis.org/dtd/mybatis-3-mapper.dtd">

<mapper namespace="com.example.demo.dao.UserInfoMapper">

    <resultMap id="BaseResultMap" type="com.example.demo.model.UserInfo">

        <id column="id" jdbcType="INTEGER" property="id"/>

        <result column="user_name" jdbcType="VARCHAR" property="userName"/>

    </resultMap>

    <sql id="Base_Column_List">

      id,user_name

    </sql>

    <select id="selectById" parameterType="java.lang.Integer" resultMap="BaseResultMap">

        select

        <include refid="Base_Column_List"/>

        from user_info

        where id = #{id,jdbcType=VARCHAR}

    </select>

</mapper>
DAO层
package com.example.demo.dao;

import com.example.demo.model.UserInfo;

import org.apache.ibatis.annotations.Param;

/**

 * @author

 * @Description:

 * @time 2018/4/18 11:54

 */

public interface UserInfoMapper {

    UserInfo selectById(@Param("id") Integer id);

}
Service
package com.example.demo.service;

import com.example.demo.model.UserInfo;

/**

 * @author

 * @Description:

 * @time 2018/4/18 11:56

 */

public interface UserInfoService {

    UserInfo selectById(Integer id);

}
ServiceImpl
package com.example.demo.service.impl;

import com.example.demo.dao.UserInfoMapper;

import com.example.demo.model.UserInfo;

import com.example.demo.service.UserInfoService;

import org.springframework.stereotype.Service;

import javax.annotation.Resource;

/**

 * @author

 * @Description:

 * @time 2018/4/18 11:56

 */

@Service

public class UserInfoServiceImpl implements UserInfoService{

    @Resource

    private UserInfoMapper userInfoMapper;

    public UserInfo selectById(Integer id){

        return userInfoMapper.selectById(id);

    }

}
Controller
package com.example.demo.controller;

import com.example.demo.model.UserInfo;

import com.example.demo.service.UserInfoService;

import org.springframework.web.bind.annotation.PostMapping;

import org.springframework.web.bind.annotation.RequestMapping;

import org.springframework.web.bind.annotation.RestController;

import javax.annotation.Resource;

/**

 * @author

 * @Description:

 * @time 2018/4/18 11:39

 */

@RestController

@RequestMapping("userInfo")

public class UserInfoController {

    @Resource

    private UserInfoService userInfoService;

    @PostMapping("/hello")

    public String hello(){

        return "hello SpringBoot";

    }

    @PostMapping("/selectById")

    public UserInfo selectById(Integer id){

        return userInfoService.selectById(id);

    }

}
MyBatis 的配置Java类
package com.example.demo.core.configurer;

import org.apache.ibatis.session.SqlSessionFactory;

import org.mybatis.spring.SqlSessionFactoryBean;

import org.mybatis.spring.mapper.MapperScannerConfigurer;

import org.springframework.context.annotation.Bean;

import org.springframework.context.annotation.Configuration;

import org.springframework.core.io.support.PathMatchingResourcePatternResolver;

import org.springframework.core.io.support.ResourcePatternResolver;

import javax.sql.DataSource;

/**

 * @ClassName: MybatisConfigurer

 * @Description: Mybatis配置

 * @author

 * @date 2018年1月20日 下午4:03:46

 *

 */

@Configuration

public class MybatisConfigurer {

   @Bean

   public SqlSessionFactory sqlSessionFactoryBean(DataSource dataSource) throws Exception {

      SqlSessionFactoryBean factory = new SqlSessionFactoryBean();

      factory.setDataSource(dataSource);

      factory.setTypeAliasesPackage("com.example.demo.model");

      // 添加XML目录

      ResourcePatternResolver resolver = new PathMatchingResourcePatternResolver();

      factory.setMapperLocations(resolver.getResources("classpath:mapper/*.xml"));

      return factory.getObject();

   }

   @Bean

   public MapperScannerConfigurer mapperScannerConfigurer() {

      MapperScannerConfigurer mapperScannerConfigurer = new MapperScannerConfigurer();

      mapperScannerConfigurer.setSqlSessionFactoryBeanName("sqlSessionFactoryBean");

      mapperScannerConfigurer.setBasePackage("com.example.demo.dao");

      return mapperScannerConfigurer;

   }

}
@Configuration表示该文件是一个配置文件
@Bean表示该方法是一个传统xml配置文件中的<Bean id=""></Bean>
其中factory.setTypeAliasesPackage("com.example.demo.model")表示项目中model的存储路径;
factory.setMapperLocations(resolver.getResources("classpath:mapper/*.xml"));表示mapper.xml存储路径;
mapperScannerConfigurer.setBasePackage("com.example.demo.dao");表示dao层的存储路径
五:运行项目
找到DemoApplication,右键,选择run DemoApplication
以上内容来源网上,如有侵权请联系本人!!!
(一)搭建自己的SpringBoot后台框架整合MyBatis的更多相关文章
- springboot 后台框架平台 mybatis 集成代码生成器 shiro 权限 websocket
1.代码生成器: [正反双向](单表.主表.明细表.树形表,快速开发利器)freemaker模版技术 ,0个代码不用写,生成完整的一个模块,带页面.建表sql脚本.处理类.service等完整模块2. ...
- 【springboot spring mybatis】看我怎么将springboot与spring整合mybatis与druid数据源
目录 概述 1.mybatis 2.druid 壹:spring整合 2.jdbc.properties 3.mybatis-config.xml 二:java代码 1.mapper 2.servic ...
- SpringBoot 2.X整合Mybatis
1.创建工程环境 勾选Web.Mybatis.MySQL,如下 依赖如下 <dependency> <groupId>org.springframework.boot</ ...
- 利用IDEA搭建SpringBoot项目,整合mybatis
一.配置文件.启动项目 生成之后这几个文件可以删掉的 配置application spring.datasource.url=jdbc:mysql://localhost:3306/test?serv ...
- SpringBoot学习之整合Mybatis
本博客使用IDEA开发工具,通过Maven构建SpringBoot项目,初始化项目添加的依赖有:spring-boot-starter-jdbc.spring-boot-starter-web.mys ...
- SpringBoot | 3.2 整合MyBatis
目录 前言 1. 导入MyBatis场景 1.1 初始化导向 1.2 手动导入 2. *MyBatis自动配置原理 3. 全局配置文件 @Mapper @MapperScan 3.1 配置模式 3.2 ...
- SpringBoot当中如何整合mybatis和注入
[学习笔记] 6.整合mybatis和注入: 马克-to-win@马克java社区: 根据第3部分的helloworld例子,用那个项目做底子.pom.xml只需要加入mybatis和mysql的部分 ...
- spring 框架整合mybatis的源码分析
问题:spring 在整合mybatis的时候,我们是看不见sqlSessionFactory,和sqlsession(sqlsessionTemplate 就是sqlsession的具体实现)的,这 ...
- springboot笔记07——整合MyBatis
前言 Springboot 整合 MyBatis 有两种方式,分别是:"全注解版" 和 "注解.xml混合版". 创建项目 创建Springboot项目,选择依 ...
随机推荐
- ubuntu 的权限和目录
/ : 根目录 /bin 和 /sbin中放置的是可执行文件 /etc 里面放的是配置文件 /boot 引导 /mnt 是挂载目录 /home 主目录 /dev 设备 /usr li ...
- iOS_40_核心动画
核心动画之CATransition转场动画 终于效果图: 核心动画之CAKeyFrameAnimation,图标抖动效果 终于效果图: 核心动画之CAAnimationGroup(动画组) 终于效果图 ...
- 记一次OGG数据写入HBase的丢失数据原因分析
一.现象二.原因排查2.1 SparkStreaming程序排查2.2 Kafka数据验证2.3 查看OGG源码2.3.1 生成Kafka消息类2.3.2 Kafka配置类2.3.3 Kafka 消息 ...
- 使用libcurl的包装库cpr发起http请求
cpr GitHub地址https://github.com/whoshuu/cpr 简单示例:cpr_http_request.cpp #include <iostream> #incl ...
- IOS开发,知识点小结,ios开发中经常使用的宏定义总结
IOS开发,从应用跳转到用浏览器打开网页: [[UIApplication sharedApplication] openURL:[NSURL URLWithString:@"http:// ...
- ubuntu12.04配置NFS服务详解
1:安装nfs sudo apt-get install nfs-kernel-server 2:配置服务 sudo vim /etc/exports 在末尾添加 /home/jyg *(rw,syn ...
- C++的学习 (此博客将一直补充更新下去,C++语法方面的内容不开新随笔了, *【语法学习】)
// #include <sstream> // stringstream 是 C++ 提供的另一个字串型的串流(stream)物件,包含在上述头文件中 // 先谈它在字符串处理方面的应用 ...
- YTU 2422: C语言习题 n个数逆序
2422: C语言习题 n个数逆序 时间限制: 1 Sec 内存限制: 128 MB 提交: 150 解决: 96 题目描述 将n(n<20)个数按输入时顺序的逆序排列,用函数实现. 输入 ...
- codeforces 454B. Little Pony and Sort by Shift 解题报告
题目链接:http://codeforces.com/problemset/problem/454/B 题目意思:给出一个序列你 a1, a2, ..., an. 问每次操作只能通过将最后一个数拿出来 ...
- BlueSea笔记<1>--Cricket初探
最近在看Cricket这个实现了Actor模式的F#开源框架,对其工作方式作了一番探究.首先来看一段简单的例子代码: type Say = | Hello let greeter = actor { ...