Android中的对话框AlertDialog使用技巧合集-转载
Android中的对话框AlertDialog使用技巧合集
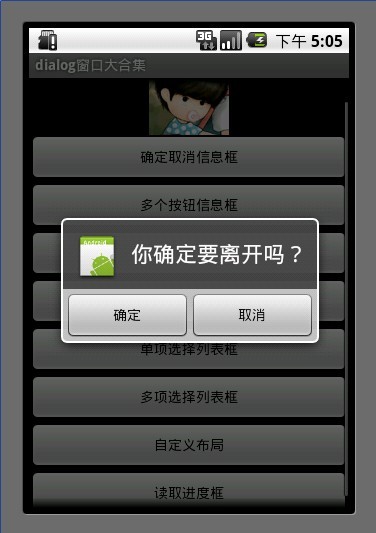
1.确定取消对话框
对话框中有2个按钮 通过调用 setPositiveButton 方法 和 setNegativeButton 方法 可以设置按钮的显示内容以及按钮的监听事件。
- AlertDialog.Builder builder = new AlertDialog.Builder(MainDialog.this);
使用builder设置对话框的title button icon 等等
- builder.setIcon(R.drawable.icon);
- builder.setTitle("你确定要离开吗?");
- builder.setPositiveButton("确定", new DialogInterface.OnClickListener() {
- public void onClick(DialogInterface dialog, int whichButton) {
- //这里添加点击确定后的逻辑
- showDialog("你选择了确定");
- }
- });
- builder.setNegativeButton("取消", new DialogInterface.OnClickListener() {
- public void onClick(DialogInterface dialog, int whichButton) {
- //这里添加点击确定后的逻辑
- showDialog("你选择了取消");
- }
- });
- builder.create().show();
这个dialog用于现实onClick后监听的内容信息
- private void showDialog(String str) {
- w AlertDialog.Builder(MainDialog.this)
- .setMessage(str)
- .show();
- }
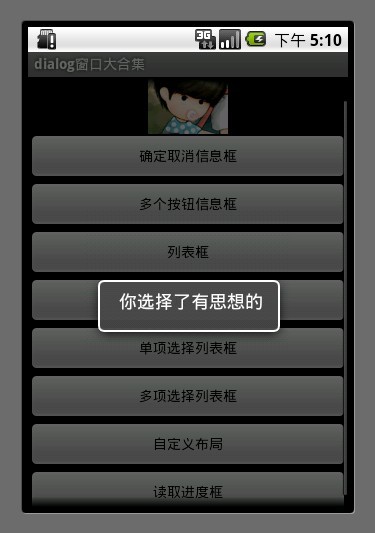
2.多个按钮信息框

- AlertDialog.Builder builder = new AlertDialog.Builder(MainDialog.this);
- builder.setIcon(R.drawable.icon);
- builder.setTitle("投票");
- builder.setMessage("您认为什么样的内容能吸引您?");
- builder.setPositiveButton("有趣味的", new DialogInterface.OnClickListener() {
- public void onClick(DialogInterface dialog, int whichButton) {
- showDialog("你选择了有趣味的");
- }
- });
- builder.setNeutralButton("有思想的", new DialogInterface.OnClickListener() {
- public void onClick(DialogInterface dialog, int whichButton) {
- showDialog("你选择了有思想的");
- }
- });
- builder.setNegativeButton("主题强的", new DialogInterface.OnClickListener() {
- public void onClick(DialogInterface dialog, int whichButton) {
- showDialog("你选择了主题强的");
- }
- });
- builder.create().show();
3.列表框

这个数组用于列表选择
- final String[] mItems = {"item0","item1","itme2","item3","itme4","item5","item6"};
- AlertDialog.Builder builder = new AlertDialog.Builder(MainDialog.this);
- builder.setTitle("列表选择框");
- builder.setItems(mItems, new DialogInterface.OnClickListener() {
- public void onClick(DialogInterface dialog, int which) {
- //点击后弹出窗口选择了第几项
- showDialog("你选择的id为" + which + " , " + mItems[which]);
- }
- });
- builder.create().show();
4.单项选择列表框
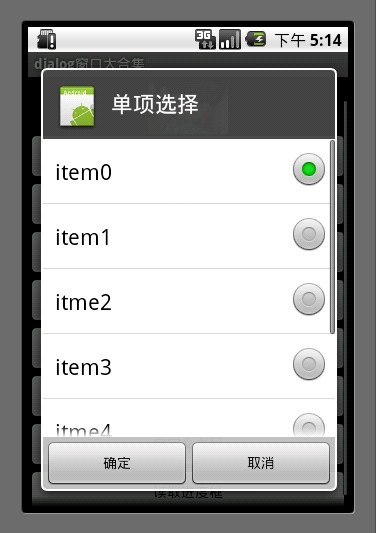
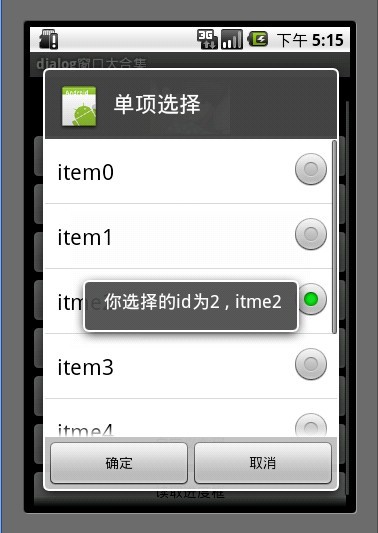
mSingleChoice 用于记录单选中的ID
- int mSingleChoiceID = -1;
- AlertDialog.Builder builder = new AlertDialog.Builder(MainDialog.this);
- mSingleChoiceID = -1;
- builder.setIcon(R.drawable.icon);
- builder.setTitle("单项选择");
- builder.setSingleChoiceItems(mItems, 0, new DialogInterface.OnClickListener() {
- public void onClick(DialogInterface dialog, int whichButton) {
- mSingleChoiceID = whichButton;
- showDialog("你选择的id为" + whichButton + " , " + mItems[whichButton]);
- }
- });
- builder.setPositiveButton("确定", new DialogInterface.OnClickListener() {
- public void onClick(DialogInterface dialog, int whichButton) {
- if(mSingleChoiceID > 0) {
- showDialog("你选择的是" + mSingleChoiceID);
- }
- }
- });
- builder.setNegativeButton("取消", new DialogInterface.OnClickListener() {
- public void onClick(DialogInterface dialog, int whichButton) {
- }
- });
- builder.create().show();
5.进度条框
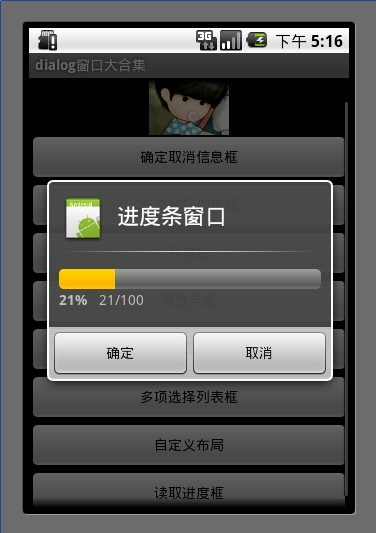
点击进度条框按钮后 开启一个线程计算读取的进度 假设读取结束为 100
Progress在小于100的时候一直在线程中做循环++ 只到读取结束后,停止线程。
- mProgressDialog = new ProgressDialog(MainDialog.this);
- mProgressDialog.setIcon(R.drawable.icon);
- mProgressDialog.setTitle("进度条窗口");
- mProgressDialog.setProgressStyle(ProgressDialog.STYLE_HORIZONTAL);
- mProgressDialog.setMax(MAX_PROGRESS);
- mProgressDialog.setButton("确定", new DialogInterface.OnClickListener() {
- public void onClick(DialogInterface dialog, int whichButton) {
- //这里添加点击后的逻辑
- }
- });
- mProgressDialog.setButton2("取消", new DialogInterface.OnClickListener() {
- public void onClick(DialogInterface dialog, int whichButton) {
- //这里添加点击后的逻辑
- }
- });
- mProgressDialog.show();
- new Thread(this).start();
- ic void run() {
- int Progress = 0;
- while(Progress < MAX_PROGRESS) {
- try {
- Thread.sleep(100);
- Progress++;
- mProgressDialog.incrementProgressBy(1);
- } catch (InterruptedException e) {
- // TODO Auto-generated catch block
- e.printStackTrace();
- }
- }
6.多项选择列表框
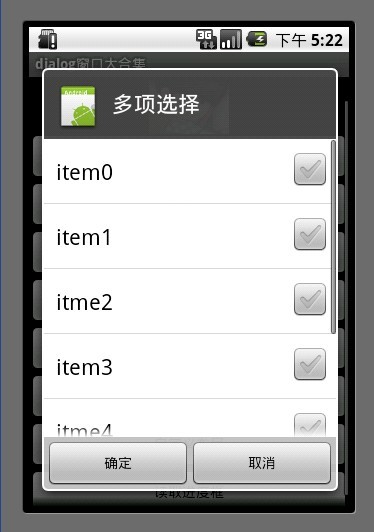
MultiChoiceID 用于记录多选选中的id号 存在ArrayList中
选中后 add 进ArrayList
取消选中后 remove 出ArrayList。
- ArrayList <Integer>MultiChoiceID = new ArrayList <Integer>();
- AlertDialog.Builder builder = new AlertDialog.Builder(MainDialog.this);
- MultiChoiceID.clear();
- builder.setIcon(R.drawable.icon);
- builder.setTitle("多项选择");
- builder.setMultiChoiceItems(mItems,
- new boolean[]{false, false, false, false, false, false, false},
- new DialogInterface.OnMultiChoiceClickListener() {
- public void onClick(DialogInterface dialog, int whichButton,
- boolean isChecked) {
- if(isChecked) {
- MultiChoiceID.add(whichButton);
- showDialog("你选择的id为" + whichButton + " , " + mItems[whichButton]);
- }else {
- MultiChoiceID.remove(whichButton);
- }
- }
- });
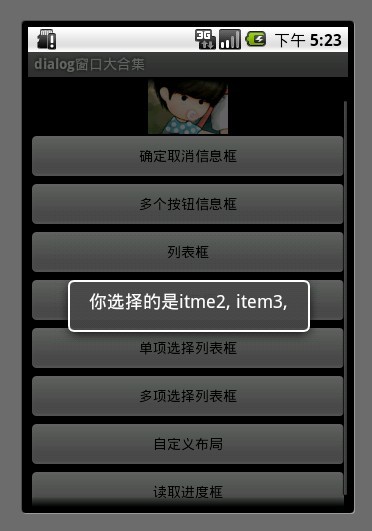
- builder.setPositiveButton("确定", new DialogInterface.OnClickListener() {
- public void onClick(DialogInterface dialog, int whichButton) {
- String str = "";
- int size = MultiChoiceID.size();
- for (int i = 0 ;i < size; i++) {
- str+= mItems[MultiChoiceID.get(i)] + ", ";
- }
- showDialog("你选择的是" + str);
- }
- });
- builder.setNegativeButton("取消", new DialogInterface.OnClickListener() {
- public void onClick(DialogInterface dialog, int whichButton) {
- }
- });
- builder.create().show();
7.自定义布局
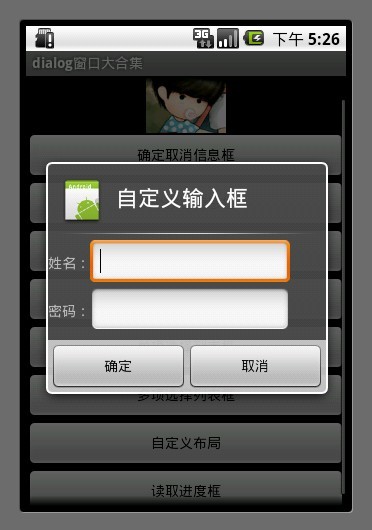
讲到自定义布局我就得多说一说了,为什么要多说一说呢?
其实自定义布局在Android的开发中非常重要 因为它能让开发者做出自己五彩缤纷的Activity 而不用去使用系统枯燥的界面。
自定义dialog有什么好处?
比如我们在开发过长当中 要通过介绍系统发送的一个广播弹出一个dialog . 但是dialog必需是基于activity才能呈现出来 如果没有activity 的话 程序就会崩溃。所以我们可以写一个自定义的 dialog 把它定义成一个activity
这样我们收到一条打开dialog的广播后 直接启动这个 activity 程序正常运行~~
这就是自定义dialog的好处。
注明:下面这个例子只是写了自定义dialog 没有把它单独的写在一个activity中 如果须要的话 可以自己改一下。
- AlertDialog.Builder builder = new AlertDialog.Builder(MainDialog.this);
- LayoutInflater factory = LayoutInflater.from(this);
- final View textEntryView = factory.inflate(R.layout.test, null);
- builder.setIcon(R.drawable.icon);
- builder.setTitle("自定义输入框");
- builder.setView(textEntryView);
- builder.setPositiveButton("确定", new DialogInterface.OnClickListener() {
- public void onClick(DialogInterface dialog, int whichButton) {
- EditText userName = (EditText) textEntryView.findViewById(R.id.etUserName);
- EditText password = (EditText) textEntryView.findViewById(R.id.etPassWord);
- showDialog("姓名 :" + userName.getText().toString() + "密码:" + password.getText().toString() );
- }
- });
- builder.setNegativeButton("取消", new DialogInterface.OnClickListener() {
- public void onClick(DialogInterface dialog, int whichButton) {
- }
- });
- builder.create().show();
- <span style="color:#000000;"><?xml version="1.0" encoding="utf-8"?>
- <RelativeLayout xmlns:android="http://schemas.android.com/apk/res/android"
- android:layout_height="wrap_content"
- android:layout_width="wrap_content"
- android:orientation="horizontal"
- android:id="@+id/dialog">
- <LinearLayout
- android:layout_height="wrap_content"
- android:layout_width="wrap_content"
- android:orientation="horizontal"
- android:id="@+id/dialogname">
- <TextView android:layout_height="wrap_content"
- android:layout_width="wrap_content"
- android:id="@+id/tvUserName"
- android:text="姓名:" />
- <EditText android:layout_height="wrap_content"
- android:layout_width="wrap_content"
- android:id="@+id/etUserName"
- android:minWidth="200dip"/>
- </LinearLayout>
- <LinearLayout
- android:layout_height="wrap_content"
- android:layout_width="wrap_content"
- android:orientation="horizontal"
- android:id="@+id/dialognum"
- android:layout_below="@+id/dialogname"
- >
- <TextView android:layout_height="wrap_content"
- android:layout_width="wrap_content"
- android:id="@+id/tvPassWord"
- android:text="密码:" />
- <EditText android:layout_height="wrap_content"
- android:layout_width="wrap_content"
- android:id="@+id/etPassWord"
- android:minWidth="200dip"/>
- </LinearLayout>
- </RelativeLayout></span>
8.读取进度框
显示一个正在转圈的进度条loading
- mProgressDialog = new ProgressDialog(this);
- mProgressDialog.setTitle("读取ing");
- mProgressDialog.setMessage("正在读取中请稍候");
- mProgressDialog.setIndeterminate(true);
- mProgressDialog.setCancelable(true);
- mProgressDialog.show();
源码下载地址:http://www.kuaipan.cn/index.php?ac=file&oid=3166172581218727
Android中的对话框AlertDialog使用技巧合集-转载的更多相关文章
- android中提示&对话框----AlertDialog
AlertDialog(对话框) 一.对话框的基本使用流程 step1:创建AlertDialog.Buider; step2:调用setIcon()设置图标,setTitle()或者setCusto ...
- Android中UI设计的一些技巧!!!
出处:http://blog.csdn.net/android_tutor/article/details/5995759 大家好,今天给大家分享的是Android中UI设计的一些技巧,本节内容主要有 ...
- Android详细的对话框AlertDialog.Builder使用方法
我们在平时做开发的时候,免不了会用到各种各样的对话框,相信有过其他平台开发经验的朋友都会知道,大部分的平台都只提供了几个最简单的实现,如果我们想实现自己特定需求的对话框,大家可能首先会想到,通过继 ...
- Android中Dialog对话框的调用及监听
Android中经常会需要在Android界面上弹出一些对话框提示用户,比如App的退出的时候都会有各种框来挽留你的心,支付宝的时候输入密码的密码框,非常常见及其实用的功能,类似于JS中的alter, ...
- Android中Dialog对话框
布局文件xml: <LinearLayout xmlns:android="http://schemas.android.com/apk/res/android" xmlns ...
- android 中打 Log 的一些技巧
在 android 平台上搞开发工作,会经常用到一些 Log 输出调试信息. 众所周知,android 中有五种类型的 Log , v, d, i, w, e 这里就不再赘 述 (如果对这些不了解的朋 ...
- android中常见对话框之一AlertDialog
在Android应用中,有多种对话框:Dialog.AlertDialog.ProgressDialog.时间.日期等对话框. (1)Dialog类,是一切对话框的基类,需要注意的是,Dialog类虽 ...
- 11.Android之常用对话框AlertDialog学习
(1)首先我们写个简单的AlertDialog对话框,要创建一个AlertDialog,就要用到AlertDialog.Builder中的create()方法,然后创建对话框可以设置对话框的属性,比如 ...
- android中提示&对话框----ProgressDialog&DatePickerDialog &TimePickerDialog&PopupWindow
ProgressDialog(精度条对话框): 1.直接调用ProgressDialog提供的静态方法show()显示 2.创建ProgressDialog,再设置对话框的参数,最后show()出来 ...
随机推荐
- Queues 队列
1. Definiation What is a queue? A queue is a list. With a queue, inseration is done at one end (know ...
- Python之列表&元组&字典
今天学习了Python的基本数据类型,做以下笔记,以备查用. 一.列表 列表的常用方法: 1.append()方法 def append(self, p_object): # real signatu ...
- HTTP Status 400 - Required request part 'file' is not present
今天使用Spring MVC做一个文件上传的功能,在提交表单的时候出现了如下错误:
- 可靠通信的保障 —— 使用ACK机制发送自定义信息——ESFramework 通信框架4.0 快速上手(12)
使用ESPlus.Application.CustomizeInfo.Passive.ICustomizeInfoOutter接口的Send方法,我们已经可以给服务端或其它在线客户端发送自定义信息了, ...
- servlet规范核心类图
作为新手在写servlet时很多时候忘记类与类之间的关系,找到这张图就瞬间清晰了,这比看API要舒服很多.
- LeetCode OJ 122. Best Time to Buy and Sell Stock II
Say you have an array for which the ith element is the price of a given stock on day i. Design an al ...
- tomcat 7 启动超时设置。。。实在太隐蔽了
打开Tomcat,选择 Window->Show View->Servers,在主窗口下的窗口中的Servers标签栏鼠标左键双击tomcat服务器名,例如 Tomcat v7.0 Ser ...
- phpstudy 相关配置
在/etc/my.cnf中 添加 expire_logs_days=5 phpstudy add list del
- Chapter 16_2 继承
类也是对象,所有它们也可以从其他类获得方法.这就是“继承”,可以在Lua中表示: Account = { balance = } function Account:new(o) o = o or {} ...
- 关于socket客户端接收不定长数据的解决方案
#!/usr/bin/env python3.5 # -*-coding:utf8-*- """ 本实例客户端用于不断接收不定长数据,存储到变量res "&qu ...