Java后端进阶-网络编程(Netty零拷贝机制)
package com.study.hc.net.netty.demo;
import io.netty.buffer.ByteBuf;
import io.netty.buffer.Unpooled;
import org.junit.Test;
import java.util.Arrays;
/**
* bytebuf的常规API操作示例
*/
public class ByteBufDemo {
@Test
public void apiTest() {
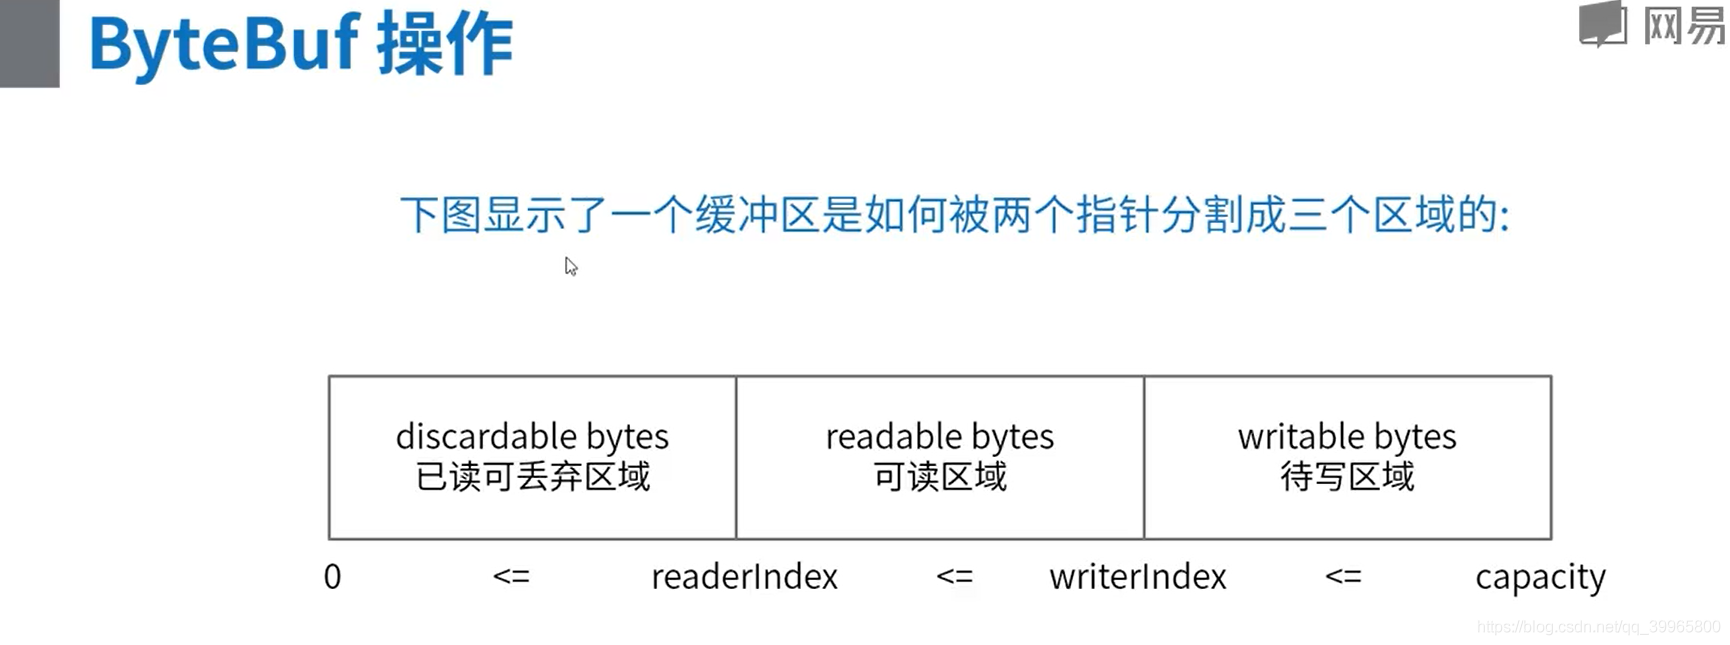
// +-------------------+------------------+------------------+
// | discardable bytes | readable bytes | writable bytes |
// | | (CONTENT) | |
// +-------------------+------------------+------------------+
// | | | |
// 0 <= readerIndex <= writerIndex <= capacity
// 1.创建一个非池化的ByteBuf,大小为10个字节
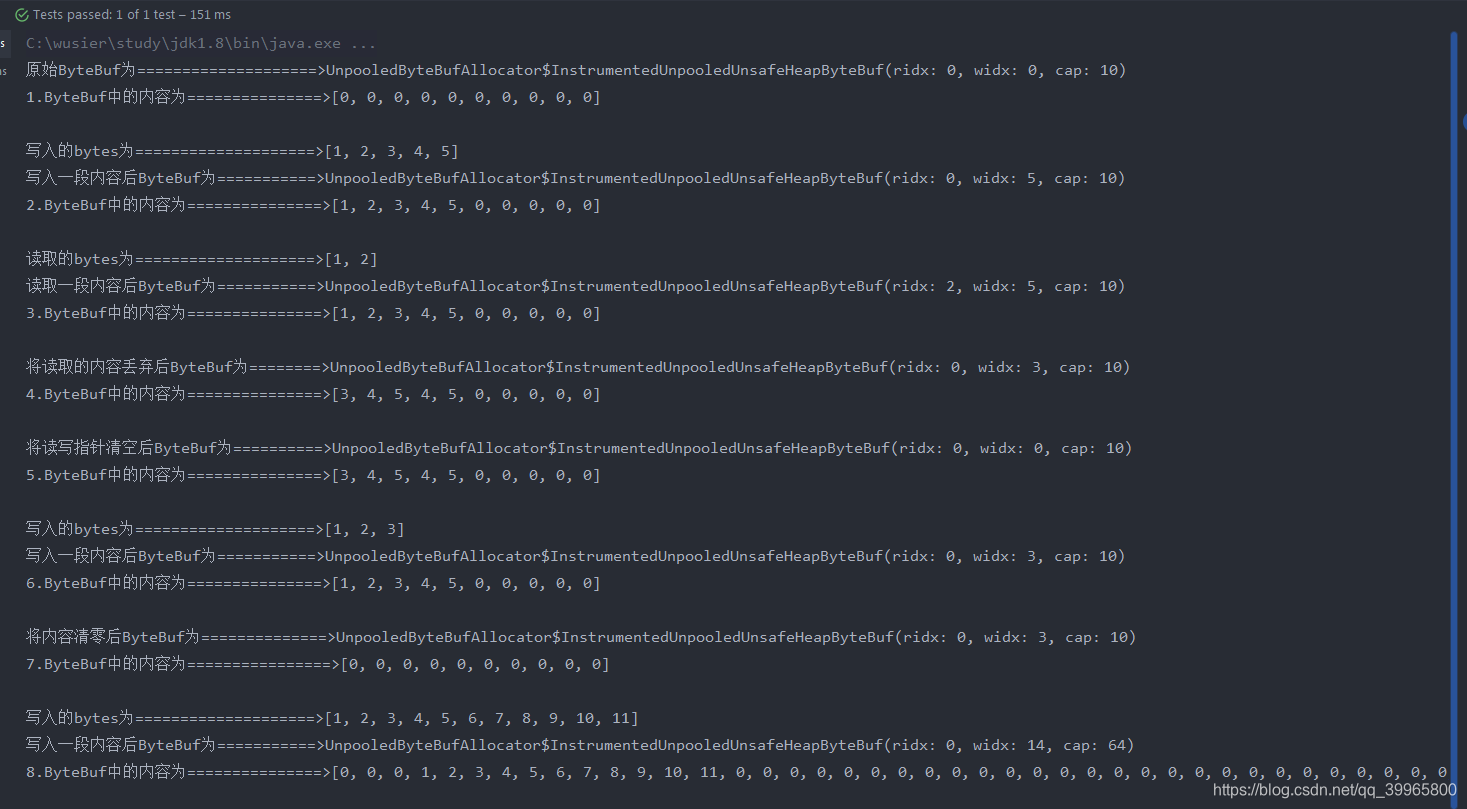
ByteBuf buf = Unpooled.buffer(10);
System.out.println("原始ByteBuf为====================>" + buf.toString());
System.out.println("1.ByteBuf中的内容为===============>" + Arrays.toString(buf.array()) + "\n");
// 2.写入一段内容
byte[] bytes = {1, 2, 3, 4, 5};
buf.writeBytes(bytes);
System.out.println("写入的bytes为====================>" + Arrays.toString(bytes));
System.out.println("写入一段内容后ByteBuf为===========>" + buf.toString());
System.out.println("2.ByteBuf中的内容为===============>" + Arrays.toString(buf.array()) + "\n");
// 3.读取一段内容
byte b1 = buf.readByte();
byte b2 = buf.readByte();
System.out.println("读取的bytes为====================>" + Arrays.toString(new byte[]{b1, b2}));
System.out.println("读取一段内容后ByteBuf为===========>" + buf.toString());
System.out.println("3.ByteBuf中的内容为===============>" + Arrays.toString(buf.array()) + "\n");
// 4.将读取的内容丢弃
buf.discardReadBytes();
System.out.println("将读取的内容丢弃后ByteBuf为========>" + buf.toString());
System.out.println("4.ByteBuf中的内容为===============>" + Arrays.toString(buf.array()) + "\n");
// 5.清空读写指针
buf.clear();
System.out.println("将读写指针清空后ByteBuf为==========>" + buf.toString());
System.out.println("5.ByteBuf中的内容为===============>" + Arrays.toString(buf.array()) + "\n");
// 6.再次写入一段内容,比第一段内容少
byte[] bytes2 = {1, 2, 3};
buf.writeBytes(bytes2);
System.out.println("写入的bytes为====================>" + Arrays.toString(bytes2));
System.out.println("写入一段内容后ByteBuf为===========>" + buf.toString());
System.out.println("6.ByteBuf中的内容为===============>" + Arrays.toString(buf.array()) + "\n");
// 7.将ByteBuf清零
buf.setZero(0, buf.capacity());
System.out.println("将内容清零后ByteBuf为==============>" + buf.toString());
System.out.println("7.ByteBuf中的内容为================>" + Arrays.toString(buf.array()) + "\n");
// 8.再次写入一段超过容量的内容
byte[] bytes3 = {1, 2, 3, 4, 5, 6, 7, 8, 9, 10, 11};
buf.writeBytes(bytes3);
System.out.println("写入的bytes为====================>" + Arrays.toString(bytes3));
System.out.println("写入一段内容后ByteBuf为===========>" + buf.toString());
System.out.println("8.ByteBuf中的内容为===============>" + Arrays.toString(buf.array()) + "\n");
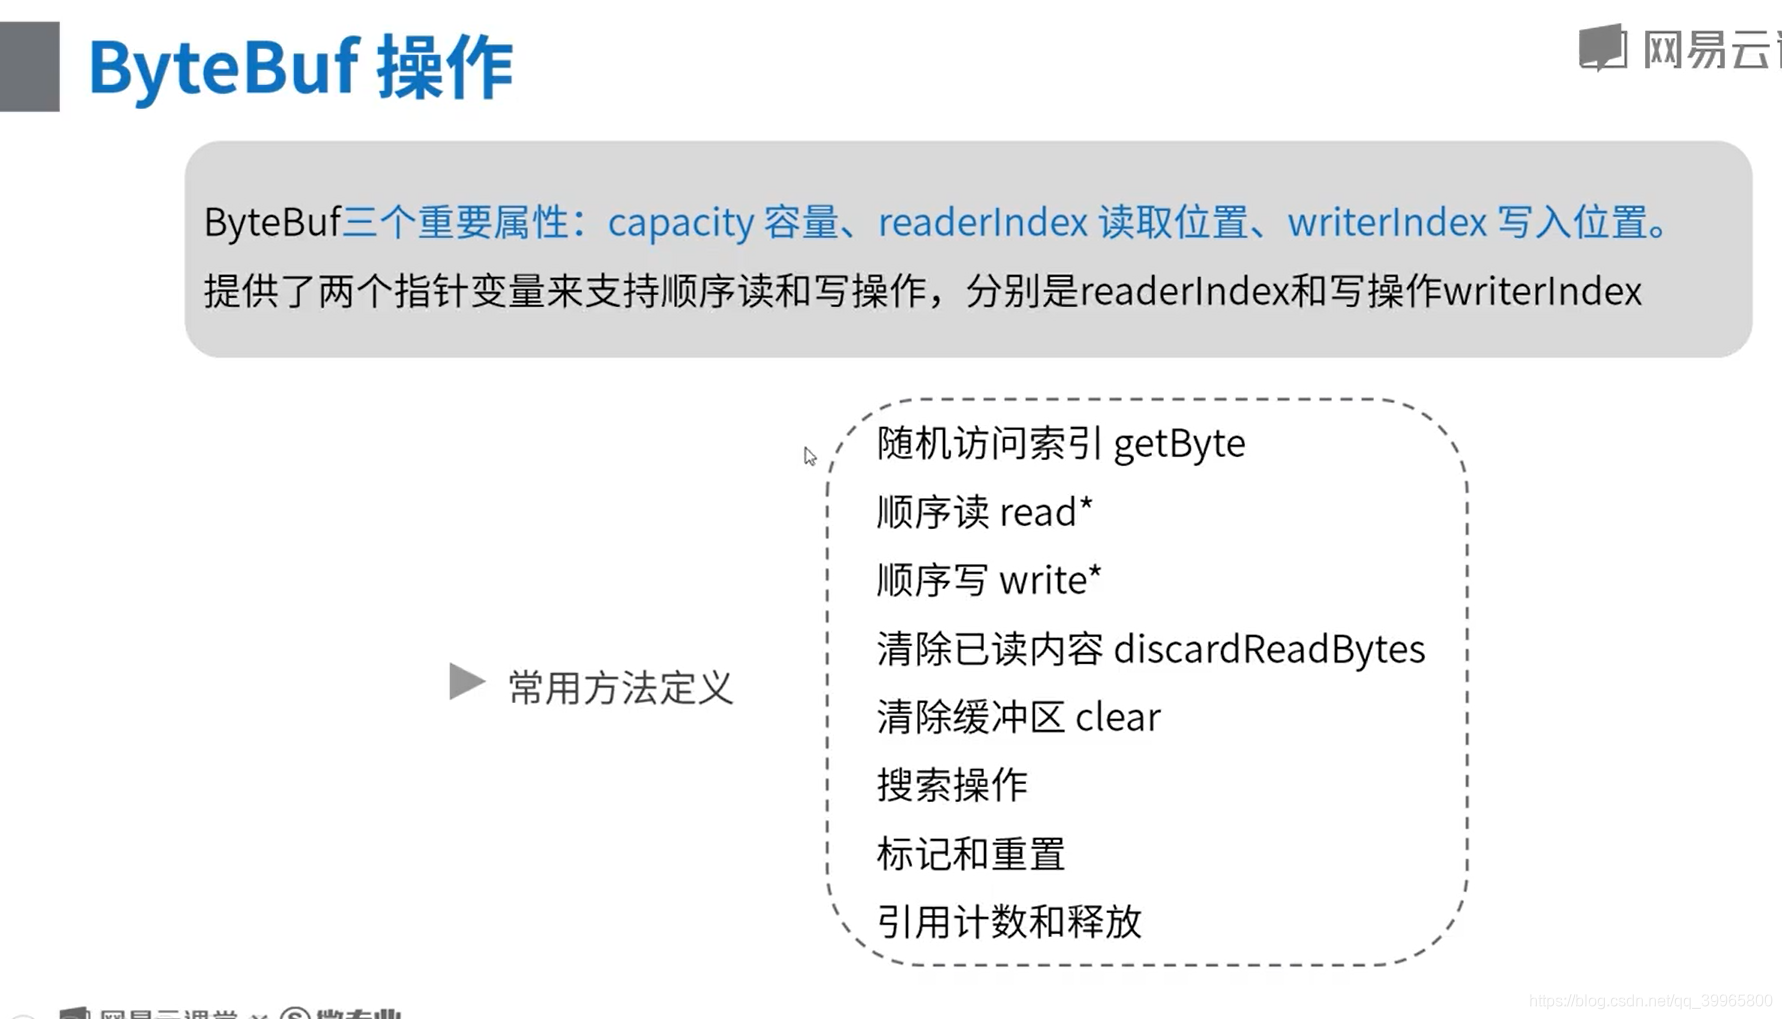
// 随机访问索引 getByte
// 顺序读 read*
// 顺序写 write*
// 清除已读内容 discardReadBytes
// 清除缓冲区 clear
// 搜索操作
// 标记和重置
// 完整代码示例:参考
// 搜索操作 读取指定位置 buf.getByte(1);
//
}
}
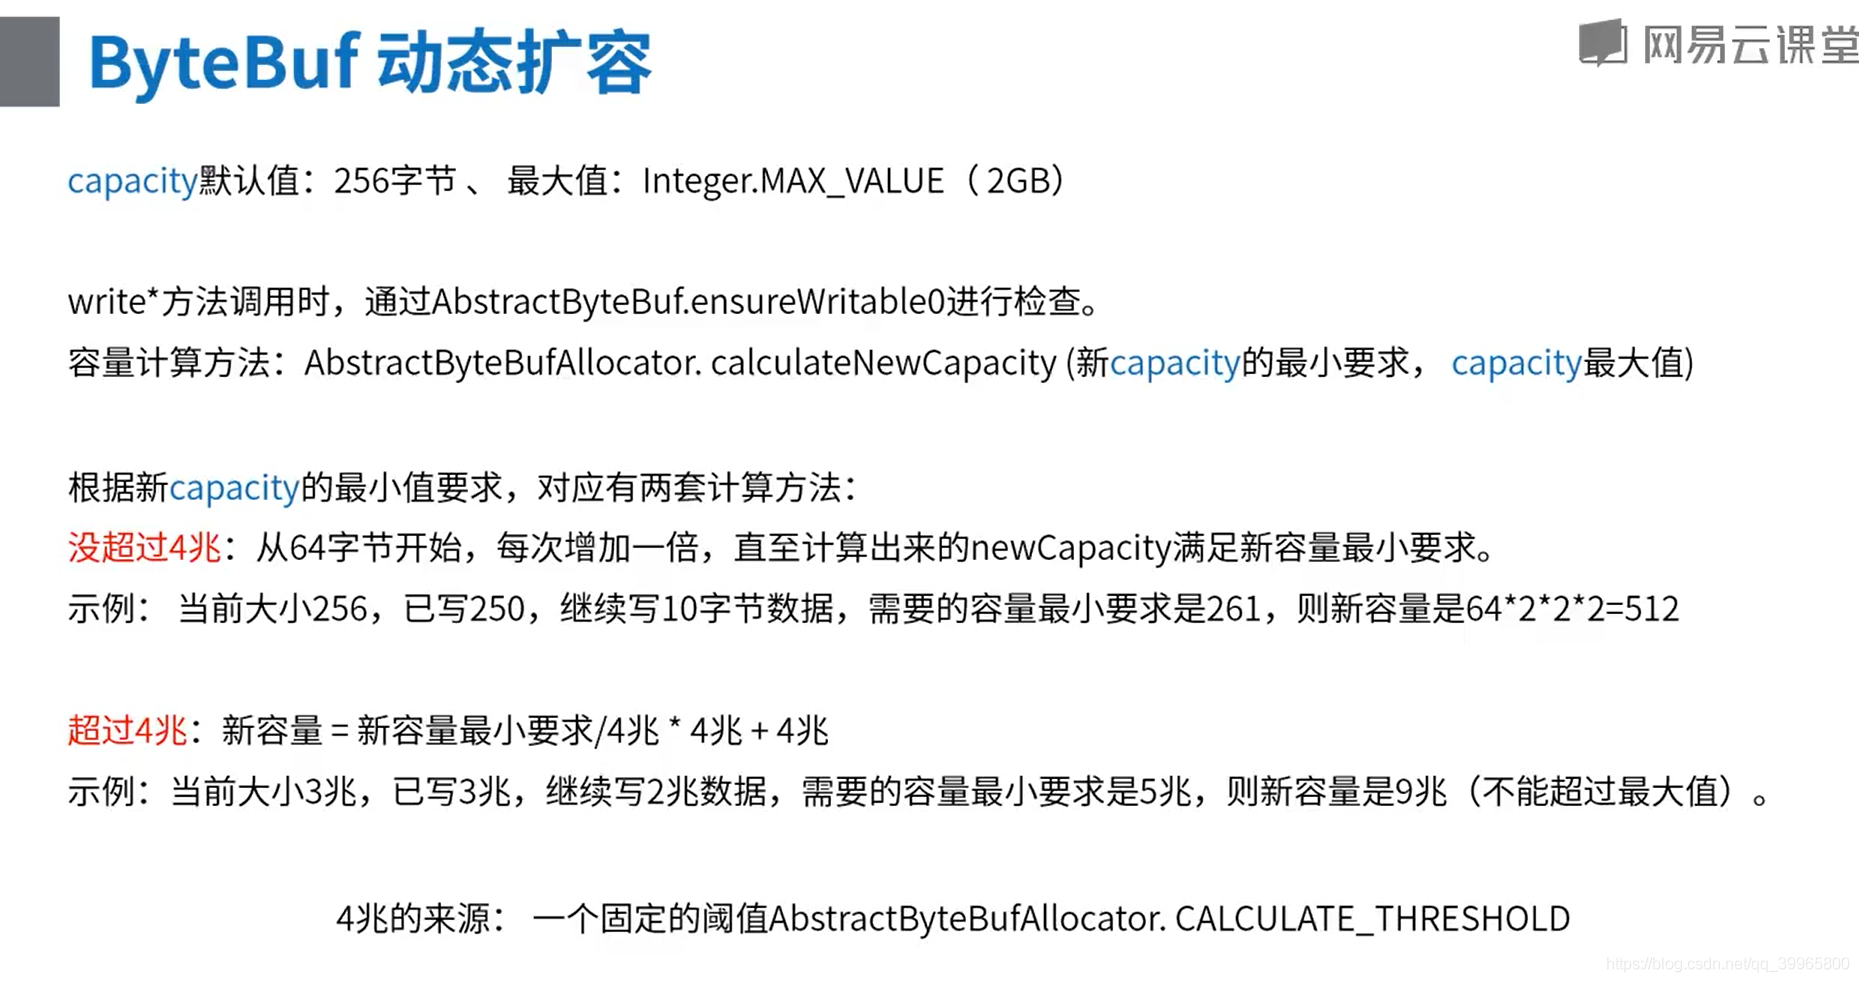
会动态扩容
DirectByteBufDemo
package com.study.hc.net.netty.demo;

import io.netty.buffer.ByteBuf;

import io.netty.buffer.Unpooled;

import org.junit.Test;

import java.util.Arrays;

/**

 * 堆外内存的常规API操作示例

 */

public class DirectByteBufDemo {

    @Test

    public void apiTest() {

        //  +-------------------+------------------+------------------+

        //  | discardable bytes |  readable bytes  |  writable bytes  |

        //  |                   |     (CONTENT)    |                  |

        //  +-------------------+------------------+------------------+

        //  |                   |                  |                  |

        //  0      <=       readerIndex   <=   writerIndex    <=    capacity

        // 1.创建一个非池化的ByteBuf,大小为10个字节

        ByteBuf buf = Unpooled.directBuffer(10);

        System.out.println("原始ByteBuf为====================>" + buf.toString());

        // System.out.println("1.ByteBuf中的内容为===============>" + Arrays.toString(buf.array()) + "\n");

        // 2.写入一段内容

        byte[] bytes = {1, 2, 3, 4, 5};

        buf.writeBytes(bytes);

        System.out.println("写入的bytes为====================>" + Arrays.toString(bytes));

        System.out.println("写入一段内容后ByteBuf为===========>" + buf.toString());

        //System.out.println("2.ByteBuf中的内容为===============>" + Arrays.toString(buf.array()) + "\n");

        // 3.读取一段内容

        byte b1 = buf.readByte();

        byte b2 = buf.readByte();

        System.out.println("读取的bytes为====================>" + Arrays.toString(new byte[]{b1, b2}));

        System.out.println("读取一段内容后ByteBuf为===========>" + buf.toString());

       //System.out.println("3.ByteBuf中的内容为===============>" + Arrays.toString(buf.array()) + "\n");

        // 4.将读取的内容丢弃

        buf.discardReadBytes();

        System.out.println("将读取的内容丢弃后ByteBuf为========>" + buf.toString());

        //System.out.println("4.ByteBuf中的内容为===============>" + Arrays.toString(buf.array()) + "\n");

        // 5.清空读写指针

        buf.clear();

        System.out.println("将读写指针清空后ByteBuf为==========>" + buf.toString());

        //System.out.println("5.ByteBuf中的内容为===============>" + Arrays.toString(buf.array()) + "\n");

        // 6.再次写入一段内容,比第一段内容少

        byte[] bytes2 = {1, 2, 3};

        buf.writeBytes(bytes2);

        System.out.println("写入的bytes为====================>" + Arrays.toString(bytes2));

        System.out.println("写入一段内容后ByteBuf为===========>" + buf.toString());

       // System.out.println("6.ByteBuf中的内容为===============>" + Arrays.toString(buf.array()) + "\n");

        // 7.将ByteBuf清零

        buf.setZero(0, buf.capacity());

        System.out.println("将内容清零后ByteBuf为==============>" + buf.toString());

       // System.out.println("7.ByteBuf中的内容为================>" + Arrays.toString(buf.array()) + "\n");

        // 8.再次写入一段超过容量的内容

        byte[] bytes3 = {1, 2, 3, 4, 5, 6, 7, 8, 9, 10, 11};

        buf.writeBytes(bytes3);

        System.out.println("写入的bytes为====================>" + Arrays.toString(bytes3));

        System.out.println("写入一段内容后ByteBuf为===========>" + buf.toString());

       // System.out.println("8.ByteBuf中的内容为===============>" + Arrays.toString(buf.array()) + "\n");

        //  随机访问索引 getByte

        //  顺序读 read*

        //  顺序写 write*

        //  清除已读内容 discardReadBytes

        //  清除缓冲区 clear

        //  搜索操作

        //  标记和重置

        //  完整代码示例:参考

        // 搜索操作 读取指定位置 buf.getByte(1);

        //

    }

}
package com.study.hc.net.netty.demo;
import io.netty.buffer.ByteBuf;
import io.netty.buffer.CompositeByteBuf;
import io.netty.buffer.Unpooled;
import java.nio.charset.Charset;
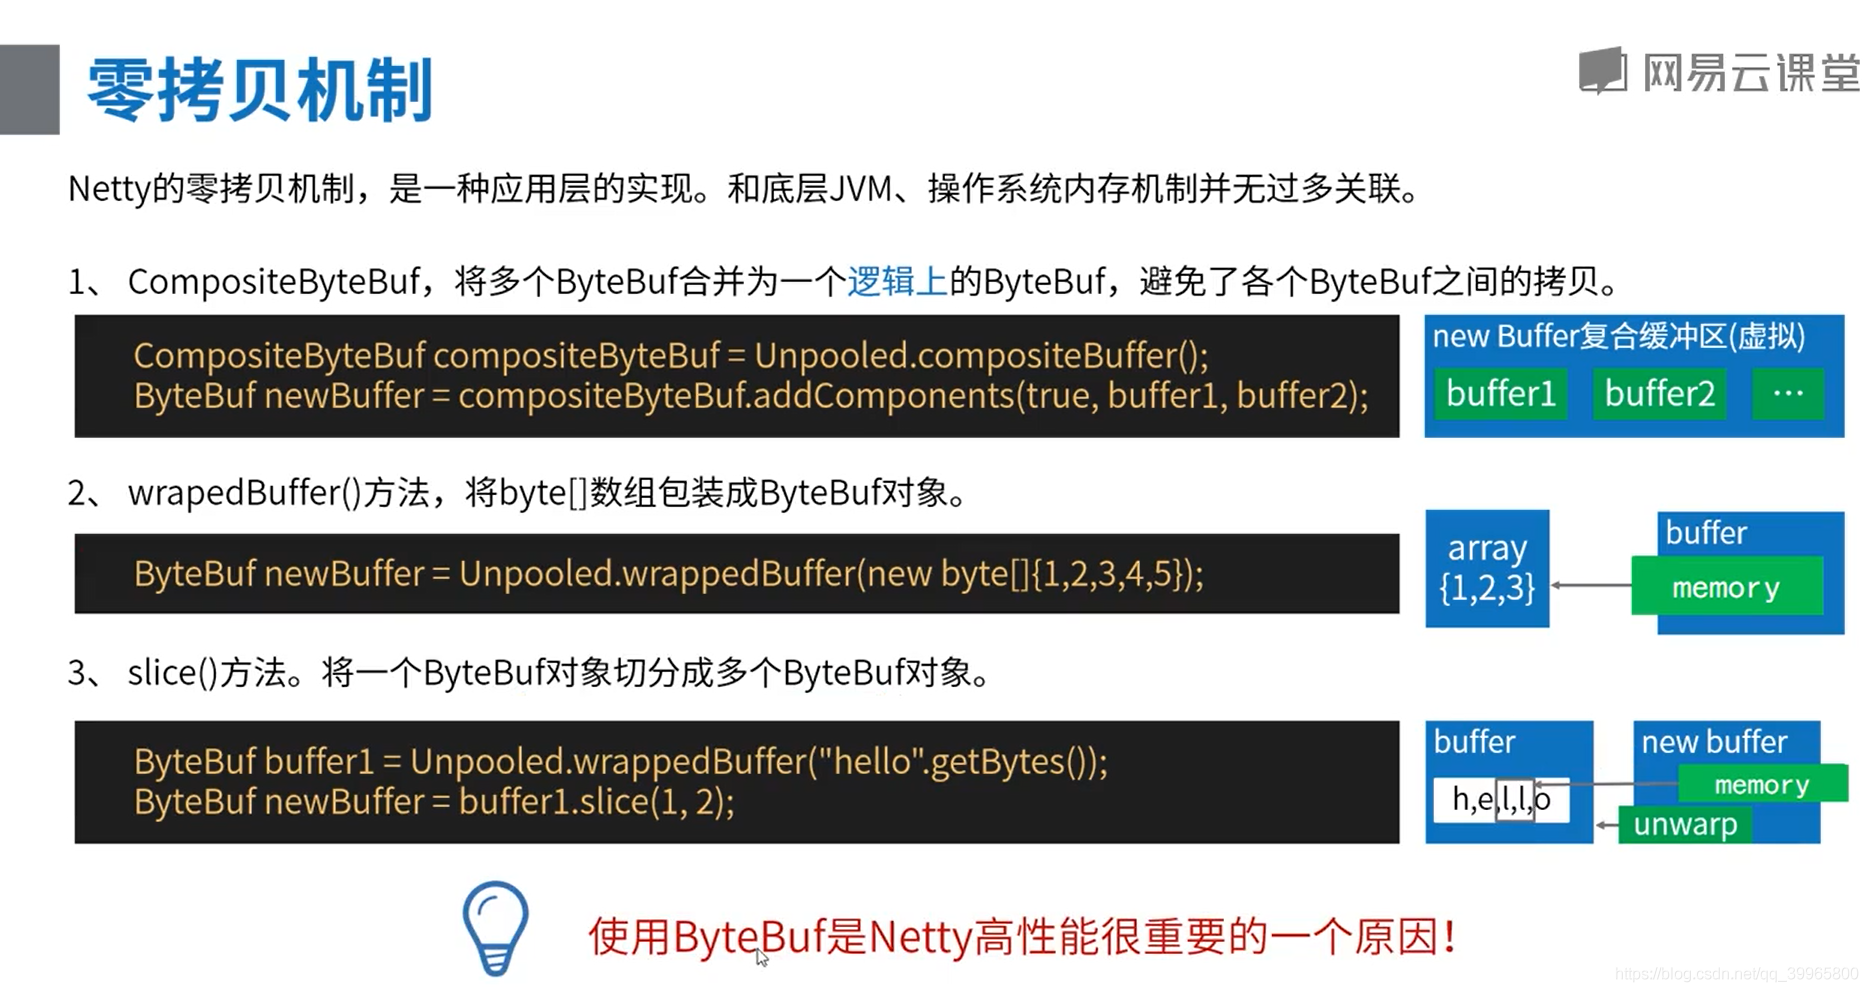
/**
* 零拷贝示例
*/
public class ZeroCopyTest {
@org.junit.Test
public void wrapTest() {
byte[] arr = {1, 2, 3, 4, 5};
ByteBuf byteBuf = Unpooled.wrappedBuffer(arr);
System.out.println(byteBuf.getByte(4));
arr[4] = 6;
System.out.println(byteBuf.getByte(4));
}
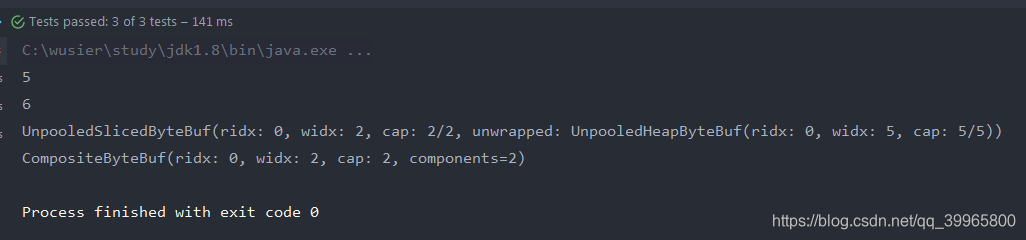
@org.junit.Test
public void sliceTest() {
ByteBuf buffer1 = Unpooled.wrappedBuffer("hello".getBytes());
ByteBuf newBuffer = buffer1.slice(1, 2);
newBuffer.unwrap();
System.out.println(newBuffer.toString());
}
@org.junit.Test
public void compositeTest() {
ByteBuf buffer1 = Unpooled.buffer(3);
buffer1.writeByte(1);
ByteBuf buffer2 = Unpooled.buffer(3);
buffer2.writeByte(4);
CompositeByteBuf compositeByteBuf = Unpooled.compositeBuffer();
CompositeByteBuf newBuffer = compositeByteBuf.addComponents(true, buffer1, buffer2);
System.out.println(newBuffer);
}
}
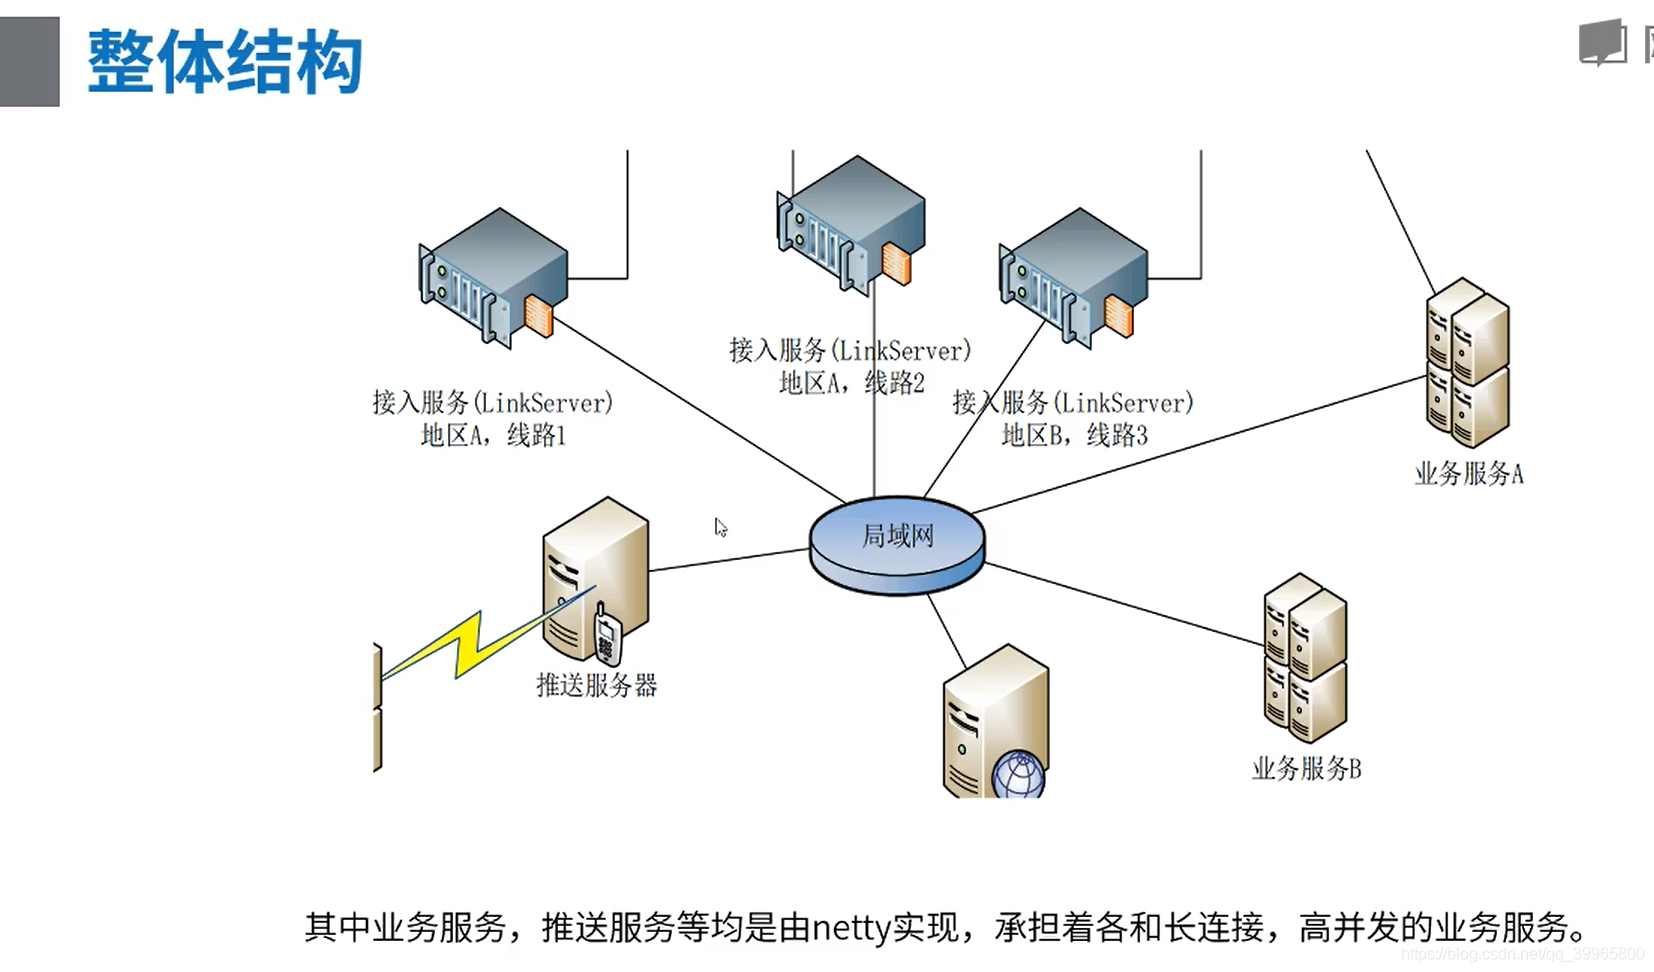
案例设计——推送功能实现以及百万连接优化
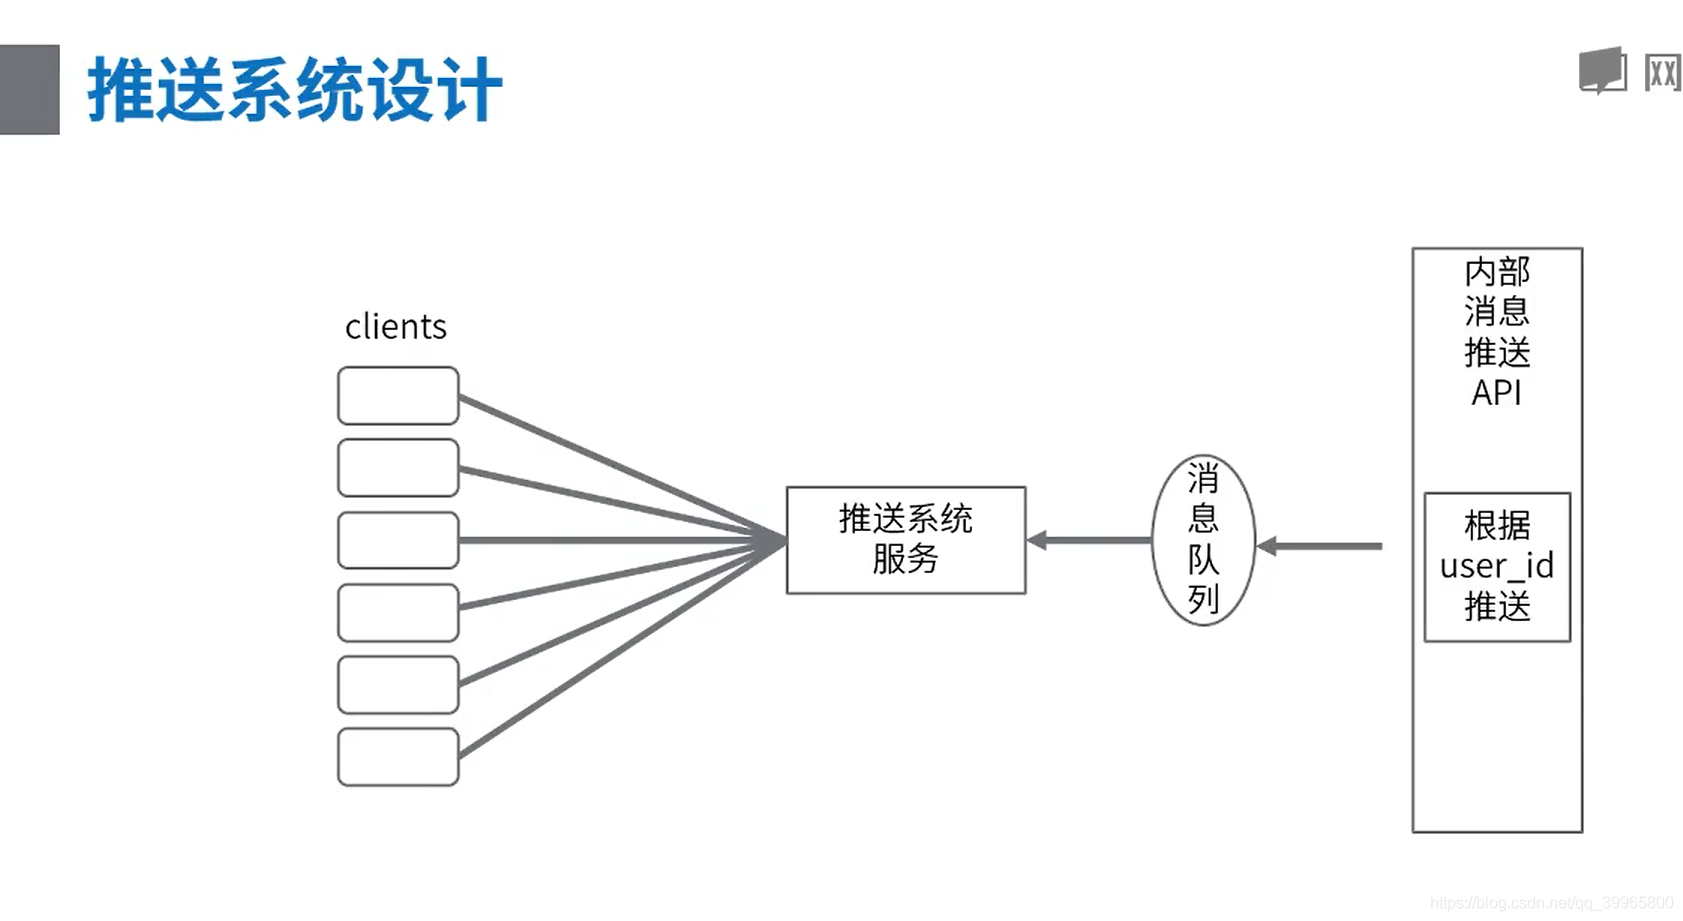
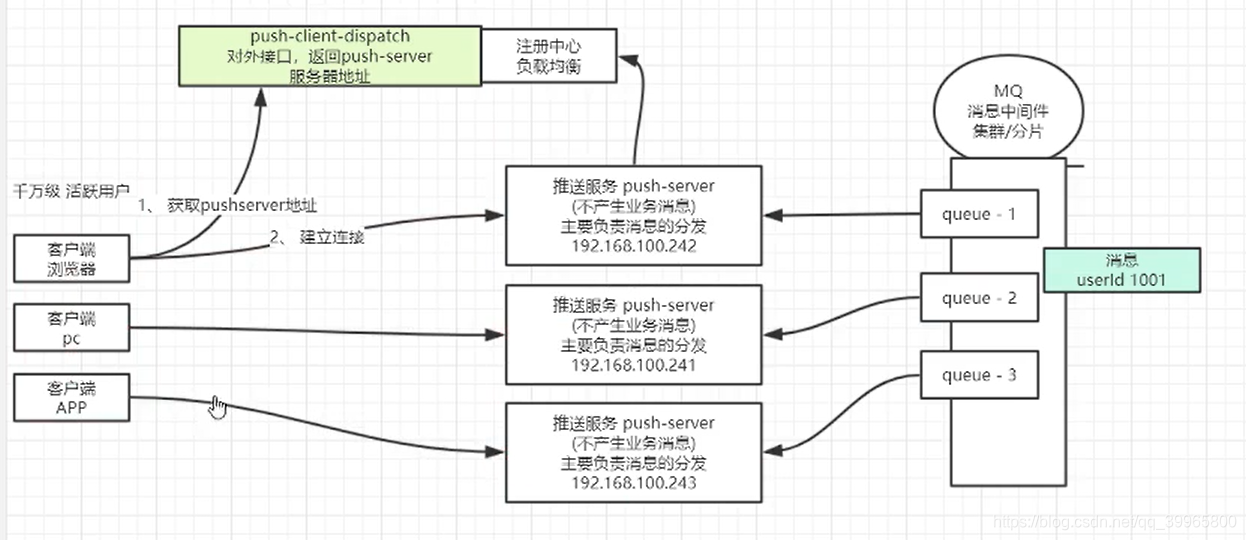
用zookeeper可以替换注册中心负载均衡
代码实现一下
package com.study.netty.push.test;

import java.io.IOException;

import java.io.InputStream;

import java.net.ServerSocket;

import java.net.Socket;

public class TonySocketServer {

    public static void main(String[] args) throws IOException, Exception {

        // server

        ServerSocket serverSocket = new ServerSocket(9999);

        // 获取新连接

        while (true) {

            final Socket accept = serverSocket.accept();

            InputStream inputStream = accept.getInputStream();

            while (true) {

                byte[] request = new byte[1024];

                int read = inputStream.read(request);

                if (read == -1) {

                    break;

                }

                // 得到请求内容,解析,得到发送对象和发送内容

                String content = new String(request);

                System.out.println(content);

            }

        }

    }

}
package com.study.netty.push.test;

import java.io.IOException;

import java.io.OutputStream;

import java.net.Socket;

import java.util.concurrent.CountDownLatch;

public class TonySocketClient {

    public static void main(String[] args) throws Exception {

        Socket socket = new Socket("localhost", 9999);

        OutputStream outputStream = socket.getOutputStream();

        // 消息长度固定为 220字节,包含有

        // 1. 目标用户ID长度为10, 10 000 000 000 ~ 19 999 999 999

        // 2. 消息内容字符串长度最多70。 按一个汉字3字节,内容的最大长度为210字节

        byte[] request = new byte[220];

        byte[] userId = "10000000000".getBytes();

        byte[] content = "我爱你tony你爱我吗我爱你tony你爱我吗我爱你tony你爱我吗我爱你tony你爱我吗".getBytes();

        System.arraycopy(userId, 0, request, 0, 10);

        System.arraycopy(content, 0, request, 10, content.length);

        CountDownLatch countDownLatch = new CountDownLatch(10);

        for (int i = 0; i < 10; i++) {

            new Thread(() -> {

                try {

                    outputStream.write(request);

                } catch (IOException e) {

                    e.printStackTrace();

                }

                countDownLatch.countDown();

            }).start();

        }

        countDownLatch.await();

        Thread.sleep(2000L); // 两秒后退出

        socket.close();

    }

}
java13没有出现这样的问题,很神奇
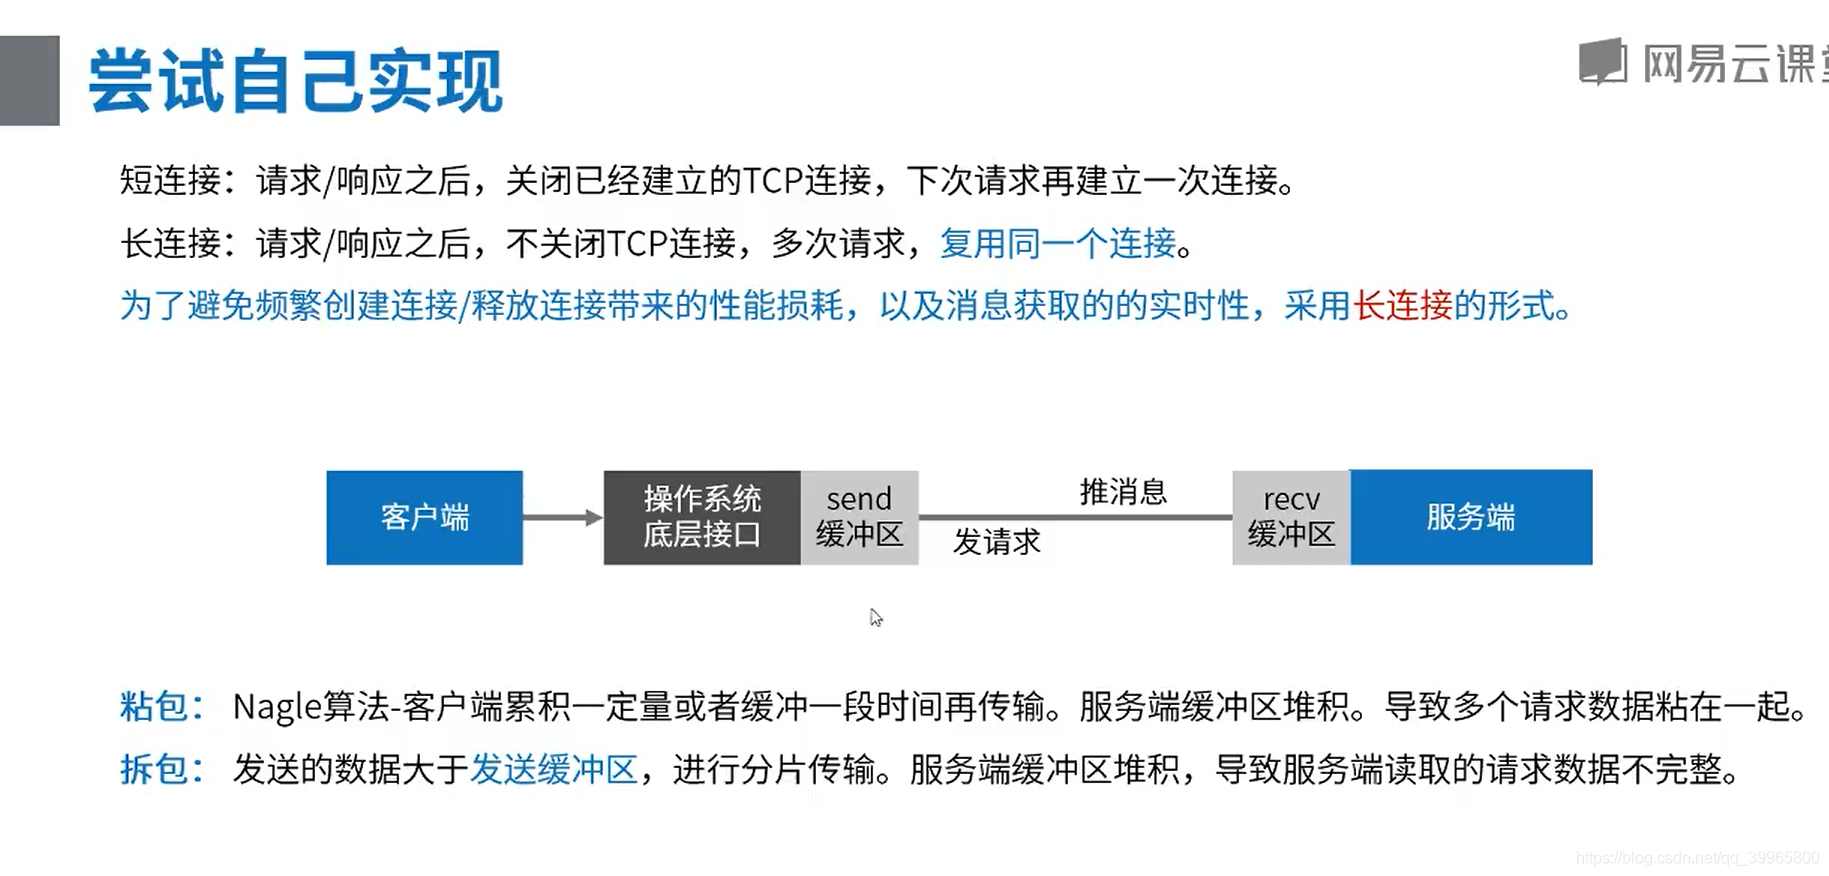
需要进行解码和编码
用Netty实现!
package com.study.netty.push.netty;

import io.netty.bootstrap.ServerBootstrap;

import io.netty.channel.ChannelInitializer;

import io.netty.channel.ChannelPipeline;

import io.netty.channel.EventLoopGroup;

import io.netty.channel.nio.NioEventLoopGroup;

import io.netty.channel.socket.SocketChannel;

import io.netty.channel.socket.nio.NioServerSocketChannel;

import io.netty.handler.codec.LineBasedFrameDecoder;

public class XNettyServer {

    public static void main(String[] args) throws Exception {

        // 1、 线程定义

        // accept 处理连接的线程池

        EventLoopGroup acceptGroup = new NioEventLoopGroup();

        // read io 处理数据的线程池

        EventLoopGroup readGroup = new NioEventLoopGroup();

        try {

            ServerBootstrap b = new ServerBootstrap();

            b.group(acceptGroup, readGroup);

            // 2、 选择TCP协议,NIO的实现方式

            b.channel(NioServerSocketChannel.class);

            b.childHandler(new ChannelInitializer<SocketChannel>() {

                @Override

                protected void initChannel(SocketChannel ch) throws Exception {

                    // 3、 职责链定义(请求收到后怎么处理)

                    ChannelPipeline pipeline = ch.pipeline();

                    // TODO 3.1 增加解码器

                    pipeline.addLast(new XDecoder());

                    // TODO 3.2 打印出内容 handdler

                    pipeline.addLast(new XHandller());

                }

            });

            // 4、 绑定端口

            System.out.println("启动成功,端口 9999");

            b.bind(9999).sync().channel().closeFuture().sync();

        } finally {

            acceptGroup.shutdownGracefully();

            readGroup.shutdownGracefully();

        }

    }

}
package com.study.netty.push.netty;

import java.util.List;

import io.netty.buffer.ByteBuf;

import io.netty.buffer.Unpooled;

import io.netty.channel.ChannelHandlerContext;

import io.netty.handler.codec.ByteToMessageDecoder;

public class XDecoder extends ByteToMessageDecoder {

    static final int PACKET_SIZE = 220;

    // 用来临时保留没有处理过的请求报文

    ByteBuf tempMsg = Unpooled.buffer();

    @Override

    protected void decode(ChannelHandlerContext ctx, ByteBuf in, List<Object> out) throws Exception {

        System.out.println("收到了一次数据包,长度是:" + in.readableBytes());

        // in 请求的数据

        // out 将粘在一起的报文拆分后的结果保留起来

        // 1、 合并报文

        ByteBuf message = null;

        int tmpMsgSize = tempMsg.readableBytes();

        // 如果暂存有上一次余下的请求报文,则合并

        if (tmpMsgSize > 0) {

            message = Unpooled.buffer();

            message.writeBytes(tempMsg);

            message.writeBytes(in);

            System.out.println("合并:上一数据包余下的长度为:" + tmpMsgSize + ",合并后长度为:" + message.readableBytes());

        } else {

            message = in;

        }

        // 2、 拆分报文

        // 这个场景下,一个请求固定长度为3,可以根据长度来拆分

        // i+1 i+1 i+1 i+1 i+1

        // 不固定长度,需要应用层协议来约定 如何计算长度

        // 在应用层中,根据单个报文的长度及特殊标记,来将报文进行拆分或合并

        // dubbo rpc协议 = header(16) + body(不固定)

        // header最后四个字节来标识body

        // 长度 = 16 + body长度

        // 0xda, 0xbb 魔数

        int size = message.readableBytes();

        int counter = size / PACKET_SIZE;

        for (int i = 0; i < counter; i++) {

            byte[] request = new byte[PACKET_SIZE];

            // 每次从总的消息中读取3个字节的数据

            message.readBytes(request);

            // 将拆分后的结果放入out列表中,交由后面的业务逻辑去处理

            out.add(Unpooled.copiedBuffer(request));

        }

        // 3、多余的报文存起来

        // 第一个报文: i+  暂存

        // 第二个报文: 1 与第一次

        size = message.readableBytes();

        if (size != 0) {

            System.out.println("多余的数据长度:" + size);

            // 剩下来的数据放到tempMsg暂存

            tempMsg.clear();

            tempMsg.writeBytes(message.readBytes(size));

        }

    }

}
package com.study.netty.push.netty;

import io.netty.buffer.ByteBuf;

import io.netty.channel.ChannelHandlerContext;

import io.netty.channel.ChannelInboundHandlerAdapter;

/**

 * 后续处理handdler

 */

public class XHandller extends ChannelInboundHandlerAdapter {

    @Override

    public void channelReadComplete(ChannelHandlerContext ctx) throws Exception {

        ctx.flush();

    }

    @Override

    public void channelRead(ChannelHandlerContext ctx, Object msg) throws Exception {

        // 输出 bytebuf

        ByteBuf buf = (ByteBuf) msg;

        byte[] content = new byte[buf.readableBytes()];

        buf.readBytes(content);

        System.out.println(new String(content));

    }

    // 异常

    @Override

    public void exceptionCaught(ChannelHandlerContext ctx, Throwable cause) throws Exception {

        cause.printStackTrace();

        ctx.close();

    }

}
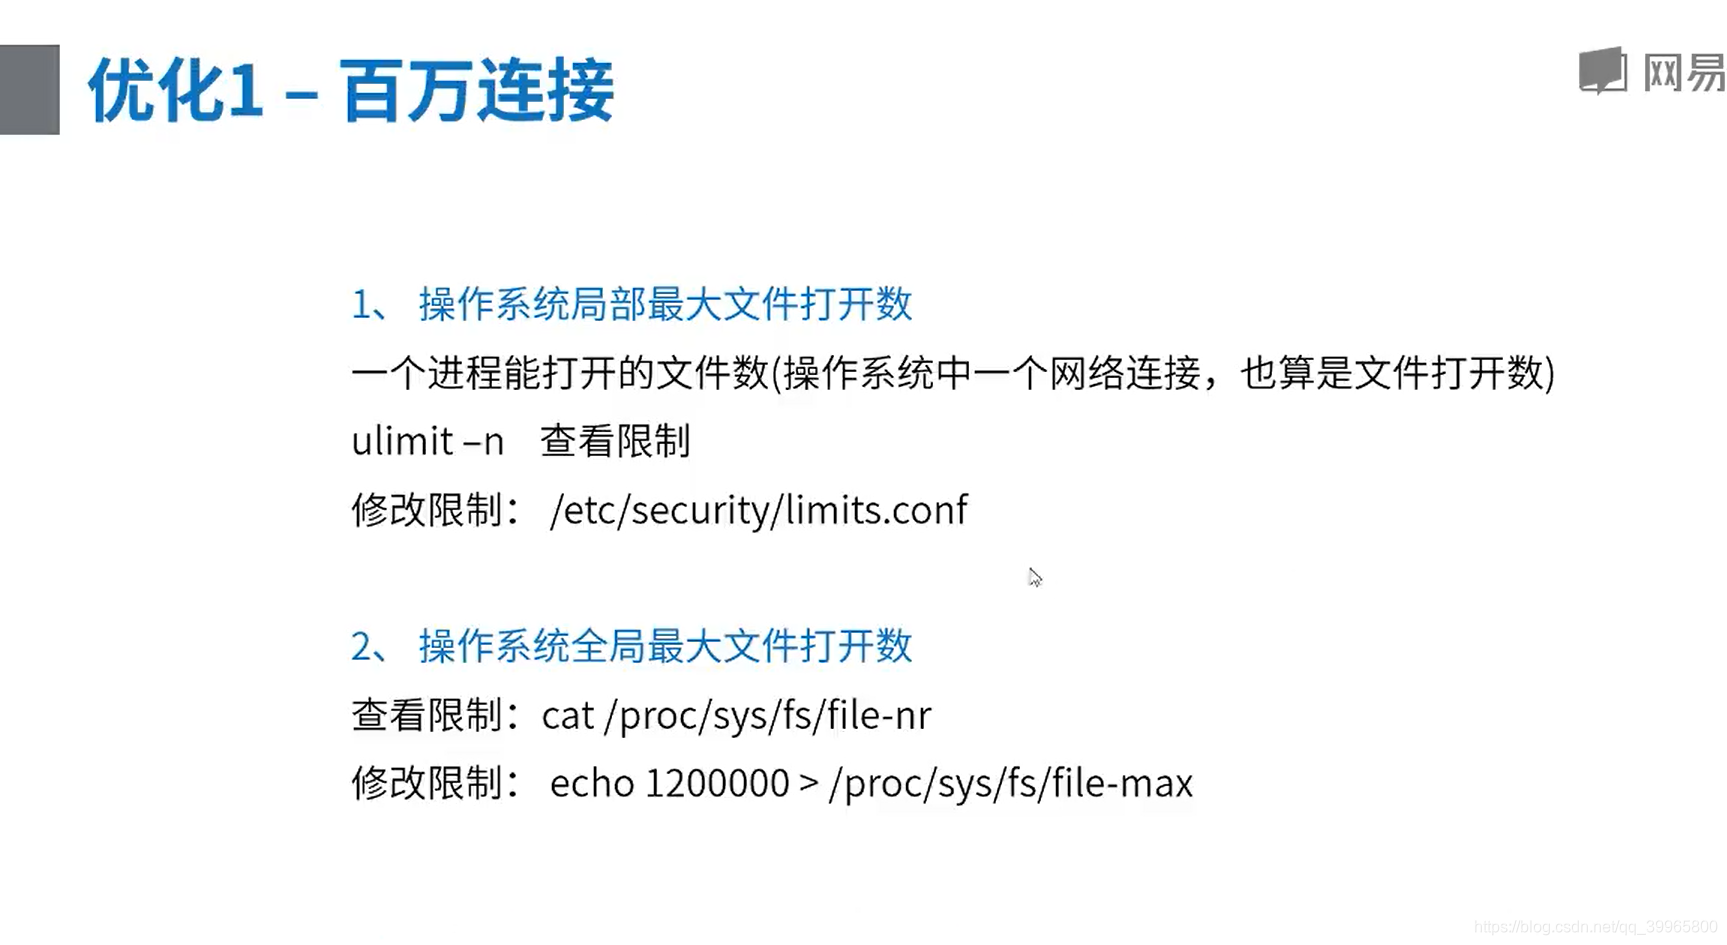
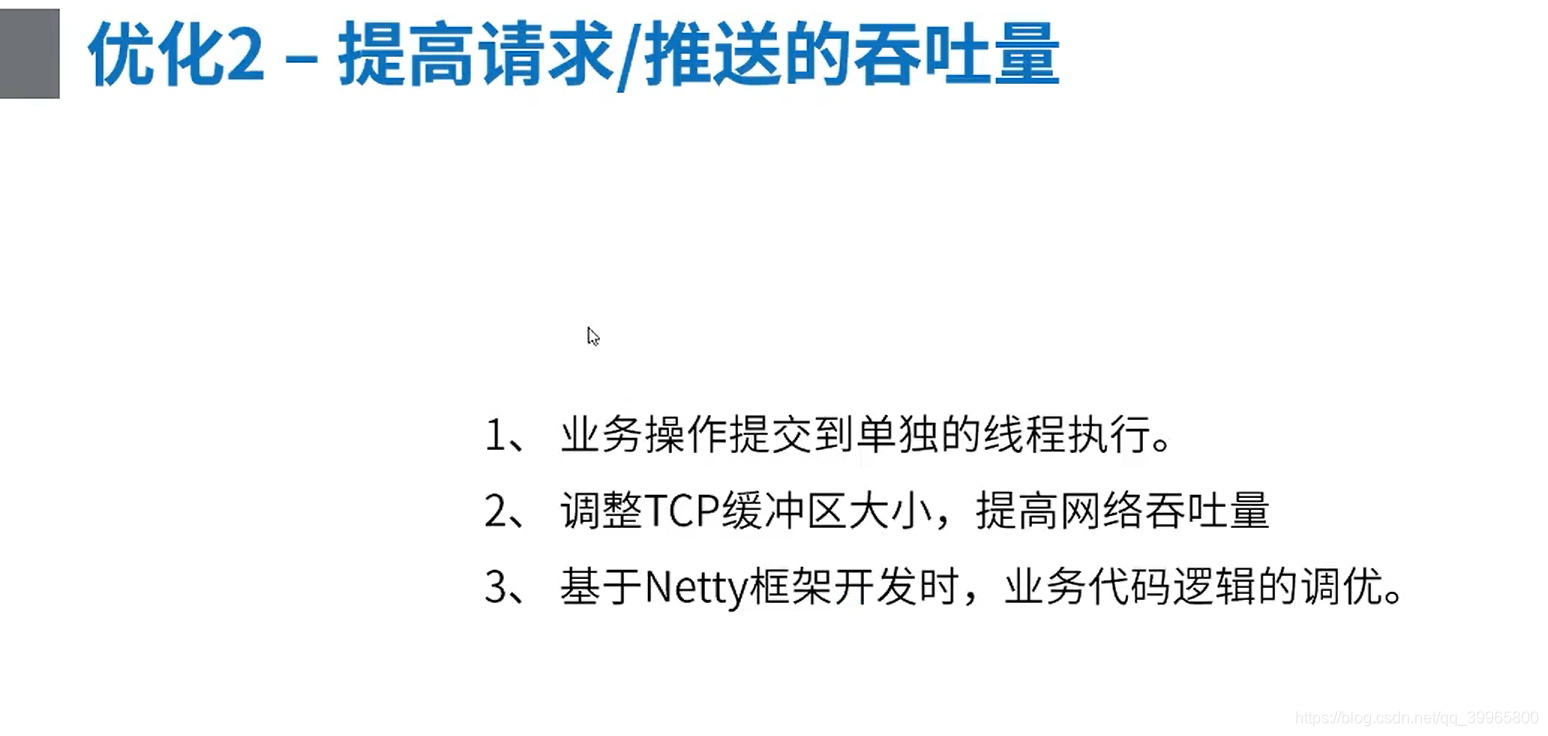
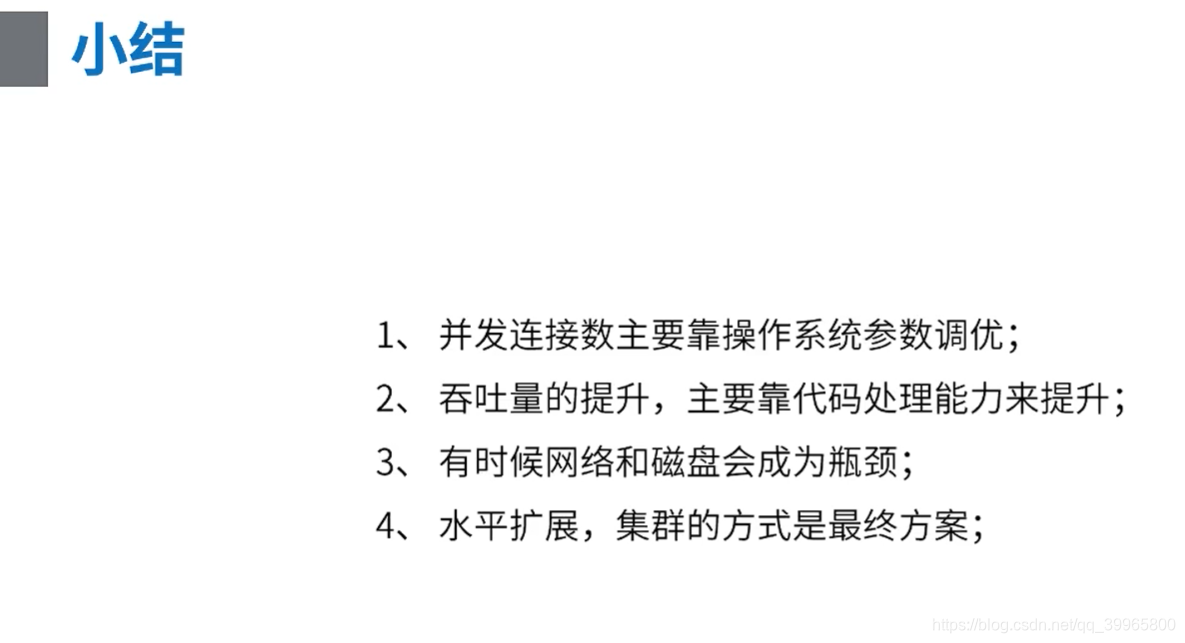
优化百万连接
案例2——Netty在网易内部的实践
Java后端进阶-网络编程(Netty零拷贝机制)的更多相关文章
- Java后端进阶-网络编程(NIO/BIO)
Socket编程 BIO网络编程 BIO Server package com.study.hc.net.bio; import java.io.BufferedReader; import java ...
- Java后端进阶-网络编程(Netty线程模型)
前言 我们在使用Netty进行服务端开发的时候,一般来说会定义两个NioEventLoopGroup线程池,一个"bossGroup"线程池去负责处理客户端连接,一个"w ...
- Java后端进阶-网络编程(Netty责任链Pipeline)
设计模式-责任链模式 一个责任链模拟demo package com.study.hc.net.netty.demo; // -----链表形式调用------netty就是类似的这种形式 publi ...
- Linux网络编程--sendfile零拷贝高效率发送文件
from http://blog.csdn.net/hnlyyk/article/details/50856268 Linux系统使用man sendfile,查看sendfile原型如下: #inc ...
- Java高并发网络编程(四)Netty
在网络应用开发的过程中,直接使用JDK提供的NIO的API,比较繁琐,而且想要进行性能提升,还需要结合多线程技术. 由于网络编程本身的复杂性,以及JDK API开发的使用难度较高,所以在开源社区中,涌 ...
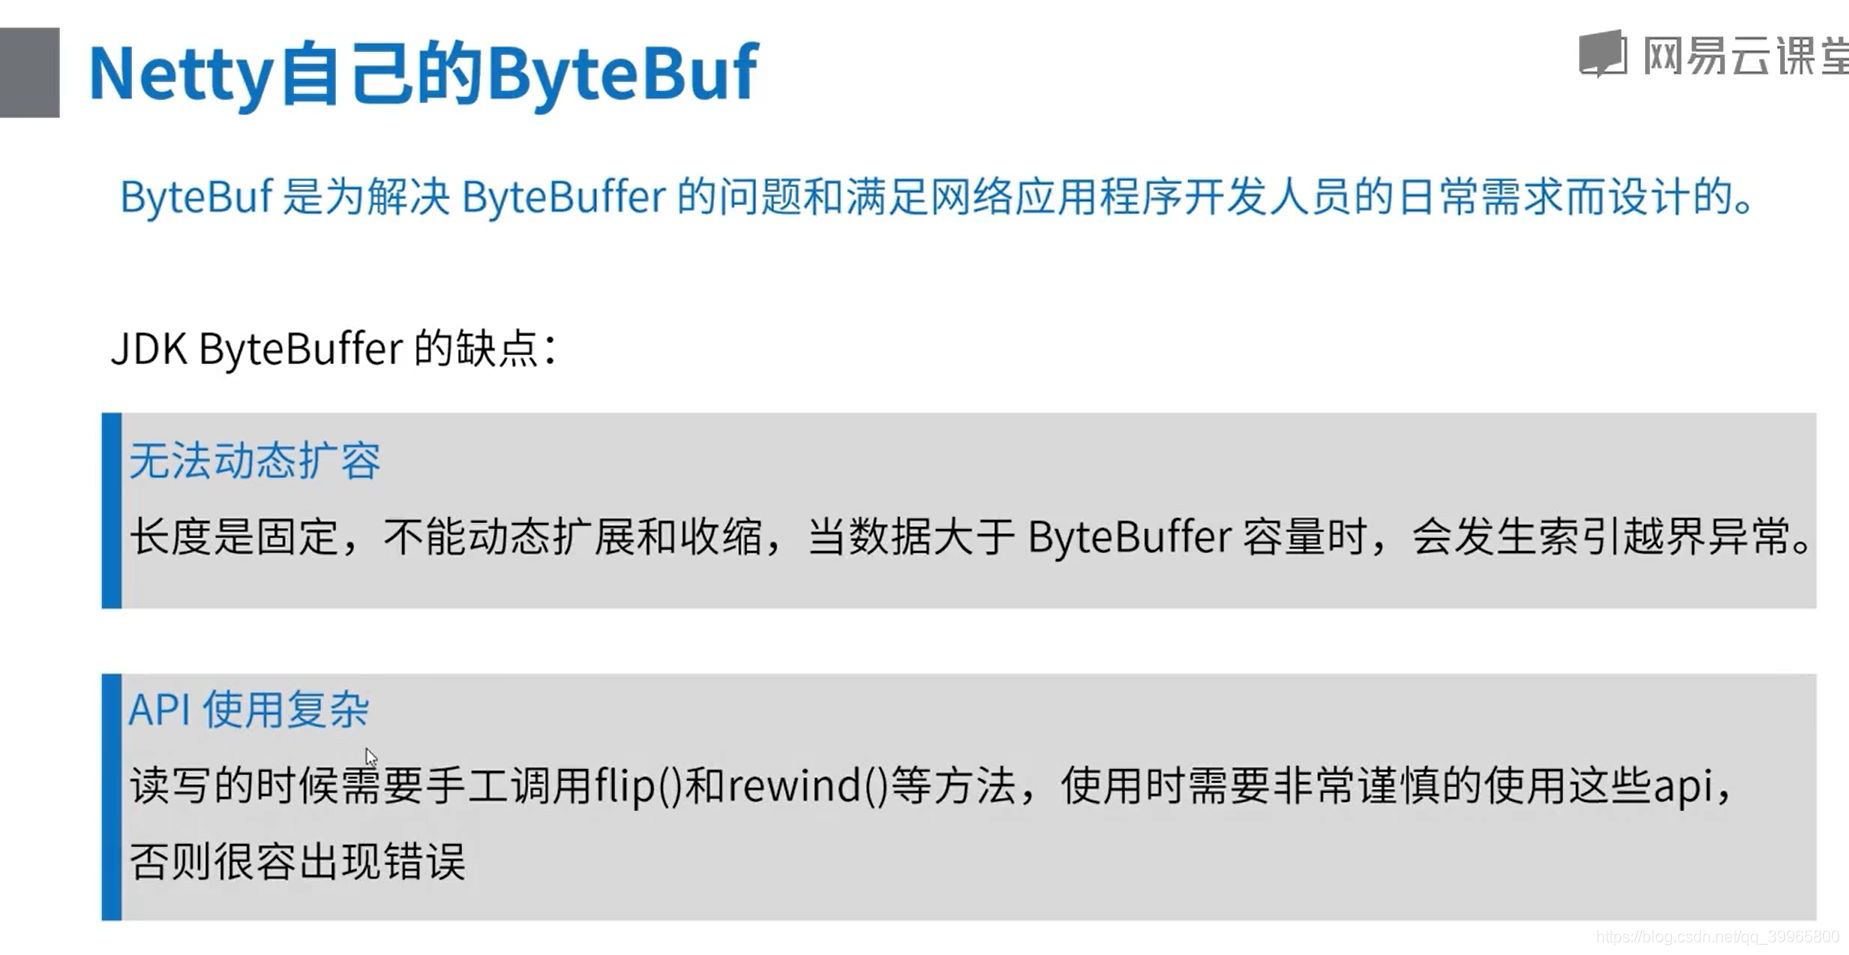
- Java网络编程 -- Netty中的ByteBuf
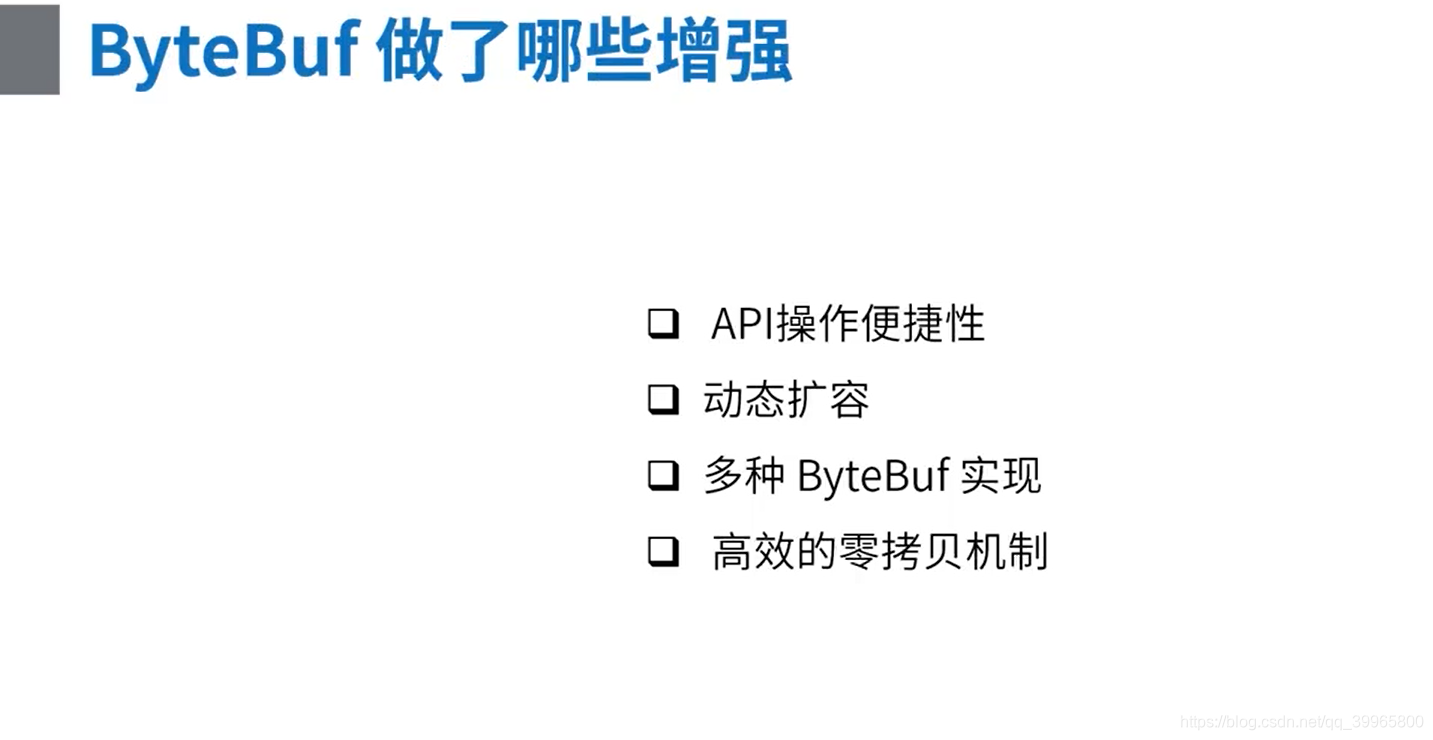
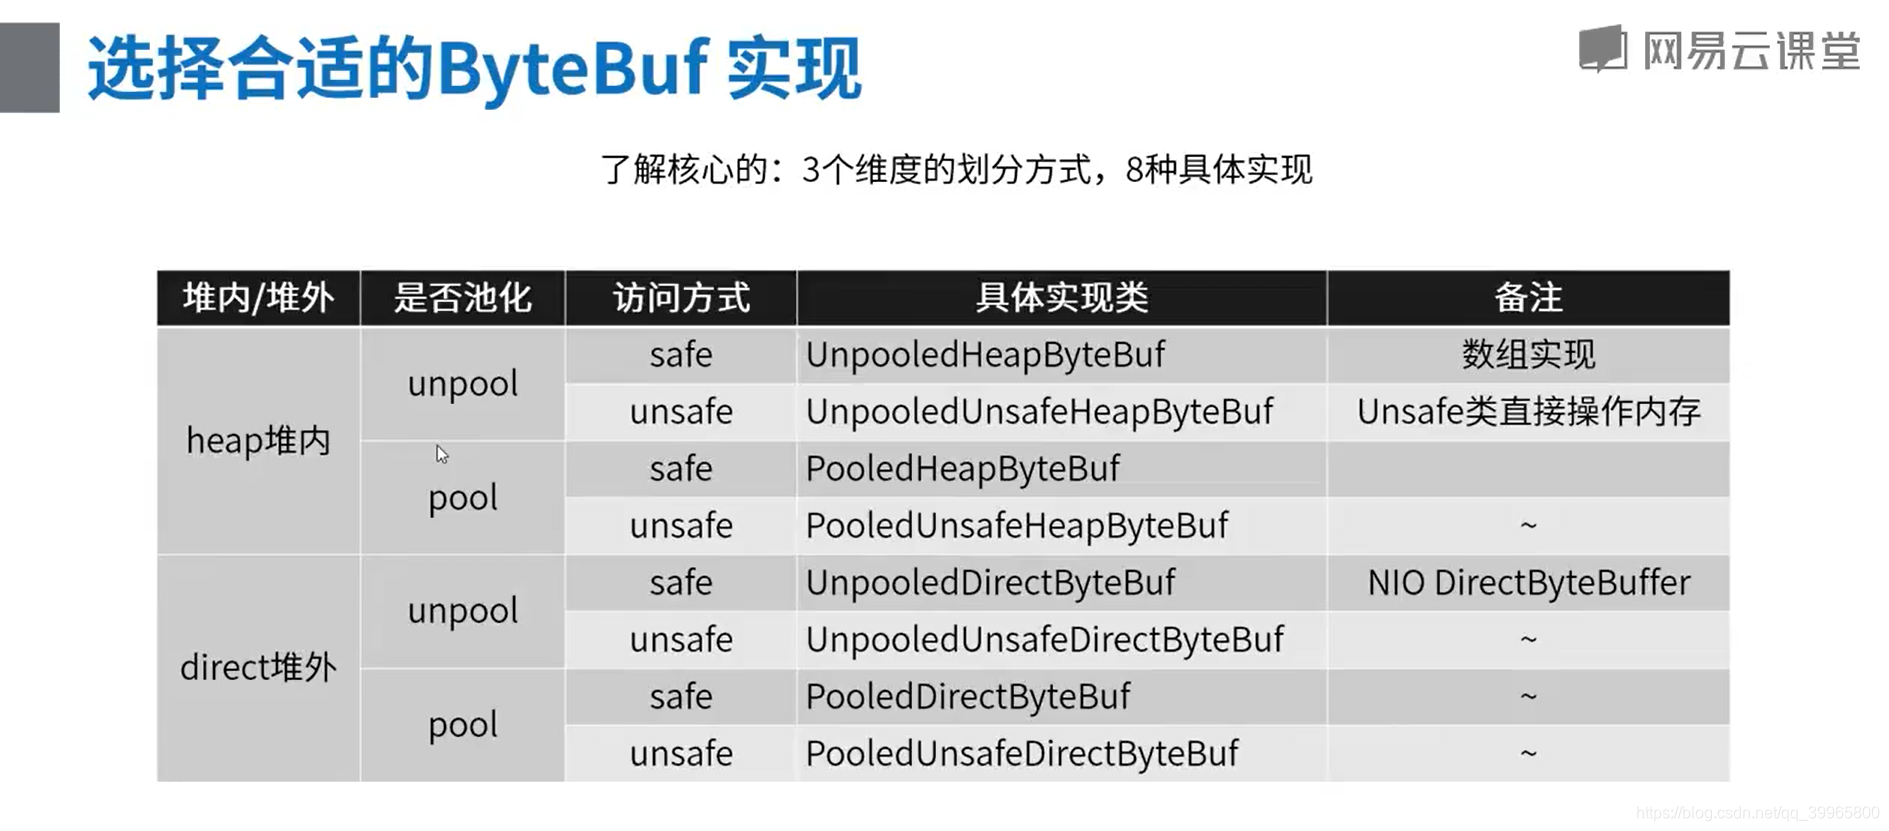
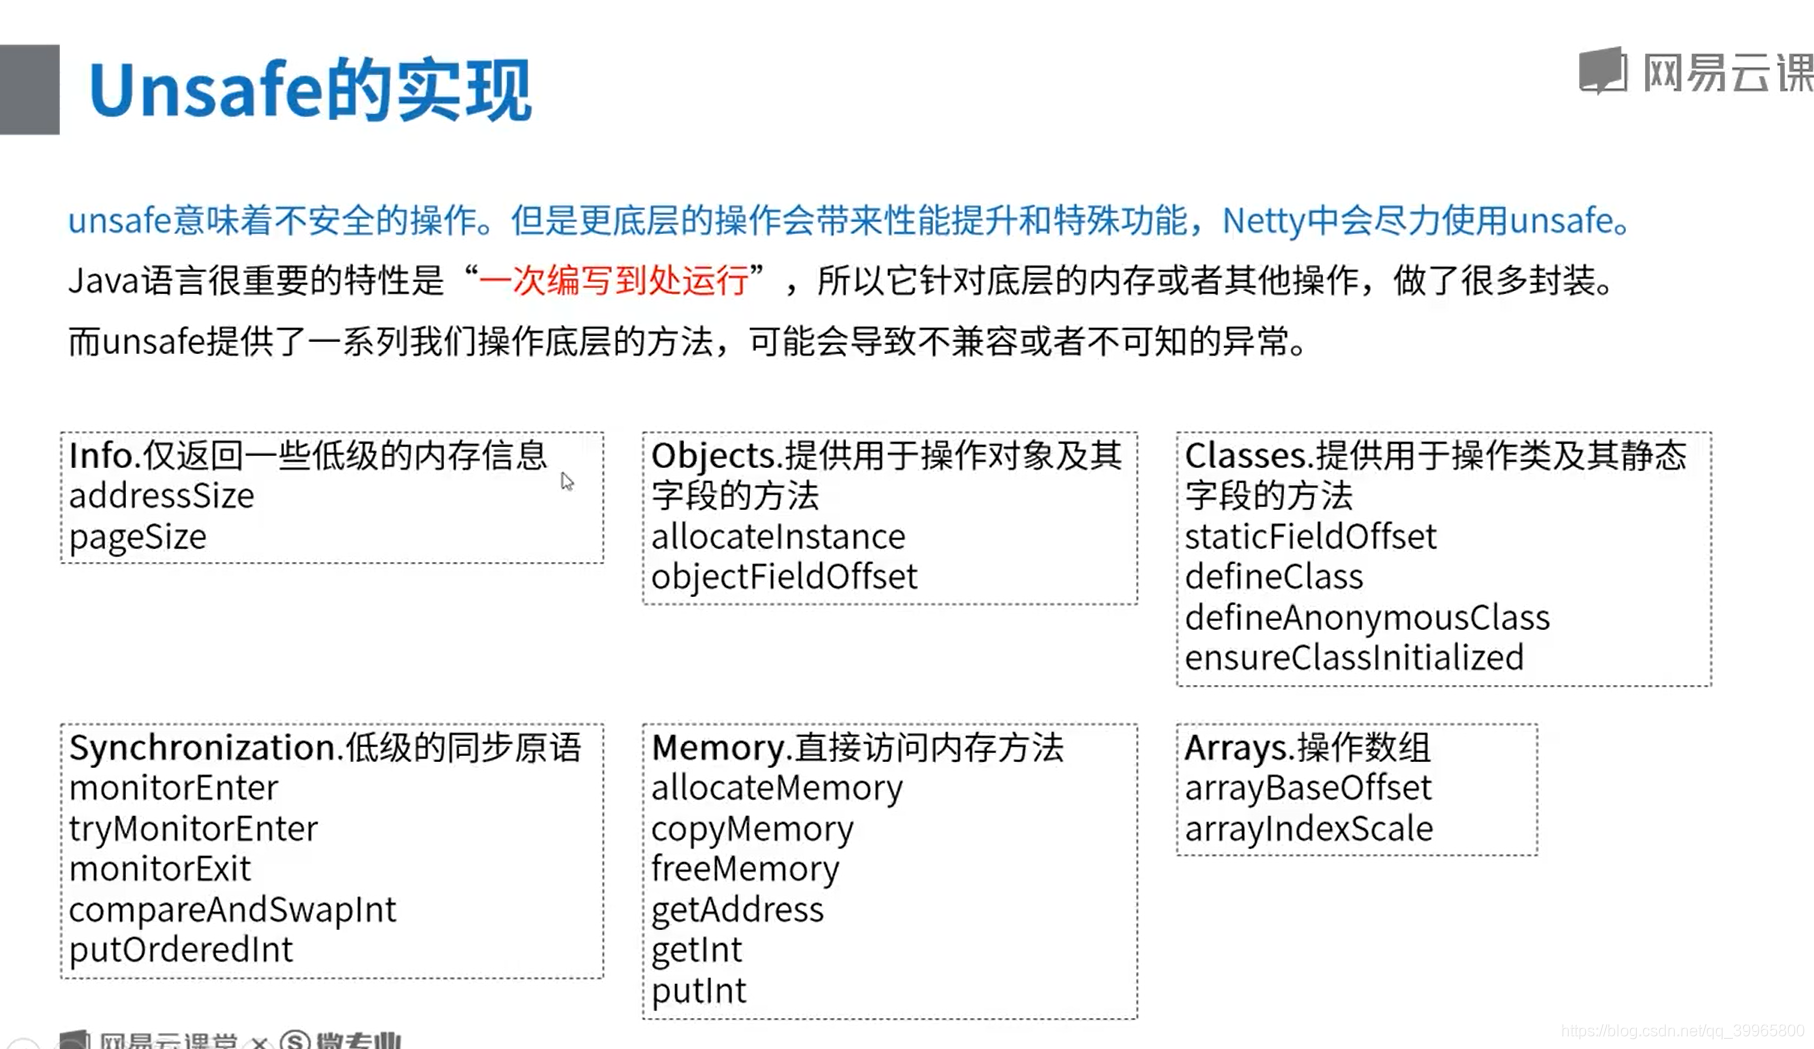
由于JDK中提供的ByteBuffer无法动态扩容,并且API使用复杂等原因,Netty中提供了ByteBuf.Bytebuf的API操作更加便捷,可以动态扩容,提供了多种ByteBuf的实现,以及高 ...
- Java学习之网络编程实例
转自:http://www.cnblogs.com/springcsc/archive/2009/12/03/1616413.html 多谢分享 网络编程 网络编程对于很多的初学者来说,都是很向往的一 ...
- 零拷贝详解 Java NIO学习笔记四(零拷贝详解)
转 https://blog.csdn.net/u013096088/article/details/79122671 Java NIO学习笔记四(零拷贝详解) 2018年01月21日 20:20:5 ...
- Netty 零拷贝(一)NIO 对零拷贝的支持
Netty 零拷贝(二)NIO 对零拷贝的支持 Netty 系列目录 (https://www.cnblogs.com/binarylei/p/10117436.html) 非直接缓冲区(HeapBy ...
随机推荐
- ATP - UI 自动化测试用例管理平台搭建
用到的工具:python3 + django2 + mysql + RabbitMQ + celery + selenium python3和selenium这个网上很多教程,我不在这一一说明: ...
- vue高级
1.nrm nrm提供了一些最常用的npm包镜像地址,可以快速切换服务器地址下载资源.它只是提供了地址,并不是装包工具.如果没有安装npm,需要安装node,然后直接安装即可.node下载链接:htt ...
- Socket实现简单聊天
服务端: package main.java.com.socket_dome; import java.io.IOException; import java.io.InputStream; impo ...
- 关于Java中for,while,if,方法的练习
练习 计算0到100之间的奇数和偶数和 package com.kangkang.forDemo;public class demo01 { public static void main(S ...
- ng-class动态类几种用法
方法1.逻辑在后面的中括号里面 ng-class="{true : 'checker disabled',false : 'checker' }[selectAllButton]" ...
- Java I/O流 04
I/O流·其他流 序列流 * A:什么是序列流 * 序列流可以把多个字节输入流整合成一个,从序列流中读取数据时,将从被整合的第一个流开始,读完后再读下一个 * B:使用方式 * 整合两个:Sequen ...
- 【老孟Flutter】Flutter 2的新功能
老孟导读:昨天期待已久的 Flutter 2.0 终于发布了, Flutter Web和Null安全性趋于稳定,Flutter桌面安全性逐渐转向Beta版! 原文链接:https://medium.c ...
- Android实现三角形气泡效果方式汇总
在开发过程中,我们可能会经常遇到这样的需求样式: 这张图是截取京东消息通知的弹出框,我们可以看到右上方有个三角形的气泡效果,这只是其中一种,三角形的方向还可以是上.下.左.右. 通过截图可以发现,气泡 ...
- Apache配置 11. 访问控制-user_agent
(1)介绍 user_agent是指用户浏览器端的信息.比如你是用IE的还是Firefox浏览器的.有些网站会根据这个来调整打开网站的类型,如是手机的就打开wap,显示非手机的就打开PC常规页面. ( ...
- 如何强制删除一个apk
有些apk安装完后无法卸载,现在收集了一些方法,以及个人的一些手段. 1. 假设该app名为ketech,安装包名为ketech.apk. 2. 查看/data/app里面是否有名称包含ketech的 ...