mybatis 使用经验小结
一、多数据源问题
主要思路是把dataSource、sqlSesstionFactory、MapperScannerConfigurer在配置中区分开,各Mapper对应的包名、类名区分开
 <?xml version="1.0" encoding="UTF-8"?>

 <beans xmlns="http://www.springframework.org/schema/beans"

        xmlns:xsi="http://www.w3.org/2001/XMLSchema-instance" xmlns:aop="http://www.springframework.org/schema/aop"

        xmlns:tx="http://www.springframework.org/schema/tx" xmlns:jdbc="http://www.springframework.org/schema/jdbc"

        xmlns:context="http://www.springframework.org/schema/context"

        xsi:schemaLocation="

      http://www.springframework.org/schema/context http://www.springframework.org/schema/context/spring-context-3.0.xsd

      http://www.springframework.org/schema/beans http://www.springframework.org/schema/beans/spring-beans-3.0.xsd

      http://www.springframework.org/schema/jdbc http://www.springframework.org/schema/jdbc/spring-jdbc-3.0.xsd

      http://www.springframework.org/schema/tx http://www.springframework.org/schema/tx/spring-tx-3.0.xsd

      http://www.springframework.org/schema/aop http://www.springframework.org/schema/aop/spring-aop-3.0.xsd"

        default-autowire="byName">

     <bean id="dataSource1" class="org.h2.jdbcx.JdbcConnectionPool"

           destroy-method="dispose">

         <constructor-arg>

             <bean class="org.h2.jdbcx.JdbcDataSource">

                 <property name="URL" value="jdbc:h2:r:/h2db/awbprint/a"/>

                 <property name="user" value="sa"/>

                 <property name="password" value="sa"/>

             </bean>

         </constructor-arg>

     </bean>

     <bean id="dataSource2" class="org.h2.jdbcx.JdbcConnectionPool"

           destroy-method="dispose">

         <constructor-arg>

             <bean class="org.h2.jdbcx.JdbcDataSource">

                 <property name="URL" value="jdbc:h2:r:/h2db/awbprint/b"/>

                 <property name="user" value="sa"/>

                 <property name="password" value="sa"/>

             </bean>

         </constructor-arg>

     </bean>

     <bean id="sqlSessionFactory1" class="org.mybatis.spring.SqlSessionFactoryBean">

         <property name="dataSource" ref="dataSource1"/>

         <property name="configLocation" value="classpath:mybatis-config.xml"></property>

         <property name="typeAliasesPackage" value="awbprint.mybatis.entity"></property>

         <property name="mapperLocations" value="classpath:mybatis/a/**/*.xml"></property>

     </bean>

     <bean id="sqlSessionFactory2" class="org.mybatis.spring.SqlSessionFactoryBean">

         <property name="dataSource" ref="dataSource2"/>

         <property name="configLocation" value="classpath:mybatis-config.xml"></property>

         <property name="typeAliasesPackage" value="awbprint.mybatis.entity"></property>

         <property name="mapperLocations" value="classpath:mybatis/b/**/*.xml"></property>

     </bean>

     <bean class="org.mybatis.spring.mapper.MapperScannerConfigurer">

         <property name="sqlSessionFactoryBeanName" value="sqlSessionFactory1"></property>

         <property name="basePackage" value="awbprint.mybatis.mapper.a"/>

     </bean>

     <bean class="org.mybatis.spring.mapper.MapperScannerConfigurer">

         <property name="sqlSessionFactoryBeanName" value="sqlSessionFactory2"></property>

         <property name="basePackage" value="awbprint.mybatis.mapper.b"/>

     </bean>

 </beans>
上面的配置,一个连h2的a数据库,一个连h2的b数据库,至于事务管理器,大家可参考这个思路,建二个,各管各的。
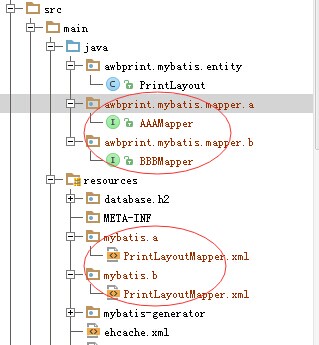
项目中mapper接口及映射文件均用包名区分开,如下图:
二、如何使用Map做为参数及动态条件生成
     <resultMap id="BaseResultMap" type="awbprint.mybatis.entity.PrintLayout">

         <id column="D_RECID" property="recid" jdbcType="DECIMAL"/>

         <result column="D_USER_NAME" property="userName" jdbcType="VARCHAR"/>

         <result column="D_NAME" property="name" jdbcType="VARCHAR"/>

         <result column="D_TYPE" property="type" jdbcType="VARCHAR"/>

         ...

     </resultMap>

    <sql id="Base_Column_List">

         D_RECID, D_USER_NAME, D_NAME, D_TYPE, ...

     </sql>

     <select id="select" resultMap="BaseResultMap"

             parameterType="java.util.Map">

         select

         <include refid="Base_Column_List"/>

         from T_PRINT_LAYOUT

         where D_USER_NAME = #{userName,jdbcType=VARCHAR} and D_TYPE = #{awbType,jdbcType=VARCHAR}

         <if test="recId != null">

             and D_RECID = #{recId,jdbcType=DECIMAL}

         </if>

         <if test="ids != null">

             or D_RECID in

             <foreach item="item" index="index" collection="ids"

                      open="(" separator="," close=")">

                 #{item}

             </foreach>

         </if>

     </select>
14-31演示了如何使用Map做为参数,动态传入查询条件,及List参数生成in(...)条件
java端代码示例:
         PrintLayoutMapper mapper = context.getBean(PrintLayoutMapper.class);

         Map<String, Object> map = new HashMap<String, Object>();

         map.put("userName", "ADMIN");

         map.put("awbType", "CARGOLABEL_MU");

         map.put("recId", 1);

         List<Integer> ids = new ArrayList<Integer>();

         ids.add(0, 1);

         ids.add(0, 2);

         ids.add(0, 3);

         map.put("ids", ids);

         List<?> list = mapper.select(map);
其实PrintLayoutMapper接口的定义为:
 public interface PrintLayoutMapper {

     ...

     List<PrintLayout> select(Map<String, Object> map);

 }
最终生成的SQL语句为:
select D_RECID, D_USER_NAME, D_NAME, D_TYPE, ... from T_PRINT_LAYOUT where D_USER_NAME = ? and D_TYPE = ? and D_RECID = ? or D_RECID in ( ? , ? , ? )
三、兼容不同的数据库
 <insert id="insert">

  <selectKey keyProperty="id" resultType="int" order="BEFORE">

  <if test="_databaseId == 'oracle'">

  select seq_users.nextval from dual

  </if>

  <if test="_databaseId == 'db2'">

  select nextval for seq_users from sysibm.sysdummy1"

  </if>

  </selectKey>

  insert into users values (#{id}, #{name})

 </insert>
这是官方文档上的示例,演示了如何兼容oracle与db2这二种不同的数据库,来获取序列的下一个值
四、加强版的分支、选择判断
 <select id="findActiveBlogLike"

  resultType="Blog">

  SELECT * FROM BLOG WHERE state = ‘ACTIVE’

  <choose>

  <when test="title != null">

  AND title like #{title}

  </when>

  <when test="author != null and author.name != null">

  AND author_name like #{author.name}

  </when>

  <otherwise>

  AND featured = 1

  </otherwise>

  </choose>

 </select>
这也是官方文档上的示例,因为<if>...</if>并没对应的<else>标签,所以要达到<if>...<else>...</else> </if>的效果,得借助<choose>、<when>、<otherwise>组合使用。
五、避免Where 空条件的尴尬
 <select id="findActiveBlogLike" resultType="Blog">

  SELECT * FROM BLOG

  WHERE

  <if test="state != null">

  state = #{state}

  </if>

 </select>
如果state参数为空时,最终生成SQL语句为
  SELECT * FROM BLOG

  WHERE
执行会出错,当然,你可以在where 后加一个1=1,改成
 <select id="findActiveBlogLike" resultType="Blog">

  SELECT * FROM BLOG

  WHERE 1=1

  <if test="state != null">

  and state = #{state}

  </if>

 </select>
但是这个做法不太“环保”(毕竟引入了一个垃圾条件),其实只要改成<where>...</where>即可
 <select id="findActiveBlogLike" resultType="Blog">

  SELECT * FROM BLOG

  <where>

      <if test="state != null">

          and state = #{state}

      </if>

  </where>

 </select>
六、$与#的区别
select * from T_PRINT_LAYOUT where D_RECID = ${recId}
最后生成的SQL为:
select * from T_PRINT_LAYOUT where D_RECID = 1
即:直接将参数值替换到了原来${recId}的位置,相当于硬拼SQL
select * from T_PRINT_LAYOUT where D_RECID = #{recid,jdbcType=DECIMAL}
最后生成的SQL为:
select * from T_PRINT_LAYOUT where D_RECID = ?
即:#{...}被识别为一个SQL参数
七、大量数据的批量insert
大量数据(条数>10000)做insert时,如果按常规方式,每条insert into table(...) values(...);来提交,速度巨慢。改善性能的思路是多条insert批量提交。
oracle环境中,有一种批量insert的小技巧,原理是 insert into ... select from ...,套在mybatis上,变形为:
 INSERT INTO T_TEST

   (ID, COL_A, COL_B)

   SELECT SEQ_TEST.NEXTVAL, A.*

     FROM (

               SELECT 'A1', 'B1' FROM DUAL

     UNION ALL SELECT 'A2', 'B2' FROM DUAL

     UNION ALL SELECT 'A3', 'B3' FROM DUAL

     UNION ALL SELECT 'A4', 'B4' FROM DUAL

     UNION ALL SELECT 'A5', 'B5' FROM DUAL

     UNION ALL SELECT 'A6', 'B6' FROM DUAL

     ) A
中间的部分非常有规律,可以用foreach标签生成,参考下面的片段:
 <insert id="insertBatch2" parameterType="ctas.entity.SharkFlt">

     <selectKey keyProperty="recId" order="BEFORE" resultType="Long">

       select SEQ_CTAS_SHARK_FLT.nextval as recId from dual

     </selectKey>

     insert into CTAS_SHARK_FLT (<include refid="Base_Column_List"/>) SELECT SEQ_TEST.NEXTVAL, A.*

     FROM (

     <foreach collection="list" item="item" index="index" open="" close="" separator="union all">

       select #{item.awbType,jdbcType=VARCHAR}, #{item.awbPre,jdbcType=VARCHAR},... from dual

     </foreach>

     ) A

   </insert>
即使这样,也不能直接run,oracle中一次执行的sql语句长度是有限制的,如果最后拼出来的sql字符串过长,会导致执行失败,所以java端还要做一个分段处理,参考下面的处理:
         List<SharkFlt> data = new ArrayList<SharkFlt>();

         for (TSharkFlt f : sharkFlts) {

             data.add(getSharkFlt(f));

         }

         System.out.println(data.size());

         long beginTime = System.currentTimeMillis();

         System.out.println("开始插入...");

         SqlSessionFactory sqlSessionFactory = ctx.getBean(SqlSessionFactory.class);

         SqlSession session = null;

         try {

             session = sqlSessionFactory.openSession(ExecutorType.BATCH, false);

             int a = 2000;//每次提交2000条

             int loop = (int) Math.ceil(data.size() / (double) a);

             List<SharkFlt> tempList = new ArrayList<SharkFlt>(a);

             int start, stop;

             for (int i = 0; i < loop; i++) {

                 tempList.clear();

                 start = i * a;

                 stop = Math.min(i * a + a - 1, data.size() - 1);

                 System.out.println("range:" + start + " - " + stop);

                 for (int j = start; j <= stop; j++) {

                     tempList.add(data.get(j));

                 }

                 session.insert("ctas.importer.writer.mybatis.mappper.SharkFltMapper.insertBatch2", tempList);

                 session.commit();

                 session.clearCache();

                 System.out.println("已经插入" + (stop + 1) + " 条");

             }

         } catch (Exception e) {

             e.printStackTrace();

             session.rollback();

         } finally {

             if (session != null) {

                 session.close();

             }

         }

         long endTime = System.currentTimeMillis();

         System.out.println("插入完成,耗时 " + (endTime - beginTime) + " 毫秒!");
13,27-29这几行是关键,这一段逻辑会经常使用,为了重用,可以封装一下:
     /**

      * 批量提交数据

      * @param sqlSessionFactory

      * @param mybatisSQLId SQL语句在Mapper XML文件中的ID

      * @param commitCountEveryTime 每次提交的记录数

      * @param list 要提交的数据列表

      * @param logger 日志记录器

      */

     private <T> void batchCommit(SqlSessionFactory sqlSessionFactory, String mybatisSQLId, int commitCountEveryTime, List<T> list, Logger logger) {

         SqlSession session = null;

         try {

             session = sqlSessionFactory.openSession(ExecutorType.BATCH, false);

             int commitCount = (int) Math.ceil(list.size() / (double) commitCountEveryTime);

             List<T> tempList = new ArrayList<T>(commitCountEveryTime);

             int start, stop;

             Long startTime = System.currentTimeMillis();

             for (int i = 0; i < commitCount; i++) {

                 tempList.clear();

                 start = i * commitCountEveryTime;

                 stop = Math.min(i * commitCountEveryTime + commitCountEveryTime - 1, list.size() - 1);

                 for (int j = start; j <= stop; j++) {

                     tempList.add(list.get(j));

                 }

                 session.insert(mybatisSQLId, tempList);

                 session.commit();

                 session.clearCache();

             }

             Long endTime = System.currentTimeMillis();

             logger.debug("batchCommit耗时:" + (endTime - startTime) + "毫秒");

         } catch (Exception e) {

             logger.error("batchCommit error!", e);

             e.printStackTrace();

             session.rollback();

         } finally {

             if (session != null) {

                 session.close();

             }

         }

     }
对应的,如果是批量update,也是类似的思路,只不过要注意一点:oracle环境中,多条语句提交的sql语句为
begin
update xxx set xxx =xxx ;
update xxx set xxx =xxx;
end;
用mytais拼的时候,参考下面的写法:
   <update id="updateBatch" parameterType="java.util.List">

     <foreach collection="list" item="item" index="index" open="begin" close="end;" >

       update xxx set x=#{item.x,jdbcType=VARCHAR} where x =#{item.x,jdbcType=VARCHAR};

     </foreach>

   </update>
关于批量提交的性能,Oracle环境下,我大概测试了一下:
insert into ... select xxx
union all select yyy
union all select zzz;
最快,其次是
begin
insert into ... values ...;
insert into ... values ...;
end;
当然最慢是逐条insert提交,最后谈下Spring与mybatis集成后,AOP事务管理 对 批量提交的影响 ,通常情况下,我们会这样配置AOP事务管理:
     <tx:advice id="txAdvice" transaction-manager="transactionManager">

         <tx:attributes>

             <tx:method name="do*" read-only="false" rollback-for="java.lang.Exception"/>

             <tx:method name="*" propagation="SUPPORTS" read-only="true"/>

         </tx:attributes>

     </tx:advice>

     <aop:config>

         <aop:pointcut id="pc" expression="execution(* ctas.service.*.*(..))"/>

         <aop:advisor pointcut-ref="pc" advice-ref="txAdvice"/>

     </aop:config>
这样,ctas.service(及子包)下的所有方法都被拦截,而且只有do开头的方法,具有可写的事务(即:能insert/update/delete记录),而其它方法是只读事务(即:只能select数据),但是我们前面谈到的批量提交操作,都是写代码手动提交的,不需要spring管理,所以配置中需要将某些方法排除,可以约定self开头的方法,由开发者自己管理事务,不需要spring代为管理,上面的配置要改成:
     <aop:config>

         <aop:pointcut id="pc" expression="execution(* ctas.service.*.*(..)) and !execution(* ctas.service.*.self*(..)))"/>

         <aop:advisor pointcut-ref="pc" advice-ref="txAdvice"/>

     </aop:config>
通过 and !execution(...) 将self开头的方法排除就可以了,前面的批量操作代码写到selfXXX方法中。
关于批量提交,还有一种情况:父子表的批量插入。思路还是一样的,但是SQL的写法有点区别,原理参考下面的语句(Oracle环境)
 DECLARE

   BASE_ID   INTEGER;

   DETAIL_ID INTEGER;

 BEGIN

   --第1组记录

   SELECT SEQ_T_BASE.NEXTVAL INTO BASE_ID FROM DUAL;

   INSERT INTO T_BASE (ID, FEE) VALUES (BASE_ID, ?);

   SELECT SEQ_T_DETAIL.NEXTVAL INTO DETAIL_ID FROM DUAL;

   INSERT INTO T_DETAIL (ID, BASE_ID, FEE) VALUES (DETAIL_ID, BASE_ID, ?);

   SELECT SEQ_T_DETAIL.NEXTVAL INTO DETAIL_ID FROM DUAL;

   INSERT INTO T_DETAIL (ID, BASE_ID, FEE) VALUES (DETAIL_ID, BASE_ID, ?);

   --第2组记录

   SELECT SEQ_T_BASE.NEXTVAL INTO BASE_ID FROM DUAL;

   INSERT INTO T_BASE (ID, FEE) VALUES (BASE_ID, ?);

   SELECT SEQ_T_DETAIL.NEXTVAL INTO DETAIL_ID FROM DUAL;

   INSERT INTO T_DETAIL (ID, BASE_ID, FEE) VALUES (DETAIL_ID, BASE_ID, ?);

   SELECT SEQ_T_DETAIL.NEXTVAL INTO DETAIL_ID FROM DUAL;

   INSERT INTO T_DETAIL (ID, BASE_ID, FEE) VALUES (DETAIL_ID, BASE_ID, ?);

   --...

 END;
xml映射文件中的写法:
     <insert id="insertBatch" parameterType="java.util.List">

         DECLARE

         base_id INTEGER ;

         detail_id INTEGER ;

         <foreach collection="list" item="item" index="index" open="begin" close="end;">

             select seq_t_base.nextval into base_id from dual;

             insert into t_base(id, fee) values(base_id, #{item.baseEntity.fee,jdbcType=DECIMAL});

             <foreach collection="item.details" item="detail" index="index">

                 select seq_t_detail.nextval into detail_id from dual;

                 insert into t_detail(id, base_id, fee) values(detail_id,base_id,#{detail.fee,jdbcType=DECIMAL});

             </foreach>

         </foreach>

     </insert>
List中的Dto定义
 public class BaseDetailDto {

     private TBase baseEntity;

     private List<TDetail> details;

     public TBase getBaseEntity() {

         return baseEntity;

     }

     public void setBaseEntity(TBase baseEntity) {

         this.baseEntity = baseEntity;

     }

     public List<TDetail> getDetails() {

         return details;

     }

     public void setDetails(List<TDetail> details) {

         this.details = details;

     }

 }
mybatis 使用经验小结的更多相关文章
- mybatis 使用经验小结 good
一.多数据源问题 主要思路是把dataSource.sqlSesstionFactory(用来产生sqlSession).MapperScannerConfigurer在配置中区分开,各Mapper对 ...
- mybatis入门小结(六)
入门小结---查询 1.1.1.1.1 #{}和${} #{}表示一个占位符号,通过#{}可以实现preparedStatement向占位符中设置值,自动进行java类型和jdbc类型转换,#{}可以 ...
- 【心得】Lattice后端使用经验小结(ECP5UM,DDR3,Diamond3.10,Reveal逻辑分析)
[博客导航] [导航]FPGA相关 背景 下边的内容,适合初次使用Lattice的.具备FPGA开发经验的同学. 1.初次使用,还真遇到不少的坑,Lattice的工具也有不少优缺点,通过总结,希望能缩 ...
- MyBatis学习小结
一款轻量级的ORM框架 全局配置文件 SqlMapConfig.xml <?xml version="1.0" encoding="UTF-8" ?> ...
- Git使用经验小结
2012春,开始正式使用SVN,2014年9月加入一起好后,开始使用Git. 有了一些使用经验,也看了下网上关于"Git全胜SVN"的言论. 结合自己的实际情况,简要写几句: 1 ...
- mybatis基础小结
1.JDBC是怎么访问数据库的?答:JDBC编程有6步,分别是1.加载sql驱动,2.使用DriverManager获取数据库连接,3.使用Connecttion来创建一个Statement对象 St ...
- Mybatis用法小结
select 1.基本用法 <select id="selectTableOne" resultType="com.test.entity.tableOne&quo ...
- jmeter linux使用经验小结
1. 确认务必安装了JDK,并且把路径配置OK.否则执行会报错. 2. 当做负载机时,在hosts 配置上 你的ip 你的hostname 或者使用./bin/jmeter-server ...
- Struts2 interceptor使用经验小结
1. interceptor 调用Spring容器中的bean 在interceptor中常有需要调用Spring Bean的需要,其实很简单和Struts2的Action一样配置即可. Spring ...
随机推荐
- Cropper – 简单的 jQuery 图片裁剪插件
Cropper 是一个简单的 jQuery 图像裁剪插件.它支持选项,方法,事件,触摸(移动),缩放,旋转.输出的裁剪数据基于原始图像大小,这样你就可以用它们来直接裁剪图像. 如果你尝试裁剪跨域图像, ...
- PHP如何连接MySQL数据库
* PHP连接MySQL数据库 * 准备工作 * 在XAMPP软件的安装目录/php/ext目录中 * php_mysql.dll和php_mysqli.dll文件必须存在 * 在XAMPP软件的安装 ...
- jQuery静态方法noop,camelCase,nodeName,trim使用和源码分析
noop方法 jQuery.noop()函数是一个空函数,它什么也不做. 当某些时候你需要传入函数参数,而且希望它什么也不做的时候,你可以使用该函数,也无需再新建一个空的函数. 示例: // 传入一个 ...
- UIScrollView的delegate方法妙用之让UICollectionView滑动到某个你想要的位置
一个UICollectionView有好多个cell,滑动一下,谁也不知道会停留在哪个cell,滑的快一点,就会多滑一段距离,反之则会滑的比较近,这正是UIScrollview用户体验好的地方. 如果 ...
- Activity详解四 activity四种加载模式
先看效果图: 1概述 Activity启动方式有四种,分别是: standard singleTop singleTask singleInstance 可以根据实际的需求为Activity设置对应的 ...
- Mac Security工具使用总结
Security是Mac系统中钥匙串和安全模块的命令行管理工具,(图形化工具为Keychain Access.app).钥匙串(Keychain)实质上就是一个用于存放证书.密钥.密码等安全认证实体的 ...
- 最新深度技术GHOST XP系统旗舰增强版 V2016年
来自系统妈:http://www.xitongma.com 深度技术GHOST xp系统旗舰增强版 V2016年 系统概述 深度技术ghost xp系统旗舰增强版集合微软JAVA虚拟机IE插件,增强浏 ...
- iOS面试题总结 (二)
14 OC的理解和特性 OC作为一个面向对象的语言,他也就具有面向对象的特点-封装,继承,多态. OC是一门动态性的语言,他具有动态绑定,动态加载,动态类型.动态即就是在运行时才会做的一些事情. 动态 ...
- iPad编程
1. iPad 现有型号: iPad Pro, iPad Air, iPad mini 均配备Retina显示屏.早期还有iPad 依次对应的坐标系及分辨率: iPad Pro 坐标系:1366 x ...
- Android View的几个位置坐标关系
1. View的边界,left, top, right, bottom(即左上右下),这些值都是相对View的父容器说的: 2. View的x, translationX, y, translatio ...