自动扫雷 python
自动扫雷一般分为两种,一种是读取内存数据,而另一种是通过分析图片获得数据,并通过模拟鼠标操作,这里我用的是第二种方式。
// 2018.8.10更新
代码已上传至GitHub
https://github.com/chestnut-egg/GoMine
一、准备工作
1.扫雷游戏
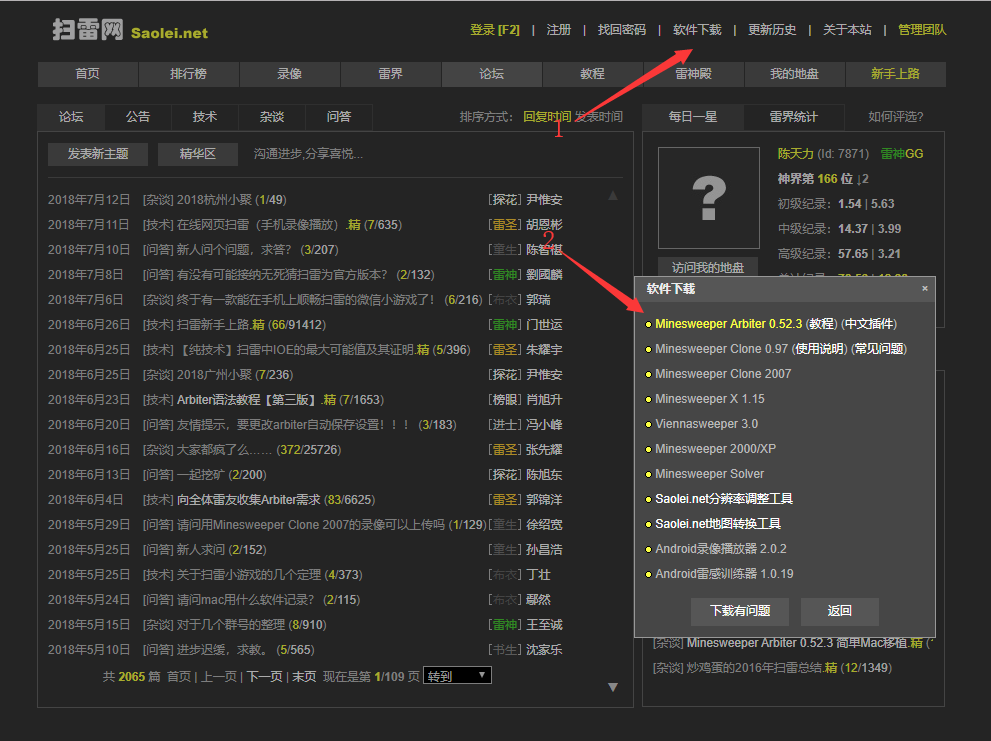
我是win10,没有默认的扫雷,所以去扫雷网下载
http://www.saolei.net/BBS/
2.python 3
我的版本是 python 3.6.1
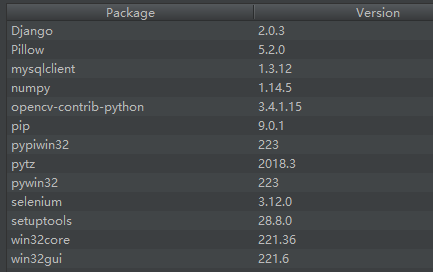
3.python的第三方库
win32api,win32gui,win32con,Pillow,numpy,opencv
可通过 pip install --upgrade SomePackage 来进行安装
注意:有的版本是下载pywin32,但是有的要把pywin32升级到最高并自动下载了pypiwin32,具体情况每个python版本可能都略有不同
我给出我的第三方库和版本仅供参考
二、关键代码组成
1.找到游戏窗口与坐标
#扫雷游戏窗口

class_name = "TMain"

title_name = "Minesweeper Arbiter "

hwnd = win32gui.FindWindow(class_name, title_name)

#窗口坐标

left =

top =

right =

bottom =

if hwnd:

    print("找到窗口")

    left, top, right, bottom = win32gui.GetWindowRect(hwnd)

    #win32gui.SetForegroundWindow(hwnd)

    print("窗口坐标:")

    print(str(left)+' '+str(right)+' '+str(top)+' '+str(bottom))

else:

    print("未找到窗口")
2.锁定并抓取雷区图像
#锁定雷区坐标
#去除周围功能按钮以及多余的界面
#具体的像素值是通过QQ的截图来判断的

left +=

top +=

right -=

bottom -=

#抓取雷区图像

rect = (left, top, right, bottom)

img = ImageGrab.grab().crop(rect)
3.各图像的RGBA值
#数字1-8 周围雷数

#0 未被打开

#ed 被打开 空白

#hongqi 红旗
#boom 普通雷
#boom_red 踩中的雷
rgba_ed = [(, (, , )), (, (, , ))]

rgba_hongqi = [(, (, , )), (, (, , )), (, (, , )), (, (, , )), (, (, , ))]

rgba_0 = [(, (, , )), (, (, , )), (, (, , ))]

rgba_1 = [(, (, , )), (, (, , )), (, (, , ))]

rgba_2 = [(, (, , )), (, (, , )), (, (, , ))]

rgba_3 = [(, (, , )), (, (, , )), (, (, , ))]

rgba_4 = [(, (, , )), (, (, , )), (, (, , ))]

rgba_5 = [(, (, , )), (, (, , )), (, (, , ))]

rgba_6 = [(, (, , )), (, (, , )), (, (, , ))]

rgba_8 = [(, (, , )), (, (, , ))]

rgba_boom = [(, (, , )), (, (, , )), (, (, , )), (, (, , ))]

rgba_boom_red = [(, (, , )), (, (, , )), (, (, , )), (, (, , ))]
4.扫描雷区图像保存至一个二维数组map
#扫描雷区图像

def showmap():

    img = ImageGrab.grab().crop(rect)

    for y in range(blocks_y):

        for x in range(blocks_x):

            this_image = img.crop((x * block_width, y * block_height, (x + ) * block_width, (y + ) * block_height))

            if this_image.getcolors() == rgba_0:

                map[y][x] =

            elif this_image.getcolors() == rgba_1:

                map[y][x] =

            elif this_image.getcolors() == rgba_2:

                map[y][x] =

            elif this_image.getcolors() == rgba_3:

                map[y][x] =

            elif this_image.getcolors() == rgba_4:

                map[y][x] =

            elif this_image.getcolors() == rgba_5:

                map[y][x] =

            elif this_image.getcolors() == rgba_6:

                map[y][x] =

            elif this_image.getcolors() == rgba_8:

                map[y][x] =

            elif this_image.getcolors() == rgba_ed:

                map[y][x] = -

            elif this_image.getcolors() == rgba_hongqi:

                map[y][x] = -

            elif this_image.getcolors() == rgba_boom or this_image.getcolors() == rgba_boom_red:

                global gameover

                gameover =

                break

                #sys.exit()

            else:

                print("无法识别图像")

                print("坐标")

                print((y,x))

                print("颜色")

                print(this_image.getcolors())

                sys.exit()

    #print(map)
5.扫雷算法
这里我采用的最基础的算法
1.首先点出一个点
2.扫描所有数字,如果周围空白+插旗==数字,则空白均有雷,右键点击空白插旗
3.扫描所有数字,如果周围插旗==数字,则空白均没有雷,左键点击空白
4.循环2、3,如果没有符合条件的,则随机点击一个白块
#插旗

def banner():

    showmap()

    for y in range(blocks_y):

        for x in range(blocks_x):

            if  <= map[y][x] and map[y][x] <= :

                boom_number = map[y][x]

                block_white =

                block_qi =

                for yy in range(y-,y+):

                    for xx in range(x-,x+):

                        if  <= yy and  <= xx and yy < blocks_y and xx < blocks_x:

                            if not (yy == y and xx == x):if map[yy][xx] == :

                                    block_white +=

                                elif map[yy][xx] == -:

                                    block_qi += if boom_number == block_white + block_qi:for yy in range(y - , y + ):

                        for xx in range(x - , x + ):

                            if  <= yy and  <= xx and yy < blocks_y and xx < blocks_x:

                                if not (yy == y and xx == x):

                                    if map[yy][xx] == :

                                        win32api.SetCursorPos([left+xx*block_width, top+yy*block_height])

                                        win32api.mouse_event(win32con.MOUSEEVENTF_RIGHTDOWN, , , , )

                                        win32api.mouse_event(win32con.MOUSEEVENTF_RIGHTUP, , , , )

                                        showmap()

#点击白块

def dig():

    showmap()

    iscluck =

    for y in range(blocks_y):

        for x in range(blocks_x):

            if  <= map[y][x] and map[y][x] <= :

                boom_number = map[y][x]

                block_white =

                block_qi =

                for yy in range(y - , y + ):

                    for xx in range(x - , x + ):

                        if  <= yy and  <= xx and yy < blocks_y and xx < blocks_x:

                            if not (yy == y and xx == x):

                                if map[yy][xx] == :

                                    block_white +=

                                elif map[yy][xx] == -:

                                    block_qi += if boom_number == block_qi and block_white > :for yy in range(y - , y + ):

                        for xx in range(x - , x + ):

                            if  <= yy and  <= xx and yy < blocks_y and xx < blocks_x:

                                if not(yy == y and xx == x):

                                    if map[yy][xx] == :

                                        win32api.SetCursorPos([left + xx * block_width, top + yy * block_height])

                                        win32api.mouse_event(win32con.MOUSEEVENTF_LEFTDOWN, , , , )

                                        win32api.mouse_event(win32con.MOUSEEVENTF_LEFTUP, , , , )

                                        iscluck =

    if iscluck == :

        luck()

#随机点击

def luck():

    fl =

    while(fl):

        random_x = random.randint(, blocks_x - )

        random_y = random.randint(, blocks_y - )

        if(map[random_y][random_x] == ):

            win32api.SetCursorPos([left + random_x * block_width, top + random_y * block_height])

            win32api.mouse_event(win32con.MOUSEEVENTF_LEFTDOWN, , , , )

            win32api.mouse_event(win32con.MOUSEEVENTF_LEFTUP, , , , )

            fl =
def gogo():
    win32api.SetCursorPos([left, top])
    win32api.mouse_event(win32con.MOUSEEVENTF_LEFTDOWN, 0, 0, 0, 0)
    win32api.mouse_event(win32con.MOUSEEVENTF_LEFTUP, 0, 0, 0, 0)
    showmap()
    global gameover
    while(1):
        if(gameover == 0):
            banner()
            banner()
            dig()
        else:
            gameover = 0
            win32api.keybd_event(113, 0, 0, 0)
            win32api.SetCursorPos([left, top])
            win32api.mouse_event(win32con.MOUSEEVENTF_LEFTDOWN, 0, 0, 0, 0)
            win32api.mouse_event(win32con.MOUSEEVENTF_LEFTUP, 0, 0, 0, 0)
            showmap()
这个算法在初级和中级通过率都不错,但是在高级成功率惨不忍睹,主要是没有考虑逻辑组合以及白块是雷的概率问题,可以对这两个点进行改进,提高成功率
自动扫雷 python的更多相关文章
- 利用Python实现自动扫雷
自动扫雷一般分为两种,一种是读取内存数据,而另一种是通过分析图片获得数据,并通过模拟鼠标操作,这里我用的是第二种方式. 一.准备工作 我的版本是 python 3.6.1python的第三方库:win ...
- 1秒内通关扫雷?他创造属于自己的世界记录!Python实现自动扫雷
五一劳动节假期,我们一起来玩扫雷吧.用Python+OpenCV实现了自动扫雷,突破世界记录,我们先来看一下效果吧. 中级 - 0.74秒 3BV/S=60.81 相信许多人很早就知道有扫雷这么一款经 ...
- [Dynamic Language] 用Sphinx自动生成python代码注释文档
用Sphinx自动生成python代码注释文档 pip install -U sphinx 安装好了之后,对Python代码的文档,一般使用sphinx-apidoc来自动生成:查看帮助mac-abe ...
- 如何使用python来模拟鼠标点击(将通过实例自动化模拟在360浏览器中自动搜索"python")
一.准备工作: 安装pywin32,后面开发需要pywin32的支持,否则无法完成与windows层面相关的操作. pywin32的具体安装及注意事项: 1.整体开发环境: 基于windows7操作系 ...
- PyCharm配置autopep8,自动格式化Python代码
1. 关于PEP 8 PEP 8,Style Guide for Python Code,是Python官方推出编码约定,主要是为了保证 Python 编码的风格一致,提高代码的可读性. 官网地址:h ...
- nginx tomcat 自动部署python脚本【转】
#!/usr/bin/env python #--coding:utf8-- import sys,subprocess,os,datetime,paramiko,re local_path='/ho ...
- 文件参数化-utp框架之根据yaml文件自动生成python文件+utp运行用例
根据yaml文件自动生成python文件 utp框架: bin目录:存放执行文件(run.py) cases目录:存放生成的用例的python文件(该目录下的文件为根据data目录下的测试用例生成的p ...
- SAE部署Python-让云端自动运行Python代码
之前写过模拟登录新浪微博的帖子,然而我并没有去爬过微博的数据,觉得有点浪费,于是就想写一个代码来发微博.写完之后觉得如果能自动发微博就好了,但是我又不可能24小时开始(晚上12点后还会断网),也没有v ...
- windows 10 如何设定计划任务自动执行 python 脚本?
我用 python 写了一些脚本,有一些是爬虫脚本,比如爬取知乎特定话题的热门问题,有一些是定期的统计分析脚本,输出统计结果到文档中.之前我都是手动执行这些脚本,现在我希望如何这些脚本能自动定时执行. ...
随机推荐
- API加密框架monkey-api-encrypt发布1.2版本
框架介绍 monkey-api-encrypt 是我之前写的一个API加密的框架,主要是将加密/解密的逻辑交给框架实现,等数据到达Controller后自动解密了,让开发人员不需要关注数据的加解密操作 ...
- redis:安装及基础知识(一)
Redis官网:https://redis.io/ Redis中文网:http://www.redis.cn/ Redis 是一个开源的,内存中的数据结构存储系统,它可以用作数据库.缓存和消息中间件. ...
- Spring5:事务管理【整合Mybatis】
Spring 整合Mybatis 1:导入依赖 <dependencies> <!--测试依赖--> <dependency> <groupId>jun ...
- MVC-路由扩展-限制浏览器
根据路由原理,MVC每次都会走获取路由上下文数据. 自定义Route 调用,以及完善其他代码 运行结果,当在谷浏览器执行时:
- Discuz的文件目录解析
最近在学习discuz,对这个不了解的 可以参考 http://www.cnblogs.com/hgj123/p/4641845.html
- What does __GNUC__ mean?
It indicates that I'm a GNU compiler and you can use GNU extensions. https://stackoverflow.com/quest ...
- web 之 session
Session? 在WEB开发中,服务器可以为每个用户浏览器创建一个会话对象(session对象),注意:一个浏览器独占一个session对象(默认情况下).因此,在需要保存用户数据时,服务器程序可以 ...
- 【高并发】又一个朋友面试栽在了Thread类的stop()方法和interrupt()方法上!
写在前面 新一轮的面试已经过去,可能是疫情的原因吧,很多童鞋纷纷留言说今年的面试题难度又提高了,尤其是对并发编程的知识.我细想了下,也许有那么点疫情的原因吧,但无论面试的套路怎么变,只要掌握了核心知识 ...
- XEP-0199 XMPP Ping
原文来自:https://xmpp.org/extensions/xep-0199.html,只翻译了技术方面的内容. 摘要:这个规范定义了一个通过XML流发送应用级别pings的XMPP扩展协议.这 ...
- Java初学者最近三次作业的心得体会
作为一个初学者,简单的谈一下自己的作业心得体会.如果你是完全没有接触过Java的学习,本篇博文可能会有些收获,如果你已经学习Java有一段时间了,那么可以放弃这篇文章了,因为这篇文章讲解的是基本的东西 ...