android 入门 001 (界面布局)
学android 首先学会怎么布局界面,我开始是学.net的,因工作需要学习一下安卓,外行写的不好,请多多见谅指教 。这一篇文章然我们来学习一下四种布局吧!
RelativeLayout(相对布局) 、LinearLayout(线性布局) 、TableLayout(表格布局) 、FrameLayout(帧布局)
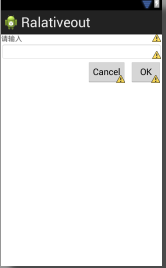
1、RelativeLayout
<RelativeLayout xmlns:android="http://schemas.android.com/apk/res/android"

    xmlns:tools="http://schemas.android.com/tools"

    android:layout_width="fill_parent"

    android:layout_height="match_parent"

    >

    <TextView

        android:id="@+id/lable"

        android:layout_width="fill_parent"

        android:layout_height="wrap_content"

        android:text="请输入" />

    <EditText

         android:id="@+id/txt"

        android:layout_width="fill_parent"

        android:layout_height="wrap_content"

         android:background="@android:drawable/editbox_background"

         android:layout_below="@id/lable"

        />

    <Button

        android:id="@+id/OK"

        android:layout_width="wrap_content"

        android:layout_height="wrap_content"

        android:layout_below="@id/txt"

        android:text="OK"

        android:layout_alignParentRight="true"

        android:layout_marginLeft="10px"

        />

         />

    <Button

        android:id="@+id/Cancel"

        android:layout_width="wrap_content"

        android:layout_height="wrap_content"

        android:layout_toLeftOf="@id/OK"

         android:layout_alignTop="@id/OK"

        android:text="Cancel"

        />

</RelativeLayout>
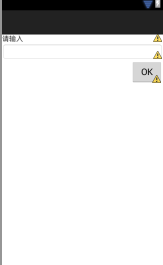
2、LinearLayout
<LinearLayout xmlns:android="http://schemas.android.com/apk/res/android"

    xmlns:tools="http://schemas.android.com/tools"

    android:layout_width="fill_parent"

    android:layout_height="fill_parent"

     android:orientation="vertical"

    >

    <TextView

        android:id="@+id/lable"

        android:layout_width="fill_parent"

        android:layout_height="wrap_content"

        android:text="请输入" />

    <EditText

         android:id="@+id/txt"

        android:layout_width="fill_parent"

        android:layout_height="wrap_content"

         android:background="@android:drawable/editbox_background"

         android:layout_below="@id/lable"

        />

    <Button

        android:id="@+id/OK"

        android:layout_width="wrap_content"

        android:layout_height="wrap_content"

        android:layout_below="@id/txt"

        android:text="OK"

       android:layout_gravity="right"

        />

         />

</LinearLayout>
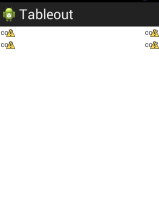
3、TableLayout
<TableLayout xmlns:android="http://schemas.android.com/apk/res/android"

    android:layout_width="fill_parent"

    android:layout_height="fill_parent"

    android:stretchColumns="1"

    >

   <TableRow >

       <TextView

           android:text="col1"

           android:padding="3dip"

           />

        <TextView

           android:text="col2"

           android:padding="3dip"

           android:gravity="right"

           />

   </TableRow>

    <TableRow >

       <TextView

           android:text="col1"

           android:padding="3dp"

           />

        <TextView

           android:text="col2"

           android:padding="3dp"

           android:gravity="right"

           />

   </TableRow>

</TableLayout>
4、FrameLayout
<FrameLayout xmlns:android="http://schemas.android.com/apk/res/android"

    xmlns:tools="http://schemas.android.com/tools"

    android:layout_width="fill_parent"

    android:layout_height="fill_parent"

    >

     <ImageView

         android:layout_height="fill_parent"

         android:layout_width="fill_parent"

         android:src="@drawable/movie"

         />

     <ImageView

         android:layout_height="wrap_content"

         android:layout_width="wrap_content"

         android:src="@drawable/play"

          android:layout_gravity="center"

         />

</FrameLayout>


android 入门 001 (界面布局)的更多相关文章
- Android 你知道界面布局嵌套多少层之后会Crash吗
我们先放一张Hierarchy Viewer的图:(模拟器Android4.4) 看到数字6了吗,那个RelativeLayout是MainActivity的根ViewGroup, 而在Relativ ...
- Android实现入门界面布局
Android实现入门界面布局 开发工具:Andorid Studio 1.3 运行环境:Android 4.4 KitKat 代码实现 首先是常量的定义,安卓中固定字符串应该定义在常量中. stri ...
- Android入门(十):界面的布局方式及其实际应用
关于Android界面布局,网上已经有了很多非常不错的学习资料,在这里我也不班门弄斧了,推荐两篇我认为写的不错的教程,然后再重点讲一下几种布局方式的实际应用. 教程链接:①http://www.cnb ...
- Android基础-系统架构分析,环境搭建,下载Android Studio,AndroidDevTools,Git使用教程,Github入门,界面设计介绍
系统架构分析 Android体系结构 安卓结构有四大层,五个部分,Android分四层为: 应用层(Applications),应用框架层(Application Framework),系统运行层(L ...
- 【详细】Android入门到放弃篇-YES OR NO-》各种UI组件,布局管理器,单元Activity
问:达叔,你放弃了吗? 答:不,放弃是不可能的,丢了Android,你会心疼吗?如果别人把你丢掉,你是痛苦呢?还是痛苦呢?~ 引导语 有人说,爱上一个人是痛苦的,有人说,喜欢一个人是幸福的. 人与人之 ...
- 2013 duilib入门简明教程 -- 界面布局(9)
上一个教程实现的标题栏代码中,并没有看到处理自适应窗口大小的代码,但是窗口大小变化后,按钮的位置会跟着变化,这是因为我们将按钮放到了HorizontalLayout.VerticalLayou ...
- Android界面布局基本知识简述
Android手机操作系统在模拟器中进行相关的编写,可以帮助我们实现各种功能需求.尤其是在界面的操作方面显得更为突出.在这里我们就可以对Android界面布局的相关操作来对这方面的知识进行一个深入的了 ...
- Android基础总结(3)——UI界面布局
Android的UI设计有好几种界面程序编写方式.大体上可分为两大类:一类是利用可视化工具来进行,允许你进行拖拽控件来进行布局:还有一类是编写xml文档来进行布局.这两种方法可以相互转换. 1.常见的 ...
- [Android 性能优化系列]降低你的界面布局层次结构的一部分
大家假设喜欢我的博客,请关注一下我的微博,请点击这里(http://weibo.com/kifile),谢谢 转载请标明出处(http://blog.csdn.net/kifile),再次感谢 原文地 ...
随机推荐
- SparkSQL基础应用(1.3.1)
一.概述 从1.3版本开始Spark SQL不再是测试版本,之前使用的SchemaRDD重命名为DataFrame,统一了Java和ScalaAPI. SparkSQL是Spark框架中处理结构化数据 ...
- requireJs和r.js压缩工具
上面release是执行命令 node r.js -o build.js 生成的,需要切换到目录require/tools下面,也就是 有r.js和build.js的目录,才能执行命令 代码目录如上: ...
- springmvc+spring+mybatis分页查询实例版本2.0
先在改成纯利用js进行分页,首先查询出所有记录,初始化通过jquery控制只知显示首页内容,创建页面切换功能的函数,每次显示固定的内容行并把其他内容行隐藏,这样只需要一次提交就可以实现分页,但是仍有缺 ...
- Mysql索引总结(二)
在数据库表中,对字段建立索引可以大大提高查询速度.假如我们创建了一个 mytable表: ) NOT NULL ); 在查找username="admin"的记录 SELECT * ...
- Mysql索引总结(一)
数据库开发中索引的使用占了很重要的位置,好的索引会使数据库的读写效率加倍,烂的索引则会拖累整个系统甚至引发灾难. 索引分三类: index ----普通的索引,数据可以重复 unique ----唯一 ...
- 出现“不能执行已释放的Script代码”错误的原因及解决办法
很多web开发者或许都遇到过这样的问题,程序莫名奇怪出现“不能执行已释放Script的代码”,错误行1,列1.对于这种消息描述不着边,行列描述更是让人迷茫的js错误,相信是所有调试js程序的朋友们最郁 ...
- ASP.NET MVC5 新特性:Attribute路由使用详解 (转载)
1.什么是Attribute路由?怎么样启用Attribute路由? 微软在 ASP.NET MVC5 中引入了一种新型路由:Attribute路由,顾名思义,Attribute路由是通过Attrib ...
- Java中的get()和set()方法
对于JAVA初学者来说,set和get这两个方法似乎已经很熟悉了,这两个方法是JAVA变成中的基本用法,也是出现频率相当高的两个方法. 如果你对于这两个方法还有困惑甚至完全不知道这两个方法是做什么的, ...
- 利用Qt Assistant 定制帮助文档
为了将Qt Assistant定制为自己应用程序的帮助文档浏览器.需要完成以下几步: 一.导入HTML格式的帮助文档 (1)首先,针对自己的应用程序创建HTML格式的帮助文档,请参见<Doxyg ...
- shell 日期加减
shell 日期加减运算 比如今日是2012-04-22 $ date -d "+1 day" +%Y-%m-%d 2012-04-23 $ date -d "- ...