
【angular5项目积累总结】侧栏菜单 navmenu
View
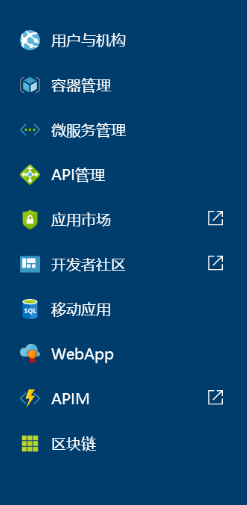
Code
import { Component, OnInit } from '@angular/core';

import { HttpClient } from '@angular/common/http';

import { ConfigureService } from '../../configure/configure.service';

import { Router } from '@angular/router';

@Component({

    selector: 'nav-menu',

    templateUrl: './navmenu.component.html',

    styleUrls: ['./navmenu.component.css'],

    host: {

        'class': 'fxs-sidebar fxs-trim-border',

        '[class.fxs-sidebar-is-collapsed]': '!sidebarExpanded'

    }

})

export class NavMenuComponent implements OnInit {

    constructor(private httpProvider: HttpClient,

        public configService: ConfigureService,

        private router: Router

    ) { }

    create() {

        this.router.navigate(['/create'], {});

    }

    isExpanded: boolean = true;

    sidebarExpanded: boolean = true;

    menuItems: Array<any> = [];

    sideMenu: any;

    _toggleSidebar(): void {

        this.sidebarExpanded = !this.sidebarExpanded;

    }

    isHyperLink(path): boolean {

        if (path.indexOf('http') == 0) {

            return true;

        }

        return false;

    }

    showSideMenu(): boolean {

        return this.sideMenu != null;

    }

    ngOnInit(): void {

        let setting = this.configService.config;

        if (this.menuItems.length == 0) {

            this.httpProvider

                .get(setting.PlatformServer + setting.Api_menus)

                .subscribe((result: any) => {

                    this.menuItems = result;

                    for (var i = 0; i < this.menuItems.length; i++) {

                        if (this.menuItems[i].link == 'SideMenu') {

                            this.sideMenu = this.menuItems[i];

                            return;

                        }

                    }

                });

        }

    }

}
<div class="fxs-sidebar-bar fxs-trim fxs-trim-text">

    <div class="fxs-sidebar-top">

        <button class="expanderBtn fxs-sidebar-collapse-button fxs-trim-hover fxs-trim-svg" title="Show text labels" (click)="_toggleSidebar()">

            <svg height="100%" width="100%" role="presentation" focusable="false">

                <use xmlns:xlink="http://www.w3.org/1999/xlink" xlink:href="#FxSymbol0-00f"></use>

            </svg>

        </button>

        <!--<button class="fxs-sidebar-create fxs-trim-hover fxs-trim-border" role="button" title="新建" (click)="create()">

            <div class="fxs-sidebar-button-flex">

                <div class="fxs-sidebar-create-icon fxs-fill-success">

                    <svg viewBox="0 0 18 18" class="" role="presentation" focusable="false" xmlns:svg="http://www.w3.org/2000/svg" xmlns:xlink="http://www.w3.org/1999/xlink" id="FxSymbol0-00f" width="100%" height="100%"><g><title></title><path d="M8 18h2v-8h8V8h-8V0H8v8H0v2h8z"></path></g></svg>

                </div>

                <div class="fxs-sidebar-create-label fxs-sidebar-show-if-expanded fxs-trim-text">新建</div>

            </div>

            <span class="fxs-hide-accessible-label">新建</span>

        </button>-->

    </div>

    <div class="fxs-sidebar-middle" role="navigation">

        <ul class="fxs-sidebar-favorites">

            <ng-container *ngFor="let menuItem of menuItems">

                <li *ngIf="menuItem.link != 'SideMenu'" class="fxs-sidebar-item fxs-trim-hover fxs-sidebar-draggable fxs-sidebar-droppable fxs-trim-border" draggable="true" attr.aria-label="{{menuItem.menuName}}">

                    <a *ngIf="isHyperLink(menuItem.link);then hyperlink else routerlink"></a>

                    <ng-template #routerlink>

                        <a routerLink={{menuItem.link}} class="fxs-sidebar-item-link fxs-trim-text" title="{{menuItem.menuName}}" role="link">

                            <div class="fxs-sidebar-icon fxs-trim-svg">

                                <svg height="100%" width="100%" role="presentation" focusable="false">

                                    <use xmlns:xlink="http://www.w3.org/1999/xlink" attr.xlink:href="{{menuItem.icon}}"></use>

                                </svg>

                            </div>

                            <div class="fxs-sidebar-label fxs-sidebar-show-if-expanded" *ngIf="isExpanded">{{menuItem.menuName}}</div>

                        </a>

                    </ng-template>

                    <ng-template #hyperlink>

                        <a href={{menuItem.link}} target="_blank" class="fxs-sidebar-item-link fxs-trim-text" title="{{menuItem.menuName}}" role="link">

                            <div class="fxs-sidebar-icon fxs-trim-svg">

                                <svg height="100%" width="100%" role="presentation" focusable="false">

                                    <use xmlns:xlink="http://www.w3.org/1999/xlink" attr.xlink:href="{{menuItem.icon}}"></use>

                                </svg>

                            </div>

                            <div class="fxs-sidebar-label fxs-sidebar-show-if-expanded" *ngIf="isExpanded">{{menuItem.menuName}}</div>

                            <div class="fxs-sidebar-icon fxs-trim-svg" style="padding-right:19px;">

                                <svg style="height:15px" viewBox="0 0 16 16" class="msportalfx-svg-palette-inherit" role="presentation" focusable="false" xmlns:svg="http://www.w3.org/2000/svg" xmlns:xlink="http://www.w3.org/1999/xlink" id="FxSymbol0-067" width="100%" height="100%"><g><title></title><path d="M4.992 9.819l8.018-7.991v4.005H14V0H8.167v1h4.038L4.232 8.987l.76.833z"></path><path d="M12.993 13.03H1.01V1.028h4.823V0H0v14h14V8.167h-1.007v4.863z"></path></g></svg>

                            </div>

                        </a>

                    </ng-template>

                </li>

            </ng-container>

        </ul>

    </div>

    <side-menu *ngIf="showSideMenu()" [SideMenuName]="sideMenu.menuName"></side-menu>

</div>
【angular5项目积累总结】侧栏菜单 navmenu的更多相关文章
- 多种css3时尚侧栏菜单展开显示效果Off-Canvas Menu Effects
今天我们想分享多种css3时尚侧栏菜单展开显示效果.侧边栏应用广泛,我们之前已经产生了一些效果灵感.风格演变,今天我们要展示一套新的灵感的现代效果.不同的布局和菜单的同步转换和页面可以让一切看起来更有 ...
- ionic 侧栏菜单用法
第一步: 引入js和css文件我这里是直接引入的cdn,ionic是基于angular的,bundle.min.js把常用angular的js已经压缩到一起,可以直接引入.bundle.min.js, ...
- Ionic Js十七:侧栏菜单
一个容器元素包含侧边菜单和主要内容.通过把主要内容区域从一边拖动到另一边,来让左侧或右侧的侧栏菜单进行切换. 效果图如下所示:   用法 要使用侧栏菜单,添加一个父元素,一个中间内容 ,和一个或更 ...
- ionic js 侧栏菜单 把主要内容区域从一边拖动到另一边,来让左侧或右侧的侧栏菜单进行切换
ionic 侧栏菜单 一个容器元素包含侧边菜单和主要内容.通过把主要内容区域从一边拖动到另一边,来让左侧或右侧的侧栏菜单进行切换. 效果图如下所示: 用法 要使用侧栏菜单,添加一个父元素<ion ...
- 【angular5项目积累总结】遇到的一些问题以及解决办法
1.项目中字符串特别是\r\n,替换成br之后,在页面换行无法生效? 答:绑定元素 innerHTML. <div class="panel-body" [innerHTML ...
- 【angular5项目积累总结】消息订阅服务
code import { Injectable } from '@angular/core'; import { Subject } from 'rxjs/Subject'; @Injectable ...
- 【angular5项目积累总结】列表多选样式框(2)
view code list.css :host { display: flex; width: 100%; border-left: 1px solid #ccc; font: normal 12p ...
- 【angular5项目积累总结】列表多选样式框(1)
憋不住想说一下:angular坑太多,各种教程各种不完整,官网还只是简单的画饼充饥,没办法只有自己研究自己总结,便于以后提高工作效率. 第一种: view code list.css :ho ...
- 【angular5项目积累总结】avatar组件
View Code import { Component, HostListener, ElementRef } from '@angular/core'; import { Adal4Service ...
随机推荐
- 从0开始学Python---01
1.开始 Vim test.py #!/usr/bin/python print "hello,world!"; chmod +x test.py ./test.py 2.基本知 ...
- 关于Servlet中GET和POST方法的总结
JSP.Servlet中get请求和post请求的区别总结 在学习JavaWeb最初的开始阶段,大家都会遇到HttpServlet中的doGet和doPost方法.关于Servlet中get请求和 ...
- nginx实现unigui群集
nginx实现unigui群集 在笔者写此文的时候,UNIGUI1.50.x的版本已经发布,其提供的HyperServer已经支持群集. 有网友还专门为此做了群集方面的测试: 从上图可以看出:群集总共 ...
- Android-Kotlin-抽象类与多态的表现
选择包名,然后右键: 选择Class类型,会有class: 选择File类型,不会自动有class: 目录结构: 定义描述抽象类 Person人类: package cn.kotlin.kotlin ...
- scrapy中Request中常用参数
url: 就是需要请求,并进行下一步处理的url callback: 指定该请求返回的Response,由那个函数来处理. method: 一般不需要指定,使用默认GET方法请求即可 headers: ...
- cad2015卸载/安装失败/如何彻底卸载清除干净cad2015注册表和文件的方法
cad2015提示安装未完成,某些产品无法安装该怎样解决呢?一些朋友在win7或者win10系统下安装cad2015失败提示cad2015安装未完成,某些产品无法安装,也有时候想重新安装cad2015 ...
- Doxygen的使用,配置及实例
Doxygen是一种开源跨平台的,以类似JavaDoc风格描述的文档系统,可以从一套归档源文件开始,生成文档 下载Doxygen + Graphviz Doxygen可以生成动态文档 Graphviz ...
- 机器学习与Tensorflow(3)—— 机器学习及MNIST数据集分类优化
一.二次代价函数 1. 形式: 其中,C为代价函数,X表示样本,Y表示实际值,a表示输出值,n为样本总数 2. 利用梯度下降法调整权值参数大小,推导过程如下图所示: 根据结果可得,权重w和偏置b的梯度 ...
- redis集成相关工具类
package cn.yiyuan.util; import java.io.ByteArrayInputStream; import java.io.ByteArrayOutputStream; i ...
- GITLAB安装笔记
CentOS 7 最小安装后操作 设置时区timedatectl set-timezone Asia/Shanghai 添加 Gitlab 清华源 vi /etc/yum.repos.d/gitlab ...