
Android UI(五)云通讯录项目之联系人列表,带侧滑选择,带搜索框
作者:泥沙砖瓦浆木匠
网站:http://blog.csdn.net/jeffli1993
个人签名:打算起手不凡写出鸿篇巨作的人,往往坚持不了完成第一章节。
交流QQ群:【编程之美 365234583】http://jq.qq.com/?_wv=1027&k=XVfBTo
要捐钱的就打支付宝吧:13958686678(泥瓦匠开个玩笑~)
一、前言
继续AndroidUI系列,泥瓦匠又要开始扯淡了。哈哈今天在文章头加了个支付宝账号。我也真逗,至今没收到一笔是写博客的钱。或是分享的。泥瓦匠也就挂着逗逗乐而已。笑着就笑吧,我也在笑了。
和我的师傅扯着蛋。也教授了泥瓦匠很多东西。泥瓦匠一直在学习,一直在进步而已。这是师傅送我的话:
睡少点,玩少点,分清主次拍优先级。还要发挥同伴的能力,不是什么事情都要自己做的。
二、正文
今天要讲的内容很多。还是主要大家去看代码吧。我把主要的东西,介绍下。然后给源码自己参透吧。下面给大家带来的是这一讲,云通讯录之联系人列表,带侧滑选择,带搜索框。
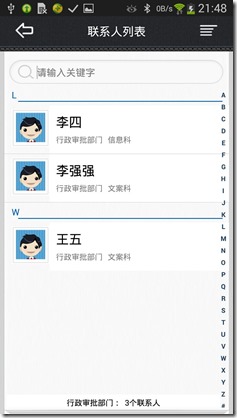

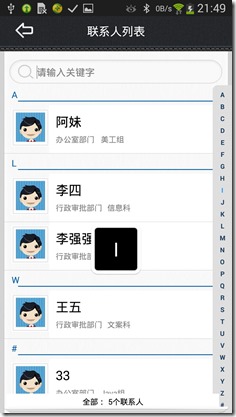
泥瓦匠的思路:
- 一个barTop层:两个ImgView或是Button,一个TextView,用styles.xml控制其的样式。
- 核心中间listView 和 侧滑View 搜索框View 自定义实现。这将是本讲的重点
- 底部TextView的实现
三、实现核心代码
泥瓦匠刚刚吃完午饭,来扯会淡。路上遇到一对黑人唱着歌,朝着食堂吃饭去了。生活就需要这样子,其乐融融。
下面泥瓦匠先实现旁边的侧滑(SideBar),其实也就是和上一篇的Android UI(四)云通讯录项目之云端更新进度条实现中的自定义View一样的。只要知道一些Canvas、Paint的一些基础就好了。我们很简单的定义了一个26个字母的String数组,然后循环将他们Paint出来就好了。其实就是这么简单。
package org.nsg.views;

import com.example.android05.R;

import android.content.Context;

import android.graphics.Canvas;

import android.graphics.Color;

import android.graphics.Paint;

import android.graphics.Typeface;

import android.graphics.drawable.ColorDrawable;

import android.util.AttributeSet;

import android.view.MotionEvent;

import android.view.View;

import android.widget.TextView;

public class SideBar extends View

{

	// touching event

	private OnTouchingLetterChangedListener onTouchingLetterChangedListener;

	// 26 letters

	public static String[] b =

		{

			"A", "B", "C", "D", "E", "F", "G", "H", "I", "J", "K",

			"L", "M", "N", "O", "P", "Q", "R", "S", "T", "U", "V",

			"W", "X", "Y", "Z", "#"

		};

	// if choosed

	private int choose  = -1;

	private Paint paint = new Paint();

	private TextView mTextDialog;

	public void setmTextDialog(TextView mTextDialog)

	{

		this.mTextDialog = mTextDialog;

	}

	public SideBar(Context context, AttributeSet attrs, int defStyleAttr)

	{

		super(context, attrs, defStyleAttr);

	}

	public SideBar(Context context, AttributeSet attrs)

	{

		super(context, attrs);

	}

	public SideBar(Context context)

	{

		super(context);

	}

	// override onDraw function

	protected void onDraw(Canvas canvas)

	{

		super.onDraw(canvas);

		// get the height

		int height = getHeight();

		// get the width

		int width = getWidth();

		// get one letter height

		int singleHeight = height / b.length;

		for (int i = 0; i < b.length; i++)

		{

			paint.setColor(Color.rgb(33, 65, 98));

			paint.setTypeface(Typeface.DEFAULT_BOLD);

			paint.setAntiAlias(true);

			paint.setTextSize(20);

			// if choosed

			if(i == choose)

			{

				paint.setColor(Color.parseColor("#3399ff"));

				paint.setFakeBoldText(true);

			}

			// draw text

			float x = width / 2 - paint.measureText(b[i]) / 2;

			float y = singleHeight * i + singleHeight;

			canvas.drawText(b[i], x, y, paint);

			paint.reset();

		}

	}

	@SuppressWarnings("deprecation")

	@Override

	public boolean dispatchTouchEvent(MotionEvent event)

	{

		final int action = event.getAction();

		final float y = event.getY(); // get the Y

		final int oldChoose = choose;

		final OnTouchingLetterChangedListener changedListener = onTouchingLetterChangedListener;

		final int letterPos = (int)( y / getHeight() * b.length);

		switch (action)

		{

			case MotionEvent.ACTION_UP:

				setBackgroundDrawable(new ColorDrawable(0x00000000));

				choose = -1;

				invalidate();

				if (mTextDialog != null)

					mTextDialog.setVisibility(View.INVISIBLE);

				break;

			default:

				setBackgroundResource(R.drawable.bg_sidebar);

				if (oldChoose != letterPos)

				{

					if (letterPos >= 0 && letterPos < b.length)

					{

						if (changedListener != null)

							changedListener.onTouchingLetterChanged(b[letterPos]);

						if (mTextDialog != null)

						{

							mTextDialog.setText(b[letterPos]);

							mTextDialog.setVisibility(View.VISIBLE);

						}

						choose = letterPos;

						invalidate();

					}

				}

				break;

		}

		return true;

	}

	public void setOnTouchingLetterChangedListener(OnTouchingLetterChangedListener changedListener)

	{

		this.onTouchingLetterChangedListener = changedListener;

	}

	public interface OnTouchingLetterChangedListener

	{

		public void onTouchingLetterChanged(String str);

	}

}
既然做好了这个,我们就实现这个listView,其实ListView是最好实现的。先定义一个ListView,然后再创一个相应的item的xml。用代码将它们循环一下就好。
下面是item的xml代码:
<?xml version="1.0" encoding="utf-8"?>

<LinearLayout xmlns:android="http://schemas.android.com/apk/res/android"

    android:layout_width="fill_parent"

    android:layout_height="match_parent"

    android:gravity="center_vertical"

    android:orientation="vertical" >

    <TextView

        android:id="@+id/txt_catalog"

        android:layout_width="fill_parent"

        android:layout_height="wrap_content"

        android:layout_weight="1"

        android:paddingBottom="5dp"

        android:paddingTop="5dp"

        android:paddingLeft="12dp"

        android:text="A"

        android:textColor="@color/bluejeff"

        android:drawableBottom="@drawable/line_blue" />

	<RelativeLayout

	    android:layout_width="wrap_content"

	    android:layout_height="wrap_content">

	    <ImageView

	       android:id="@+id/user_head"

	       android:layout_width="wrap_content"

	       android:layout_height="wrap_content"

	       android:layout_marginLeft="12dp"

	       android:layout_marginTop="6dp"

	       android:layout_marginBottom="6dp"

	       android:background="@drawable/bg_border"

	       android:src="@drawable/user_head" />

	    <LinearLayout

	        android:layout_width="match_parent"

	        android:layout_height="wrap_content"

	        android:layout_toRightOf="@id/user_head"

	        android:background="@color/white"

	        android:orientation="vertical">

	         <TextView

		        android:id="@+id/txt_user_name"

		        android:layout_width="wrap_content"

		        android:layout_height="wrap_content"

		        android:textColor="@color/black"

		       	android:layout_marginTop="12dp"

		       	android:layout_marginLeft="10dp"

		       	android:layout_marginBottom="6dp"

		        android:textSize="20sp"

		        android:text="Jeff Lee"/>

	         <TextView

	             android:id="@+id/txt_user_list_info"

	             android:layout_width="wrap_content"

	             android:layout_height="30dp"

	             android:textSize="12sp"

	             android:layout_marginLeft="10dp"

	             android:text="IT部门    信息科"

	             android:textColor="@color/gray" />

	     </LinearLayout>

	    <TextView

	        android:id="@+id/txt_user_id"

	        android:layout_width="wrap_content"

	        android:layout_height="wrap_content"

	        android:textColor="#336598"

	        android:visibility="gone"

	        android:text="1"/>

	</RelativeLayout>

</LinearLayout>
然后我们实现那个搜索框,搜索框其实看上去就是个TextView。所以我们继承TextView的类,并实现焦点控制的监听器等,让这些更好的给我们用。难点也没有,就是那个画出搜索图标而已。代码我下面也给出来了:
最后,大功告成。小结下,其实这个界面还有增加了一个SidleBar。在我们Android UI(三)SlidingMenu实现滑动菜单(详细 官方)这里讲过的。因为user有个组,或是在其中一本电话本里面的。然后一个界面大家别觉得它太麻烦。一个一个来,有成就感。老话说一句呗:打算起手不凡写出鸿篇巨作的人,往往坚持不了完成第一章节。
任何做事都一样,注意细节。一步一步来,Think big, Start small, Scale fast.道理都知道,就去做呗。
四、总结
本章关于云通讯录的界面我会慢慢分享给大家。项目也放在下面的链接供大家下载学习。这个比较难,大家好好看代码吧。关于代码在下面的链接:http://files.cnblogs.com/Alandre/Android05.rar
如以上文章或链接对你有帮助的话,别忘了在文章按钮或到页面右下角点击 “赞一个” 按钮哦。你也可以点击页面右边“分享”悬浮按钮哦,让更多的人阅读这篇文章
Android UI(五)云通讯录项目之联系人列表,带侧滑选择,带搜索框的更多相关文章
- Android UI(四)云通讯录项目之云端更新进度条实现
作者:泥沙砖瓦浆木匠网站:http://blog.csdn.net/jeffli1993个人签名:打算起手不凡写出鸿篇巨作的人,往往坚持不了完成第一章节.交流QQ群:[编程之美 365234583]h ...
- iOS开发UI篇 -- UISearchBar 属性、方法详解及应用(自定义搜索框样式)
很多APP都会涉及到搜索框,苹果也为我们提供了默认的搜索框UISearchBar.但实际项目中我们通常需要更改系统默认搜索框的样式.为了实现这一目标,我们需要先搞懂 UISearchBar 的属性及方 ...
- 【转】Android UI 五种布局
在一个Android应用中,Layout是开发中的一个很重要环节,Layout是组成UI不可缺少的一部分. ## Android UI 核心类 在Android应用构建UI的方法有以下几种: 单纯使用 ...
- android学习视频(实战项目演练)
1.基于Android平台实战无线点餐系统(客户端(Client)和服务端(Server))①http://kuai.xunlei.com/d/xmBrDwI8CAAyXVFRa3d②http://k ...
- 十七、Android学习笔记_Android 使用 搜索框
1.在资源文件夹下创建xml文件夹,并创建一个searchable.xml: android:searchSuggestAuthorityshux属性的值跟实现SearchRecentSuggesti ...
- Android学习笔记_79_ Android 使用 搜索框
1.在资源文件夹下创建xml文件夹,并创建一个searchable.xml: android:searchSuggestAuthorityshux属性的值跟实现SearchRecentSuggesti ...
- Android UI 绘制过程浅析(五)自定义View
前言 这已经是Android UI 绘制过程浅析系列文章的第五篇了,不出意外的话也是最后一篇.再次声明一下,这一系列文章,是我在拜读了csdn大牛郭霖的博客文章<带你一步步深入了解View> ...
- 【Android UI设计与开发】第05期:引导界面(五)实现应用程序只启动一次引导界面
[Android UI设计与开发]第05期:引导界面(五)实现应用程序只启动一次引导界面 jingqing 发表于 2013-7-11 14:42:02 浏览(229501) 这篇文章算是对整个引导界 ...
- Android向手机通讯录中的所有的联系人(包括SIM卡),向手机通讯录中插入联系人
package com.example.myapi.phonepersion; import java.util.ArrayList; import java.util.List; import an ...
随机推荐
- 批处理-Java JDK环境变量配置
setx /M JAVA_HOME "C:\Program Files\Java\jdk1.8.0_131" setx /M CLASSPATH ".;%%JAVA_HO ...
- 解决在静态页面上使用动态参数,造成spider多次和重复抓取的问题
我们在使用百度统计中的SEO建议检查网站时,总是发现“静态页参数”一项被扣了18分,扣分原因是“在静态页面上使用动态参数,会造成spider多次和重复抓取”.一般来说静态页面上使用少量的动态参数的话并 ...
- C++ STL next_permutation(快速排列组合)
排列组合必备!! https://blog.csdn.net/bengshakalakaka/article/details/78515480
- scrapy的基础概念和流程
1. 什么是scrapy Scrapy是一个为了爬取网站数据,提取结构性数据而编写的应用框架,我们只需要实现少量的代码,就能够快速的抓取. Scrapy 使用了Twisted['twɪstɪd]异步网 ...
- ICO图标下载地址
http://findicons.com/ http://www.iconfont.cn/
- 26.HashCode
在前面三篇博文中讲解了(HashMap.HashSet.HashTable),在其中不断地讲解他们的put和get方法,在这两个方法中计算key的hashCode应该是最重要也是最精华的部分,所以 ...
- Stacking Plates(存档待续.....(没有写思路和程序))
问题描述 盘子装运公司是一家网络零售商,顾名思义,是一家只销售盘子的公司.该公司销售的盘子由不计其数的生产厂商提供,品种是全宇宙最多的,为此公司的员工倍感自豪. 在最近的一次成本分析中,公司员工发现, ...
- TextView文字描边实现
TextView文字描边实现 需求描述 文字显示在图片的上面,图片的内容是不确定了,为了防止文字与图片的颜色相近导致用户看不到或者看不清文字的问题,所以显示文字描边,避免问题. 实现 实现思想 使用T ...
- 第48节:Java当中的集合框架
Java当中的集合框架 01 在我们班里有50位同学,就有50位对象. // 简书作者:达叔小生 Student[] stus = new Student[20]; 结果来了一位插班生,该同学因为觉得 ...
- CSS3——:nth-child选择器基本用法简述
注:n 是从1开始的 :nth-child 是 CSS3 提供的一个好用的选择器,因为在项目中经常用到,所以简单总结了它的常用方法 下面示例代码截图用的是同一个例子,p元素的父元素都是body p ...