Vue:生命周期
一、什么是vue的生命周期
Vue中的生命周期是指组件从创建到销毁的一系列过程。看下面这张官方文档的图:
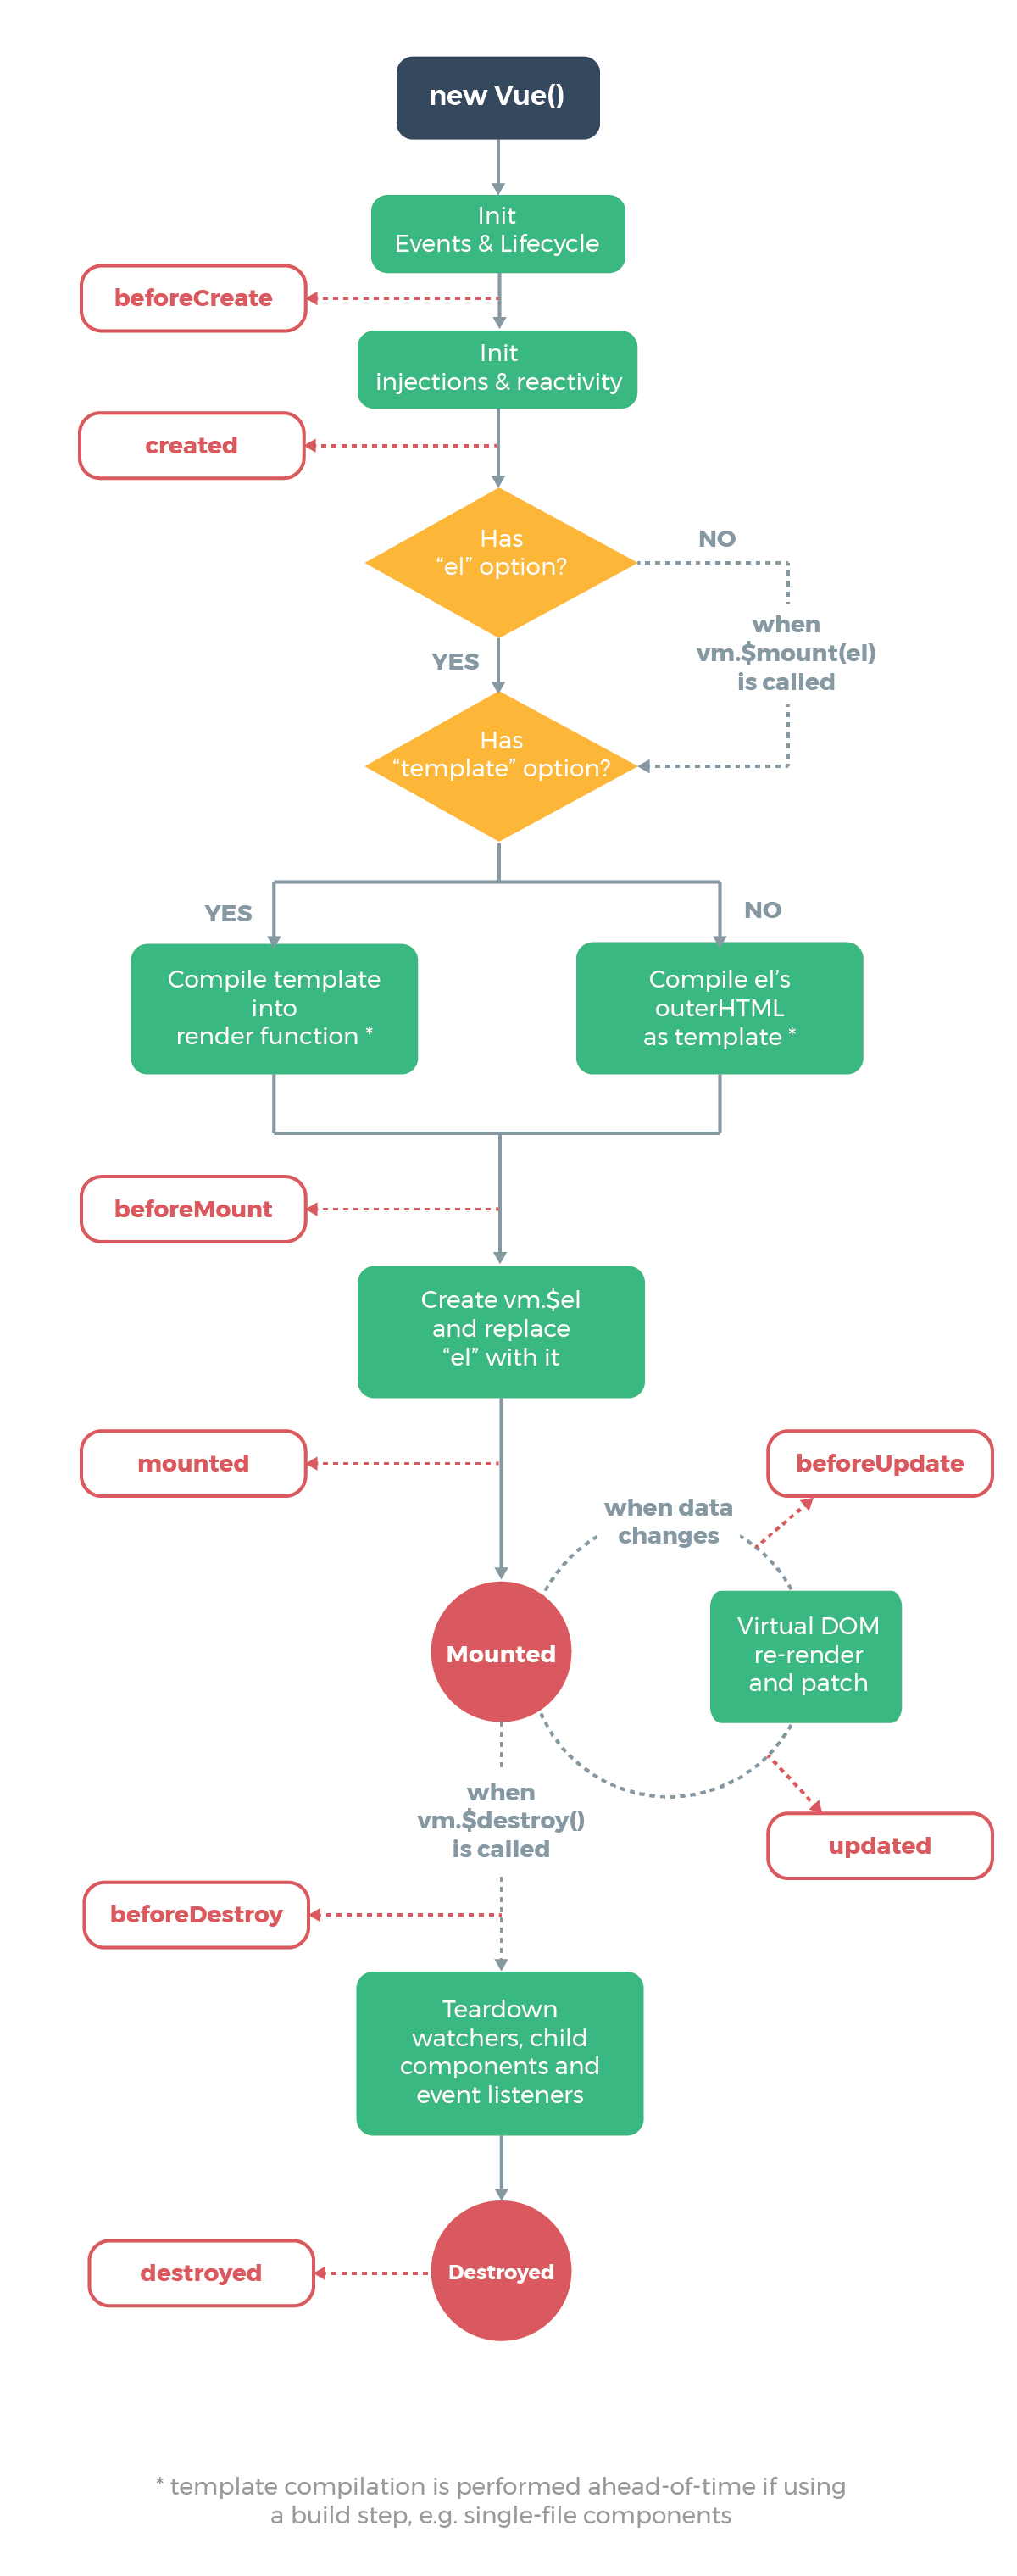
从图片中可以看出Vue的整个生命周期包括8个状态,按照先后顺序分别为:
- beforeCreate
- Created
- beforeMount
- mounted
- beforeUpdate
- updated
- beforeDestroy
- destroyed
Vue组件的生命周期共分为三个阶段,如下图所示:
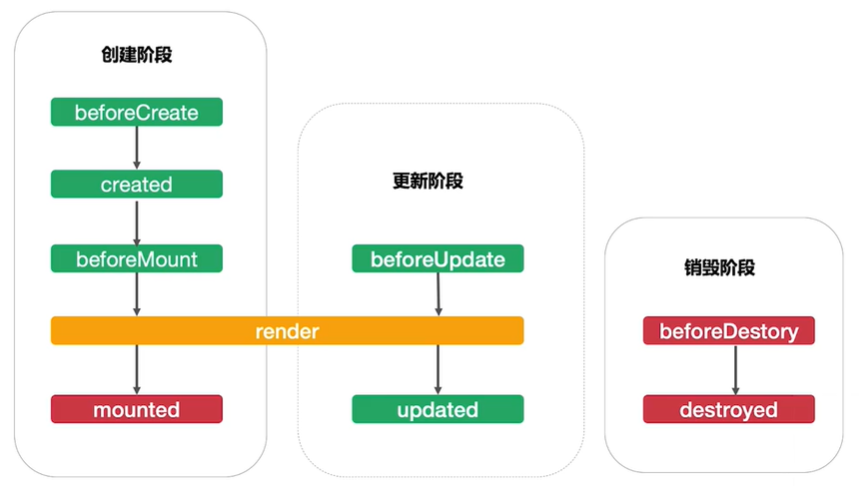
创建阶段和销毁阶段在组件的生命周期中只会执行一次,而更新阶段会执行多次。
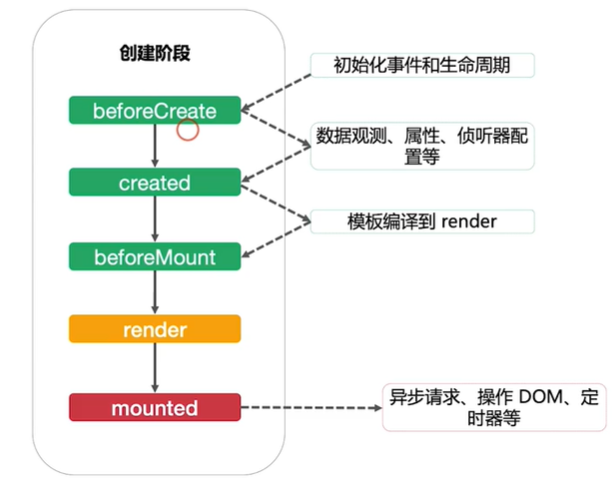
先看一下创建阶段完成的事情:
在看更新阶段完成的事情:

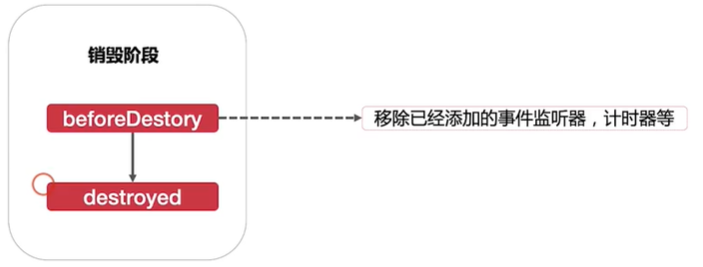
最后在看一下销毁阶段完成的事情:
先看下面的一段代码:
<!DOCTYPE html>

<html lang="en">

<head>

    <meta charset="UTF-8">

    <meta name="viewport" content="width=device-width, initial-scale=1.0">

    <meta http-equiv="X-UA-Compatible" content="ie=edge">

    <title>生命周期</title>

    <!--引入vue.js-->

    <script src="./js/vue.js" ></script>

    <script>

        window.onload=function(){

            new Vue({

                el:'#app',// 2.0不允许挂载到html,body元素上

                data:{

                    msg:'welcome'

                },

                methods:{

                    update(){

                        this.msg="欢迎";

                    },

                    destroy(){

                        this.$destroy();

                    }

                },

                //创建前状态  el和data并未初始化

                beforeCreate(){

                    console.group('------beforeCreate创建前状态------');

                    console.log("%c%s", "color:red" , "el     : " + this.$el); //undefined

                    console.log("%c%s", "color:red","data   : " + this.$data); //undefined

                    console.log("%c%s", "color:red","message: " + this.msg)

                    console.log('组件实例刚刚创建,还未进行数据观测和事件配置');

                },

                created(){//常用  创建完毕状态   完成了data数据的初始化  el没有

                    console.group('------created创建完毕状态------');

                    console.log("%c%s", "color:red","el     : " + this.$el); //undefined

                    console.log("%c%s", "color:red","data   : " + this.$data); //已被初始化

                    console.log("%c%s", "color:red","message: " + this.msg); //已被初始化

                    console.log("实例已经创建完成,并且已经进行数据观测和事件配置")

                },

                beforeMount(){  //挂载前状态 完成了el和data初始化

                    this.msg="112233";

                    console.group('------beforeMount挂载前状态------');

                    console.log("%c%s", "color:red","el     : " + (this.$el)); //已被初始化

                    console.log(this.$el);

                    console.log("%c%s", "color:red","data   : " + this.$data); //已被初始化

                    console.log("%c%s", "color:red","message: " + this.msg); //已被初始化

                    console.log("模板编译之前,还没挂载");

                },

                mounted(){//常用  挂载结束状态  完成挂载

                    console.group('------mounted 挂载结束状态------');

                    console.log("%c%s", "color:red","el     : " + this.$el); //已被初始化

                    console.log(this.$el);

                    console.log("%c%s", "color:red","data   : " + this.$data); //已被初始化

                    console.log("%c%s", "color:red","message: " + this.msg); //已被初始化

                    console.log("模板编译之后,已经挂载,此时才会有渲染页面,才能看到页面上数据的显示")

                },

                beforeUpdate(){   //更新前状态

                    console.group('------beforeUpdate 更新前状态------');

                    console.log("%c%s", "color:red","el     : " + this.$el);

                    console.log(this.$el);

                    console.log("%c%s", "color:red","data   : " + this.$data);

                    console.log("%c%s", "color:red","message: " + this.msg);

                },

                updated(){   //更新完成状态

                    console.group('------updated 更新完成状态------');

                    console.log("%c%s", "color:red","el     : " + this.$el);

                    console.log(this.$el);

                    console.log("%c%s", "color:red","data   : " + this.$data);

                    console.log("%c%s", "color:red","message: " + this.msg);

                },

                beforeDestroy(){   //销毁前状态

                    console.group('------beforeDestroy 销毁前状态------');

                    console.log("%c%s", "color:red","el     : " + this.$el);

                    console.log(this.$el);

                    console.log("%c%s", "color:red","data   : " + this.$data);

                    console.log("%c%s", "color:red","message: " + this.msg);

                },

                destroyed(){  //销毁完成状态

                    console.group('------destroyed 组件销毁完成状态------');

                    console.log("%c%s", "color:red","el     : " + this.$el);

                    console.log(this.$el);

                    console.log("%c%s", "color:red","data   : " + this.$data);

                    console.log("%c%s", "color:red","message: " + this.msg)

                }

            });

        }

    </script>

</head>

<body>

    <div id="app">

        <input type="text" v-model="msg" />

        <button @click="update">更新数据</button>

        <button @click="destroy">销毁组件</button>

    </div>

</body>

</html>
在控制台的console里面查看运行后的效果:

然后点击“更新数据”按钮,会看到input绑定的数据发生变化:
数据更新前

数据更新后:

控制台显示的打印信息:

最后点击“销毁组件”按钮,查看控制台显示的打印信息:

这样,一个完整的Vue实例生命周期就结束了。
注意:Vue组件被销毁以后,这时如果在更新数据就不会有任何反应了,因为组件已经被销毁
Vue:生命周期的更多相关文章
- vue生命周期的介绍
<!DOCTYPE html> <html> <head> <meta charset="UTF-8"> <title> ...
- vue 生命周期
一 vue的生命周期如下图所示(很清晰) 二 vue生命周期的栗子 注意触发vue的created事件以后,this便指向vue实例,这点很重要 <!DOCTYPE html> <h ...
- 详解vue生命周期
vue生命周期 @(vue)[生命周期] 前言 在使用vue一个多礼拜后,感觉现在还停留在初级阶段,虽然知道怎么和后端做数据交互,但是对于mounted这个挂载还不是很清楚的.放大之,对vue的生命周 ...
- 关于vue生命周期
官网给出的实例的生命周期图如下: beforeCreate(页面创建前),created(页面创建后),beforeMount(页面载入前),mounted(页面载入后),beforeUpdate(页 ...
- vue生命周期的理解
我从官网上下载了一张vue生命周期的图,接下来实际分析一波vue到底执行了什么东西. 1.我们在使用vue时必不可少的操作就是 var vm = new Vue({}),这样我们就创建了一个vue的实 ...
- Vue生命周期,面试常见问题
一.对于MVVM的理解? MVVM 是 Model-View-ViewModel 的缩写.Model代表数据模型,也可以在Model中定义数据修改和操作的业务逻辑.View 代表UI 组件,它负责将数 ...
- 【Vue笔记】-- 详解vue生命周期
针对于Vue的生命周期进行详细的说明,方面加深对各个方法的引用. 引言: 前几天重新回顾vue官网时,看到vue的生命周期,想着自己用vue开发了快一年了,就总结总结vue知识,再次加深自己对vue的 ...
- 面试题之(vue生命周期)
在面试的时候,vue生命周期被考察的很频繁. 什么是vue生命周期呢? Vue实例有一个完整的生命周期,也就是从开始创建.初始化数据.编译模板.挂载Dom.渲染→更新→渲染.卸载等一系列过程,我们称这 ...
- [转] Vue生命周期
Vue生命周期 这是Vue文档里关于实例生命周期的解释图 那么下面我们来进行测试一下 <section id="app-8"> {{data}} </sectio ...
- vue生命周期、钩子函数
https://segmentfault.com/a/1190000011381906 详解生命周期和钩子函数 每个vue实例再被创建之前都要经过一系列的初始化过程,这个过程就是vue的生命周期 ...
随机推荐
- Python应用——自定义函数:分割PDF文件函数
案例 将一个 pdf 文件按要求分割为几个部分.比如说一个pdf有20页,分成5个pdf文件,每个pdf文件包含4页.设计函数实现? Python代码 from PyPDF2 import PdfFi ...
- 潭州课堂25班:Ph201805201 django框架 第一课 环境搭建 (课堂笔记)
在虚拟机中创建虚拟环 mkvirtualenv -p /usr/bin/python3 djtest mkvirtualenv 是创建命令, -p /usr/bin/python3 是指定在 pyt ...
- Linux下载软件
.yum yum install tree yum install telnet 直接安装与更新 .查询软件是否装上 rpm -qa tree telnet .查询软件包的内容 rpm -ql tre ...
- ReactNative bug:Application XXX has not bean registered.
故障现象 当react-native init新项目之后运行react-native run -android/ios时手机报错 Application XXX has not bean regist ...
- BZOJ4855 : [Jsoi2016]轻重路径
首先用树状数组维护dfs序来快速支持一个点子树大小的询问. 每次删掉一个叶子时,从根开始往叶子走,显然只有$2size[x]\leq size[father]$的点的父亲才有可能换重儿子. 从根开始往 ...
- BZOJ2670 : Almost
求出前缀和$s[]$,那么区间$[l,r]$的几乎平均数$=\frac{s[r]-s[l-1]}{r-l}$. 若只有一个询问,那么可以维护$(i,s[i-1])$的凸壳,在凸壳上二分点$(i,s[i ...
- redis:sentinel监控服务器
1. Sentinel工具完成监控--操作步骤 (1)把redis解压包中的sentinel.conf拷贝到redis的安装目录下: [root@192 redis]# cp /opt/redis-4 ...
- Understanding Built-In User and Group Accounts in IIS 7
Understanding Built-In User and Group Accounts in IIS 7 By lzb October 19, 2018 Introduction In earl ...
- 5、css补充
css其余问题补充 本篇导航: 默认的高度和宽度问题 后台管理布局 css响应式布局 一.默认的高度和宽度问题 1.父子都是块级元素 <!DOCTYPE html> <html> ...
- pygame 笔记-5 模块化&加入敌人
上一节,已经用OOP方法,把几个类抽象出来了,但是都集中在一个.py文件中,代码显得很冗长,这一节复用模块化的思想,把这个大文件拆分成几个小文件: 先把主角Player单独放到一个文件player.p ...