纯javaScript、jQuery实现个性化图片轮播
纯javaScript实现个性化图片轮播
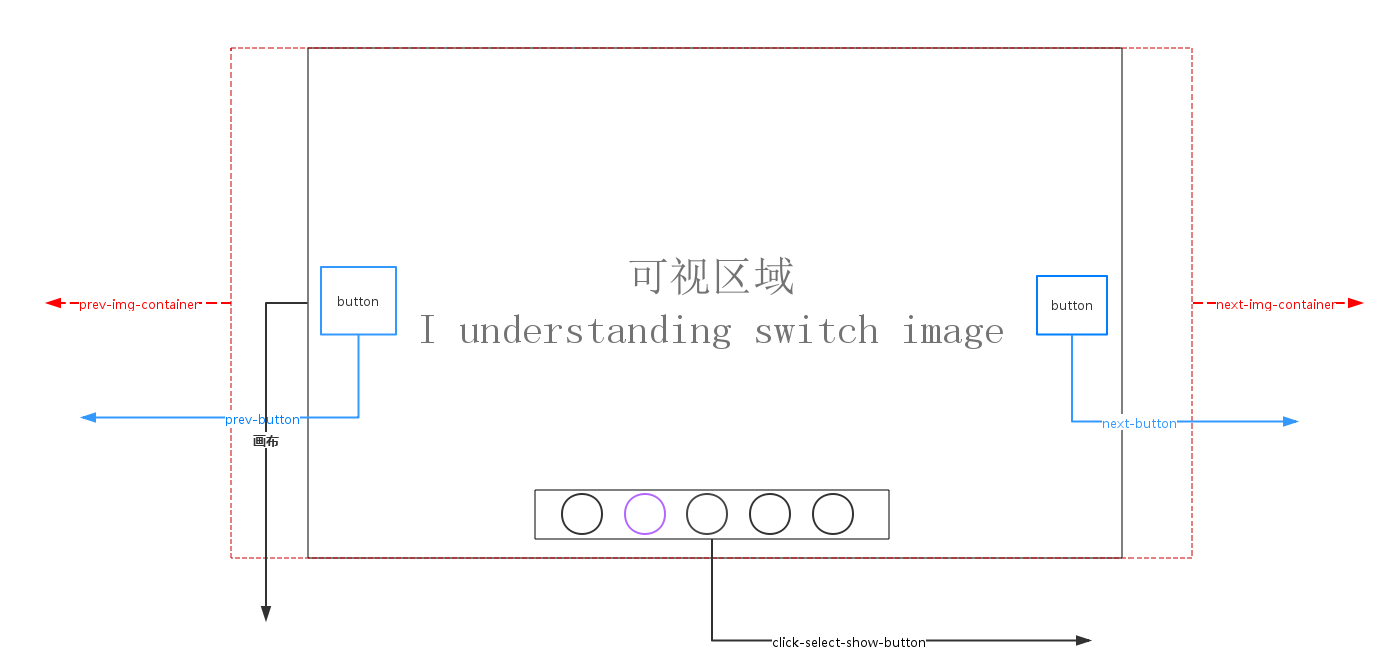
轮播原理说明<如上图所示>:
1. 画布部分(可视区域)属性说明:overflow:hidden使得超出画布部分隐藏或说不可见。position:relative 会导致自身位置的相对变化,而不会影响其他元素的位置、大小的变化。使得使用了position:absolute 元素相对于画布位置进行定位;
absolute元素脱离了文档结构,产生破坏性,导致父元素坍塌,float元素也会脱离文档结构,absolute元素会悬浮在页面上方,遮挡其他部分显示,这点和PhotoShop图层相似,所以要使用z-index控制出现顺序
2.轮播注意点:左右无限滚动
prev-button 第一张图片的前一张是最后一张图片,
next-button 最后一张图片的下一张图片是第一张,
prev-button、next-button位置的偏移是通过设置prev-img-container、next-img-container的left<相对于画布>属性值
click-select-show-button区域,点击该区域小圆圈是通过上一次图片的所在index,当前点击myIndex, 计算公式:(myIndex-index)*(-图片的宽度width)
3.动画过渡注意点:点击prev-button、next-button、click-select-show-button小圆圈,判定当前是否处于动画状态中
4.定时器setTimeout()、clearTimeout
<实现效果图>

Css样式
/**CSS-style**/

/**画布大小*/

#container {

    margin: auto;

    width: 600px;

    height: 400px;

    overflow: hidden;/*超出画布部分隐藏*/

    position: relative;/*相对定位*/

    cursor: pointer;

}

/**图片容器*/

#list {

    width: 4200px;

    height: 400px;

    position: absolute;

    z-index:;

}

#list img { float: left; }

/**轮播选中按钮样式*/

#button {

 position: absolute;

 bottom: 25px;

 left: 175px;

 width: 250px;

 z-index: ;

}

#button ul li {

  list-style: none;

  width: 15px;

  border-radius: %;

  padding: .5px;

  height: 15px;

  margin-right: 10px;

  background: green;

  float: left;

  font:15px/15px "microsoft yahei";

  text-align: center;

  font-weight: bold;

  color: white;

  cursor: pointer;

}

#button ul li.chos {

    background: orange;

}

#container:hover .arrow{

    display: block;

}

#pre {

    left: 20px;

}

#next {

    right: 20px;

}

/**pre next定位*/

.arrow {

    position: absolute;

    width: 40px;

    height: 40px;

    background: black;

    z-index: ;

    top: 180px;

    text-decoration: none;

    text-align: center;

    line-height: 40px;

    font-size: 40px;

    color: white;

    opacity: 0.3;

    filter: alpha(opacity=0.3);

    display: none;

}

/**pre next按钮透明度*/

#container a:hover {

    opacity: 0.7;

    filter: alpha(opacity=0.7);

}
html代码
 <!DOCTYPE html>

 <html lang="en">

 <head>

     <meta charset="UTF-8">

     <title>纯javaScript实现个性化图片轮播</title>

     <link rel="stylesheet" type="text/css" href="styles/main.css">

     <script type="text/javascript" src="scripts/scroImg.js"></script>

 </head>

 <body>

     <div id="container">

         <div id="list" style="left:-600px">

             <img src="data:images/5.jpg">

             <img src="data:images/1.jpg">

             <img src="data:images/2.jpg">

             <img src="data:images/3.jpg">

             <img src="data:images/4.jpg">

             <img src="data:images/5.jpg">

             <img src="data:images/1.jpg">

         </div>

         <div id="button">

             <ul>

                 <li index=''></li>

                 <li index=''></li>

                 <li index=''></li>

                 <li index=''></li>

                 <li index=''></li>

             </ul>

         </div>

         <a href="#" class="arrow" id="prev"><</a>

         <a href="#" class="arrow" id="next">></a>

     </div>

 </body>

 </html>
一、javaScript实现图片轮播
 window.onload=function(){

     var container=document.getElementById('container');

     var list=document.getElementById('list');

     var buttons=document.getElementById('button').getElementsByTagName('li');

     var prev=document.getElementById('prev');

     var next=document.getElementById('next');

     var index=;

     var interval=;

     var timer=null;

     var animated=false;

     //next

     next.onclick=function(){

         if (!animated) {

             animate(-);

         };

         index+=;

         if (index>) {

             index=;

         };

         showButton();

         console.info('next'+index);

     }

     //prev

     prev.onclick=function(){

         if(!animated){

             animate();

         }

         index-=;

         if(index<){

             index=;

         }

         showButton();

         console.info('prev'+index);

     }

     //animate

     function animate(offset){

         animated=true;

         var left=parseInt(list.style.left)+offset;

         var animateTime=;//位移总时间

         var interval=;//时间间隔

         var speed=offset/(animateTime/interval);//每次位移量

         var go=function(){//animate内部函数

             if ((speed< && parseInt(list.style.left)>left) ||  (speed> && parseInt(list.style.left)<left)) {//是否位移

                 list.style.left=parseInt(list.style.left)+speed+'px';

                 setTimeout(go,interval)

             }else{

                 list.style.left=left+'px';

                 if (left<-) { //最后一张后面

                     list.style.left=-+'px'; //显示前一张

                 };

                 if(left>-){//第一张最前面

                     list.style.left=-+'px';//显示最后一张

                 }

                 animated=false;

             };

         }

         go();

     }

     //chos

     function showButton(){

         for (var i = ; i < buttons.length; i++) {

             buttons[i].className='';

         };

         buttons[index-].className='chos';

     }

     //buttons-click

     for (var i = ; i < buttons.length; i++) {

         buttons[i].onclick=function(){

             if(this.className=='chos'){

                 return;

             }

             var myIndex=parseInt(this.getAttribute('index'));

             var offset=(myIndex-index)*-; //偏移量

             animate(offset);

             index=myIndex;//set Index

             showButton();

         }

     };

     function play(){

         timer=setTimeout(function(){

             next.click();

             play();

         },interval)

     }

     function stop(){

         clearInterval(timer);

     }

     play();

     container.onmouseover=function(){

         stop();

     }

     container.onmouseout=function(){

         play();

     }

 }
二、jQuery实现图片轮播
  $(function () {

         var container = $('#container');

         var list = $('#list');

         var buttons = $('#container').find('li');

         var prev = $('#pre');

         var next = $('#next');

         var index = ;

         var len = ;

         var interval = ;

         var timer;

         function animate (offset) {

             var left = parseInt(list.css('left')) + offset;

             if (offset>) {

                 offset = '+=' + offset;

             }

             else {

                 offset = '-=' + Math.abs(offset);

             }

             list.animate({'left': offset}, , function () {

                 if(left > -){

                     list.css('left', - * len);

                 }

                 if(left < (- * len)) {

                     list.css('left', -);

                 }

             });

         }

         function showButton() {

             buttons.eq(index-).addClass('chos').siblings().removeClass('chos');

         }

         function play() {

             timer = setTimeout(function () {

                 next.trigger('click');

                 play();

             }, interval);

         }

         function stop() {

             clearTimeout(timer);

         }

         next.bind('click', function () {

             if (list.is(':animated')) {

                 return;

             }

             if (index == ) {

                 index = ;

             }

             else {

                 index += ;

             }

             animate(-);

             showButton();

         });

         prev.bind('click', function () {

             if (list.is(':animated')) {

                 return;

             }

             if (index == ) {

                 index = ;

             }

             else {

                 index -= ;

             }

             animate();

             showButton();

         });

         buttons.each(function () {

              $(this).bind('click', function () {

                  if (list.is(':animated') || $(this).attr('class')=='chos') {

                      return;

                  }

                  var myIndex = parseInt($(this).attr('index'));

                  var offset = - * (myIndex - index);

                  animate(offset);

                  index = myIndex;

                  showButton();

              })

         });

         container.hover(stop, play);

         play();

 });
学习网慕课网 http://www.imooc.com/video/665
源码下载 http://pan.baidu.com/s/1i4VA009
纯javaScript、jQuery实现个性化图片轮播的更多相关文章
- 使用javascript,jquery实现的图片轮播功能
使用javascript,jquery实现的图片轮播功能本功能采用最基础的javascript和一些简单的jquery技术实现,易理解,以修改使用,代码简易,适合刚开始接触到网站开发的朋友们参考.可以 ...
- jQuery个性化图片轮播效果
jQuery个性化图片轮播效果 购物产品展示:图片轮播器<效果如下所示> 思路说明: 每隔一段时间,实现图片的自动切换及选项卡选中效果,鼠标划入图片动画停止,划出或离开动画开始 两个区域: ...
- jQuery轻量级京东图片轮播代码等
http://sc.chinaz.com/jiaoben/jiaodiantu.html jQuery轻量级京东图片轮播代码 查看全图点击预览 顶(17)踩(4)报错评论(0)下载地址 更新时间: ...
- JQuery插件之图片轮播插件–slideBox
来源:http://www.ido321.com/852.html 今天偶然发现了一个比较好用的图片轮播插件—slideBox 先看看效果:http://slidebox.sinaapp.com/ 代 ...
- js/jquery中实现图片轮播
一,jquery方法 <!DOCTYPE html> <html> <head> <meta http-equiv="Content-Type&qu ...
- JQuery slidebox实现图片轮播
jQuery图片轮播(焦点图)插件jquery.slideBox,简单设置下参数就可以多个多种动画效果,左右,上下,速度,还可指定默认显示第N张,点击的按钮在现代浏览中可以实现圆形或圆角效果,插件代码 ...
- JavaScript对象(document对象 图片轮播)
图片轮播: 需要注意的HTML需要img标签,他和input标签一样,是非封闭的标签 <!DOCTYPE html PUBLIC "-//W3C//DTD XHTML 1.0 Tran ...
- JQuery插件开发初探——图片轮播
在熟悉了插件开发的结构以后,自己尝试着做了一个稍微复杂一点的小功能:图片轮播插件. 由于之前使用的一款图片轮播插件,性能不高,页面加载的时候需要载入全部的图片,因此速度很慢. 通过自己做这个小插件,能 ...
- 超实用的JavaScript代码段 Item3 --图片轮播效果
图片轮播效果 图片尺寸 统一设置成:490*170px; 一.页面加载.获取整个容器.所有放数字索引的li及放图片列表的ul.定义放定时器的变量.存放当前索引的变量index 二.添加定时器,每隔2秒 ...
随机推荐
- Python 爬虫模拟登陆知乎
在之前写过一篇使用python爬虫爬取电影天堂资源的博客,重点是如何解析页面和提高爬虫的效率.由于电影天堂上的资源获取权限是所有人都一样的,所以不需要进行登录验证操作,写完那篇文章后又花了些时间研究了 ...
- 深入理解DIP、IoC、DI以及IoC容器
摘要 面向对象设计(OOD)有助于我们开发出高性能.易扩展以及易复用的程序.其中,OOD有一个重要的思想那就是依赖倒置原则(DIP),并由此引申出IoC.DI以及Ioc容器等概念.通过本文我们将一起学 ...
- ABP文档 - 本地化
文档目录 本节内容: 简介 应用语言 本地化源 XML文件 注册XML本地化源 JSOn文件 注册JSON本地化源 资源文件 自定义源 获取一个本地文本 在服务端 在MVc控制器里 在MVC视图里 在 ...
- eclipse 快捷键大全
注:因eclipse版本.电脑配置等原因 有些快捷键可能导致不可用(遇到些许问题可在下方评论) [Ct rl+T] 搜索当前接口的实现类 1. [ALT +/] 此快捷键为用户编辑的好帮手,能为 ...
- C++中的命名空间
一,命名空间(namespace)的基本概念以及由来 1.什么是标识符: 在C++中,标识符可以是基本的变量,类,对象,结构体,函数,枚举,宏等. 2.什么是命名空间: 所谓的命名空间是指标识符的可见 ...
- java时间
Calendar.getInstance().getTime() 获取当前时间(包括星期和时区 CST China Standard Time): Fri Jan 06 21:03:36 CST 2 ...
- 【Java每日一题】20170104
20170103问题解析请点击今日问题下方的"[Java每日一题]20170104"查看(问题解析在公众号首发,公众号ID:weknow619) package Jan2017; ...
- Android中AlarmManager使用示例(持续更新,已经更改)
现在普遍的手机都会有一个闹钟的功能,如果使用Android来实现一个闹钟可以使用AtarmManager来实现.AtarmManager提供了一种系统级的提示服务,允许你安排在将来的某个时间执行一个服 ...
- MongoDB常用操作--集合1
1.创建集合有两种方式,显示创建和隐式创建 显示创建可以使用命令 db.createCollection("集合名称") 隐式创建可以使用命令 db.集合名称.insert({}) ...
- crontab介绍
1.Cron的启动与关闭 由于Cron是Linux的内置服务,可以用以下的方法启动.关闭这个服务: /sbin/service crond start //启动服务/sbin/se ...