Javascript图片裁切
最近浏览了不少网站的图片裁切效果,大部分的做法如下图所示(借用一张脚本之家的图片),通过改变裁切框的大小来选取合适的位置。

但本文介绍的是另外一种裁切方式,裁切框由开发者决定,图片大小由用户决定,通过缩放、拖动图片来选取合适位置,并且在这一过程中始终保持图片宽高比,demo如下。
这样做法主要有以下优点:
- 裁切框的宽高与跟实际使用的处宽高比一致,防止出现图片变形问题
- 不限制图片的显示大小,保证图片原始比例,通过缩放可得到原始尺寸
- 对于局部的裁切更加友好,比如截取一张高清图片中很小的一个部位,我们只需将图片放大并拖动到裁切框内即可,而其他方式需要将裁切框调整的非常小,不利于用户操作
说完了有点也该说说缺点,缺点就是难度增大了一个数量级。。。。
主要实现思路:
- 将两张图片绝对定位
- 一张放在裁切框内一张放在裁切框外并设置透明效果,裁切框overflow为hidden
- 鼠标操作过程中时刻保持两张图片的绝对同步。
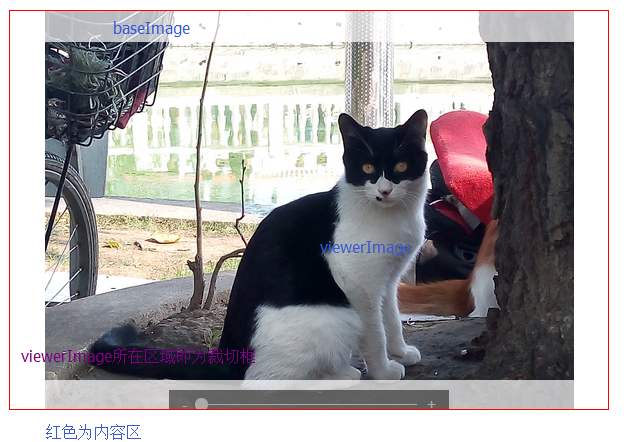
 <div class="jimu-crop-image" data-dojo-attach-point="cropSection">

     <div class="viewer-box" data-dojo-attach-point="viewerBox">

         <div class="viewer-content" data-dojo-attach-point="viewerContent">

             <img class="viewer-image hide-image" data-dojo-attach-point="viewerImage" src="">

         </div>

         <img class="base-image hide-image" data-dojo-attach-point="baseImage" data-dojo-attach-event="mousedown:_onViewerMouseDown,mouseup:_onViewerMouseUp">

         <div class="controller">

             <div class="zoom-out" data-dojo-attach-event="click:_onZoomOutClick">-</div>

             <div class="slider" data-dojo-attach-point="sliderNode">

                 <div class="button" data-dojo-attach-point="sliderButton" data-dojo-attach-event="mousedown:_onSliderMouseDown,mouseup:_onSliderMouseUp"></div>

                 <div class="horizontal"></div>

             </div>

             <div class="zoom-in" data-dojo-attach-event="click:_onZoomInClick">+</div>

         </div>

     </div>

 </div>
初始工作:
首先在postCreate中绑定document的mousemove跟mousedown事件,在鼠标离开工作区后仍可以继续拖动或缩放。startup中利用计时器获取image的原始宽度,据此来判断图片是否加载完毕。不熟悉dojo的道友只要知道postCreate会在startup之前执行即可。
postCreate: function() {

    this._dragingHandlers = [];

    this.setImageSrc(this.imageSrc);

    this.own(on(this.ownerDocument, 'mousemove', lang.hitch(this, '_onMouseMove')));

    this.own(on(this.ownerDocument, 'mouseup', lang.hitch(this, '_onMouseUp')));

    this.loadingImg.src = require.toUrl('jimu') + '/images/loading.gif';

},

startup: function() {

    var timeOut = /data:image\/(.*);base64/.test(this.imageSrc) ? 50 : 500;

    var tic = lang.hitch(this, function() {

        var imageStyle = this._getComputedStyle(this.baseImage);

        var imageWidth = parseFloat(imageStyle.width);

        console.log('image width', imageWidth);

        // debugger;

        if (isFinite(imageWidth) && imageWidth > 0) {

            this._init();

            html.setStyle(this.loadingImg, 'display', 'none');

        } else {

            setTimeout(tic, timeOut);

        }

    });

    setTimeout(tic, timeOut);

},
_init函数做了以下几件事:
1、获取图片的原始尺寸,后续计算缩放因子时会用到
var cropSectionStyle = this._getComputedStyle(this.cropSection);

var cropSectionContentBox = html.getContentBox(this.cropSection);

var imageStyle = this._getComputedStyle(this.baseImage);

var imageWidth = parseFloat(imageStyle.width) || this.baseImage.offsetWidth;

var imageHeight = parseFloat(imageStyle.height) || this.baseImage.offsetHeight;

var imageRadio = imageWidth / imageHeight;

this._maxImageWidth = imageWidth;

this._maxImageHeight = imageHeight;

if (imageHeight < this.realHeight && imageWidth < this.realWidth) {

    alert('image is too smaller to display');

    return;
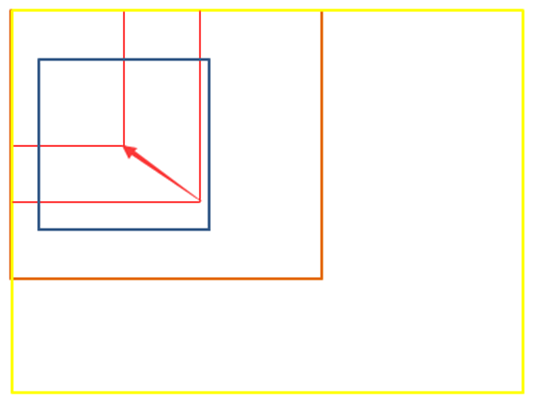
2、在保证裁切区域宽高比的情况下,让裁切区域尽量的填满工作区。
这里裁切工作最重要的就是防止图片变形,所以只要保证宽高比一致可以将裁切区域适当放大。cropSectionContentBox是当前工作区的content区域,假设用户设置裁切框的宽度大于高度,对于实际出现在页面中的裁切框宽、高,我们从数值较小的高度来找起,找到合适的高度将宽度按原比例放大即可。
如果将裁切框高度设置与工作区高度相同,判断裁切区宽度是否超出工作区,没有则裁切区高度等于工作区高度。若超过,则在0~cropSectionContentBox.h中找一个数,保证在该高度下,裁切区宽度尽量接近工作区。这样我们找到一个可以尽量覆盖工作区的裁切框。
高度大于宽度时的处理类似。
//create a box which keep the ratio of width and height to full fill the content of popup

this.idealWidth = this.realWidth;

this.idealHeight = this.realHeight;

this.ratio = this.ratio ? this.ratio : this.realWidth / this.realHeight;

var _ratio = this.ratio;

if (this.ratio >= 1) {

    if (cropSectionContentBox.h * this.ratio <= cropSectionContentBox.w) {

        this.idealHeight = cropSectionContentBox.h;

        this.idealWidth = cropSectionContentBox.h * this.ratio;

    } else {

        this.idealHeight = this._findProperlyValue(0, cropSectionContentBox.h, cropSectionContentBox.w - 5, function(p) {

            return p * _ratio;

        });

        this.idealWidth = this.idealHeight * this.ratio;

    }

} else {

    if (cropSectionContentBox.w / this.ratio <= cropSectionContentBox.h) {

        this.idealWidth = cropSectionContentBox.w;

        this.idealHeight = cropSectionContentBox.w / this.ratio;

    } else {

        this.idealWidth = this._findProperlyValue(0, cropSectionContentBox.w, cropSectionContentBox.h - 5, function(p) {

            return p / _ratio;

        });

        this.idealHeight = this.idealWidth / this.ratio;

    }

}
3、保持图片原始宽高比的前提下,让图片尽量接近裁切框
该过程与上文将裁切框尽量填充工作区的处理类似,区别在上上文是填充这里是覆盖,所以判断条件要变一下。如果图片宽度大于高度,寻找一个高度使得断按比例缩放后的宽度是否能够覆盖裁切框的宽度,首先考虑裁切框高度,不满足的话从0~idealWidth中找到一个值;这里不用担心图片超出工作区,只需要找到一个合适高度即可。
// keep original ratio of image

if (imageRadio >= 1) {

    if (this.idealHeight * imageRadio >= this.idealWidth) {

        html.setStyle(this.viewerImage, 'height', this.idealHeight + 'px');

        html.setStyle(this.baseImage, 'height', this.idealHeight + 'px');

    } else {

        var properlyHeight = this._findProperlyValue(0, this.idealWidth, this.idealWidth, function(p) {

            return p * imageRadio;

        });

        html.setStyle(this.viewerImage, 'height', properlyHeight + 'px');

        html.setStyle(this.baseImage, 'height', properlyHeight + 'px');

    }

} else {

    if (this.idealWidth / imageRadio >= this.idealHeight) {

        html.setStyle(this.viewerImage, 'width', this.idealWidth + 'px');

        html.setStyle(this.baseImage, 'width', this.idealWidth + 'px');

    } else {

        var properlyWidth = this._findProperlyValue(0, this.idealHeight, this.idealHeight, function(p) {

            return p / imageRadio;

        });

        html.setStyle(this.viewerImage, 'width', properlyWidth + 'px');

        html.setStyle(this.baseImage, 'width', properlyWidth + 'px');

    }

}
3、以上计算完成后设置图片初始位置,让裁切框相对图片居中
imageStyle = this._getComputedStyle(this.baseImage);

imageWidth = parseFloat(imageStyle.width) || this.baseImage.offsetWidth;

imageHeight = parseFloat(imageStyle.height) || this.baseImage.offsetHeight;

this._minImageWidth = imageWidth;

this._minImageHeight = imageHeight;

this._currentImageWidth = imageWidth;

this._currentImageHeight = imageHeight;

this._currentTop = -(imageHeight - this.idealHeight) / 2;

this._currentLeft = -(imageWidth - this.idealWidth) / 2;

html.setStyle(this.baseImage, {

    top: this._currentTop + 'px',

    left: this._currentLeft + 'px'

});

html.setStyle(this.viewerImage, {

    top: this._currentTop + 'px',

    left: this._currentLeft + 'px'

});
4、如果原始裁切区域很小,经过上述步骤后工作区内的裁切框会比原始框大,这时上传一张小图片,在工作区内这张图片有可能被拉伸,这种情况下隐藏缩放功能
//sometimes zoomratio < 1; it's should be not allowed to zoom

this._zoomRatio = this._maxImageWidth / this._minImageWidth;

if (this._zoomRatio < 1) {

    html.setStyle(this.zoomController, 'display', 'none');

}

if (!this._latestPercentage) {

    this._latestPercentage = 0;

}
第一个重要过程结束了,这是整个过程的完整代码:
 _init: function() {

                 var cropSectionStyle = this._getComputedStyle(this.cropSection);

                 var cropSectionContentBox = html.getContentBox(this.cropSection);

                 var imageStyle = this._getComputedStyle(this.baseImage);

                 var imageWidth = parseFloat(imageStyle.width) || this.baseImage.offsetWidth;

                 var imageHeight = parseFloat(imageStyle.height) || this.baseImage.offsetHeight;

                 var imageRadio = imageWidth / imageHeight;

                 this._maxImageWidth = imageWidth;

                 this._maxImageHeight = imageHeight;

                 if (imageHeight < this.realHeight && imageWidth < this.realWidth) {

                     alert('image is too smaller to display');

                     return;

                 }

                 //create a box which keep the ratio of width and height to full fill the content of popup

                 this.idealWidth = this.realWidth;

                 this.idealHeight = this.realHeight;

                 this.ratio = this.ratio ? this.ratio : this.realWidth / this.realHeight;

                 var _ratio = this.ratio;

                 if (this.ratio >= 1) {

                     if (cropSectionContentBox.h * this.ratio <= cropSectionContentBox.w) {

                         this.idealHeight = cropSectionContentBox.h;

                         this.idealWidth = cropSectionContentBox.h * this.ratio;

                     } else {

                         this.idealHeight = this._findProperlyValue(0, cropSectionContentBox.h, cropSectionContentBox.w - 5, function(p) {

                             return p * _ratio;

                         });

                         this.idealWidth = this.idealHeight * this.ratio;

                     }

                 } else {

                     if (cropSectionContentBox.w / this.ratio <= cropSectionContentBox.h) {

                         this.idealWidth = cropSectionContentBox.w;

                         this.idealHeight = cropSectionContentBox.w / this.ratio;

                     } else {

                         this.idealWidth = this._findProperlyValue(0, cropSectionContentBox.w, cropSectionContentBox.h - 5, function(p) {

                             return p / _ratio;

                         });

                         this.idealHeight = this.idealWidth / this.ratio;

                     }

                 }

                 html.setStyle(this.viewerBox, {

                     width: this.idealWidth + 'px',

                     height: this.idealHeight + 'px'

                 });

                 var paddingTop = Math.abs((parseFloat(cropSectionStyle.height) - this.idealHeight) / 2);

                 html.setStyle(this.cropSection, {

                     'paddingTop': paddingTop + 'px',

                     'paddingBottom': paddingTop + 'px'

                 });

                 // keep original ratio of image

                 if (imageRadio >= 1) {

                     if (this.idealHeight * imageRadio >= this.idealWidth) {

                         html.setStyle(this.viewerImage, 'height', this.idealHeight + 'px');

                         html.setStyle(this.baseImage, 'height', this.idealHeight + 'px');

                     } else {

                         var properlyHeight = this._findProperlyValue(0, this.idealWidth, this.idealWidth, function(p) {

                             return p * imageRadio;

                         });

                         html.setStyle(this.viewerImage, 'height', properlyHeight + 'px');

                         html.setStyle(this.baseImage, 'height', properlyHeight + 'px');

                     }

                 } else {

                     if (this.idealWidth / imageRadio >= this.idealHeight) {

                         html.setStyle(this.viewerImage, 'width', this.idealWidth + 'px');

                         html.setStyle(this.baseImage, 'width', this.idealWidth + 'px');

                     } else {

                         var properlyWidth = this._findProperlyValue(0, this.idealHeight, this.idealHeight, function(p) {

                             return p / imageRadio;

                         });

                         html.setStyle(this.viewerImage, 'width', properlyWidth + 'px');

                         html.setStyle(this.baseImage, 'width', properlyWidth + 'px');

                     }

                 }

                 query('.hide-status', this.domNode).removeClass('hide-status');

                 imageStyle = this._getComputedStyle(this.baseImage);

                 imageWidth = parseFloat(imageStyle.width) || this.baseImage.offsetWidth;

                 imageHeight = parseFloat(imageStyle.height) || this.baseImage.offsetHeight;

                 this._minImageWidth = imageWidth;

                 this._minImageHeight = imageHeight;

                 this._currentImageWidth = imageWidth;

                 this._currentImageHeight = imageHeight;

                 this._currentTop = -(imageHeight - this.idealHeight) / 2;

                 this._currentLeft = -(imageWidth - this.idealWidth) / 2;

                 html.setStyle(this.baseImage, {

                     top: this._currentTop + 'px',

                     left: this._currentLeft + 'px'

                 });

                 html.setStyle(this.viewerImage, {

                     top: this._currentTop + 'px',

                     left: this._currentLeft + 'px'

                 });

                 //sometimes zoomratio < 1; it's should be not allowed to zoom

                 this._zoomRatio = this._maxImageWidth / this._minImageWidth;

                 if (this._zoomRatio < 1) {

                     html.setStyle(this.zoomController, 'display', 'none');

                 }

                 if (!this._latestPercentage) {

                     this._latestPercentage = 0;

                 }

             },

             _findProperlyValue: function(start, end, value, formatter, tolerance) {

                 tolerance = isFinite(tolerance) ? parseFloat(tolerance) : 1;

                 value = value - tolerance < 0 || value + tolerance < 0 ? tolerance : value;

                 var middle = (start + end) / 2;

                 var formatterValue = formatter(middle);

                 if (formatterValue <= value + tolerance && formatterValue >= value - tolerance) {

                     return middle;

                 } else if (formatterValue > value) {

                     return this._findProperlyValue(start, middle, value, formatter);

                 } else if (formatterValue < value) {

                     return this._findProperlyValue(middle, end, value, formatter);

                 }

             },
平移与缩放:
平移的过程比较简单,只需要记录移动过程中鼠标的相对位置变化,不断改变图片左上角的left跟top即可,在dragstart跟selectstart事件中preventDefault防止出现元素被选中变蓝。
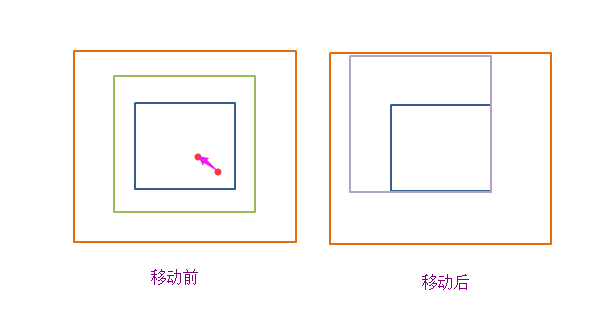
_resetImagePosition: function(clientX, clientY) {

                var delX = clientX - this._currentX;

                var delY = clientY - this._currentY;

                if (this._currentTop + delY >= 0) {

                    html.setStyle(this.baseImage, 'top', 0);

                    html.setStyle(this.viewerImage, 'top', 0);

                    this._currentY = clientY;

                    this._currentTop = 0;

                } else if (this._currentTop + delY <= this._maxOffsetTop) {

                    html.setStyle(this.baseImage, 'top', this._maxOffsetTop + 'px');

                    html.setStyle(this.viewerImage, 'top', this._maxOffsetTop + 'px');

                    this._currentY = clientY;

                    this._currentTop = this._maxOffsetTop;

                } else {

                    html.setStyle(this.baseImage, 'top', this._currentTop + delY + 'px');

                    html.setStyle(this.viewerImage, 'top', this._currentTop + delY + 'px');

                    this._currentY = clientY;

                    this._currentTop += delY;

                }

                if (this._currentLeft + delX >= 0) {

                    html.setStyle(this.baseImage, 'left', 0);

                    html.setStyle(this.viewerImage, 'left', 0);

                    this._currentX = clientX;

                    this._currentLeft = 0;

                } else if (this._currentLeft + delX <= this._maxOffsetLeft) {

                    html.setStyle(this.baseImage, 'left', this._maxOffsetLeft + 'px');

                    html.setStyle(this.viewerImage, 'left', this._maxOffsetLeft + 'px');

                    this._currentX = clientX;

                    this._currentLeft = this._maxOffsetLeft;

                } else {

                    html.setStyle(this.baseImage, 'left', this._currentLeft + delX + 'px');

                    html.setStyle(this.viewerImage, 'left', this._currentLeft + delX + 'px');

                    this._currentX = clientX;

                    this._currentLeft += delX;

                }

            },
缩放的主要原则就是保持裁剪框的中心点在缩放前后的相对位置不变。
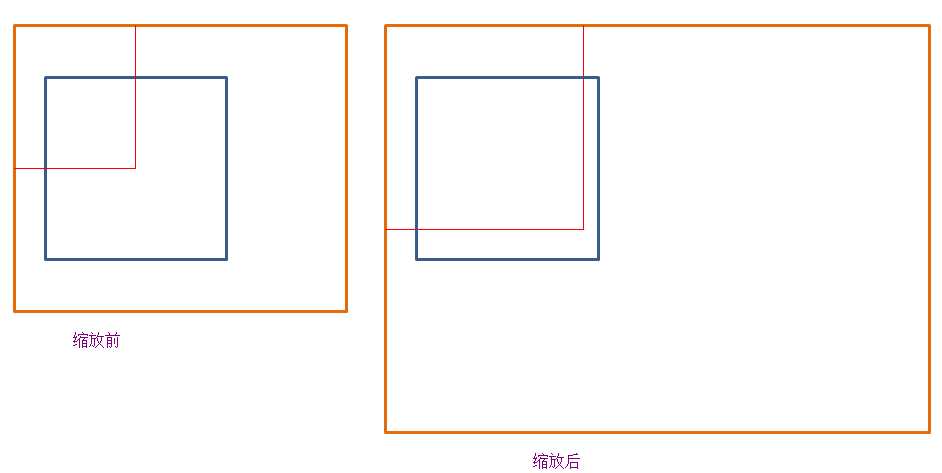
为了将缩放后的原裁切框的中心点移回原位,我们需要计算两中值:图片大小变化量,图片左上角移动量。
var delImageWidth = this._minImageWidth * (this._zoomRatio - 1) * leftPercentage / 100;

var delImageHeight = this._minImageHeight * (this._zoomRatio - 1) * leftPercentage / 100;

var imageStyle = html.getComputedStyle(this.baseImage);

                this._currentLeft = parseFloat(imageStyle.left);

                this._currentTop = parseFloat(imageStyle.top);

var delImageLeft = (Math.abs(this._currentLeft) + this.idealWidth / 2) *

                    ((this._minImageWidth + delImageWidth) / this._currentImageWidth - 1);

var delImageTop = (Math.abs(this._currentTop) + this.idealHeight / 2) *

                    ((this._minImageWidth + delImageWidth) / this._currentImageWidth - 1);
其中_zoomRatio = _maxImageWidth / _minImageWidth; _maxImageWidth为图片原始大小,_minImageWidth是让图片接近裁切框的最小宽度。
leftPercentage为滑动按钮相对滑动条的位移百分比。
_currentLeft、_currentTop是本次缩放前图片相对裁切框的绝对位置(position:absolute)。
_currentImageWidth、_currentImageHeight是本次缩放前图片的大小。
剩下要做的是防止裁切框内出现空白现象,假设用户放大图片,将图片拖放到边界与裁切框边界重合,这时缩小图片的话裁切框内便会出现空白。为了防止这种情况我们也需要做相应处理。
当图片左上边界与裁切框左上边界重合时,无论如何缩小,image的left、top始终为零,只改变图片大小。
当图片右下边界与裁切框右下边界重合时,根据图片大小与裁切框大小可以计算出合适的left跟top
//prevent image out the crop box

                if (leftPercentage - _latestPercentage >= 0) {

                    console.log('zoomin');

                    html.setStyle(this.baseImage, {

                        top: this._currentTop -delImageTop + 'px',

                        left: this._currentLeft -delImageLeft + 'px'

                    });

                    html.setStyle(this.viewerImage, {

                        top: this._currentTop -delImageTop + 'px',

                        left: this._currentLeft -delImageLeft + 'px'

                    });

                } else {

                    console.log('zoomout');

                    var top = 0;

                    var left = 0;

                    if (this._currentTop - delImageTop >= 0) {

                        top = 0;

                    } else if (this._currentTop - delImageTop +

                        this._minImageHeight + delImageHeight <=

                        this.idealHeight) {

                        top = this.idealHeight - this._minImageHeight - delImageHeight;

                    } else {

                        top = this._currentTop - delImageTop;

                    }

                    console.log(this._currentLeft, delImageLeft);

                    if (this._currentLeft - delImageLeft >= 0) {

                        left = 0;

                    } else if (this._currentLeft - delImageLeft +

                        this._minImageWidth + delImageWidth <=

                        this.idealWidth) {

                        left =this.idealWidth - this._minImageWidth - delImageWidth;

                    } else {

                        left = this._currentLeft - delImageLeft;

                    }

                    html.setStyle(this.baseImage, {

                        top: top + 'px',

                        left: left + 'px'

                    });

                    html.setStyle(this.viewerImage, {

                        top: top + 'px',

                        left: left + 'px'

                    });

                }
以上便是客户端的实现思路。全部代码也已放在github中,浏览器支持:现代浏览器和ie8+
服务器端使用nodejs+express框架,主要代码如下:
 /**********

 body: {

   imageString: base64 code

   maxSize: w,h

   cropOptions: w,h,t,l

 }

 ************/

 exports.cropImage = function(req, res) {

   var base64Img = req.body.imageString;

   if(!/^data:image\/.*;base64,/.test(base64Img)){

     res.send({

       success: false,

       message: 'Bad base64 code format'

     });

   }

   var fileFormat = base64Img.match(/^data:image\/(.*);base64,/)[1];

   var base64Data = base64Img.replace(/^data:image\/.*;base64,/, "");

   var maxSize = req.body.maxSize;

   maxSize = maxSize.split(',');

   var cropOptions = req.body.cropOptions;

   cropOptions = cropOptions.split(',');

   try{

     var buf = new Buffer(base64Data, 'base64');

     var jimp = new Jimp(buf, 'image/' + fileFormat, function() {

       var maxW = parseInt(maxSize[0], 10);

       var maxH = parseInt(maxSize[1], 10);

       var cropW = parseInt(cropOptions[0], 10);

       var cropH = parseInt(cropOptions[1], 10);

       var cropT = parseInt(cropOptions[2], 10);

       var cropL = parseInt(cropOptions[3], 10);

       this.resize(maxW, maxH)

       .crop(cropT, cropL, cropW, cropH);

     });

     jimp.getBuffer('image/' + fileFormat, function(b) {

       var base64String = "data:image/" + fileFormat + ";base64," + b.toString('base64');

       res.send({

         success: true,

         source: base64String

       });

     });

   }catch(err) {

     logger.error(err);

     res.send({

       success: false,

       message: 'unable to complete operations'

     });

   }

 };
Javascript图片裁切的更多相关文章
- Javascript图片预加载详解
预加载图片是提高用户体验的一个很好方法.图片预先加载到浏览器中,访问者便可顺利地在你的网站上冲浪,并享受到极快的加载速度.这对图片画廊及图片占据很大比例的网站来说十分有利,它保证了图片快速.无缝地发布 ...
- Echo.js – 简单易用的 JavaScript 图片延迟加载插件
Echo.js 是一个独立的延迟加载图片的 JavaScript 插件.Echo.js 不依赖第三方库,压缩后不到1KB大小. 延迟加载是提高网页首屏显示速度的一种很有效的方法,当图片元素进入窗口可视 ...
- javascript图片懒加载与预加载的分析
javascript图片懒加载与预加载的分析 懒加载与预加载的基本概念. 懒加载也叫延迟加载:前一篇文章有介绍:JS图片延迟加载 延迟加载图片或符合某些条件时才加载某些图片. 预加载:提前加载图片, ...
- javascript图片切换
JavaScript 图片滑动切换效果 作者:cloudgamer 时间: 2009-09-25 文档类型:原创 来自:蓝色理想 第 1 页 JavaScript 图片滑动切换效果 [1] 第 2 页 ...
- Android实现图片裁切
介绍 在应用开发中,如果涉及到个人信息,头像一般是不可避免的,类似这种情况,我们就需要用到图片裁切的功能,实现头像裁切,然后上传给服务器. 一般裁切的做法就是图层叠加选取框,然后根据坐标,计算裁切区域 ...
- 图片裁切插件jCrop的使用心得(三)
在这一篇里,我来具体讲讲代码该如何写. 下面是jCrop的初始化代码 //图片裁剪插件Jcrop初始化 function initJcrop() { // 图片加载完成 document.getEle ...
- 图片裁切插件jCrop的使用心得(二)
上一篇简单的介绍了一下开发的背景以及一些学习资料,下面开始介绍如何上手. 一.下载jCrop http://deepliquid.com/content/Jcrop_Download.html 直接去 ...
- javascript - 图片的幻灯片效果
javascript 代码: <script type="text/javascript"> function select_play() { var select_p ...
- html5手势操作与多指操作封装与Canvas图片裁切实战
当前情况,移动端的开发占比越来越高,单指的拖拽触碰等操作是常规需要.特殊的多指操作与手势操作还需另做处理,而且还涉及到兼容性问题. // 屏幕上存在两根或两根以上的手指 时触发 仅IOS存在手势事件, ...
随机推荐
- windows qt 编译 boost 添加 路径
win32-msvc2015: { contains(QMAKE_HOST.arch, x86):{ INCLUDEPATH += D:\3SDK\boost_1_61_0 LIBS += -LD:\ ...
- 188. Best Time to Buy and Sell Stock IV leetcode解题笔记
Say you have an array for which the ith element is the price of a given stock on day i. Design an al ...
- 03-Swift常量&变量
什么是常量和变量 在Swift中规定:在定义一个标识符时必须明确说明该标识符是一个常量还是变量 使用let来定义常量,定义之后不可以修改 使用var来定义变量,定义之后可以修改 常量和变量的基本使用 ...
- OSG配置问题
BUILD_OSG_ARAPPERS: 这一项要选,不然后面编译自己的测试程序的时候,会报无法打开文件"osgIntrospectiond.lib"错误. Could not fi ...
- SQL:无法解决 equal to 操作的排序规则冲突。
更改存储过程的时候,在SQL中出现了 “无法解决 equal to 操作的排序规则冲突”错误,网上搜之,发现是表之间元素创建时排序规则不同(一个是collate Chinese_PRC_CI_AI_W ...
- max min 与 min max 的差别
在求解最优化问题时,遇到一个对偶问题的转换:对于形如 的问题,可以转换为求解 即原问题的对偶问题.而在一般情况下: 对于这个为题的说明我参照http://math.stackexchange.com/ ...
- oracle 小题
create table student(sno varchar2(10) primary key,sname varchar2(20),sage number(2),ssex varchar2(5) ...
- JavaScript 中 申明变量的方式--let 语句
let 语句 - 声明一个块范围变量. 语法 let 变量名 = 初始化值; 例子 "use strict"; let name = '赵敏'; (function opt(){ ...
- 将一个数组分成奇数部分和偶数部分,并分别排好序 CVTE
给定一个数组,将奇数放到前面,偶数放到后面,各自排好序 (2016年3月12日晚上,CVTE笔试编程第一道题): 思路很简单: (1)先将数组中的奇数和偶数分开(利用两个指针遍历一遍即可,同时统计好数 ...
- yeoman(转)
前言有一种技术可以提高我们的工作效率,可以让我们专心做我们擅长的事,可以屏蔽复杂性,可以规范我们的架构和我们的代码,可以让我们的享受编程的乐趣.Yeoman可以做到. 很多年以前,rails刚刚出世, ...