SpringBoot整合Swagger2以及生产环境的安全问题处理
1.创建springboot项目
https://www.cnblogs.com/i-tao/p/8878562.html
这里我们使用多环境配置:
- application-dev.yml(开发环境)
- application-test.yml(测试环境)
- application-uat.yml(预发布)
- application-pro.yml(生产环境)
2.添加Swagger2依赖
<dependency>
    <groupId>io.springfox</groupId>
    <artifactId>springfox-swagger2</artifactId>
    <version>2.6.1</version>
</dependency>

<dependency>
    <groupId>io.springfox</groupId>
    <artifactId>springfox-swagger-ui</artifactId>
    <version>2.6.1</version>
</dependency>
2.1 启动类开启Swagger2
package com.tao.springboot;

import org.springframework.boot.SpringApplication;

import org.springframework.boot.autoconfigure.SpringBootApplication;

import springfox.documentation.swagger2.annotations.EnableSwagger2;

@SpringBootApplication

@EnableSwagger2

public class SpringbootApplication {

    public static void main(String[] args) {

        SpringApplication.run(SpringbootApplication.class, args);

    }

}
2.2 Swagger2配置类
package com.tao.springboot.util;

import org.springframework.context.annotation.Bean;

import org.springframework.context.annotation.Configuration;

import springfox.documentation.builders.ApiInfoBuilder;

import springfox.documentation.builders.PathSelectors;

import springfox.documentation.builders.RequestHandlerSelectors;

import springfox.documentation.service.ApiInfo;

import springfox.documentation.spi.DocumentationType;

import springfox.documentation.spring.web.plugins.Docket;

@Configuration

public class Swagger2 {

    @Bean

    public Docket createRestApi() {

        return new Docket(DocumentationType.SWAGGER_2)

                .apiInfo(apiInfo())

                .select()

                .apis(RequestHandlerSelectors.basePackage("com.tao.springboot.action"))//controller路径

                .paths(PathSelectors.any())

                .build();

    }

    private ApiInfo apiInfo() {

        return new ApiInfoBuilder()

                .title("标题")

                .description("描述")

                .termsOfServiceUrl("地址")

                .version("1.0")

                .build();

    }

}
2.3 开始在action里面写一个接口
package com.tao.springboot.action;

import org.springframework.web.bind.annotation.RequestMapping;
import org.springframework.web.bind.annotation.RequestMethod;
import org.springframework.web.bind.annotation.RestController;

@RestController
@RequestMapping(value = "/says",method = RequestMethod.GET)
public class sayHello {
    /**
     * 根据用户名说hello
     * @param name
     * @return
     */
    @RequestMapping(value = "/hello",method = RequestMethod.GET)
    public String hello(String name){
        return name+" hello";
    }
}
为了方便接口管理和维护,增加Swagger2注解:
- @Api:修饰整个类,描述Controller的作用
- @ApiOperation:描述一个类的一个方法,或者说一个接口
- @ApiParam:单个参数描述
- @ApiModel:用对象来接收参数
- @ApiProperty:用对象接收参数时,描述对象的一个字段
- @ApiResponse:HTTP响应其中1个描述
- @ApiResponses:HTTP响应整体描述
- @ApiIgnore:使用该注解忽略这个API
- @ApiError :发生错误返回的信息
- @ApiImplicitParam:一个请求参数
- @ApiImplicitParams:多个请求参数
package com.tao.springboot.action; import io.swagger.annotations.ApiImplicitParam;
import io.swagger.annotations.ApiOperation;
import org.springframework.web.bind.annotation.RequestMapping;
import org.springframework.web.bind.annotation.RequestMethod;
import org.springframework.web.bind.annotation.RestController; @RestController
@RequestMapping(value = "/says",method = RequestMethod.GET)
public class sayHello {
/**
* 根据用户名说hello
* @param name
* @return
*/
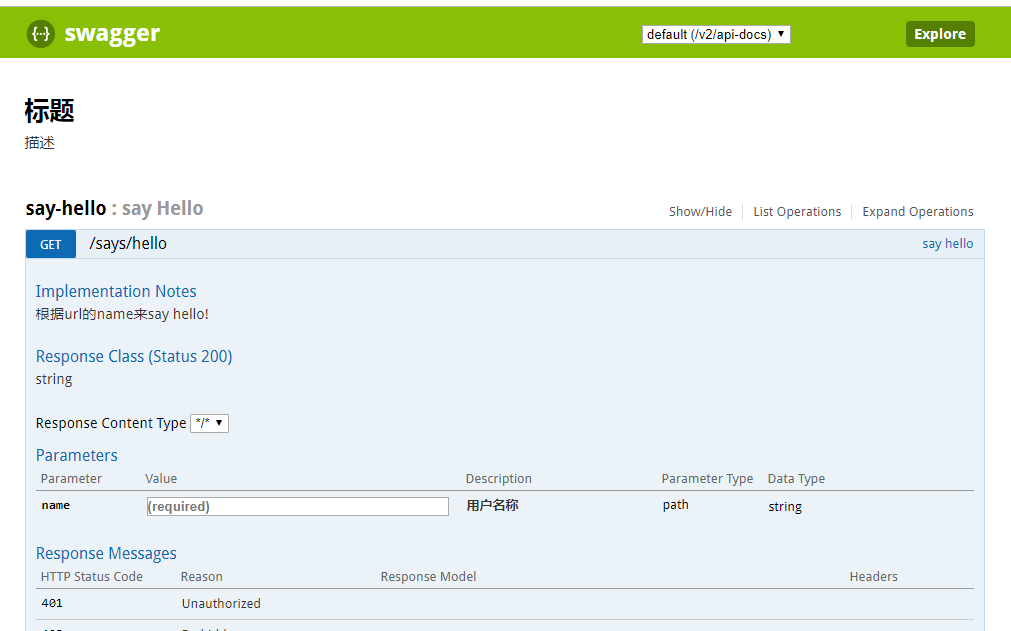
@ApiOperation(value="say hello", notes="根据url的name来say hello!")
@ApiImplicitParam(name = "name", value = "用户名称", required = true, dataType = "String", paramType = "path")
@RequestMapping(value = "/hello",method = RequestMethod.GET)
public String hello(String name){
return name+" hello";
}
}
访问:http://localhost:8081/swagger-ui.html
3.如果解决线上接口不被暴露?
3.1 使用springboot security过滤
略……
3.2 生产环境移除Swagger2
略……
3.3 直接使用多环境配置,生产环境不启用Swagger2
application.yml文件
spring:
  profiles:
    active: pro
application-pro.yml
#生产环境

server:

  port:

swagger2:

  enable: false
2.2 Swagger2配置类增加
@Value("${swagger2.enable}")

    private boolean swagger2Enable;
package com.tao.springboot.util;

import org.springframework.beans.factory.annotation.Value;

import org.springframework.context.annotation.Bean;

import org.springframework.context.annotation.Configuration;

import springfox.documentation.builders.ApiInfoBuilder;

import springfox.documentation.builders.PathSelectors;

import springfox.documentation.builders.RequestHandlerSelectors;

import springfox.documentation.service.ApiInfo;

import springfox.documentation.spi.DocumentationType;

import springfox.documentation.spring.web.plugins.Docket;

@Configuration

public class Swagger2 {

    @Value("${swagger2.enable}")

    private boolean swagger2Enable;

    @Bean

    public Docket createRestApi() {

        return new Docket(DocumentationType.SWAGGER_2)

                .enable(swagger2Enable)

                .apiInfo(apiInfo())

                .select()

                .apis(RequestHandlerSelectors.basePackage("com.tao.springboot.action"))//controller路径

                .paths(PathSelectors.any())

                .build();

    }

    private ApiInfo apiInfo() {

        return new ApiInfoBuilder()

                .title("标题")

                .description("描述")

                .termsOfServiceUrl("地址")

                .version("1.0")

                .build();

    }

}
访问:http://localhost:8081/swagger-ui.html

访问:http://localhost:8080/swagger-ui.html

github地址:https://github.com/80905949/springbootswagger2.git
SpringBoot整合Swagger2以及生产环境的安全问题处理的更多相关文章
- [转]SpringBoot整合Swagger2以及生产环境的安全问题处理
1.创建springboot项目 https://www.cnblogs.com/i-tao/p/8878562.html 这里我们使用多环境配置: application-dev.yml(开发环境) ...
- SpringBoot(七):SpringBoot整合Swagger2
原文地址:https://blog.csdn.net/saytime/article/details/74937664 手写Api文档的几个痛点: 文档需要更新的时候,需要再次发送一份给前端,也就是文 ...
- SpringBoot整合Swagger2
相信各位在公司写API文档数量应该不少,当然如果你还处在自己一个人开发前后台的年代,当我没说,如今为了前后台更好的对接,还是为了以后交接方便,都有要求写API文档. 手写Api文档的几个痛点: 文档需 ...
- SpringBoot整合Swagger2(Demo示例)
写在前面 由于公司项目采用前后端分离,维护接口文档基本上是必不可少的工作.一个理想的状态是设计好后,接口文档发给前端和后端,大伙按照既定的规则各自开发,开发好了对接上了就可以上线了.当然这是一种非常理 ...
- springboot 整合Swagger2的使用
Swagger2相较于传统Api文档的优点 手写Api文档的几个痛点: 文档需要更新的时候,需要再次发送一份给前端,也就是文档更新交流不及时. 接口返回结果不明确 不能直接在线测试接口,通常需要使用工 ...
- SpringBoot整合Swagger2案例,以及报错:java.lang.NumberFormatException: For input string: ""原因和解决办法
原文链接:https://blog.csdn.net/weixin_43724369/article/details/89341949 SpringBoot整合Swagger2案例 先说SpringB ...
- SpringBoot整合Swagger2详细教程
1. 简介 随着前后端分离开发模式越来越流行,编写接口文档变成了开发人员非常头疼的事.而Swagger是一个规范且完整的web框架,用于生成.描述.调用可视化的RESTful风格的在线接口文档,并 ...
- SpringBoot整合Swagger2及使用
简介 swagger是一个流行的API开发框架,这个框架以"开放API声明"(OpenAPI Specification,OAS)为基础, 对整个API的开发周期都提供了相应的解决 ...
- SpringBoot整合Swagger2,再也不用维护接口文档了!
前后端分离后,维护接口文档基本上是必不可少的工作.一个理想的状态是设计好后,接口文档发给前端和后端,大伙按照既定的规则各自开发,开发好了对接上了就可以上线了.当然这是一种非常理想的状态,实际开发中却很 ...
随机推荐
- Windows API 编程-----Windows NT 环境下禁止任务切换
函数原型: BOOL WINAPI SystemParametersInfo( _In_ UINT uiAction, _In_ UINT uiParam, _Inout_ PVOID pvParam ...
- Codeforces(Round #93) 126 B. Password
B. Password time limit per test 2 seconds memory limit per test 256 megabytes Asterix, Obelix an ...
- Codeforces Round #416 (Div. 2) A+B
A. Vladik and Courtesy 2 seconds 256 megabytes At regular competition Vladik and Valera won a and ...
- 升级CocoaPod遇到ERROR: While executing gem ... (TypeError) no implicit conversion of nil into String问题的解决方法
如下图: 先执行命令: gem update --system 再升级: sudo gem install cocoapods --pre 这样就能够正常升级了.
- 微信证书 javax.net.ssl.SSLException: java.lang.RuntimeException: Unexpected error: java.security.InvalidAlgorithmParameterException: the trustAnchors parameter must be non-empty
这几天在做微信退款接口,按照api写完之后,在本地测试了下没有问题,于是交给测试让他们在测试环境开测.他们说退款没有成功,感觉去查日志,发现后台报了 javax.net.ssl.SSLExceptio ...
- c# 读取txt文件并分隔
public static List<PostPerson> GetNameByFile() { #region 读取txt文件 var file = File.Open(Environm ...
- JAVA环境变量安装
需配置的系统环境变量参数: JAVA_HOME:C:\Program Files\Java\jdk1.8.0_60 CLASS_PATH: ;%JAVA_HOME%\lib;%JAVA_HOME%\l ...
- window 服务注册、卸载
1.以管理员身份打开 命令窗口 2.服务注册命令:sc create myServer binpath= path 3.服务卸载命令:sc delete myServer Topshelf 服务安装 ...
- 使用简单的Java代码在SAP C4C里创建销售订单
需要创建的销售订单的明细通过硬编码指定: 比如销售订单的描述为Jerry Test 2019-1-23 16:05PM 执行之后,看到Status Code 201,说明创建成功: 到UI上能看到成功 ...
- 从0开始学CentOS7(2)---安装mariaDB、jdk1.8、redis
继续前面的基础步骤~ 这个是centos7自带的数据库MariaDB,以前是mysql,到7以后,改为MariaDB... 1. MariaDB安装,没有往深处配置...懒得动了..参考:http:/ ...