
zookeeper安装与集群搭建
此处以centos系统下zookeeper安装为例,详细步骤可参考官网文档:zookeeper教程
一、单节点部署
1、下载zookeeper
wget http://mirrors.hust.edu.cn/apache/zookeeper/zookeeper-3.4.10/zookeeper-3.4.10.tar.gz
2、解压下载下来的压缩文件
tar -zxvf zookeeper-3.4..tar.gz
3、进入解压缩文件夹的conf目录,新建zoo.cfg配置文件(zookeeper启动时默认加载conf目录下的zoo.cfg文件)
cd zookeeper-3.4.

cd conf/

touch zoo.cfg

vi zoo.cfg
该目录下有一个样例配置文件,可供参考:zoo_sample.cfg
4、修改配置文件(默认监听服务器上所有网卡收到的请求):
vi zoo.cfg
修改完成后,配置文件内容如下:
tickTime=

dataDir=/opt/zookeeper-3.4./data

clientPort=
官网介绍如下:
This file can be called anything, but for the sake of this discussion call it conf/zoo.cfg. Change the value of dataDir to specify an existing (empty to start with) directory. Here are the meanings for each of the fields:

tickTime

    the basic time unit in milliseconds used by ZooKeeper. It is used to do heartbeats and the minimum session timeout will be twice the tickTime.

dataDir

    the location to store the in-memory database snapshots and, unless specified otherwise, the transaction log of updates to the database.

clientPort

    the port to listen for client connections
5、创建配置文件中提到的datadir目录:
mkdir -p /opt/zookeeper-3.4./data
6、启动zookeeper,安装目录bin目录下执行如下指令:
./zkServer.sh start
其他相关命令:
关闭:./zkServer.sh stop
重启: ./zkServer.sh restart
查看状态: ./zkServer.sh status
到此zookeeper安装完成
二、集群搭建
此处主要介绍在同一机器上搭建一伪集群,生成环境建议多机进行集群部署
1、将zk安装文件夹复制成三份
cp -dr zookeeper-3.4. zookeeper-3.4.10_1

cp -dr zookeeper-3.4. zookeeper-3.4.10_2
2、修改各集群节点配置文件
vi zookeeper-3.4./conf/zoo.cfg

vi zookeeper-3.4.10_1/conf/zoo.cfg

vi zookeeper-3.4.10_2/conf/zoo.cfg
修改后给配置文件分别为:
zookeeper-3.4.10/conf/zoo.cfg
tickTime=

dataDir=/opt/zookeeper-3.4./data

clientPort=

initLimit=

syncLimit=

server.=127.0.0.1::

server.=127.0.0.1::

server.=127.0.0.1::
zookeeper-3.4.10_1/conf/zoo.cfg
tickTime=

dataDir=/opt/zookeeper-3.4.10_1/data

clientPort=

initLimit=

syncLimit=

server.=127.0.0.1::

server.=127.0.0.1::

server.=127.0.0.1::
zookeeper-3.4.10_2/conf/zoo.cfg
tickTime=

dataDir=/opt/zookeeper-3.4.10_2/data

clientPort=

initLimit=

syncLimit=

server.=127.0.0.1::

server.=127.0.0.1::

server.=127.0.0.1::
server后面的端口,前者用于zk间节点通信,后者用于leader选举
附上一段官网原文:
tickTime=

dataDir=/var/lib/zookeeper

clientPort=

initLimit=

syncLimit=

server.=zoo1::

server.=zoo2::

server.=zoo3::

The new entry, initLimit is timeouts ZooKeeper uses to limit the length of time the ZooKeeper servers in quorum have to connect to a leader. The entry syncLimit limits how far out of date a server can be from a leader.

With both of these timeouts, you specify the unit of time using tickTime. In this example, the timeout for initLimit is 5 ticks at 2000 milleseconds a tick, or 10 seconds.

The entries of the form server.X list the servers that make up the ZooKeeper service. When the server starts up, it knows which server it is by looking for the file myid in the data directory. That file has the contains the server number, in ASCII.

Finally, note the two port numbers after each server name: "" and "". Peers use the former port to connect to other peers. Such a connection is necessary so that peers can communicate, for example, to agree upon the order of updates. More specifically, a ZooKeeper server uses this port to connect followers to the leader. When a new leader arises, a follower opens a TCP connection to the leader using this port. Because the default leader election also uses TCP, we currently require another port for leader election. This is the second port in the server entry.
3、为每个节点分别新建myid文件,文件内容对应上述配置文件中server的编号
echo "" > zookeeper-3.4./data/myid

echo "" > zookeeper-3.4.10_1/data/myid

echo "" > zookeeper-3.4.10_2/data/myid
4、启动zookeeper
zookeeper-3.4./bin/zkServer.sh start

zookeeper-3.4.10_1/bin/zkServer.sh start

zookeeper-3.4.10_2/bin/zkServer.sh start
5、查看集群状态
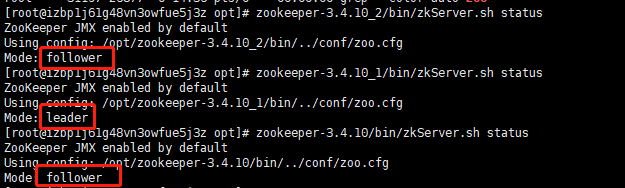
到此zk集群配置完成
zookeeper安装与集群搭建的更多相关文章
- zookeeper 安装以及集群搭建
安装环境: jdk1.7 zookeeper-3.4.10.tar.gz VM虚拟机redhat6.5-x64:192.168.1.200 192.168.1.201 192.168.1.202 ...
- zookeeper及kafka集群搭建
zookeeper及kafka集群搭建 1.有关zookeeper的介绍可参考:http://www.cnblogs.com/wuxl360/p/5817471.html 2.zookeeper安装 ...
- 【运维技术】Zookeeper单机以及集群搭建教程
Zookeeper单机以及集群搭建教程 单机搭建 单机安装以及启动 安装zookeeper的前提是必须有java环境 # 选择目录进行下载安装 cd /app # 下载zk,可以去官方网站下载,自己上 ...
- Zookeeper 安装及集群配置注意点
Zookeeper在ubuntu下安装及集群搭建,关于集群搭建,网上很多文章 可以参考:https://www.ibm.com/developerworks/cn/opensource/os-cn-z ...
- 基于zookeeper的Swarm集群搭建
简介 Swarm:docker原生的集群管理工具,将一组docker主机作为一个虚拟的docker主机来管理. 对客户端而言,Swarm集群就像是另一台普通的docker主机. Swarm集群中的每台 ...
- Zookeeper简介与集群搭建【转】
Zookeeper简介 Zookeeper是一个高效的分布式协调服务,可以提供配置信息管理.命名.分布式同步.集群管理.数据库切换等服务.它不适合用来存储大量信息,可以用来存储一些配置.发布与订阅等少 ...
- zookeeper 安装及集群
一.zookeeper介绍 zookeeper是一个中间件,为分布式系统提供协调服务,可以为大数据服务,也可以为java服务. 分布式系统,很多计算机组成一个整体,作为一个整体一致对外并处理同一请求, ...
- ActiveMQ此例简单介绍基于docker的activemq安装与集群搭建
ActiveMQ拓展连接 此例简单介绍基于Docker的activemq安装与集群搭建 一 :安装 1.获取activemq镜像 docker pull webcenter/activemq 2.启动 ...
- Redis单机安装以及集群搭建
今天主要来看一下Redis的安装以及集群搭建(我也是第一次搭建). 环境:CentOS 7.1,redis-5.0.7 一.单机安装 1.将Redis安装包放置服务器并解压 2.进入redis安装目录 ...
随机推荐
- Android OpenGL加入光照和材料属性
转载请注明出处:[huachao1001的专栏:http://blog.csdn.net/huachao1001] 在上一篇文章[ Android OpenGL显示随意3D模型文件 ]中.我们学习了怎 ...
- 配置thinkphp3.2 404页面
ThinkPHP自身提供了 404 页面的处理机制,我们只需要在控制器 中添加一个 EmptyController.class.php,并且实现以下方法即可,方法如下: <? class Em ...
- mysql多实例介绍及配置
mysql多实例介绍及配置 1.mysql多实例介绍 1.1 什么是mysql多实例 mysql多实例就是在一台机器上开启多个不同的服务端口(如:3306,3307),运行多个MySQL服务进程,通过 ...
- 网页HTML代码:滚动文字的制作
本节笔者讲述HTML代码中比较特殊的标签,它能使网页中的文字滚动,并且可以控制其滚动的属性. 制作滚动文字 通过本章前面的学习,读者已经能够很好地控制各种段落文字的显示方式,不过无论怎么设置,文字都是 ...
- poj 1274 The Perfact Stall
click here ~~ ***The Perfect Stall*** Description Farmer John completed his new barn just last week, ...
- 解决ios7.0 以后自己定义导航栏左边button靠右的问题
1.自己定义button //左button UIButton *leftBtn = [[UIButton , , , )]; [leftBtn addTarget:self action:@sele ...
- Vue props 单向数据流
1.props通信 注意:DOM模板的驼峰命名props要转为短横分割命名. <!DOCTYPE html> <html lang="zh"> <he ...
- Android使用SeekBar
转自:http://my.oschina.net/pingdy/blog/376735 最近有做一个android项目,里面有使用到在播放视频时可以跳播,同时动态显示播放时间.类似于下图 的效果,我只 ...
- 基于vue单页应用的例子
代码地址如下:http://www.demodashi.com/demo/13374.html 目录结构 src目录 主要的代码目录 components 存放项目组件 router 路由文件 sto ...
- SpringMVC 异常记录
在使用SpringMVC中开发过程中,遇到的一些坑,简单记录一下. 1.The request sent by the client was syntactically incorrect 从字面意思 ...