
zabbix利用percona-toolkit工具监控Mysql主从同步状态
一、下载percona-toolkit工具包
percona-toolkit是一组高级命令行工具的集合,可以查看当前服务的摘要信息,磁盘检测,分析慢查询日志,查找重复索引,实现表同步等等。
[root@push-- src]# cd /usr/local/src/

[root@push-- src]# wget https://www.percona.com/downloads/percona-toolkit/3.0.12/binary/redhat/7/x86_64/percona-toolkit-3.0.12-1.el7.x86_64.rpm
二、安装rpm包
root@push-- src]# rpm -ivh percona-toolkit-3.0.-.el7.x86_64.rpm

警告:percona-toolkit-3.0.-.el7.x86_64.rpm: 头V4 DSA/SHA1 Signature, 密钥 ID cd2efd2a: NOKEY

错误:依赖检测失败:

        perl(DBI) >= 1.13 被 percona-toolkit-3.0.-.el7.x86_64 需要

        perl(DBD::mysql) >= 1.0 被 percona-toolkit-3.0.-.el7.x86_64 需要

        perl(IO::Socket::SSL) 被 percona-toolkit-3.0.-.el7.x86_64 需要

        perl(Digest::MD5) 被 percona-toolkit-3.0.-.el7.x86_64 需要

        perl(Term::ReadK
显示需要一些依赖包,安装相应依赖包
[root@push-- src]# yum install -y perl-DBI perl-DBD-MySQL perl-Digest-MD5 perl-IO-Socket-SSL perl-TermReadKey
再次安装
[root@push-- src]# rpm -ivh percona-toolkit-3.0.-.el7.x86_64.rpm

警告:percona-toolkit-3.0.-.el7.x86_64.rpm: 头V4 DSA/SHA1 Signature, 密钥 ID cd2efd2a: NOKEY

准备中...                          ################################# [%]

正在升级/安装...

   :percona-toolkit-3.0.-.el7     ################################# [%]

[root@push-- src]#
安装成功,验证
[root@push-- src]# pt-online-schema-change --version

pt-online-schema-change 3.0.
三、工具命令的使用
1、pt-heartbeat
#用于监控mysql复制架构的延迟。
#主要是通过在主库上的--update线程持续更新指定表上的一个时间戳,从库上--monitor线程或者--check线程检查主库更新的时间戳并与当前系统时间对比,得到延迟值。
2、pt-query-digest
#用于分析mysql服务器的慢查询日志,并格式化输出以便于查看和分析。
3、pt-diskstats
#类似于iostat,打印磁盘io统计信息,但是这个工具是交互式并且比iostat更详细。可以分析从远程机器收集的数据。
4、pt-slave-find
#连接mysql主服务器并查找其所有的从,然后打印出所有从服务器的层级关系。
[root@push-- src]# pt-slave-find --host=127.0.0.1 --user=root --password=xxxxxxx

127.0.0.1

Version         5.7.-log

Server ID

Uptime          +:: (started --12T13::)

Replication     Is not a slave, has  slaves connected, is not read_only

Filters

Binary logging  ROW

Slave status

Slave mode      STRICT

Auto-increment  increment , offset

InnoDB version  5.7.

+- 172.28.5.222

   Version         5.7.-log

   Server ID

   Uptime          +:: (started --12T14::)

   Replication     Is not a slave, has  slaves connected, is not read_only

   Filters

   Binary logging  ROW

   Slave status

   Slave mode      STRICT

   Auto-increment  increment , offset

   InnoDB version  5.7.

   +- 172.28.5.223

      Version         5.7.-log

      Server ID

      Uptime          +:: (started --12T14::)

      Replication     Is not a slave, has  slaves connected, is not read_only

      Filters

      Binary logging  ROW

      Slave status

      Slave mode      STRICT

      Auto-increment  increment , offset

      InnoDB version  5.7.

[root@push-- src]#
5、pt-stalk
#用于收集mysql数据库故障时的相关信息便于后续诊断处理。
6、pt-kill
#Kill掉符合指定条件mysql语句
7、pt-upgrade
#该命令主要用于对比不同mysql版本下SQL执行的差异,通常用于升级前进行对比。
#会生成SQL文件或单独的SQL语句在每个服务器上执行的结果、错误和警告信息等。
8、pt-online-schema-change
#功能为支持在线变更表构,且不锁定原表,不阻塞原表的DML操作。
#该特性与Oracle的dbms_redefinition在线重定义表原理基本类似。
9、pt-mysql-summary
#对连接的mysql服务器生成一份详细的配置情况以及sataus信息
#在尾部也提供当前实例的的配置文件的信息
四、pt-heartbeat 监控主从同步原理
1、主库上存在一个用于检查延迟的表heartbeat,可手动或自动创建, pt-heartbeat使用--update参数连接到主库上并持续(根据设定的--interval参数)使用一个时间戳更新到表heartbeat
2、pt-heartbeat使用--monitor 或--check连接到从库,检查从主库同步过来的时间戳,并与当前系统时间戳进行比对产生一个差值,该值则用于判断延迟。(注,前提条件是主库与从库应保持时间同步)
五、实际操作pt-heartbeat 监控主从同步
1、主库上手工创建一个heartbeat数据库
mysql> create database heartbeat default CHARACTER set utf8;

Query OK,  row affected (0.16 sec)
2、利用pt-heartbeat的--create-table 参数在主库上添加heartbeat表
[root@push-- ~]# pt-heartbeat -S /var/lib/mysql//mysql.sock -uroot -pxxxxxxxx -D heartbeat --create-table --update

*******************************************************************

 Using the default of SSL_verify_mode of SSL_VERIFY_NONE for client

 is deprecated! Please set SSL_verify_mode to SSL_VERIFY_PEER

 possibly with SSL_ca_file|SSL_ca_path for verification.

 If you really don't want to verify the certificate and keep the

 connection open to Man-In-The-Middle attacks please set

 SSL_verify_mode explicitly to SSL_VERIFY_NONE in your application.

*******************************************************************

  at /usr/bin/pt-heartbeat line .

*******************************************************************

 Using the default of SSL_verify_mode of SSL_VERIFY_NONE for client

 is deprecated! Please set SSL_verify_mode to SSL_VERIFY_PEER

 possibly with SSL_ca_file|SSL_ca_path for verification.

 If you really don't want to verify the certificate and keep the

 connection open to Man-In-The-Middle attacks please set

 SSL_verify_mode explicitly to SSL_VERIFY_NONE in your application.

*******************************************************************

  at /usr/bin/pt-heartbeat line .

# A software update is available:
ctrl+c 退出,进入mysql查看heartbeat表
[root@push-- ~]# mysql -S /var/lib/mysql//mysql.sock -uroot -p

Enter password:

Welcome to the MySQL monitor.  Commands end with ; or \g.

Your MySQL connection id is

Server version: 5.7.-log MySQL Community Server (GPL)

Copyright (c) , , Oracle and/or its affiliates. All rights reserved.

Oracle is a registered trademark of Oracle Corporation and/or its

affiliates. Other names may be trademarks of their respective

owners.

Type 'help;' or '\h' for help. Type '\c' to clear the current input statement.

mysql> use heartbeat;

Reading table information for completion of table and column names

You can turn off this feature to get a quicker startup with -A

Database changed

mysql> select * from heartbeat;

+----------------------------+-----------+-------------------+-----------+-----------------------+---------------------+

| ts                         | server_id | file              | position  | relay_master_log_file | exec_master_log_pos |

+----------------------------+-----------+-------------------+-----------+-----------------------+---------------------+

| --04T11::07.006920 |    | master-221.000022 |  | NULL                  |                NULL |

+----------------------------+-----------+-------------------+-----------+-----------------------+---------------------+

 row in set (0.00 sec)

mysql>
3、启动pt-heartbeat守护进程,定时更新heartbeat表,定期update(默认1S)最新的timestamp信息到ts字段中
[root@push-- ~]# pt-heartbeat -S /var/lib/mysql//mysql.sock -uroot -pxxxxxxxxxxx -D heartbeat --update --daemonize

[root@push-- ~]#
4、查看heartbeat表,不停查询,此时发现ts时间戳每秒会更新一次
mysql> select * from heartbeat;

+----------------------------+-----------+-------------------+-----------+-----------------------+---------------------+

| ts                         | server_id | file              | position  | relay_master_log_file | exec_master_log_pos |

+----------------------------+-----------+-------------------+-----------+-----------------------+---------------------+

| --04T11::06.001140 |    | master-221.000022 |  | NULL                  |                NULL |

+----------------------------+-----------+-------------------+-----------+-----------------------+---------------------+

 row in set (0.00 sec)

mysql> select * from heartbeat;

+----------------------------+-----------+-------------------+-----------+-----------------------+---------------------+

| ts                         | server_id | file              | position  | relay_master_log_file | exec_master_log_pos |

+----------------------------+-----------+-------------------+-----------+-----------------------+---------------------+

| --04T11::08.064020 |    | master-221.000022 |  | NULL                  |                NULL |

+----------------------------+-----------+-------------------+-----------+-----------------------+---------------------+

 row in set (0.00 sec)

mysql> select * from heartbeat;

+----------------------------+-----------+-------------------+-----------+-----------------------+---------------------+

| ts                         | server_id | file              | position  | relay_master_log_file | exec_master_log_pos |

+----------------------------+-----------+-------------------+-----------+-----------------------+---------------------+

| --04T11::10.097910 |    | master-221.000022 |  | NULL                  |                NULL |

+----------------------------+-----------+-------------------+-----------+-----------------------+---------------------+

 row in set (0.00 sec)
5、运行pt-hearbeat守护进程连接从库执行监控命令
[root@push-- ~]# pt-heartbeat -uroot -pxxxxxxxxx -h172.28.5. --port= -D heartbeat --monitor

*******************************************************************

 Using the default of SSL_verify_mode of SSL_VERIFY_NONE for client

 is deprecated! Please set SSL_verify_mode to SSL_VERIFY_PEER

 possibly with SSL_ca_file|SSL_ca_path for verification.

 If you really don't want to verify the certificate and keep the

 connection open to Man-In-The-Middle attacks please set

 SSL_verify_mode explicitly to SSL_VERIFY_NONE in your application.

*******************************************************************

  at /usr/bin/pt-heartbeat line .

*******************************************************************

 Using the default of SSL_verify_mode of SSL_VERIFY_NONE for client

 is deprecated! Please set SSL_verify_mode to SSL_VERIFY_PEER

 possibly with SSL_ca_file|SSL_ca_path for verification.

 If you really don't want to verify the certificate and keep the

 connection open to Man-In-The-Middle attacks please set

 SSL_verify_mode explicitly to SSL_VERIFY_NONE in your application.

*******************************************************************

  at /usr/bin/pt-heartbeat line .

# A software update is available:

.00s [  .00s,  .00s,  .00s ]

.00s [  .00s,  .00s,  .00s ]

.00s [  .00s,  .00s,  .00s ]

.00s [  .00s,  .00s,  .00s ]

.00s [  .00s,  .00s,  .00s ]

.00s [  .00s,  .00s,  .00s ]

.00s [  .00s,  .00s,  .00s ]

.00s [  .00s,  .00s,  .00s ]

.00s [  .00s,  .00s,  .00s ]

.00s [  .00s,  .00s,  .00s ]

.00s [  .00s,  .00s,  .00s ]

.00s [  .00s,  .00s,  .00s ]

.00s [  .00s,  .00s,  .00s ]

.00s [  .00s,  .00s,  .00s ]

.00s [  .00s,  .00s,  .00s ]

.00s [  .00s,  .00s,  .00s ]

.00s [  .00s,  .00s,  .00s ]

.00s [  .00s,  .00s,  .00s ]

.00s [  .00s,  .00s,  .00s ]

.00s [  .00s,  .00s,  .00s ]

.00s [  .00s,  .00s,  .00s ]

.00s [  .00s,  .00s,  .00s ]

.00s [  .00s,  .00s,  .00s ]

.00s [  .00s,  .00s,  .00s ]

.00s [  .00s,  .00s,  .00s ]

^C
监控数据会每秒刷新一次,可以看到目前主从同步良好,没有延迟。
6、重启主库更新进程
[root@push-- ~]# pt-heartbeat --stop

Successfully created file /tmp/pt-heartbeat-sentinel

[root@push-- ~]# rm -rf /tmp/pt-heartbeat-sentinel

[root@push-- ~]# pt-heartbeat -S /var/lib/mysql//mysql.sock -uroot -pxxxxxxxxxxx -D heartbeat --update --interval= --daemonize

[root@push-- ~]#
7、使用守护进程监控从库,并输出到日志文件
[root@push-- ~]# pt-heartbeat -uroot -pxxxxxxxxxxx -h172.28.5. --port= -D heartbeat --monitor --daemonize --log=/tmp/mysql-slave-sync.log

[root@push-- ~]#
8、实时查看日志
[root@push-- ~]# tail -f /tmp/mysql-slave-sync.log

.00s [  .00s,  .00s,  .00s ]

.00s [  .00s,  .00s,  .00s ]

.00s [  .00s,  .00s,  .00s ]

.00s [  .00s,  .00s,  .00s ]

.00s [  .00s,  .00s,  .00s ]

.00s [  .00s,  .00s,  .00s ]

.00s [  .00s,  .00s,  .00s ]

.00s [  .00s,  .00s,  .00s ]

.00s [  .00s,  .00s,  .00s ]

.00s [  .00s,  .00s,  .00s ]

.00s [  .00s,  .00s,  .00s ]

.00s [  .00s,  .00s,  .00s ]

.00s [  .00s,  .00s,  .00s ]
9、测试验证
1、登录从库,停掉slave
[root@push-- ~]# mysql -uroot -p -S /var/lib/mysql//mysql.sock

Enter password:

Welcome to the MySQL monitor.  Commands end with ; or \g.

Your MySQL connection id is

Server version: 5.7. MySQL Community Server (GPL)

Copyright (c) , , Oracle and/or its affiliates. All rights reserved.

Oracle is a registered trademark of Oracle Corporation and/or its

affiliates. Other names may be trademarks of their respective

owners.

Type 'help;' or '\h' for help. Type '\c' to clear the current input statement.

mysql> stop slave;

Query OK,  rows affected (0.07 sec)
2、查看日志
[root@push-- ~]# tail -f /tmp/mysql-slave-sync.log

.00s [  .42s,  .08s,  .36s ]

.00s [  .85s,  .17s,  .39s ]

.00s [  .30s,  .26s,  .42s ]

.00s [  .77s,  .35s,  .45s ]

.00s [  .25s,  .45s,  .48s ]

.00s [  .75s,  .55s,  .52s ]

.00s [  .27s,  .65s,  .55s ]

.00s [  .80s,  .76s,  .59s ]

.00s [  .35s,  .87s,  .62s ]

.00s [  .92s,  .98s,  .66s ]

.00s [ .50s,  .10s,  .70s ]

.00s [ .10s,  .22s,  .74s ]

.00s [ .72s,  .34s,  .78s ]
此时已经出现了延迟
3、再次启动从库,同步数据
mysql> start slave;

Query OK,  rows affected (0.01 sec)

mysql>
此时监控同步延迟马上减小到0,表示同步成功,没有延迟。
.00s [ .50s, .50s, .40s ]

.00s [ .50s, .50s, .96s ]

.00s [ .50s, .50s, .52s ]

.00s [ .50s, .50s, .09s ]

.00s [ .50s, .50s, .65s ]

.00s [ .50s, .50s, .22s ]

.00s [ .50s, .50s, .78s ]

.00s [ .50s, .50s, .35s ]

.00s [ .50s, .50s, .92s ]

.00s [ .50s, .50s, .49s ]

.00s [ .50s, .50s, .06s ]

.00s [ .50s, .50s, .63s ]

.00s [ .50s, .50s, .21s ]

.00s [ .50s, .50s, .78s ]

.00s [ .50s, .50s, .36s ]

.00s [ .50s, .50s, .93s ]

.00s [ .50s, .50s, .51s ]

.00s [ .50s, .50s, .09s ]

.00s [ .50s, .50s, .67s ]

.00s [ .50s, .50s, .25s ]

.00s [ .50s, .50s, .83s ]

.00s [ .13s, .23s, .33s ]

.02s [ .82s, .56s, .69s ]

.00s [ .03s, .81s, .69s ]

.00s [ .23s, .05s, .69s ]

.00s [ .42s, .28s, .69s ]

.00s [ .58s, .52s, .69s ]

.00s [ .73s, .75s, .69s ]

.00s [ .87s, .97s, .69s ]

.00s [ .98s, .20s, .69s ]

.00s [ .08s, .42s, .69s ]

.00s [ .17s, .63s, .69s ]

.00s [ .23s, .85s, .69s ]

.00s [ .28s, .06s, .69s ]

.00s [ .32s, .26s, .69s ]

.00s [ .33s, .47s, .69s ]
六、利用Zabbix监控Mysql主从同步
1、使用pt-heartbeat 的--check选项参数,可以返回当前从库的同步延迟数据
[root@push-- zabbix]# pt-heartbeat -uroot -pxxxxxxxxx -h172.28.5. --port= -D heartbeat --check

0.00

[root@push-- zabbix]#
2、利用这个返回的延迟数,可以自定义一个zabbix监控项
[root@push-- ~]# vim /usr/local/zabbix/conf/zabbix_agentd.conf
在zabbix_agentd.conf配置文件中添加一个监控项
UserParameter=hlsms.check_mysql_slave_status, pt-heartbeat -uroot -pxxxxxxxxxx -h172.28.5. --port= -D heartbeat --check >/dev/null
3、启动zabbix_agent服务,使新加监控项生效
[root@push-- ~]# killall zabbix_agentd

[root@push-- ~]# zabbix_agentd -c /usr/local/zabbix/conf/zabbix_agentd.conf

[root@push-- ~]#
4、在zabbix服务器端利用zabbix_get命令检验监控项
[root@zabbix_server mysh]# zabbix_get -s 172.28.5.221 -p  -k "hlsms.check_mysql_slave_status"

0.00
成功返回最新同步延迟数据
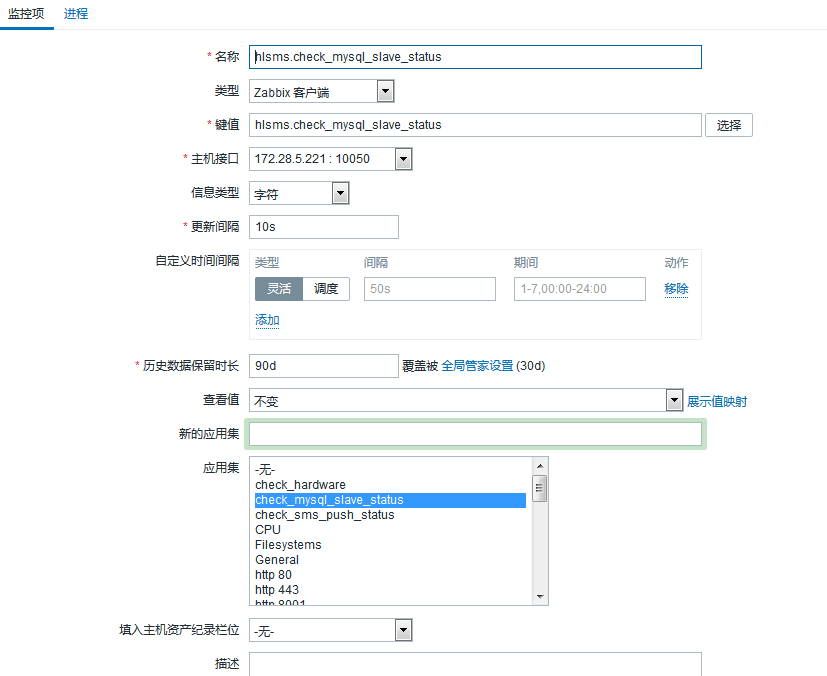
5、在zabbix管控台在主库的主机下新建一个监控项hlsms.check_mysql_slave_status,每10秒监控一次
6、在主库主机上打开最新数据,查看是否有hlsms.check_mysql_slave_status返回的数据
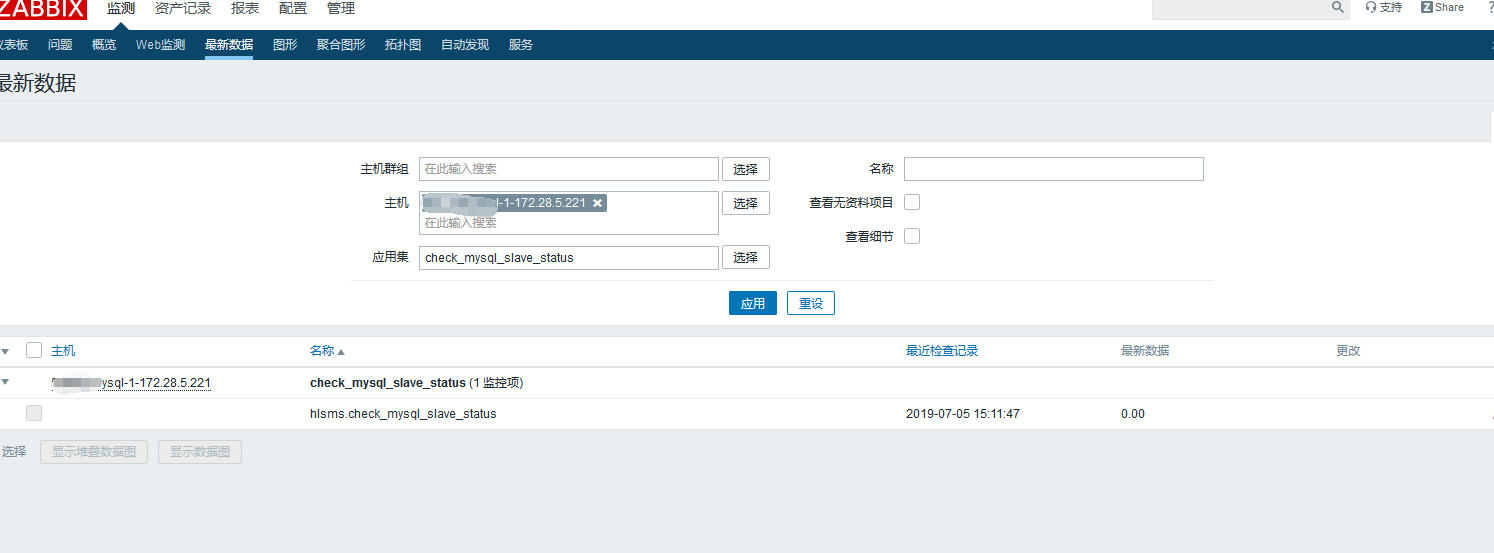
可以看到已经有数据获取到了,正常情况下同步成功没有延迟返回时0.00,有延迟会返回x.00,x表示延迟了多少秒。
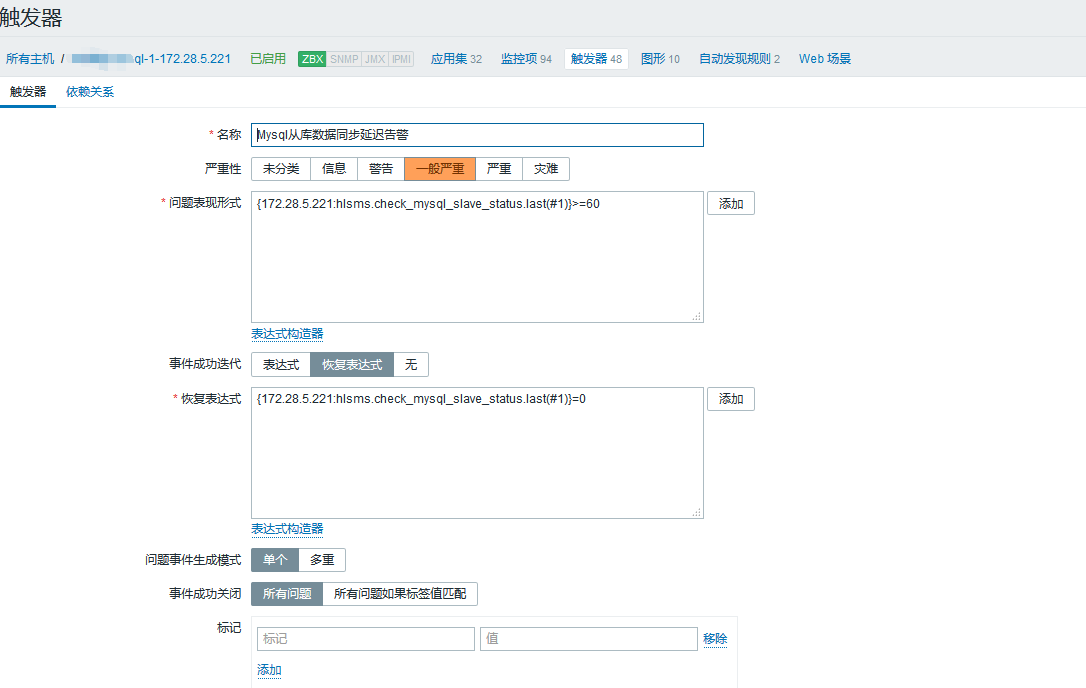
7、创建触发器,当同步延迟达到60秒,发送告警,当同步延迟为0时,恢复。
8、测试zabbix监控项
停掉从库
mysql> stop slave;

Query OK,  rows affected (0.06 sec)

mysql>
此时刷新主库主机最新数据hlsms.check_mysql_slave_status监控项
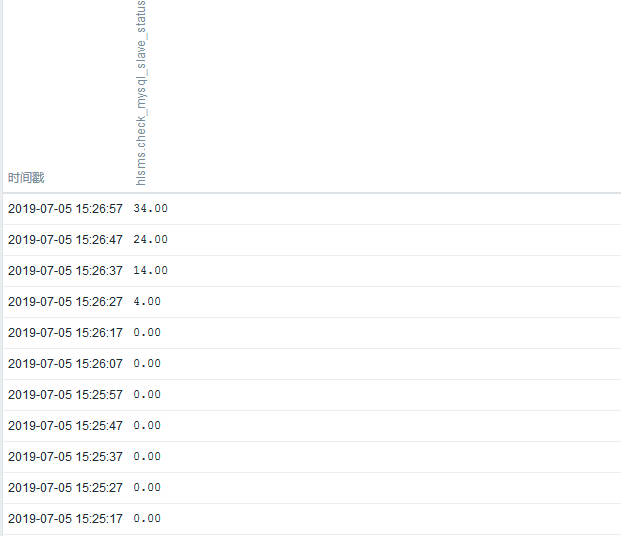
可以看到已经获取到了最新延迟,等到了60后,产生告警

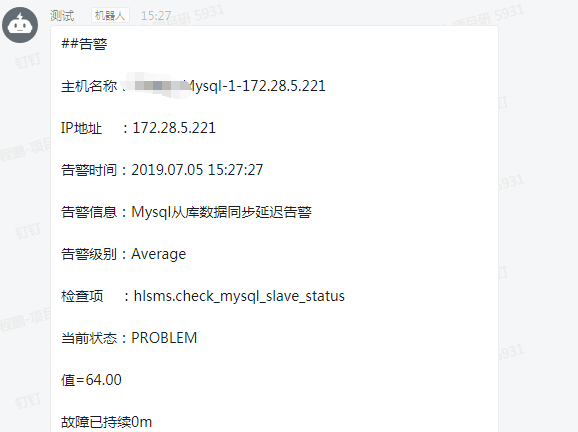
告警成功,再次连接从库,启动同步线程
mysql> start slave;

Query OK,  rows affected (0.02 sec)

mysql>
当完全同步后,返回延迟数据为0,
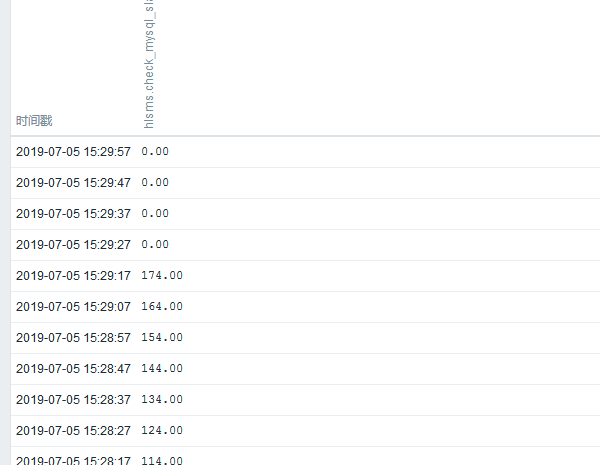
告警随之恢复
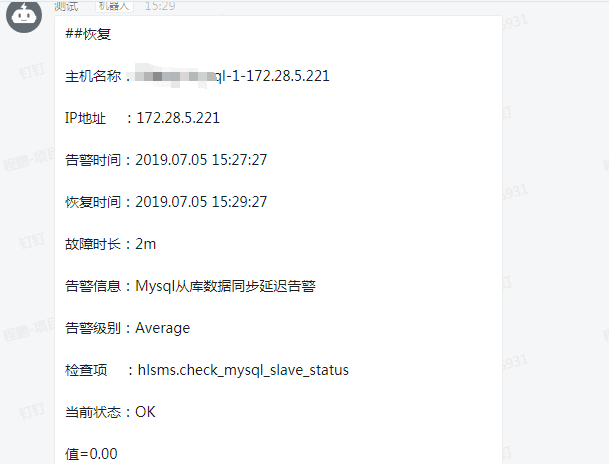
至此,zabbix监控Mysql主从状态配置成功。
zabbix利用percona-toolkit工具监控Mysql主从同步状态的更多相关文章
- 监控mysql主从同步状态脚本
监控mysql主从同步状态脚本 示例一: cat check_mysql_health #!/bin/sh slave_is=($(mysql -S /tmp/mysql3307.sock -uroo ...
- 监控mysql主从同步状态是否异常
监控mysql主从同步状态是否异常,如果异常,则发生短信或邮寄给管理员 标签:监控mysql主从同步状态是否异常 阶段1:开发一个守护进程脚本每30秒实现检测一次. 阶段2:如果同步出现如下错误号(1 ...
- 监控mysql主从同步状态
在高并发网站架构中,MySQL数据库主从同步是不可或缺的,不过经常会发生由于网络原因或者操作错误,MySQL主从经常会出现不同步的情况,那么如何监控MySQL主从同步,也变成网站正常运行的重要环节. ...
- nagios 实现Mysql 主从同步状态的监控
一.系统环境 主机名 IP nagios 192.168.15.111 mysql_s 192.168.15.21 二.操作步骤 2.1 mysql_s端的配置 2.1.1 编写check_mysql ...
- zabbix3.0.4监控mysql主从同步
zabbix3.0.4监控mysql主从同步 1.监控mysql主从同步原理: 执行一个命令 mysql -u zabbix -pzabbix -e 'show slave status\G' 我们在 ...
- 监控mysql主从同步
1,昨天看到shell一道面试题,需求如下: 监控MySQL主从同步是否异常,如果异常,则发送短信或者邮件给管理员.提示:如果没主从同步环境,可以用下面文本放到文件里读取来模拟:阶段1:开发一个守护进 ...
- nagios系列(七)nagios通过自定义脚本的方式监控mysql主从同步
nagios监控mysql主从同步 起因:nagios可能监控到mysql服务的运行情况,但确不能监控mysql的主从复制是否正常:有时候,同步已经停止,但管理人员却不知道. 登陆mysql从服务器, ...
- shell脚本监控MySQL主从同步
企业面试题1:监控MySQL主从同步是否异常,如果异常,则发送短信或者邮件给管理员. 阶段1:开发一个守护进程脚本每30秒实现检测一次. 阶段2:如果同步出现如下错误号(1158,1159,1008, ...
- 用shell脚本监控MySQL主从同步
企业面试题1:(生产实战案例):监控MySQL主从同步是否异常,如果异常,则发送短信或者邮件给管理员.提示:如果没主从同步环境,可以用下面文本放到文件里读取来模拟:阶段1:开发一个守护进程脚本每30秒 ...
随机推荐
- 全面解读php-运算符
一.运算符的优先级 二.短路作用 本文为袋鼠学习中的总结,如有转载请注明出处:https://www.cnblogs.com/chrdai/p/11074776.html
- shell初级-----处理用户输入
命令行参数 读取参数 位置参数变量是标准的数字:$0是程序名,$1是第一个参数,$2,是第二个参数,直到第九个参数$9. 特殊的变量:$#表示参数个数,$?表示最后运行的命令的结束代码(返回值) 每个 ...
- 【9】letter-spacing / box-shadow
1.letter-spacing :增加或减少字符间的空白(字符间距),如:h1 {letter-spacing:2px} 2.box-shadow : box-shadow: 10px 10px 5 ...
- 阶段3 2.Spring_10.Spring中事务控制_10spring编程式事务控制2-了解
在业务层声明 transactionTemplate 并且声称一个set方法等着spring来注入 在需要事物控制的地方执行 execute.但是这个execute需要一个参数 需要的参数是Trans ...
- MySQL 树形结构 根据指定节点 获取其所有父节点序列
背景说明 需求:MySQL树形结构, 根据指定的节点,获取其所有父节点序列. 问题分析 1.可以使用类似Java这种面向对象的语言,对节点集合进行逻辑处理,获取父节点. 2.直接自定义MySQL函数 ...
- 微信小程序的配置详解
1.配置详解: 使用app.json文件来对微信小程序进行全局配置,决定页面文件的路径.窗口表现.设置网络超时时间.设置多 tab 等. 1>pages 接受一个数组,每一项都是字符串,来指定小 ...
- java:Mybatis框架2(基于mapper接口的开发,多种查询,复合类型查询,resultMap定义,多表联查,sql片段)
1.mybatis02: mybatis-config.xml: <?xml version="1.0" encoding="UTF-8"?> &l ...
- 启动elasticsearch-head显示集群健康值:未连接
ES启动后,进行es header访问的话,使用localhost:9100会显示集群健康值未连接 2种情况(均为windows10环境下): 1:未在elasticsearch-6.8.0\conf ...
- LeetCode.922-按奇偶排序数组 II(Sort Array By Parity II)
这是悦乐书的第354次更新,第379篇原创 01 看题和准备 今天介绍的是LeetCode算法题中Easy级别的第216题(顺位题号是922).给定非负整数的数组A,A中的一半整数是奇数,而剩下的一半 ...
- #Java学习之路——基础阶段二(第十一篇)
我的学习阶段是跟着CZBK黑马的双源课程,学习目标以及博客是为了审查自己的学习情况,毕竟看一遍,敲一遍,和自己归纳总结一遍有着很大的区别,在此期间我会参杂Java疯狂讲义(第四版)里面的内容. 前言: ...