Vue自行封装常用组件-倒计时
倒计时组件,比较复杂一点,大神勿调侃,精确到毫秒,因为项目中多次出现倒计时,所以拿出来分享下
使用方法:
1.在父组件中引入"uni-countdown"
//import uniCountdown from "./uni-countdown";
2.在父组件中注册 uniCountdown
//components:{uniCountdown},
3.放在父组件中使用
//<uni-countdown></uni-countdown> 参数代码太多直接看文件里面的吧
4.调用uniCountdown组件
//this.StatusLock = true
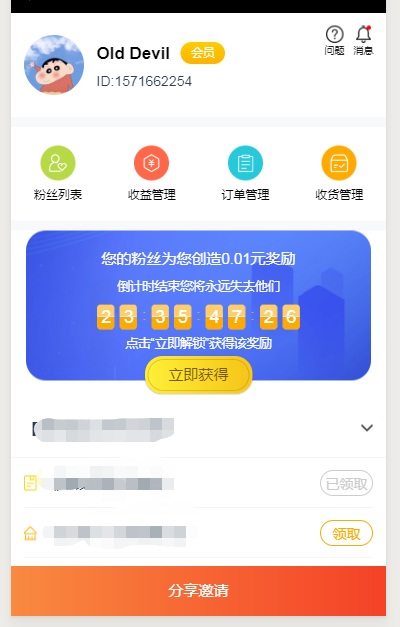
注:index.vue为父组件,后者为子组件,效果图先上,可以先看是否是自己想要的组件,再选择使用
index.vue
<template>

  <div>

    <div class="TimingBox" v-show="StatusLock">

      <div>

        <p class="texttitle">您的粉丝为您创造{{Amount}}元奖励</p>

        <p class="text">倒计时结束您将永远失去他们</p>

        <div class="ContentOfTheTiming">

          <div style="font-size:.6rem;" class="flex center">

            <uni-countdown

              bordercolor="#FFAA00"

              background="url('/wxviews/img/组10.png') center center"

              fontSize=".7rem"

              splitorColor="#fa0"

              :show-day="false"

              :hour="cdHours"

              :minute="cdMins"

              :second="cdSecs"

              :ms="cdMs"

            ></uni-countdown>

          </div>

        </div>

        <p class="become_a_Member">点击“立即解锁”获得该奖励</p>

        <div class="bigBoxBtn flex center" @click="TheBuyButton()">

          <div class="TheBuyButton">立即获得</div>

        </div>

      </div>

    </div>

  </div>

</template>

<script>

import uniCountdown from "../components/uni-countdown";

export default {

  data() {

    return {

      // 时

      cdHours: 0,

      // 分

      cdMins: 0,

      // 秒

      cdSecs: 0,

      // 毫秒

      cdMs: 60,

      Statuslock: false,

      productDetail: {},

      Amount: null

    };

  },

  components:{

      uniCountdown

  },

  created() {

    //在钩子里面先请求接口拿到时间

    this.CountDown();

  },

  methods: {

    CountDown() {

      //请求方式,看你们自己想用啥 就用啥

      Request.post(

        "api/Post_GetCommissionOrderCountdown",

        {

          MemLoginId: localStorage.getItem("MemLoginId")

        },

        res => {

          this.productDetail = res;

          this.Amount = res.Amount;

          //执行showTime()

          const countDownArr = this.showTime(

            null,

            // 拿到结束时间 EndTime

            this.productDetail.EndTime

          ).split("-");

          //Status ? 1 : 0

          if (res.Status === 0) {

            // 控制显示或隐藏 StatusLock

            this.StatusLock = false;

            return;

          }

          if ((this.cdHours = 0 && this.cdMins == 0 && this.cdSecs == 0)) {

            this.StatusLock = false;

            return;

          }

          if (this.cdHours > 0 || this.cdMins > 0 || this.cdSecs > 0) {

            this.StatusLock = true;

            this.cdHours = countDownArr[0] * 24 + countDownArr[1];

            this.cdMins = countDownArr[2];

            this.cdSecs = countDownArr[3];

            return;

          }

          if (res.Status === 1) {

            this.StatusLock = true;

            this.cdHours = countDownArr[0] * 24 + countDownArr[1];

            this.cdMins = countDownArr[2];

            this.cdSecs = countDownArr[3];

            return;

          }

        },

        err => {}

      );

    },

    TheBuyButton(){

        alert('暂时还没有开放此功能')

    },

    showTime(startTimeStr, endTimeStr) {

      var startTime = startTimeStr

        ? new Date(startTimeStr.replace(/-/g, "/"))

        : new Date();

      var endTime = new Date(endTimeStr.replace(/-/g, "/"));

      var totalSecs = (endTime - startTime) / 1000;

      var days = Math.floor(totalSecs / 3600 / 24);

      var hours = Math.floor((totalSecs - days * 24 * 3600) / 3600);

      var mins = Math.floor((totalSecs - days * 24 * 3600 - hours * 3600) / 60);

      var secs = Math.floor(

        totalSecs - days * 24 * 3600 - hours * 3600 - mins * 60

      );

      if ((days + "").slice(0, 1) != "-") {

        return days + "-" + hours + "-" + mins + "-" + secs;

      } else {

        return 0 + "-" + 0 + "-" + 0 + "-" + 0;

      }

    }

  }

};

</script>

<style lang="less" scoped>

.TheBuyButton {

  width: 4rem;

  height: 1.2rem;

  background: linear-gradient(

    90deg,

    rgba(254, 239, 54, 1) 0%,

    rgba(246, 197, 25, 1) 100%

  );

  box-shadow: 0px 0px 3px 0px rgba(115, 91, 6, 1);

  border-radius: 0.6rem;

  margin: 0 auto;

  position: relative;

  color: #735b06;

  font-size: 0.6rem;

  line-height: 1.2rem;

}

.TimingBox {

  width: 100%;

  background: #fff;

  height: 6.7rem;

}

.ContentOfTheTiming {

  width: 100%;

  height: 1rem;

  margin: 0 0 0.2rem 0;

}

.become_a_Member {

  color: #fff;

  font-size: 0.5rem;

}

.djs > div {

  width: 13.8rem;

  height: 6rem;

  margin: 0 auto;

  background-color: #fff;

  background: url("") no-repeat;

  background-size: 100% 100%;

  background-repeat: no-repeat;

  text-align: center;

  border-radius: 0.5rem;

  box-sizing: border-box;

}

.bigBoxBtn {

  width: 4.3rem;

  height: 1.5rem;

  background: linear-gradient(

    90deg,

    rgba(254, 239, 54, 1) 0%,

    rgba(246, 197, 25, 1) 100%

  );

  box-shadow: 0px 1px 3px 0px rgba(115, 91, 6, 0.67);

  border-radius: 0.7rem;

  position: relative;

  margin: 0 auto;

  bottom: -0.2rem;

}

.center {

  -webkit-box-pack: center;

  -ms-flex-pack: center;

  justify-content: center;

  -webkit-box-align: center;

  -ms-flex-align: center;

  align-items: center;

}

.flex {

  display: -webkit-box;

  display: -ms-flexbox;

  display: flex;

}

</style>
uni-countdown.vue
<template>

  <div class="uni-countdown">

    <div

      v-if="showDay"

      :style="{borderColor:borderColor, color:color, background:background, fontSize:fontSize}"

      class="uni-countdown__number">{{ d }}</div>

    <div

      v-if="showDay"

      :style="{color:splitorColor}"

      class="uni-countdown__splitor">天</div>

    <div

      :style="{borderColor:borderColor, color:color, background:background, fontSize:fontSize,backgroundSize:backgroundSize,backgroundRepeat:backgroundRepeat}"

      class="uni-countdown__number"><p style="line-height:1rem; margin:0;">{{ h1 }}</p><hr class="hrxt"></div>

        <div

      :style="{borderColor:borderColor, color:color, background:background, fontSize:fontSize,backgroundSize:backgroundSize,backgroundRepeat:backgroundRepeat}"

      class="uni-countdown__number"><p style="line-height:1rem; margin:0;">{{ h2 }}</p><hr class="hrxt"></div>

    <div

      :style="{color:splitorColor}"

      class="uni-countdown__splitor">{{ showColon ? ':' : '时' }}</div>

    <div

      :style="{borderColor:borderColor, color:color, background:background, fontSize:fontSize,backgroundSize:backgroundSize,backgroundRepeat:backgroundRepeat}"

      class="uni-countdown__number"><p style="line-height:1rem; margin:0;">{{ i1 }}</p><hr class="hrxt"></div>

             <div

      :style="{borderColor:borderColor, color:color, background:background, fontSize:fontSize,backgroundSize:backgroundSize,backgroundRepeat:backgroundRepeat}"

      class="uni-countdown__number"><p style="line-height:1rem; margin:0;">{{ i2 }}</p><hr class="hrxt"></div>

    <div

      :style="{color:splitorColor}"

      class="uni-countdown__splitor">{{ showColon ? ':' : '分' }}</div>

    <div

      :style="{borderColor:borderColor, color:color, background:background, fontSize:fontSize,backgroundSize:backgroundSize,backgroundRepeat:backgroundRepeat}"

      class="uni-countdown__number"><p style="line-height:1rem; margin:0;">{{ s1 }}</p><hr class="hrxt"></div>

        <div

      :style="{borderColor:borderColor, color:color, background:background, fontSize:fontSize,backgroundSize:backgroundSize,backgroundRepeat:backgroundRepeat}"

      class="uni-countdown__number"><p style="line-height:1rem; margin:0;">{{ s2 }}</p><hr class="hrxt"></div>

    <div

     <div

      :style="{color:splitorColor}"

      class="uni-countdown__splitor">{{ showColon ? ':' : '秒' }}</div>

    <div

      :style="{borderColor:borderColor, color:color, background:background, fontSize:fontSize,backgroundSize:backgroundSize,backgroundRepeat:backgroundRepeat}"

      class="uni-countdown__number"><p style="line-height:1rem; margin:0;">{{ ms1 }}</p><hr class="hrxt"></div>

        <div

      :style="{borderColor:borderColor, color:color, background:background, fontSize:fontSize,backgroundSize:backgroundSize,backgroundRepeat:backgroundRepeat}"

      class="uni-countdown__number"><p style="line-height:1rem; margin:0;">{{ ms2 }}</p><hr class="hrxt"></div>

    <div

      v-if="!showColon"

      :style="{color:splitorColor}"

      class="uni-countdown__splitor">秒</div>

  </div>

</template>

<script>

export default {

  name: 'UniCountdown',

  props: {

    showDay: {

      type: Boolean,

      default: true

    },

    showColon: {

      type: Boolean,

      default: true

    },

        background: {

            type: String,

            default: '#FFFFFF'

        },

    backgroundColor: {

      type: String,

      default: '#FFFFFF'

    },

    borderColor: {

      type: String,

      default: '#000000'

    },

    backgroundImg: {

      type:String,

      default:""

    },

        fontSize: {

            type: String,

      default: '30px'

        },

    color: {

      type: String,

      default: '#fff'

    },

    splitorColor: {

      type: String,

      default: '#000000'

    },

    day: {

      type: Number,

      default: 0

    },

    hour: {

      type: Number,

      default: 0

    },

    minute: {

      type: Number,

      default: 0

    },

    second: {

      type: Number,

      default: 0

    },

    ms: {

      type: Number,

      default: 0

    }

  },

  data () {

    return {

      timer: null,

      d: '00',

      h: '00',

            h1: '00',

            h2: '00',

      i: '00',

            i1: '00',

            i2: '00',

      s: '00',

            s1: '0',

      s2: '0',

      ms: '00',

            ms1: '0',

            ms2: '0',

      leftTime: 0,

      seconds: 0

    }

  },

  created: function (e) {

    this.seconds = this.toSeconds(this.day, this.hour, this.minute, this.second, this.ms)

    this.countDown()

    this.timer = setInterval(() => {

      this.seconds--

      if (this.seconds < 0) {

        this.timeUp()

        return

      }

      this.countDown()

    }, 1000/60)

  },

  beforeDestroy () {

    clearInterval(this.timer)

  },

  methods: {

    toSeconds (day, hours, minutes, seconds, ms) {

      return (day * 60 * 60 * 60 * 24) + (hours * 60 * 60 * 60) + (minutes * 60 * 60)  + (seconds * 60) + ms

    },

    timeUp () {

      clearInterval(this.timer)

      this.$emit('timeup')

    },

    countDown () {

      var seconds = this.seconds

      var [day, hour, minute, second, ms] = [0, 0, 0, 0, 0]

      if (seconds > 0) {

        day = Math.floor(seconds / (60 * 60 * 60 * 24))

        hour = Math.floor(seconds / (60 * 60 * 60)) - (day * 24)

        minute = Math.floor(seconds / 60 / 60) - (day * 24 * 60) - (hour * 60)

        second = Math.floor(seconds / 60) - (day * 24 * 60 * 60) - (hour * 60 * 60) - (minute * 60)

        ms = Math.floor(seconds) - (day * 24 * 60 * 60 * 60) - (hour * 60 * 60 * 60) - (minute * 60 * 60) - (second * 60)

      } else {

        this.timeUp()

      }

      if (day < 10) {

        day = '0' + day

      }

      if (hour < 10) {

        hour = '0' + hour

      }

      if (minute < 10) {

        minute = '0' + minute

      }

      if (second < 10) {

        second = '0' + second

      }

      if (ms < 10) {

        ms = '0' + ms

      }

      this.d = day

      this.h = hour

            this.h1 = hour.toString().slice(0,1)

            this.h2 = hour.toString().slice(1,2)

      this.i = minute

            this.i1 = minute.toString().slice(0,1)

            this.i2 = minute.toString().slice(1,2)

      this.s = second

            this.s1 = second.toString().slice(0,1)

      this.s2 = second.toString().slice(1,2)

      this.ms = ms

            this.ms1 = ms.toString().slice(0,1)

      this.ms2 = ms.toString().slice(1,2)

    }

  }

}

</script>

<style lang="scss">

    $countdown-height:.8rem;

  .uni-countdown__number{

     background-size: 100% 100%;

  background-repeat: no-repeat;

  }

    .uni-countdown {

        padding: .04rem 0;

        display: inline-flex;

        flex-wrap: nowrap;

        justify-content: center;

        &__splitor {

            justify-content: center;

            line-height: $countdown-height;

            padding: 0 .1rem;

      font-size: .6rem;

        }

        &__number {

            line-height: $countdown-height;

            justify-content: center;

            height: $countdown-height;

            border-radius: .12rem;

            margin: 0 .1rem;

            font-size: .7rem;

            font-weight: 500;

      width: .7rem;

      height: 1rem;

      box-sizing: border-box;

      background-size: 100% 100%;

    background-repeat: no-repeat;

        }

    }

</style>

<style lang="less">

  .hrxt{

    position: relative;

    top: -.9rem;

    left: 0;

    width: .6rem;

    border:1px solid #e5e5e5;

  }

</style>
Vue自行封装常用组件-倒计时的更多相关文章
- Vue自行封装常用组件-弹出框
使用方法: 1.在父组件中引入"box.vue" //import popUpBox from "./box.vue"; 2.在父组件中注册 popUpBo ...
- Vue自行封装常用组件-文本提示
使用方法:1.在父组件中引入"toast.vue" //import toast from "./toast"; 2.在父组件中注册 toast //compo ...
- Vue 数组封装和组件data定义为函数一些猜测
数组封装 var vm={ list:[0,1] } var push=vm.list.push;//把数组原来的方法存起来 vm.list.push=function(arg){//重新定义数组的 ...
- Vue文件封装日历组件
封装就是要具有灵活性,样式自适应,调用的时候传入props就可以变成自己想要的样式. 效果展示网址:https://1963331542.github.io/ 源代码: <template> ...
- Vue中封装axios组件实例
首先要创建一个网络模块network文件夹 里面要写封装好的几个组件 在config.js里面这样写 在index.js要这样写 core.js文件里面内容如下 然后要在main.js文件里面要设置 ...
- [ vue ] Quasar封装q-dialog组件,在外层实现弹出框的开启和关闭
场景描述: 见:https://www.cnblogs.com/remly/p/12981582.html 具体实现: <!-- 父组件 --> <template> < ...
- vue移动端常用组件
3d picker组件 参考链接:https://segmentfault.com/a/1190000007253581?utm_source=tag-newest安装:npm install vue ...
- vue中封装swipe组件
<template> <!-- TODO swipe --> <div id="hy-swiper"> <div class=" ...
- vue封装一些常用组件loading、switch、progress
vue封装一些常用组件loading.switch.progress github文档https://github.com/zengjielin/vue-component-library loadi ...
随机推荐
- Eclipse使用git发布项目到github
因为一直都在使用svn,今天尝试了下git,记录下来既是方便自己以后查看,也是分享一些经验! 废话不多说,撸起袖子就是干!!! 1.选中要上传的项目右键 2.选中git 3.在图上打钩,点击所要上传的 ...
- 利用python列出当前目录下的所有文件
问题 当一个目录下有很多文件夹或者文件,我们想分析各个文件的名字,这时就可以写一个函数,列出当前目录下所有文件名字. 代码 src_dir = r'./' # 源文件目录地址 def list_all ...
- dockerfile中配置时区
https://www.cnblogs.com/kevingrace/p/5570597.html #设置时区RUN /bin/cp /usr/share/zoneinfo/Asia/Shanghai ...
- java:ssh连接服务器,实现本地文件上传和下载
1.连接至服务器:ssh hp@10.10.17.16 -p 5555 下载文件:scp -r hp@10.10.17.16:/ccc(服务器路径,文件夹下所有文件) /path(本地路径) ...
- python的I/O编程:文件打开、操作文件和目录、序列化操作
1 文件读写 1.1 打开文件: open(r'D:\text.txt') 1.2 文件模式 值 功能描述 'r' 读模式 'w' 写模式 'a' 追加模式 'b' 二进制模式 '+' 读写模式 1. ...
- DataTable.Select筛选过滤数据返回DataRow[]转为DataTable添加到DataSet
问题还原,如图所示,我们要筛选所有SHDP 为北京翠微KR的数据. 1. 筛选DataTable微软为我们提供了一个方法DataTable.Select(),其用法如下: 1) Select()—— ...
- Datafactory 实际使用案例
Datafactory 实际使用案例 一. 简介 QuestDataFactory 是一种快速的.易于产生测试数据工具,它能建模复杂数据关系,且有带有GUI界面.DataFactory是一 ...
- 【HANA系列】SAP HANA SQL获取字符串长度
公众号:SAP Technical 本文作者:matinal 原文出处:http://www.cnblogs.com/SAPmatinal/ 原文链接:[HANA系列]SAP HANA SQL获取字符 ...
- Java工程师研发面经大合集
百度研发面经整合版 软件研发工程师 基础研发工程师 百度智能云 百度核心搜索部 百度今年的提前批有点奇怪,好像都不走流程,牛客上好几个百度内推的帖子,我投了几个,基本上都是百度智能云的,当然也有其他部 ...
- Java内存模型(三)原子性、内存可见性、重排序、顺序一致性、volatile、锁、final
一.原子性 原子性操作指相应的操作是单一不可分割的操作.例如,对int变量count执行count++d操作就不是原子性操作.因为count++实际上可以分解为3个操作:(1)读取变量co ...