springBoot03- springboot+jpa+thymeleaf增删改查
参考http://www.mooooc.com/springboot/2017/09/23/spring-boot-jpa-thymeleaf-curd.html
数据库:
CREATE TABLE `user` (

  `id` int(10) NOT NULL AUTO_INCREMENT,

  `username` varchar(50) DEFAULT NULL,

  `password` varchar(50) NOT NULL,

  `age` int(10) DEFAULT NULL,

  PRIMARY KEY (`id`)

) ENGINE=InnoDB DEFAULT CHARSET=utf8mb4
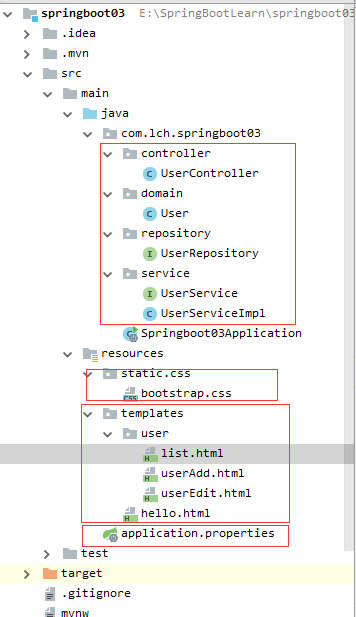
项目结构:
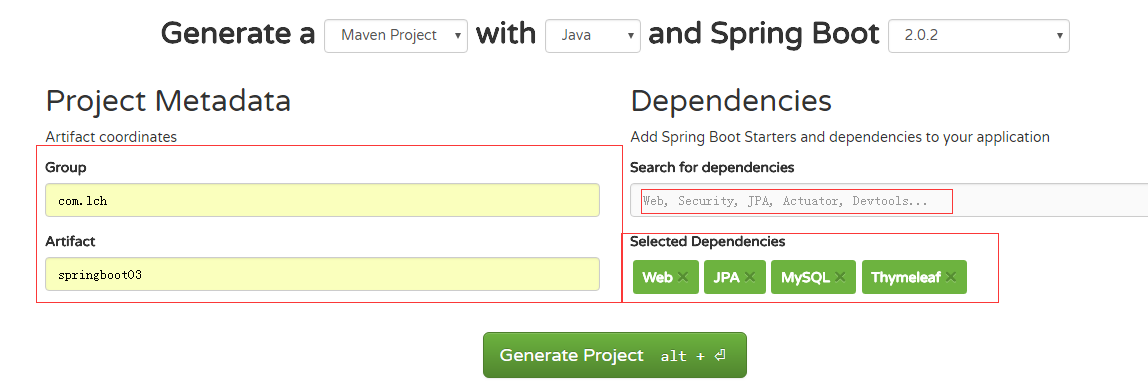
1.模版下载:
http://start.spring.io/ 在搜索框分别输入Web Thymeleaf JPA MySQL, 下载的模版工程中就自动有这些依赖配置了
1.pom文件:
<?xml version="1.0" encoding="UTF-8"?>

<project xmlns="http://maven.apache.org/POM/4.0.0" xmlns:xsi="http://www.w3.org/2001/XMLSchema-instance"

    xsi:schemaLocation="http://maven.apache.org/POM/4.0.0 http://maven.apache.org/xsd/maven-4.0.0.xsd">

    <modelVersion>4.0.</modelVersion>

    <groupId>com.lch</groupId>

    <artifactId>springboot03</artifactId>

    <version>0.0.-SNAPSHOT</version>

    <packaging>jar</packaging>

    <name>springboot03</name>

    <description>Demo project for Spring Boot</description>

    <parent>

        <groupId>org.springframework.boot</groupId>

        <artifactId>spring-boot-starter-parent</artifactId>

        <version>2.0..RELEASE</version>

        <relativePath/> <!-- lookup parent from repository -->

    </parent>

    <properties>

        <project.build.sourceEncoding>UTF-</project.build.sourceEncoding>

        <project.reporting.outputEncoding>UTF-</project.reporting.outputEncoding>

        <!--本机安装的是jdk1.,此处改为1.,project Structure里的project SDK改为jdk1.7安装地址,

        settings下Java Compile下的target bytecode version也改为1.,然后再更新maven项目即可

        view下tool windows,选择maven projects,在打开的maven 窗口点击刷新即可 -->

        <java.version>1.7</java.version>

    </properties>

    <dependencies>

        <!--下载模版项目时,选上Web Thymeleaf JPA MySQL,此处就自动有这些依赖配置了-->

        <dependency>

            <groupId>org.springframework.boot</groupId>

            <artifactId>spring-boot-starter-data-jpa</artifactId>

        </dependency>

        <dependency>

            <groupId>org.springframework.boot</groupId>

            <artifactId>spring-boot-starter-thymeleaf</artifactId>

        </dependency>

        <dependency>

            <groupId>org.springframework.boot</groupId>

            <artifactId>spring-boot-starter-web</artifactId>

        </dependency>

        <dependency>

            <groupId>mysql</groupId>

            <artifactId>mysql-connector-java</artifactId>

            <scope>runtime</scope>

        </dependency>

        <dependency>

            <groupId>org.springframework.boot</groupId>

            <artifactId>spring-boot-starter-test</artifactId>

            <scope>test</scope>

        </dependency>

    </dependencies>

    <build>

        <plugins>

            <plugin>

                <groupId>org.springframework.boot</groupId>

                <artifactId>spring-boot-maven-plugin</artifactId>

            </plugin>

        </plugins>

    </build>

</project>
2.
启动类添加Servlet的支持:继承SpringBootServletInitializer
package com.lch.springboot03;

import org.springframework.boot.SpringApplication;

import org.springframework.boot.autoconfigure.SpringBootApplication;

import org.springframework.boot.builder.SpringApplicationBuilder;

import org.springframework.boot.web.servlet.support.SpringBootServletInitializer;

@SpringBootApplication

public class Springboot03Application extends SpringBootServletInitializer{

    public static void main(String[] args) {

        SpringApplication.run(Springboot03Application.class, args);

    }

    /**

     * 启动类添加Servlet的支持:继承SpringBootServletInitializer

     * alt+ Insert 选择对configure()方法进行重写

     * @return

     */

    @Override

    protected SpringApplicationBuilder configure(SpringApplicationBuilder builder) {

        return builder.sources(Springboot03Application.class);

    }

}
3.实体类 及 数据访问层接口定义
user.java
 package com.lch.springboot03.domain;

 import javax.persistence.*;

 /**

  * 实体类映射数据库表

  * 使用spring data jpa开发的时候,会将实体类中的成员变量与表中的字段一一对应,

  * 当我们在实体类中加上一个不与数据库表一一对应的成员变量的时候,此时我们只要在

  * 这个成员变量上加上注解@Transient

  */

 @Entity

 public class User {

     @Id

     @GeneratedValue(strategy = GenerationType.IDENTITY)

     private Long id;

     @Column(nullable = false)

     private String password;

     //name="username" 设置userName属性映射到数据库的username字段,而不是默认的user_name

     @Column(name = "username", nullable = true, unique = true)

     private String userName;

     @Column(nullable = true, unique = true)

     private int age;

     public Long getId() {

         return id;

     }

     public void setId(Long id) {

         this.id = id;

     }

     public String getPassword() {

         return password;

     }

     public void setPassword(String password) {

         this.password = password;

     }

     public String getUserName() {

         return userName;

     }

     public void setUserName(String userName) {

         this.userName = userName;

     }

     public int getAge() {

         return age;

     }

     public void setAge(int age) {

         this.age = age;

     }

 }
UserRepository
 package com.lch.springboot03.repository;

 import com.lch.springboot03.domain.User;

 import org.springframework.data.jpa.repository.JpaRepository;

 public interface UserRepository extends JpaRepository<User,Long>{

     User findById(long id);

     void deleteById(Long id);

 }
4. service层
 package com.lch.springboot03.service;

 import com.lch.springboot03.domain.User;

 import java.util.List;

 public interface UserService {

     /**

      * 获取所有

      *

      * @return

      */

     public List<User> getUserList();

     /**

      * 根据id获取

      *

      * @param id

      * @return

      */

     public User findUserById(long id);

     /**

      * 新增

      *

      * @param user

      */

     public void save(User user);

     /**

      * 修改

      *

      * @param user

      */

     public void edit(User user);

     /**

      * 删除

      *

      * @param id

      */

     public void delete(long id);

 }
 package com.lch.springboot03.service;

 import com.lch.springboot03.domain.User;

 import com.lch.springboot03.repository.UserRepository;

 import org.springframework.beans.factory.annotation.Autowired;

 import org.springframework.stereotype.Service;

 import java.util.List;

 @Service

 public class UserServiceImpl implements UserService {

     @Autowired

     private UserRepository userRepository;

     @Override

     public List<User> getUserList() {

         return userRepository.findAll();

     }

     @Override

     public User findUserById(long id) {

         return userRepository.findById(id);

     }

     @Override

     public void save(User user) {

         userRepository.save(user);

     }

     @Override

     public void edit(User user) {

         userRepository.save(user);

     }

     @Override

     public void delete(long id) {

         userRepository.deleteById(id);

     }

 }
5.controller
 package com.lch.springboot03.controller;

 import com.lch.springboot03.domain.User;

 import com.lch.springboot03.service.UserService;

 import org.springframework.stereotype.Controller;

 import org.springframework.ui.Model;

 import org.springframework.web.bind.annotation.RequestMapping;

 import javax.annotation.Resource;

 import java.util.List;

 @Controller

 public class UserController {

     @Resource

     private UserService userService;

     @RequestMapping("/")

     public String index(){

         return "redirect:/list"; //重定向到 /list

     }

     @RequestMapping("/list")

     public String lsit(Model model){

         List<User> users = userService.getUserList();

         model.addAttribute("users",users);

         return "user/list"; // 跳转到springboot03\src\main\resources\templates\user下的list.html

     }

     @RequestMapping("/toAdd")

     public String toadd(User user){

         return "user/userAdd";//跳转到userAdd.html

     }

     @RequestMapping("/add")

     public String add(User user){

         userService.save(user);

         return "redirect:/list";//添加完成,请求重定向到/list

     }

     @RequestMapping("/toEdit")

     public String toEdit(Model model,Long id){

         User user = userService.findUserById(id);

         model.addAttribute("user",user);

         return "user/userEdit"; //跳转到userEdit.html页面

     }

     @RequestMapping("/edit")

     public String edit(User user){

         userService.edit(user);

         return "redirect:/list";//获取列表数据并显示

     }

     @RequestMapping("/delete")

     public String edit(Long id){

         userService.delete(id);

         return "redirect:/list";

     }

 }
return "user/userEdit"; 代表会直接去 resources 目录下找相关的文件。
6. 前端页面:
在resources的statics目录下,建立css文件夹,把bootstrap.css拷贝进去。在templates目录下建user目录,下面建list.html,userAdd.html ,userEdit.html ,与controller中定义的对应
lsit.html
 <!DOCTYPE html>

 <html lang="en" xmlns:th="http://www.thymeleaf.org">

 <head>

     <meta charset="UTF-8"/>

     <title>userList</title>

     <link rel="stylesheet" th:href="@{/css/bootstrap.css}"></link>

 </head>

 <body class="container">

 <br/>

 <h1>用户列表</h1>

 <br/><br/>

 <div class="with:80%">

     <table class="table table-hover">

         <thead>

         <tr>

             <th>#</th>

             <th>User Name</th>

             <th>Password</th>

             <th>Age</th>

             <th>Edit</th>

             <th>Delete</th>

         </tr>

         </thead>

         <tbody>

         <tr  th:each="user : ${users}">

             <th scope="row" th:text="${user.id}">1</th>

             <td th:text="${user.userName}">neo</td>

             <td th:text="${user.password}">Otto</td>

             <td th:text="${user.age}">6</td>

             <td><a th:href="@{/toEdit(id=${user.id})}">edit</a></td>

             <td><a th:href="@{/delete(id=${user.id})}">delete</a></td>

         </tr>

         </tbody>

     </table>

 </div>

 <div class="form-group">

     <div class="col-sm-2 control-label">

         <a href="/toAdd" th:href="@{/toAdd}" class="btn btn-info">add</a>

     </div>

 </div>

 </body>

 </html>
userAdd.html
<!DOCTYPE html>
<html lang="en" xmlns:th="http://www.thymeleaf.org">
<head>
<meta charset="UTF-8"/>
<title>user</title>
<link rel="stylesheet" th:href="@{/css/bootstrap.css}"></link>
</head>
<body class="container">
<br/>
<h1>添加用户</h1>
<br/><br/>
<div class="with:80%">
<form class="form-horizontal" th:action="@{/add}" method="post">
<div class="form-group">
<label for="userName" class="col-sm-2 control-label">userName</label>
<div class="col-sm-10">
<input type="text" class="form-control" name="userName" id="userName" placeholder="userName"/>
</div>
</div>
<div class="form-group">
<label for="password" class="col-sm-2 control-label" >Password</label>
<div class="col-sm-10">
<input type="password" class="form-control" name="password" id="password" placeholder="Password"/>
</div>
</div>
<div class="form-group">
<label for="age" class="col-sm-2 control-label">age</label>
<div class="col-sm-10">
<input type="text" class="form-control" name="age" id="age" placeholder="age"/>
</div>
</div>
<div class="form-group">
<div class="col-sm-offset-2 col-sm-10">
<input type="submit" value="Submit" class="btn btn-info" />
<input type="reset" value="Reset" class="btn btn-info" />
</div> </div>
</form>
</div>
</body>
</html>
userEdit.html
<!DOCTYPE html>
<html lang="en" xmlns:th="http://www.thymeleaf.org">
<head>
<meta charset="UTF-8"/>
<title>user</title>
<link rel="stylesheet" th:href="@{/css/bootstrap.css}"></link>
</head>
<body class="container">
<br/>
<h1>修改用户</h1>
<br/><br/>
<div class="with:80%">
<form class="form-horizontal" th:action="@{/edit}" th:object="${user}" method="post">
<input type="hidden" name="id" th:value="*{id}" />
<div class="form-group">
<label for="userName" class="col-sm-2 control-label">userName</label>
<div class="col-sm-10">
<input type="text" class="form-control" name="userName" id="userName" th:value="*{userName}" placeholder="userName"/>
</div>
</div>
<div class="form-group">
<label for="password" class="col-sm-2 control-label" >Password</label>
<div class="col-sm-10">
<input type="password" class="form-control" name="password" id="password" th:value="*{password}" placeholder="Password"/>
</div>
</div>
<div class="form-group">
<label for="age" class="col-sm-2 control-label">age</label>
<div class="col-sm-10">
<input type="text" class="form-control" name="age" id="age" th:value="*{age}" placeholder="age"/>
</div>
</div>
<div class="form-group">
<div class="col-sm-offset-2 col-sm-10">
<input type="submit" value="Submit" class="btn btn-info" />
<a href="/toAdd" th:href="@{/list}" class="btn btn-info">Back</a>
</div> </div>
</form>
</div>
</body>
</html>
7.数据库连接配置:
 spring.datasource.url=jdbc:mysql://127.0.0.1/test?useUnicode=true&characterEncoding=utf-8&serverTimezone=UTC&useSSL=true

 spring.datasource.username=root

 spring.datasource.password=root

 spring.datasource.driver-class-name=com.mysql.jdbc.Driver

 spring.jpa.properties.hibernate.hbm2ddl.auto=update

 spring.jpa.properties.hibernate.dialect=org.hibernate.dialect.MySQL5InnoDBDialect

 spring.jpa.show-sql= true

 #关闭thymeleaf的缓存,不然在开发过程中修改页面不会立刻生效需要重启,生产可配置为true

 spring.thymeleaf.cache=false
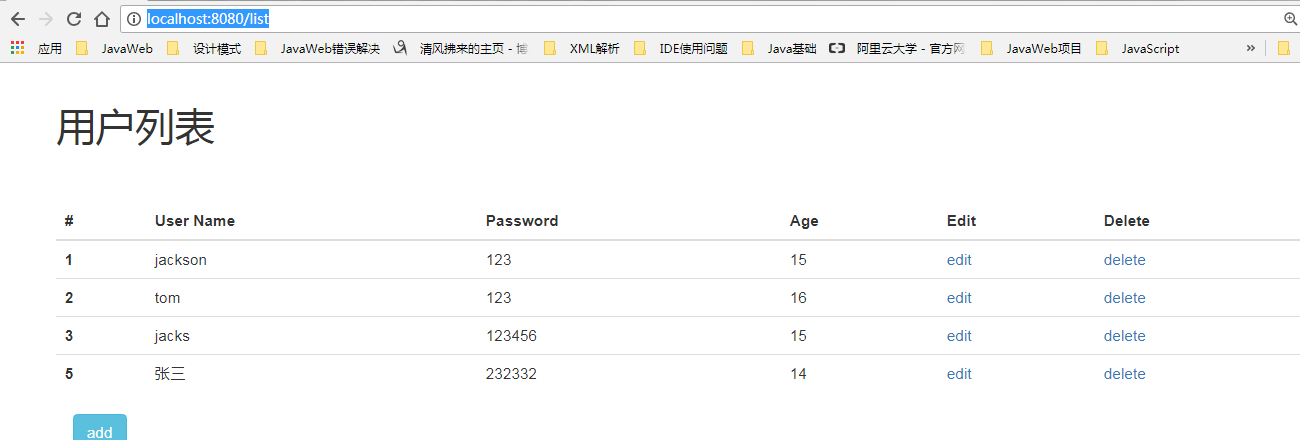
8. 启动项目并访问:http://localhost:8080/list
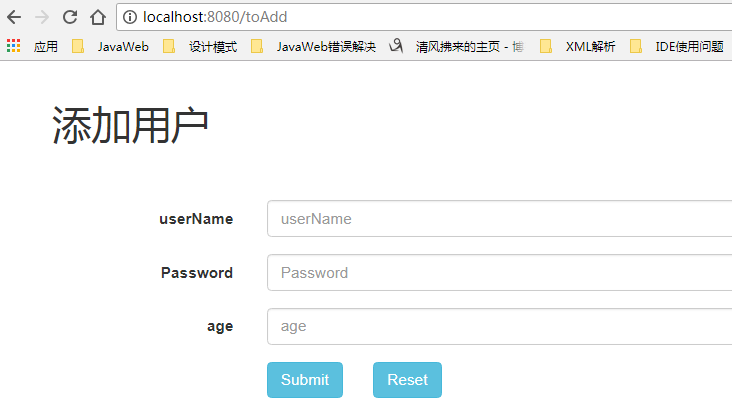
点击add :
github 代码地址:
https://github.com/liuch0228/springboot.git
springBoot03- springboot+jpa+thymeleaf增删改查的更多相关文章
- springboot+jpa+thymeleaf增删改查的示例(转)
这篇文章介绍如何使用jpa和thymeleaf做一个增删改查的示例. 先和大家聊聊我为什么喜欢写这种脚手架的项目,在我学习一门新技术的时候,总是想快速的搭建起一个demo来试试它的效果,越简单越容易上 ...
- springboot(十五):springboot+jpa+thymeleaf增删改查示例
这篇文章介绍如何使用jpa和thymeleaf做一个增删改查的示例. 先和大家聊聊我为什么喜欢写这种脚手架的项目,在我学习一门新技术的时候,总是想快速的搭建起一个demo来试试它的效果,越简单越容易上 ...
- Spring Boot(十五):spring boot+jpa+thymeleaf增删改查示例
Spring Boot(十五):spring boot+jpa+thymeleaf增删改查示例 一.快速上手 1,配置文件 (1)pom包配置 pom包里面添加jpa和thymeleaf的相关包引用 ...
- (转)Spring Boot (十五): Spring Boot + Jpa + Thymeleaf 增删改查示例
http://www.ityouknow.com/springboot/2017/09/23/spring-boot-jpa-thymeleaf-curd.html 这篇文章介绍如何使用 Jpa 和 ...
- SpringBoot JPA实现增删改查、分页、排序、事务操作等功能
今天给大家介绍一下SpringBoot中JPA的一些常用操作,例如:增删改查.分页.排序.事务操作等功能.下面先来介绍一下JPA中一些常用的查询操作: //And --- 等价于 SQL 中的 and ...
- spring boot2+jpa+thymeleaf增删改查例子
参考这遍文章做了一个例子,稍微不同之处,原文是spring boot.mysql,这里改成了spring boot 2.Oracle. 一.pom.xml引入相关模块web.jpa.thymeleaf ...
- Spring Boot + Jpa + Thymeleaf 增删改查示例
快速上手 配置文件 pom 包配置 pom 包里面添加 Jpa 和 Thymeleaf 的相关包引用 <dependency> <groupId>org.springframe ...
- SpringBoot JPA + H2增删改查示例
下面的例子是基于SpringBoot JPA以及H2数据库来实现的,下面就开始搭建项目吧. 首先看下项目的整体结构: 具体操作步骤: 打开IDEA,创建一个新的Spring Initializr项目, ...
- Spring Boot (十五): Spring Boot + Jpa + Thymeleaf 增删改查示例
这篇文章介绍如何使用 Jpa 和 Thymeleaf 做一个增删改查的示例. 先和大家聊聊我为什么喜欢写这种脚手架的项目,在我学习一门新技术的时候,总是想快速的搭建起一个 Demo 来试试它的效果,越 ...
随机推荐
- php面试专题---8、会话控制考点
php面试专题---8.会话控制考点 一.总结 一句话总结: 主要是cookie和session的区别,以及用户禁用cookie之后怎么使用session 1.为什么要使用会话控制技术? 因为http ...
- Java-package import关键字
package包关键字,在java中,有包的概念,主要是用来归类 分类作用: 便于项目的开发和维护: 通过分包,可以很清晰的来管理类: 上述 一个类Animal: 在开头有个 package com. ...
- yum python mysql
lrwxrwxrwx root root Jun : pyspark -> /etc/alternatives/pyspark lrwxrwxrwx root root Jul : python ...
- 史上最全USB HID开发资料
史上最全USB HID开发资料 史上最全USB HID开发资料,悉心整理一个月,亲自测试. 涉及STM32 C51 8051F例子都有源码,VC上位机例子以及源码,USB协议,HID协议,USB抓包工 ...
- linux常用符号命令
1.符号: 在linux中,&和&&,|和||介绍如下: & 表示任务在后台执行,如要在后台运行redis-server,则有 redis-server & & ...
- STM32 实现内部Flash的读写(HAL库版)
Flash 中文名字叫闪存,是一种长寿命的非易失性(断电数据不丢失)的存储器.可以对称为块的存储器单元块进行擦写和再编程,在进行写入操作之前必须先执行擦除.一个Nand Flash由多个块(Block ...
- msyql join语句执行原理
首先,我建了一个表t2,里面有1000条数据,有id,a,b三个字段,a字段加了索引 然后我又建立一个t1表,里面有100条数据,和t2表的前一百条数据一致,也是只有id,a,b三个字段,a字段加了索 ...
- [Linux] 015 用户管理命令
1. 用户管理命令:useradd 命令名称:useradd 命令所在路径:/bin/sbin/useradd 执行权限:root 语法:useradd 用户名 功能描述:添加新用户 范例: $use ...
- [Bzoj2243][SDOI2011]染色(线段树&&树剖||LCT)
题目链接:https://www.lydsy.com/JudgeOnline/problem.php?id=2243 线段树+树链剖分,在线段树需要每次用lt和rt两个数组记录当前区间的左右边界的颜色 ...
- python学习第十六天集合的关系测试
在做数据分析的时候,要对一个集合分析,而且分析多个集合的之间的关系分析,那么用传统的循环的比较麻烦,集合提供很多方法,很容易比较多个集合的关系,并集,交集,差集,对称差集等. n1={1,2,4,6} ...