vue02—— 动画、组件、组件之间的数据通信
一、vue中使用动画
文档:https://cn.vuejs.org/v2/guide/transitions.html
1. Vue 中的过渡动画
<!DOCTYPE html>

<html lang="en">

<head>

    <meta charset="UTF-8">

    <title>Title</title>

    <style>

        .box{

            width: 200px;

            height: 200px;

            background-color:yellow;

        }

        .fade-enter,.fade-leave-to{

            opacity: 0;

            transform: translateX(200px);

        }

        .fade-enter-active,.fade-leave-active{

            transition: all 0.5s ease-in-out;

        }

    </style>

</head>

<body>

<div id="app">

    <button @click="show=!show">切换</button>

    <transition name="fade">

        <div class="box" v-if="show">始于1886,可口可乐</div>

    </transition>

</div>

<script src="js/vue.js"></script>

<script>

    new Vue({

        el:'#app',

        data:{

            show:true

        },

    });

</script>

</body>

</html>

2. 过渡动画 案例
<!DOCTYPE html>
<html lang="en">
<head>
<meta charset="UTF-8">
<title>Title</title>
<style>
*{
padding: 0;
margin: 0;
list-style: none;
}
#app{
width: 600px;
margin: 50px auto;
}
li{
width: 500px;
height: 30px;
border: 1px dashed #3fa435;
margin-top: 10px;
}
li:hover{
cursor: pointer;
background-color: #ff7408;
transition: all 0.8s ease; /* hover 动画效果 */
}
/*从这里开始设置 vue 的动画*/
.hero-enter, .hero-leave-to{
opacity: 0;
transform: translateY(80px);
}
.hero-enter-active, .hero-leave-active{
transition: all 0.5s ease;
}
.hero-move{
transition: all 1s ease-in-out;
}
</style>
</head>
<body>
<div id="app">
<div>
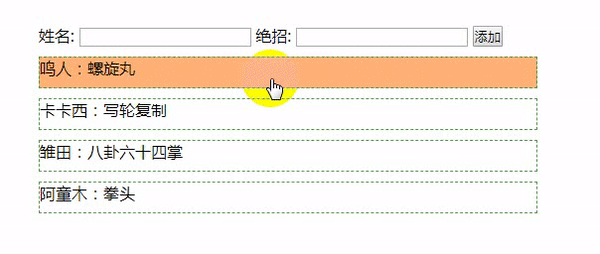
<label>姓名: <input type="text" v-model="name"></label>
<label>绝招: <input type="text" v-model="unique_skill"></label>
<button @click="add()">添加</button>
</div>
<transition-group tag="ul" name="hero">
<li v-for="(list,index) in lists" @click="del(index)" :key="index">
{{list.name}}:{{list.unique_skill}}
</li>
</transition-group>
</div>
<script src="js/vue.js"></script>
<script>
new Vue({
el:'#app',
data:{
name:'',
unique_skill:'',
lists:[
{name:'鸣人',unique_skill:'螺旋丸'},
{name:'卡卡西',unique_skill:'写轮复制'},
{name:'雏田',unique_skill:'八卦六十四掌'},
{name:'阿童木',unique_skill:'拳头'}
]
},
methods:{
del(index){
this.lists.splice(index,1)
},
add(){
this.lists.push({name:this.name,unique_skill:this.unique_skill});
this.name = '';
this.unique_skill = '';
}
}
})
</script>
</body>
</html>
3. 用第三方动画库 animate.css
<!DOCTYPE html>

<html lang="en">

<head>

    <meta charset="UTF-8">

    <title>Title</title>

    <link rel="stylesheet" href="css/animate.css">

</head>

<body>

<div id="app">

    <button @click="flag = !flag">切换</button>

    <br>

    <transition

        enter-active-class="bounceIn"

        leave-active-class="bounceIn"

        :duration="{enter:1000,leave:500}"

    >

        <img v-if="flag" src="img/1.jpg" alt="" class="animated">

    </transition>

    <h1 class="animated infinite bounce delay-2s">↑↑↑↑↑</h1>

</div>

<script src="js/vue.js"></script>

<script>

    new Vue({

        el:'#app',

        data:{

            flag:false,

        }

    })

</script>

</body>

</html>

其他动画操作方式,查看vue官网文档,这里先不记录了。
二、Vue 组件
以下演示的组件的各种创建方式。在工程化开发中.
1.全局 Vue 组件
全局组件,所有实例都可以使用
<!DOCTYPE html>
<html lang="en">
<head>
<meta charset="UTF-8">
<title></title>
</head>
<body>
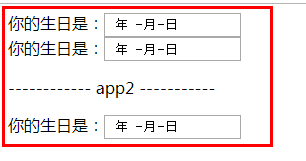
<div id="app">
<my-date></my-date>
<my-date></my-date>
</div>
<div id="app2">
<p>------------ app2 -----------</p>
<my-date></my-date>
</div>
<script src="js/vue.js"></script>
<script>
// 1. 组件构造器
let Profile = Vue.extend({
// 模板选项
template:
`
<div>
<span>你的生日是:</span><input type="date">
</div>
`
});
// 2. 注册全局组件
Vue.component('my-date',Profile);
// 1. 创建Vue的实例
new Vue({
el: '#app',
data: {
msg: '哒哒哒'
}
});
new Vue({
el:'#app2'
})
</script>
</body>
</html>
2. 局部 Vue 组件
局部组件在各自的实例里面注册。
<!DOCTYPE html>
<html lang="en">
<head>
<meta charset="UTF-8">
<title></title>
</head>
<body>
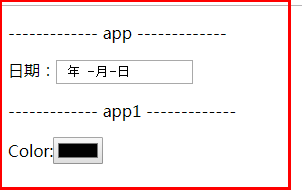
<div id="app">
<p>------------- app -------------</p>
<my-date></my-date>
<!-- my-color 这里写里也没用-->
<my-color></my-color>
</div>
<div id="app1">
<p>------------- app1 -------------</p>
<my-color></my-color>
</div>
<script src="js/vue.js"></script>
<script>
// 1. 组件构造器
let Profile = Vue.extend({
// 模板选项
template: `
<div>
<span>日期:</span><input type="date">
</div>
`
});
let Profile1 = Vue.extend({
// 模板选项
template: `
<div>
<span>Color:</span><input type="color">
</div>
`
});
// 1. 创建Vue的实例
new Vue({
el: '#app',
data: {
msg: '撩课学院'
},
components: {
'my-date': Profile
}
});
new Vue({
el: '#app1',
components: {
'my-color': Profile1
}
})
</script>
</body>
</html>
3. 另一种注册组件的方式
全局组件:
<html lang="en">
<head>
<meta charset="UTF-8">
<title></title>
</head>
<body>
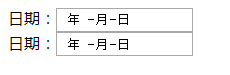
<div id="app">
<my-date></my-date>
</div>
<div id="app1">
<my-date></my-date>
</div>
<script src="js/vue.js"></script>
<script>
// 注册全局组件
Vue.component('my-date', {
template: `
<div>
<span>日期:</span><input type="date">
</div>
`
});
// 1. 创建Vue的实例
new Vue({
el: '#app',
});
new Vue({
el: '#app1',
});
</script>
</body>
</html>
局部组件:
<body>

<div id="app">

    <my-date></my-date>

    <my-color></my-color>

</div>

<script src="js/vue.js"></script>

<script>

    new Vue({

        el:'#app',

        data:{},

        components:{

            'my-date':{

                template:`<div> <span>日期:</span> <input type="date"> </div>`

            },

            'my-color': {

                template: `

          <div>

              <span>Color:</span><input type="color">

          </div>

          `

            },

        }

    })

</script>

</body>

4.父子组件
<body>
<div id="app">
<parent></parent>
<!--<child></child>-->
</div>
<script src="js/vue.js"></script>
<script>
// 1.构造子组件
let child1 = Vue.extend({
template:`<img src="img/1.jpg" width="200px">`
});
Vue.component('child',child1);
let child2 = Vue.extend({
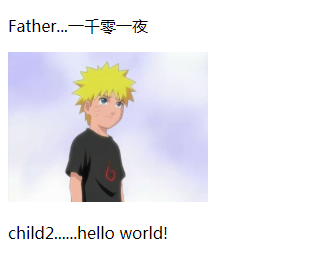
template:`<p>child2......hello world!</p>`
});
// 2.构造父组件
Vue.component('parent',{
components:{
'my-child1':child1,
'my-child2':child2
},
template:
`
<div>
<p>Father...一千零一夜</p>
<my-child1></my-child1>
<my-child2></my-child2>
</div>
`
});
new Vue({
el:'#app',
});
</script>
</body>
5. vue 组件中的 template标签
<body>
<div id="app">
<g_box></g_box>
</div>
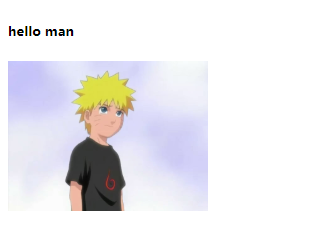
<template id="g_box">
<div>
<h5>hello man</h5>
<img src="img/1.jpg" width="200px" alt="">
</div>
</template>
<script src="js/vue.js"></script>
<script>
Vue.component('g_box',{
template:'#g_box'
});
new Vue({
el:'#app',
})
</script>
</body>
6.Vue组件中的 script 标签
这种方式不常用。
<body>

<div id="app">

    <g_div></g_div>

</div>

<script type="text/template" id="g_div">

    <div>

        <h5>hello Nurato!</h5>

        <img src="img/1.jpg" width="200px" alt="">

    </div>

</script>

<script src="js/vue.js"></script>

<script>

    Vue.component('g_div',{

       template:'#g_div'

    });

    new Vue({

        el:'#app'

    })

</script>

</body>

三、组件中间的数据通信
1.Vue的组件数据传递-data
在这里,data选项必须为函数,必须要用函数返回的方式传递数据
<body>

<div id="app">

    <g_div></g_div>

</div>

<template id="g_div">

    <div>

        <h5>{{msg}}</h5>

        <img src="img/1.jpg" width="200px" alt="">

    </div>

</template>

<script src="js/vue.js"></script>

<script>

    Vue.component('g_div',{

        template:'#g_div',

        // 这里data 只能通过函数返回的方式来,因为这样申明的话,和new Vue 里的data会互相污染

        // data:{

        //     msg:'hello man'

        // }

        data(){

            return {msg:'hello man'}

        }

    });

    new Vue({

        el:'#app',

        data:{

        }

    })

</script>

</body>

2.Vue的组件之间的通信
<body>

<div id="app">

    <g_box msg="hello Nurato" imgSrc="img/1.jpg"></g_box>

</div>

<template id="g_box">

    <div>

        <h5>{{msg}}</h5>

        <img :src="imgsrc" width="200px" alt="">

    </div>

</template>

<script src="js/vue.js"></script>

<script>

    // 1 创建组件

    Vue.component('g_box',{

        template:'#g_box',

        props:['msg','imgsrc']

    });

    // 2 创建实例

    new Vue({

        el:'#app',

        data:{

            msg:''

        }

    })

</script>

</body>

3.Vue的组件之间的通信-多层
<div id="app">

    <!-- 1. 这种不带 : 号的,可以直接填值,但是用不了 实例中 data 里的数据  -->

    <!--<my-parent imgsrc="img/1.jpg" img_title="Nurato"></my-parent>-->

    <!-- 2. 图片,imgsrc 如果是用 实例中的data,必须是用加 : 号的方式  -->

    <my-parent :img_title="title" :imgsrc="img"></my-parent>

</div>

<!-- 子组件 1 -->

<template id="my_img">

    <img :src="imgsrc"width="200px"  alt="">

</template>

<!-- 子组件 2 -->

<template id="my_title">

    <h5>{{title}}</h5>

</template>

<!-- 父级组件 -->

<div id="my_parent">

    <div>

        <child1 :imgsrc="imgsrc"></child1>

        <child2 :title="img_title"></child2>

    </div>

</div>

<script src="js/vue.js"></script>

<script>

    // 1.子组件实例

    let child1 = Vue.extend({

        template:'#my_img',

        props:['imgsrc']

    });

    let child2 = Vue.extend({

        template:'#my_title',

        props:['title']

    });

    // 父组件

    Vue.component('my-parent',{

        props:['imgsrc','img_title'],

        components:{

            'child1':child1,

            'child2':child2

        },

        template:'#my_parent'

    });

    new Vue({

        el:'#app',

        data:{

            img:'img/1.jpg',

            title:'2.哒哒哒'

        }

    })

</script>

</body>

vue02—— 动画、组件、组件之间的数据通信的更多相关文章
- jquery插件模式开发和react组件开发之间的异同
jquery插件模式开发和react组件开发之间的异同
- Vue 根组件,局部,全局组件 | 组件间通信,案例组件化
一 组件 <div id="app"> <h1>{{ msg }}</h1> </div> <script src=" ...
- 微信小程序 - 组件 | 自定义组件 | 组件事件传递页面
组件 小程序允许我们使用自定义组件的方式来构建页面 类似Vue的小组件 自定义组件 类似于页面,一个自定义组件由 json, wxml, wxss, js 4个文件组成 1.创建 1.创建compon ...
- React组件(组件属性this.state和this.props,css样式修饰组件)
目录: 1.创建组件的第一种方式 function2.将组件抽离为单独的jsx文件3.省略.jsx后缀, 配置webpack设置根目录4.创建组件的第二种方式--使用class关键字创建组件5.组件私 ...
- vue组件之间的通信,父子之间的数据通信
父子组件之间的通信问题既可以传递数据也可以传递变量,父组件传递数据给子组件可以使用props,子组件传递数据给父组件则可以自定义函数来监听子组件的事件发射器. 首先说说组件注册,组件的注册分为全局注册 ...
- [2014.01.27]wfGifAnimator 动画GIF组件 3.0
组件支持设置GIF帧延时和获取GIF的帧延迟. 组件支持添加或插入或更新帧(支持bmp/jpg/gif/wmf/emf/ico格式).删除帧.清空帧操作. 组件支持GIF动画缩放大小. 组件支持绘制线 ...
- Vue 组件&组件之间的通信 之 非父子关系组件之间的通信
Vue中不同的组件,即使不存在父子关系也可以相互通信,我们称为非父子关系通信: 我们需要借助一个空Vue实例,在不同的组件中,使用相同的Vue实例来发送/监听事件,达到数据通信的目的: 实例: 初始加 ...
- Vue 组件&组件之间的通信 父子组件的通信
在Vue的组件内也可以定义组件,这种关系成为父子组件的关系: 如果在一个Vue实例中定义了component-a,然后在component-a中定义了component-b,那他们的关系就是: Vue ...
- vue的$emit 与$on父子组件与兄弟组件的之间通信
本文主要对vue 用$emit 与 $on 来进行组件之间的数据传输. 主要的传输方式有三种: 1.父组件到子组件通信 2.子组件到父组件的通信 3.兄弟组件之间的通信 一.父组件传值给子组件 父组件 ...
随机推荐
- [Code+#4]最短路
考虑xor运算的自反性 我们可以直接枚举二进制位异或来进行转移 这样边数大约是\(n \log n\)级别的 总复杂度\(\Theta((n\log n+m)\log n)\) #include&qu ...
- JavaScript访问对象的属性和方法
对象的属性和方法统称为对象的成员. 访问对象的属性 在JavaScript中,可以使用“ . ”和“ [ ] ”来访问对象的属性. 二者区别:“ . ”表示法一般作为静态对象使用时来存取属性.而“[ ...
- ionic —指令
引用 <!--1.引入 ionic css和js--> <!--2.定义ng-app--> <!--3.定义 angular.module('myAPp',['ionic ...
- 浏览器根对象window之history
1. history(H5) Window.history保存用户在一个会话期间的网站访问记录,用户每次访问一个新的URL即创建一个新的历史记录. 1.1 length 返回浏览器历史列表中的 URL ...
- 远景GIS云上线
没有发布会.没有嘉宾.没有掌声,趁着国庆假期悄悄地将系统部署到服务器上线运行. 远景GIS云(RGIS Cloud)基于自主研发的远景GIS基础平台开发,目前已实现了Shape上传和导出.符号配置.动 ...
- Python实现冒泡,选择排序
def bubble(num): for i in range(len(num)-1): for j in range(len(num)-i-1): if(num[j]>num[j+1]): t ...
- Apache + WordPress + SSL 完全指南
似乎不少使用国外主机的站长都想弄个 https:// "玩",但是许多人对 SSL/TLS.HTTPS.证书等概念了解有限,而中文互联网上相关的教程也不是很完备,各种杂乱.正好,本 ...
- Single Number 数组中除了某个元素出现一次,其他都出现两次,找出这个元素
Given an array of integers, every element appears twice except for one. Find that single one. Note:Y ...
- Grunt入门学习之(3) -- Gruntfile具体示例
经过前面的学习,将测试的Gruntfile整合在一起! /** * Created by Administrator on 2017/6/22. */ module.exports = functio ...
- restful知识点之三restframework认证-->权限-->频率
认证.权限.频率是层层递进的关系 权限业务时认证+权限 频率业务时:认证+权限+频率 局部认证方式 from django.conf.urls import url,include from djan ...