linux-基于tensorflow2.x的手写数字识别-基于MNIST数据集
数据集
数据集下载MNIST
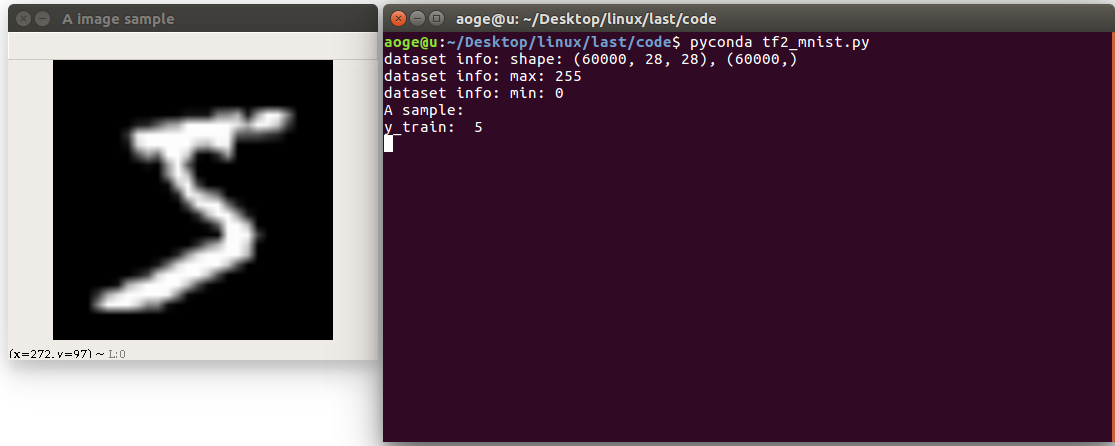
首先读取数据集, 并打印相关信息
包括
- 图像的数量, 形状
- 像素的最大, 最小值
- 以及看一下第一张图片
path = 'MNIST/mnist.npz'

with np.load(path, allow_pickle=True) as f:

    x_train, y_train = f['x_train'], f['y_train']

    x_test, y_test = f['x_test'], f['y_test']

print(f'dataset info: shape: {x_train.shape}, {y_train.shape}')

print(f'dataset info: max: {x_train.max()}')

print(f'dataset info: min: {x_train.min()}')

print("A sample:")

print("y_train: ", y_train[0])

# print("x_train: \n", x_train[0])

show_pic = x_train[0].copy()

show_pic = cv2.resize(show_pic, (28 * 10, 28 * 10))

cv2.imshow("A image sample", show_pic)

key = cv2.waitKey(0)

# 按 q 退出

if key == ord('q'):

    cv2.destroyAllWindows()

    print("show demo over")
转换为tf 数据集的格式, 并进行归一化
# convert to tf tensor

x_train = tf.convert_to_tensor(x_train, dtype=tf.float32) // 255.

x_test = tf.convert_to_tensor(x_test, dtype=tf.float32) // 255.

dataset_train = tf.data.Dataset.from_tensor_slices((x_train, y_train))

dataset_train = dataset_train.batch(batch_size).repeat(class_num)
定义网络
在这里定义一个简单的全连接网络
def build_simple_net():

    net = Sequential([

        layers.Dense(256, activation='relu'),

        layers.Dense(256, activation='relu'),

        layers.Dense(256, activation='relu'),

        layers.Dense(class_num)

    ])

    net.build(input_shape=(None, 28 * 28))

    # net.summary()

    return net
训练
使用 SGD 优化器进行训练
def train(print_info_step=250):

    net = build_simple_net()

    # 优化器

    optimizer = optimizers.SGD(lr=0.01)

    # 计算准确率

    acc = metrics.Accuracy()

    for step, (x, y) in enumerate(dataset_train):

        with tf.GradientTape() as tape:

            # [b, 28, 28] => [b, 784]

            x = tf.reshape(x, (-1, 28 * 28))

            # [b, 784] => [b, 10]

            out = net(x)

            # [b] => [b, 10]

            y_onehot = tf.one_hot(y, depth=class_num)

            # [b, 10]

            loss = tf.square(out - y_onehot)

            # [b]

            loss = tf.reduce_sum(loss) / batch_size

        # 反向传播

        acc.update_state(tf.argmax(out, axis=1), y)

        grads = tape.gradient(loss, net.trainable_variables)

        optimizer.apply_gradients(zip(grads, net.trainable_variables))

        if acc.result() >= 0.90:

            net.save_weights(save_path)

            print(f'final acc: {acc.result()}, total step: {step}')

            break

        if step % print_info_step == 0:

            print(f'step: {step}, loss: {loss}, acc: {acc.result().numpy()}')

            acc.reset_states()

        if step % 500 == 0 and step != 0:

            print('save model')

            net.save_weights(save_path)
验证
验证在测试集的模型效果, 这里仅取出第一张进行验证
def test_dataset():

    net = build_simple_net()

    # 加载模型

    net.load_weights(save_path)

    # 拿到测试集第一张图片

    pred_image = x_test[0]

    pred_image = tf.reshape(pred_image, (-1, 28 * 28))

    pred = net.predict(pred_image)

    # print(pred)

    print(f'pred: {tf.argmax(pred, axis=1).numpy()}, label: {y_test[0]}')

应用
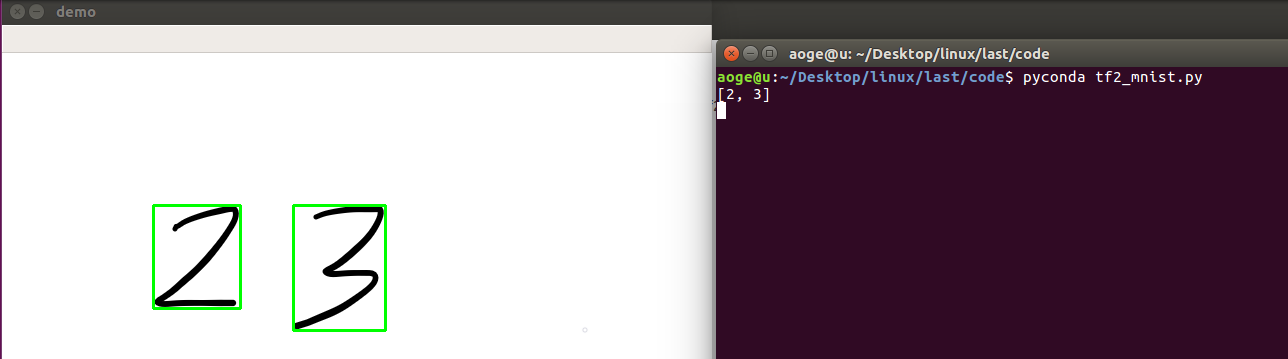
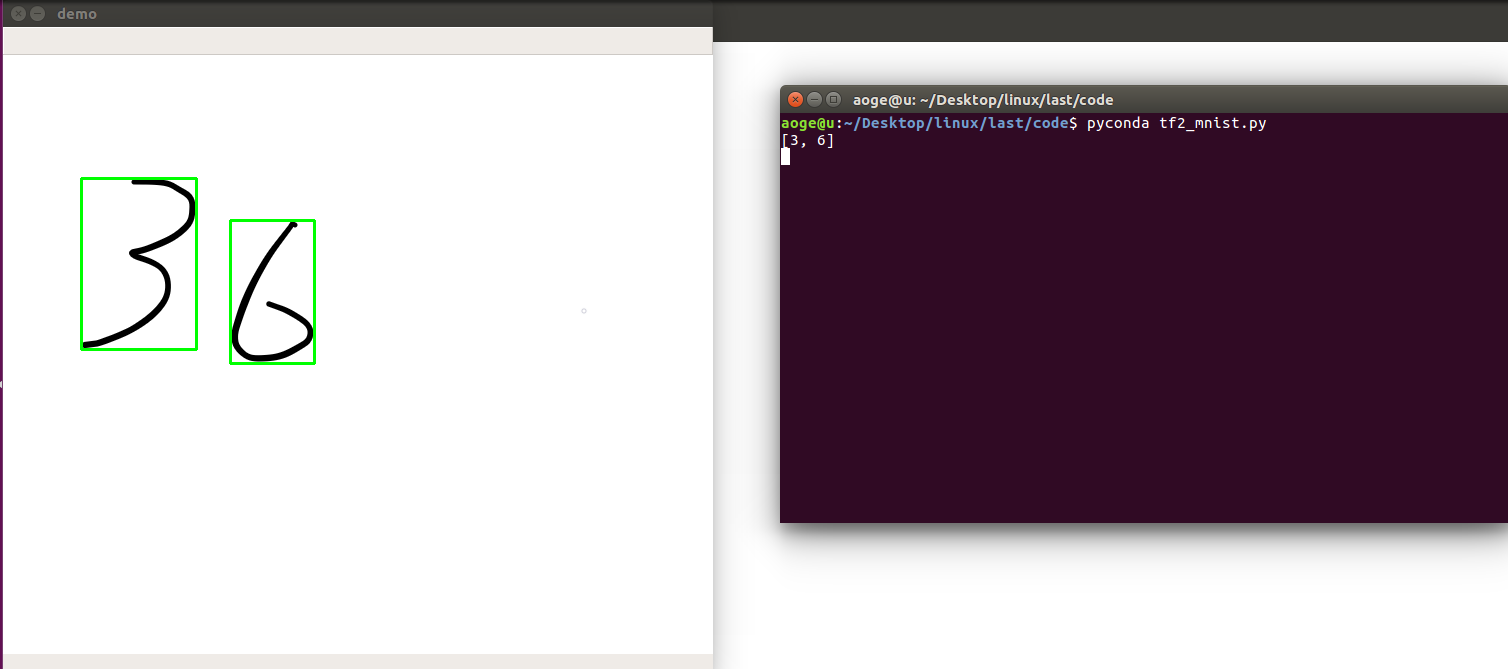
分割手写数字, 并进行逐一识别
- 先将图像二值化
- 找到轮廓
- 得到数字的坐标
- 转为模型的需要的输入格式, 并进行识别
- 显示
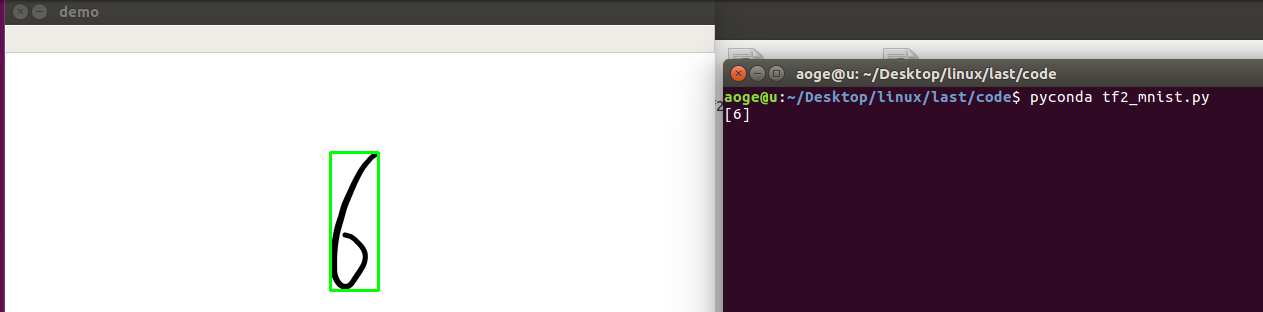
def split_number(img):

    result = []

    net = build_simple_net()

    # 加载模型

    net.load_weights(save_path)

    image = cv2.cvtColor(img.copy(), cv2.COLOR_RGB2GRAY)

    ret, thresh = cv2.threshold(image, 127, 255, 0)

    contours, hierarchy = cv2.findContours(thresh, 1, 2)

    for cnt in contours[:-1]:

        x, y, w, h = cv2.boundingRect(cnt)

        image = img[y:y+h, x:x+w]

        image = cv2.resize(image, (28, 28))

        pred_image = tf.convert_to_tensor(image, dtype=tf.float32) / 255.

        pred_image = tf.reshape(pred_image, (-1, 28 * 28))

        pred = net.predict(pred_image)

        out = tf.argmax(pred, axis=1).numpy()

        result = [out[0]] + result

        img = cv2.rectangle(img, (x, y), (x + w, y + h), (0, 255, 0), 2)

    cv2.imshow("demo", img)

    print(result)

    k = cv2.waitKey(0)

    # 按 q 退出

    if k == ord('q'):

        pass

    cv2.destroyAllWindows()
效果
单数字
多数字
附录
所有代码, 文件 tf2_mnist.py
import os

import cv2

import numpy as np

import tensorflow as tf

from tensorflow.keras import layers, Sequential, optimizers, metrics

# 屏蔽通知信息和警告信息

os.environ['TF_CPP_MIN_LOG_LEVEL'] = '2'

# 每批几张图片

batch_size = 2

# 类别数

class_num = 10

# 保存模型的路径

save_path = "./models/mnist.ckpt"

# 展示样例

show_demo = False

# 验证测试集

evaluate_dataset = False

# 是否训练

run_train = False

# 图片路径, 仅用于 detect_image(), 当为False时不识别

image_path = 'images/36.png'

path = 'MNIST/mnist.npz'

with np.load(path, allow_pickle=True) as f:

    x_train, y_train = f['x_train'], f['y_train']

    x_test, y_test = f['x_test'], f['y_test']

if show_demo:

    print(f'dataset info: shape: {x_train.shape}, {y_train.shape}')

    print(f'dataset info: max: {x_train.max()}')

    print(f'dataset info: min: {x_train.min()}')

    print("A sample:")

    print("y_train: ", y_train[0])

    # print("x_train: \n", x_train[0])

    show_pic = x_train[0].copy()

    show_pic = cv2.resize(show_pic, (28 * 10, 28 * 10))

    cv2.imshow("A image sample", show_pic)

    key = cv2.waitKey(0)

    if key == ord('q'):

        cv2.destroyAllWindows()

        print("show demo over")

# convert to tf tensor

x_train = tf.convert_to_tensor(x_train, dtype=tf.float32) // 255.

x_test = tf.convert_to_tensor(x_test, dtype=tf.float32) // 255.

dataset_train = tf.data.Dataset.from_tensor_slices((x_train, y_train))

dataset_train = dataset_train.batch(batch_size).repeat(class_num)

def build_simple_net():

    net = Sequential([

        layers.Dense(256, activation='relu'),

        layers.Dense(256, activation='relu'),

        layers.Dense(256, activation='relu'),

        layers.Dense(class_num)

    ])

    net.build(input_shape=(None, 28 * 28))

    # net.summary()

    return net

def train(print_info_step=250):

    net = build_simple_net()

    # 优化器

    optimizer = optimizers.SGD(lr=0.01)

    # 计算准确率

    acc = metrics.Accuracy()

    for step, (x, y) in enumerate(dataset_train):

        with tf.GradientTape() as tape:

            # [b, 28, 28] => [b, 784]

            x = tf.reshape(x, (-1, 28 * 28))

            # [b, 784] => [b, 10]

            out = net(x)

            # [b] => [b, 10]

            y_onehot = tf.one_hot(y, depth=class_num)

            # [b, 10]

            loss = tf.square(out - y_onehot)

            # [b]

            loss = tf.reduce_sum(loss) / batch_size

        # 反向传播

        acc.update_state(tf.argmax(out, axis=1), y)

        grads = tape.gradient(loss, net.trainable_variables)

        optimizer.apply_gradients(zip(grads, net.trainable_variables))

        if acc.result() >= 0.90:

            net.save_weights(save_path)

            print(f'final acc: {acc.result()}, total step: {step}')

            break

        if step % print_info_step == 0:

            print(f'step: {step}, loss: {loss}, acc: {acc.result().numpy()}')

            acc.reset_states()

        if step % 500 == 0 and step != 0:

            print('save model')

            net.save_weights(save_path)

def test_dataset():

    net = build_simple_net()

    # 加载模型

    net.load_weights(save_path)

    # 拿到测试集第一张图片

    pred_image = x_test[0]

    pred_image = tf.reshape(pred_image, (-1, 28 * 28))

    pred = net.predict(pred_image)

    # print(pred)

    print(f'pred: {tf.argmax(pred, axis=1).numpy()}, label: {y_test[0]}')

def split_number(img):

    result = []

    net = build_simple_net()

    # 加载模型

    net.load_weights(save_path)

    image = cv2.cvtColor(img.copy(), cv2.COLOR_RGB2GRAY)

    ret, thresh = cv2.threshold(image, 127, 255, 0)

    contours, hierarchy = cv2.findContours(thresh, 1, 2)

    for cnt in contours[:-1]:

        x, y, w, h = cv2.boundingRect(cnt)

        image = img[y:y+h, x:x+w]

        image = cv2.resize(image, (28, 28))

        pred_image = tf.convert_to_tensor(image, dtype=tf.float32) / 255.

        pred_image = tf.reshape(pred_image, (-1, 28 * 28))

        pred = net.predict(pred_image)

        out = tf.argmax(pred, axis=1).numpy()

        result = [out[0]] + result

        img = cv2.rectangle(img, (x, y), (x + w, y + h), (0, 255, 0), 2)

    cv2.imshow("demo", img)

    print(result)

    k = cv2.waitKey(0)

    if k == ord('q'):

        pass

    cv2.destroyAllWindows()

if __name__ == '__main__':

    if run_train:

        train()

    elif evaluate_dataset:

        test_dataset()

    elif image_path:

        image = cv2.imread(image_path)

        # detect_image(image)

        split_number(image)
linux-基于tensorflow2.x的手写数字识别-基于MNIST数据集的更多相关文章
- 基于Numpy的神经网络+手写数字识别
基于Numpy的神经网络+手写数字识别 本文代码来自Tariq Rashid所著<Python神经网络编程> 代码分为三个部分,框架如下所示: # neural network class ...
- 手写数字识别——基于LeNet-5卷积网络模型
在<手写数字识别——利用Keras高层API快速搭建并优化网络模型>一文中,我们搭建了全连接层网络,准确率达到0.98,但是这种网络的参数量达到了近24万个.本文将搭建LeNet-5网络, ...
- 【TensorFlow-windows】(四) CNN(卷积神经网络)进行手写数字识别(mnist)
主要内容: 1.基于CNN的mnist手写数字识别(详细代码注释) 2.该实现中的函数总结 平台: 1.windows 10 64位 2.Anaconda3-4.2.0-Windows-x86_64. ...
- 【TensorFlow-windows】(三) 多层感知器进行手写数字识别(mnist)
主要内容: 1.基于多层感知器的mnist手写数字识别(代码注释) 2.该实现中的函数总结 平台: 1.windows 10 64位 2.Anaconda3-4.2.0-Windows-x86_64. ...
- TensorFlow.NET机器学习入门【5】采用神经网络实现手写数字识别(MNIST)
从这篇文章开始,终于要干点正儿八经的工作了,前面都是准备工作.这次我们要解决机器学习的经典问题,MNIST手写数字识别. 首先介绍一下数据集.请首先解压:TF_Net\Asset\mnist_png. ...
- 基于卷积神经网络的手写数字识别分类(Tensorflow)
import numpy as np import tensorflow as tf from tensorflow.examples.tutorials.mnist import input_dat ...
- 基于多层感知机的手写数字识别(Tensorflow实现)
import numpy as np import tensorflow as tf from tensorflow.examples.tutorials.mnist import input_dat ...
- 吴裕雄--天生自然python机器学习:基于支持向量机SVM的手写数字识别
from numpy import * def img2vector(filename): returnVect = zeros((1,1024)) fr = open(filename) for i ...
- 【TensorFlow-windows】(一)实现Softmax Regression进行手写数字识别(mnist)
博文主要内容有: 1.softmax regression的TensorFlow实现代码(教科书级的代码注释) 2.该实现中的函数总结 平台: 1.windows 10 64位 2.Anaconda3 ...
随机推荐
- 获取ul中li的value值
<script> $(function(){ $(".month-list").find("li").click(function(){ var t ...
- 移动安卓App+BurpSuite的渗透测试
从Android 7.0及以上版本开始,安卓系统更改了信任用户安装证书的默认行为,用户安装的证书都是用户证书,因此不管是filddle还是burp,都是把他们的根证书安装到了用户证书,而有部分移动ap ...
- gin框架使用【3.路由参数】
GET url: http://127.0.0.1:8080/users/{id} http://127.0.0.1:8080/users/1 对于id值的获取 package main impo ...
- Java语言学习day01--6月28日
Java语言学习day01一:Java概述 1.Java语言发展史 任职于太阳微系统的 詹姆斯·高斯林 等人于1990年代初开发Java语言的雏形,最初被命名为 Oak ,目标设置在 家用电器等小型系 ...
- python基础练习题(题目 判断101-200之间有多少个素数,并输出所有素数。)
day7 --------------------------------------------------------------- 实例012:100到200的素数 题目 判断101-200之间 ...
- 论文解读(GCC)《Graph Contrastive Clustering》
论文信息 论文标题:Graph Contrastive Clustering论文作者:Huasong Zhong, Jianlong Wu, Chong Chen, Jianqiang Huang, ...
- 【2022.04.19】Docker-compose一键安装mirai,搭建QQ机器人最快方法
先用官方的脚本安装下docker curl -sSL https://get.docker.com/ | sh 安装docker-compose curl -L "https://githu ...
- 攻防世界-MISC:pure_color
这是攻防世界高手进阶区的第六题,题目如下: 点击下载附件一,得到一张空白的png图片 用StegSolve打开,然后点击箭头(如下图所示) 多点击几次,即可得到flag 所以,这道题的flag如下: ...
- plicp 点云迭代最近邻点配准法
输入参数 点云A的极坐标集合 点云A对应Lidar所在pose 点云B的极坐标集合 点云B对应Lidar所在pose Features 根据两个点云的弧度关系确定找点的起始位置 根据两个点云的弧度关系 ...
- Spring Ioc源码分析系列--Ioc的基础知识准备
Spring Ioc源码分析系列--Ioc的基础知识准备 本系列文章代码基于Spring Framework 5.2.x Ioc的概念 在Spring里,Ioc的定义为The IoC Containe ...