Spring Security原理篇(一) 启动原理
1.概述
spring security有参考的中文翻译文档https://springcloud.cc/spring-security-zhcn.html- 在学习
spring security的时候,参考的书籍并不是很多,线上的技术博文也是没有系统的全面的介绍,不得不去参考源代码,发费了大量时间和精力,而我试图也通过一系列的文章,能结合自己的学习经历,循序渐进的表达清楚自己所理解到的点。 - 所有的文章都是对源代码的解读,最后会给出一个小小的demo。
- 选用的
spring boot版本1.4.3.RELEASE,spring cloud版本Camden.SR4(后面有结合网关zuul做oauth2 认证授权介绍)。版本非spring 最新版本,选用的是平时使用最多版本。 - 文章是作为学习笔记性质为目的.当然如果文章能帮到有需要的朋友自然是特别开心和幸福的事情。有理解错误和不到位的点也希望各位指出,一起学习一起成长,一直没有都没敢写公开技术文章,第一本人水平有限,第二是不希望因为自己的错误给别人造成误导。
2.启动
2.1 简单的开始
从文档中可知,spring引入我们的项目只需要分为两步
- maven引入需要的包,spring boot中引入的spring security版本为4.1.4
 <dependency>

        <groupId>org.springframework.boot</groupId>

        <artifactId>spring-boot-starter-security</artifactId>

 </dependency>
- 配置spring security(spring security官方文档给出的例子,后面简称例子1)
@EnableWebSecurity

public class WebSecurityConfig extends WebSecurityConfigurerAdapter {
<span class="hljs-meta"><span class="hljs-meta">@Autowired</span></span>

<span class="hljs-function"><span class="hljs-keyword"><span class="hljs-function"><span class="hljs-keyword">public</span></span></span><span class="hljs-function"> </span><span class="hljs-keyword"><span class="hljs-function"><span class="hljs-keyword">void</span></span></span><span class="hljs-function"> </span><span class="hljs-title"><span class="hljs-function"><span class="hljs-title">configureGlobal</span></span></span><span class="hljs-params"><span class="hljs-function"><span class="hljs-params">(AuthenticationManagerBuilder auth)</span></span></span><span class="hljs-function"> </span><span class="hljs-keyword"><span class="hljs-function"><span class="hljs-keyword">throws</span></span></span><span class="hljs-function"> Exception </span></span>{

    auth

        .inMemoryAuthentication()

            .withUser(<span class="hljs-string"><span class="hljs-string">"user"</span></span>).password(<span class="hljs-string"><span class="hljs-string">"password"</span></span>).roles(<span class="hljs-string"><span class="hljs-string">"USER"</span></span>);

}


}
2.2 简单后面的繁琐
我们洁简的应用spring security到我们的项目,然后却开启了非常强大的功能,上面的例子,在内存中配置了一个用户名为user,密码为password,并且拥有USER角色的用户。我们还是要探究一下,spring security到底为我们做了一些什么样的工作。
我们的入手点只有两个,@EnableWebSecurity注解和WebSecurityConfigurerAdapter这个适配器类。
2.2.1 @EnableWebSecurity 注解
注解源代码
@Retention(value = java.lang.annotation.RetentionPolicy.RUNTIME)

@Target(value = { java.lang.annotation.ElementType.TYPE })

@Documented

@Import({ WebSecurityConfiguration.class,

        SpringWebMvcImportSelector.class,

        OAuth2ImportSelector.class })

@EnableGlobalAuthentication

@Configuration

public @interface EnableWebSecurity {

    boolean debug() default false;
此处还是有必要简单翻译一下官方对于类的注释,以便于更加清楚的理解注解的作用
注释中提到两个很重要的点,以及一个配置示例,
- 第一个点:
@EnableWebSecurity配置到拥有注解@Configuration的类上,就可以获取到spring security的支持. - 第二个点:
WebSecurityConfigurer的子类可以扩展spring security的应用
由此可知@EnableWebSecurity使我们拥有spring security的能力。WebSecurityConfigurer 使我们能根据业务扩展我们的应用,而WebSecurityConfigurerAdapter是WebSecurityConfigurer 的一个适配器,必然也是做了很多默认的工作。后面我们会一一说到。
从以上可以稍微总结一下我们下一步需要探究的问题,
WebSecurityConfigurerAdapter到底为我们做了什么工作.- 上面注解的源代码中Import了一个很重要的配置类
WebSecurityConfiguration怎样组件我们的过滤器(或者说过滤器链)
2.2.2 spring security创建流程
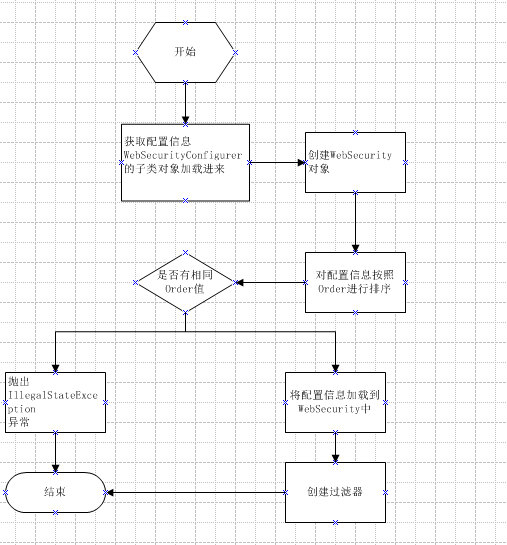
- 如果我们忽略掉细节,只看最重要的步骤,大概如此.下面我们对每一个步骤来做相应的源代码解释
WebSecurityConfiguration中的 setFilterChainProxySecurityConfigurer()方法
@Autowired(required = false)
public void setFilterChainProxySecurityConfigurer(
ObjectPostProcessor<Object> objectPostProcessor,
//T1 使用@Value获取到配置信息
@Value("#{@autowiredWebSecurityConfigurersIgnoreParents.getWebSecurityConfigurers()}") List<SecurityConfigurer<Filter, WebSecurity>> webSecurityConfigurers)
throws Exception {
<span class="hljs-comment"><span class="hljs-comment">//T2 创建一个webSecurity 对象</span></span>
webSecurity = objectPostProcessor
.postProcess(<span class="hljs-keyword"><span class="hljs-keyword">new</span></span> WebSecurity(objectPostProcessor));
<span class="hljs-keyword"><span class="hljs-keyword">if</span></span> (debugEnabled != <span class="hljs-keyword"><span class="hljs-keyword">null</span></span>) {
webSecurity.debug(debugEnabled);
}
<span class="hljs-comment"><span class="hljs-comment">//T3对configures进行排序</span></span>
Collections.sort(webSecurityConfigurers, AnnotationAwareOrderComparator.INSTANCE);
<span class="hljs-comment"><span class="hljs-comment">//T4对Order进行比较是否有相同的,由于前面进行了排序,只要比较前后有相同的就可以</span></span>
Integer previousOrder = <span class="hljs-keyword"><span class="hljs-keyword">null</span></span>;
Object previousConfig = <span class="hljs-keyword"><span class="hljs-keyword">null</span></span>;
<span class="hljs-keyword"><span class="hljs-keyword">for</span></span> (SecurityConfigurer<Filter, WebSecurity> config : webSecurityConfigurers) {
Integer order = AnnotationAwareOrderComparator.lookupOrder(config);
<span class="hljs-keyword"><span class="hljs-keyword">if</span></span> (previousOrder != <span class="hljs-keyword"><span class="hljs-keyword">null</span></span> && previousOrder.equals(order)) {
<span class="hljs-keyword"><span class="hljs-keyword">throw</span></span> <span class="hljs-keyword"><span class="hljs-keyword">new</span></span> IllegalStateException(
<span class="hljs-string"><span class="hljs-string">"@Order on WebSecurityConfigurers must be unique. Order of "</span></span>
+ order + <span class="hljs-string"><span class="hljs-string">" was already used on "</span></span> + previousConfig + <span class="hljs-string"><span class="hljs-string">", so it cannot be used on "</span></span>
+ config + <span class="hljs-string"><span class="hljs-string">" too."</span></span>);
}
previousOrder = order;
previousConfig = config;
}
<span class="hljs-keyword"><span class="hljs-keyword">for</span></span> (SecurityConfigurer<Filter, WebSecurity> webSecurityConfigurer : webSecurityConfigurers) {
<span class="hljs-comment"><span class="hljs-comment">//T5将配置信息配置到webSecurity中</span></span>
webSecurity.apply(webSecurityConfigurer);
}
<span class="hljs-keyword"><span class="hljs-keyword">this</span></span>.webSecurityConfigurers = webSecurityConfigurers;
}
T1(注释标记处)获取配置信息
@Value("#{@autowiredWebSecurityConfigurersIgnoreParents.getWebSecurityConfigurers()}"
可以看一下autowiredWebSecurityConfigurersIgnoreParents.getWebSecurityConfigurers()的源代码
public List<SecurityConfigurer<Filter, WebSecurity>> getWebSecurityConfigurers() {

        List<SecurityConfigurer<Filter, WebSecurity>> webSecurityConfigurers = new ArrayList<SecurityConfigurer<Filter, WebSecurity>>();

        Map<String, WebSecurityConfigurer> beansOfType = beanFactory

                .getBeansOfType(WebSecurityConfigurer.class);

        for (Entry<String, WebSecurityConfigurer> entry : beansOfType.entrySet()) {

            webSecurityConfigurers.add(entry.getValue());

        }

        return webSecurityConfigurers;

    }
其实我们根据debug获取到的来看,这个beansOfType 就是我们定义的继承自WebSecurityConfigurerAdapter的类,通过查看父类的定义,我们知道调用build()方法最后返回的必须是一个Filter对象,可以自行参考顶级父类(或接口)WebSecurityConfigurer和SecurityBuilder
T2这里直接用new 来创建一个WebSecurity的对象T3当有多个配置项时进行排序T4进行order重复验证T5将配置信息配置到webSecurity中,变量configurers中会存储这个信息
WebSecurityConfiguration中的 springSecurityFilterChain()方法
- 为我们创建了一个名字叫做
springSecurityFilterChain的Filter
源代码:
@Bean(name = AbstractSecurityWebApplicationInitializer.DEFAULT_FILTER_NAME)

    public Filter springSecurityFilterChain() throws Exception {

        boolean hasConfigurers = webSecurityConfigurers != null

                && !webSecurityConfigurers.isEmpty();

        //这里的意思是我们是否有自定义配置其实就是是否有注入WebSecurityConfigurer的子类,没有的话,我默认的创建一个默认的,但是默认的我们自己不可修改

        if (!hasConfigurers) {

            WebSecurityConfigurerAdapter adapter = objectObjectPostProcessor

                    .postProcess(new WebSecurityConfigurerAdapter() {

                    });

           //请参考上面的代码

            webSecurity.apply(adapter);

        }

       //现在为止webSecurity对象的信息已经填充完毕,我们可以构建一个Filter

        return webSecurity.build();

    }
- 请查看代码的注释,我们可以知道,到此为止,已经建立了一个
Filter对象,而这个Filter将会拦截掉我们的请求,对请求进行过滤拦截,从而起到对资源进行认证保护的作用。然后这个Filter并非我们自己平时定义的Filter这么简单,这个过滤器也只是一个代理的过滤器而已,里面还会有过滤器链,下一篇文章会针对过滤器链进行编写。
2.2.3 WebSecurityConfigurerAdapter为我们做了什么
- 还是从最重要的开始
- 1.
HttpSecurity通过getHttp()获取,后面会详细说到这个类 UserDetailsService用户信息获取
AuthenticationManager认证管理类
后面会详细讲解到这些信息,包括这些信息在过滤其中起到什么作用,然后最重要的是,我们要先理清楚过滤器的机制,下一篇会详细讲过滤器链
原文地址:https://www.jianshu.com/p/0c54788c94f3
Spring Security原理篇(一) 启动原理的更多相关文章
- Spring Security OAuth2 完全解析 (流程/原理/实战定制) —— Client / ResourceServer 篇
一.前言 本文假设读者对 Spring Security 本身原理有一定程度的了解,假设对 OAuth2 规范流程.Jwt 有基础了解,以此来对 SpringSecurity 整合 OAuth2 有个 ...
- spring boot跨域请求访问配置以及spring security中配置失效的原理解析
一.同源策略 同源策略[same origin policy]是浏览器的一个安全功能,不同源的客户端脚本在没有明确授权的情况下,不能读写对方资源. 同源策略是浏览器安全的基石. 什么是源 源[orig ...
- springboot(八) 嵌入式Servlet容器自动配置原理和容器启动原理
1.嵌入式Servlet容器自动配置原理 1.1 在spring-boot-autoconfigure-1.5.9.RELEASE.jar => springboot自动配置依赖 jar包下,E ...
- 01 spring security入门篇
1. 环境搭建 使用SpringBoot搭建开发环境,只需在pom.xml添加如下依赖即可. <?xml version="1.0" encoding="UTF-8 ...
- Spring Security 入门篇
本文是一个笔记系列,目标是完成一个基于角色的权限访问控制系统(RBAC),有基本的用户.角色.权限管理,重点在Spring Security的各种配置.万丈高楼平地起,接下来,一步一步,由浅入深,希望 ...
- 【串线篇】spring boot嵌入式Servlet容器启动原理;
什么时候创建嵌入式的Servlet容器工厂?什么时候获取嵌入式的Servlet容器并启动Tomcat: 获取嵌入式的Servlet容器工厂: 1).SpringBoot应用启动运行run方法 2).r ...
- 🔥🔥🔥Spring Cloud进阶篇之Eureka原理分析
前言 之前写了几篇Spring Cloud的小白教程,相信看过的朋友对Spring Cloud中的一些应用有了简单的了解,写小白篇的目的就是为初学者建立一个基本概念,让初学者在学习的道路上建立一定的基 ...
- Spring Security入门篇——标签sec:authorize的使用
Security框架可以精确控制页面的一个按钮.链接,它在页面上权限的控制实际上是通过它提供的标签来做到的 Security共有三类标签authorize authentication accessc ...
- Linux系统的启动原理
Linux系统的启动原理 RHEL的启动原理BIOS自检-MBR-启动GRUB-加载内核-systemd的init进程 systemd的初始化进程加载需要的服务,挂载文件系统/etc/fstabsys ...
随机推荐
- python装饰器2
装饰模式有很多经典的使用场景,例如插入日志.性能测试.事务处理等等,有了装饰器,就可以提取大量函数中与本身功能无关的类似代码,从而达到代码重用的目的.下面就一步步看看Python中的装饰器. 一个简单 ...
- 如何把一个普通的Eclipse项目改造成Eclipse Plugin项目
New Project->Plug-in from existing JAR Archive 同时要记得不仅要将你要转换的项目的jar包选上,同时还要将项目依赖的jar包全部选上(要不然会找不到 ...
- liferay 7用OSGi的方式修改默认权限
事先声明,支持这一功能的新版本还没有发布,2017年5月份才支持的 1.以前在62的时候是通过修改ext项目进行修改 2.现在在70可以通过Module Fragment项目进行修改 相关文件:现在出 ...
- 微服务开源生态报告 No.6
「微服务开源生态报告」,汇集各个开源项目近期的社区动态,帮助开发者们更高效的了解到各开源项目的最新进展. 社区动态包括,但不限于:版本发布.人员动态.项目动态和规划.培训和活动. 非常欢迎国内其他微服 ...
- 【linux】Ubuntu16.04中文输入法安装
最近刚给笔记本装了Ubuntu+win10双系统,但是ubuntu16.04没有自带中文输入法,所以经过网上的一些经验搜索整合,分享一下安装中文输入法的心得.本文主要介绍了谷歌拼音跟ibus中文输入法 ...
- 【Leetcode堆和双端队列】滑动窗口最大值(239)
题目 给定一个数组 nums,有一个大小为 k 的滑动窗口从数组的最左侧移动到数组的最右侧.你只可以看到在滑动窗口内的 k 个数字.滑动窗口每次只向右移动一位. 返回滑动窗口中的最大值. 示例: 输入 ...
- DFS-生日蛋糕
生日蛋糕 一道深搜题,看了这两个博客才懂的. http://blog.csdn.net/blesslzh0108/article/details/53486168 http://blog.csdn.n ...
- java中URLEncode和URLDecode
URLEncode和URLDecode用于完成普通字符串和 application/x-www-from-urlencoded MIME字符串之间的相互转化 如果传递的字符串中包含非西欧字符的字符串, ...
- java把Word文件转成html的字符串返回出去
1.需求是把前端上传的word文件解析出来,生成html的字符串返回给前端去展示,Word里面的图片可以忽略不显示,所以这段代码去掉了解析图片的代码 package com.lieni.core.ut ...
- FastAdmin 开发第 4 天:初试命令行
FastAdmin 最强大的是命令行 先从 test 表开始. 在 FastAdmin 默认有一个 test 表格,用于命令行 crud 测试. 如何开始? 只需要在项目命令行中输入以下命令就会自动生 ...