Entity Framework Code First 模式-建立多对多联系
Entity Framework 在建立多对多的联系时,会生成一个中间表,用来表示这个多对多的关系。这和数据库设计时从概念模型到逻辑模型转化时,多对多的关系不能和任何一端的实体合并,需要将关系也转化为关系模型。例子使用角色(Role)和用户(User),一个角色会有多个用户,一个用户拥有多个角色。
1.默认约定
代码:
public partial class Role

    {

        public int RoleID { get; set; }

        public string RoleName { get; set; }

        public virtual ICollection<User> Users { get; set; }

    }
public class User

    {

        public int UserID { get; set; }

        public string UserName { get; set; }

        public string Password { get; set; }

        public Nullable<bool> IsValid { get; set; }

        public virtual ICollection<Role> Roles { get; set; }

    }
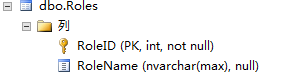
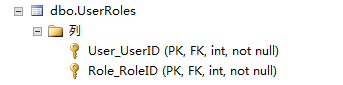
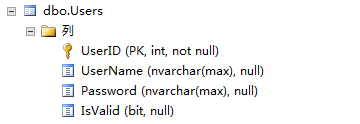
结果:
2.FluentAPI 方式
这边展示用映射类的方式去建立表,即为每个实体类去建立一个映射到数据库的类,在这里面定义映射到数据库的相关属性。
代码:
public partial class Role

    {

        public int RoleID { get; set; }

        public string RoleName { get; set; }

        public virtual ICollection<User> Users { get; set; }

    }
Role类
 public class RoleMap:EntityTypeConfiguration<Role>

    {

        public RoleMap()

        {

            //主键

            this.HasKey(s => s.RoleID);

            //属性的特性

            this.Property(s => s.RoleName)

                .HasMaxLength();

            //类映射到数据库表和列的相关说明

            this.ToTable("Role");

            this.Property(s => s.RoleID).HasColumnName("Id");

            //实体关系之间的定义

            this.HasMany(s => s.Users)

                .WithMany(s => s.Roles)

                .Map(m =>

                {

                    m.ToTable("RoleUser");

                    m.MapLeftKey("RoleId");

                    m.MapRightKey("UserID");

                });

        }

    }
RoleMap 映射类
public class User

    {

        public int UserID { get; set; }

        public string UserName { get; set; }

        public string Password { get; set; }

        public Nullable<bool> IsValid { get; set; }

        public virtual ICollection<Role> Roles { get; set; }

    }
User 类
public UserMap()

        {

            //主键

            this.HasKey(s => s.UserID);

            //属性

            this.Property(s => s.UserName)

                .HasMaxLength();

            // //类映射到数据库表和列的相关说明

            this.ToTable("User");

            this.Property(s => s.UserName).HasColumnName("Name");

        }
UserMap 映射类
在数据上下文类中的OnModelCreating方法加入如下代码:
modelBuilder.Configurations.Add(new RoleMap());

modelBuilder.Configurations.Add(new UserMap());
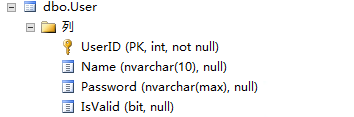
结果:


Entity Framework Code First 模式-建立多对多联系的更多相关文章
- Entity Framework Code First 模式-建立一对多联系
一.建立一对多联系 使用的例子为Product与Category,一个种类(Product)对应多个商品(Product) 1.外键列名默认约定 在“一”这边的实体增加一个集合属性(public vi ...
- Entity Framework Code First 模式-建立一对一联系
使用的例子为教室(ClassRoom),教室里的多媒体设备(Device),一个教室里有一套多媒体设备,一套多媒体设备只放在一个教室里. 1.Data Annotations方式 需要在任意一方的主键 ...
- Entity Framework Code First (三)Data Annotations
Entity Framework Code First 利用一种被称为约定(Conventions)优于配置(Configuration)的编程模式允许你使用自己的 domain classes 来表 ...
- Entity Framework Code First (二)Custom Conventions
---------------------------------------------------------------------------------------------------- ...
- Entity Framework Code First 映射继承关系
转载 http://www.th7.cn/Program/net/201301/122153.shtml Code First如何处理类之间的继承关系.Entity Framework Code Fi ...
- 使用 Entity Framework Code First
使用 Entity Framework Code First 在家闲着也是闲着,继续写我的[ASP.NET MVC 小牛之路]系列吧.在该系列的上一篇博文中,在显示书本信息列表的时候,我们是在程序代码 ...
- Entity Framework Code first(转载)
一.Entity Framework Code first(代码优先)使用过程 1.1Entity Framework 代码优先简介 不得不提Entity Framework Code First这个 ...
- Entity Framework Code First 学习日记(1)精
我最近几天正在学习Entity Framework Code First.我打算分享一系列的学习笔记,今天是第一部分: 为什么要使用Code First: 近 年来,随着domain driven d ...
- Entity Framework Code First学习系列目录
Entity Framework Code First学习系列说明:开发环境为Visual Studio 2010 + Entity Framework 5.0+MS SQL Server 2012, ...
随机推荐
- vue wabpack 切换开发环境 和生成环境 的接口地址
/config/dev.env.js 新增一行 var merge = require('webpack-merge') var prodEnv = require('./prod.env') mod ...
- 基于Netty的RPC架构学习笔记(十):自定义数据包协议
文章目录 数据包简介 粘包.分包现象 数据包格式 举个
- 2019 牛客多校第一场 D Parity of Tuples
题目链接:https://ac.nowcoder.com/acm/contest/881/D 看此博客之前请先参阅吕凯飞的论文<集合幂级数的性质与应用及其快速算法>,论文中很多符号会被本文 ...
- 面试总结【css篇】- css3新增特性
1.css3中的关键帧 @keyframes规则通过在动画序列中定义关键帧(或waypoints)的样式来控制CSS动画序列中的中间步骤.这 比转换更能控制动画序列的中间步骤. @keyframes ...
- hashCode和identityHashCode的区别你知道吗?
hashCode 关于hashCode参考之前的文章,点击参考之前文章. identityHashCode identityHashCode是System里面提供的本地方法,java.lang.Sys ...
- Windows下安装配置PLSQL
说明:1.PLSQL Developer是远程连接Oracle数据库的一个可视化工具,并且其不是一个独立的软件,是需要依赖Oracle客户端运行的.2.本安装教程是基于本机没有安装Oracle数据库的 ...
- DIV+CSS网页布局常用的一些基础知识
CSS命名规范 一.文件命名规范 全局样式:global.css:框架布局:layout.css:字体样式:font.css:链接样式:link.css:打印样式:print.css: 二.常用类/I ...
- Apache Spark 2.2.0 中文文档 - Spark RDD(Resilient Distributed Datasets)
Spark RDD(Resilient Distributed Datasets)论文 概要 1: 介绍 2: Resilient Distributed Datasets(RDDs) 2.1 RDD ...
- 随笔记录 grub引导故障修复 2019.8.7
系统备份: [root@localhost ~]# mkdir /abc [root@localhost ~]# mount /dev/sdb1 /abc [root@localhost ~]# dd ...
- 利用DNSQuery 进行DNS查询
#include <WinSock2.h> #include <WinDNS.h> #pragma comment (lib, "Dnsapi.lib") ...