js 引入Vue.js实现vue效果
拆分组件为单个js见:https://www.jianshu.com/p/2f0335818ceb
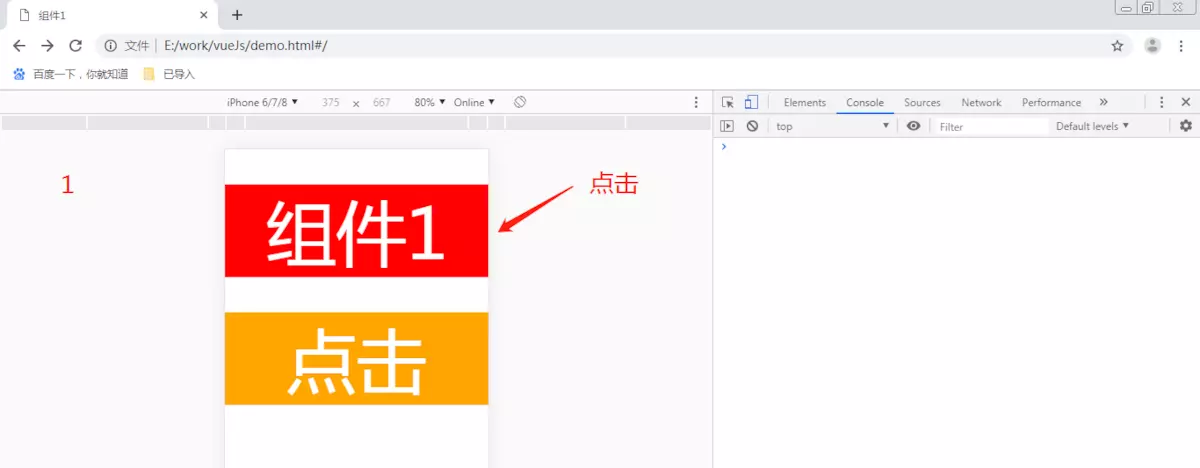
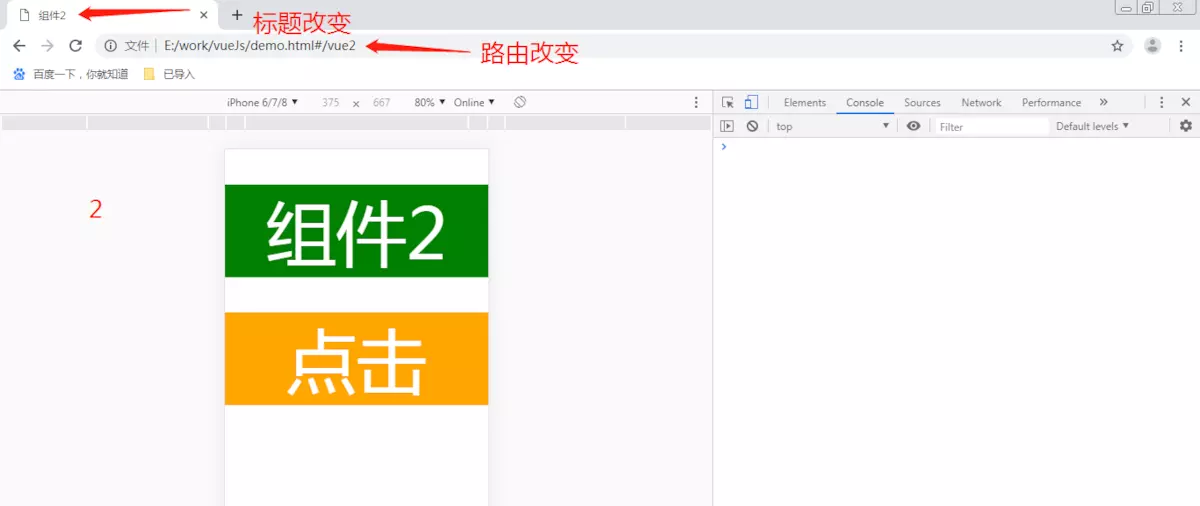
效果


html
<!DOCTYPE html>

<html>

    <head>

        <meta charset="UTF-8">

        <meta name="viewport" content="width=device-width, initial-scale=1.0, maximum-scale=1.0, user-scalable=0">

        <title>js引入vue.js实现vue</title>

        <link rel="stylesheet" href="css/1.css">

        <script src="js/jquery.js"></script>

        <script>

            function htmlFont(standardWid) {

                var explorer = navigator.userAgent,

                    html = document

                    .getElementsByTagName('html')[0];

                standardWid = (typeof standardWid == 'number') ? standardWid : 375;

                if (explorer.indexOf("Opera") >= 0) {

                    winwid = screen.width;

                } else {

                    winwid = html.offsetWidth;

                }

                if (winwid > 750) {

                    fosi = 200;

                } else {

                    winwid = winwid > standardWid * 2 ? standardWid * 2 : winwid;

                    fosi = winwid / standardWid * 100;

                }

                html.style.fontSize = fosi + 'px';

            }

            htmlFont();

        </script>

        <script src="https://cdn.staticfile.org/vue/2.4.2/vue.min.js"></script>

        <script src="https://cdn.staticfile.org/vue-router/2.7.0/vue-router.min.js"></script>

        <script src="js/1.js"></script>

    </head>

    <body>

        <div id="app" v-cloak>

            <transition :name="transitionName">

                <keep-alive>

                    <router-view class="child-view" v-if="$route.meta.keepAlive"></router-view>

                </keep-alive>

            </transition>

            <transition :name="transitionName">

                <router-view class="child-view" v-if="!$route.meta.keepAlive"></router-view>

            </transition>

        </div>

    </body>

</html>
js
'use strict';

$(document).ready(function() {

    // 0. 如果使用模块化机制编程,導入Vue和VueRouter,要调用 Vue.use(VueRouter)

    Vue.use(VueRouter);

    // 1. 定义(路由)组件。

    // 可以从其他文件 import 进来

    Vue.prototype.$fun1 = function() { //全局函数1

        console.log('fun1');

    };

    var Vue1 = Vue.extend({

        data() {

            return {}

        },

        computed: {},

        methods: {

            toVue2: function() {

                this.$router.push({

                    name: 'Vue2'

                })

            }

        },

        template: "<div class='d-vue1'><p class='redBc' @click='toVue2'>组件1</p>" +

            "<p class='orangeBc' @click='$fun1'>点击</p></div>"

    })

    Vue.component(Vue1)

    const Vue2 = Vue.extend({

        template: "<div class='d-vue2'><p class='greenBc'>组件2</p>" +

            "<p class='orangeBc' @click='$fun1'>点击</p></div>"

    })

    Vue.component(Vue2)

    // 2. 定义路由

    // 每个路由应该映射一个组件。 其中"component" 可以是

    // 通过 Vue.extend() 创建的组件构造器,

    // 或者,只是一个组件配置对象。

    const routes = [{

            path: '/',

            component: Vue1

        },

        {

            path: '/vue2',

            component: Vue2

        }

    ]

    // 3. 创建 router 实例,然后传 `routes` 配置

    const router = new VueRouter({

        routes: [{

                path: '/',

                name: 'Vue1',

                meta: {

                    index: 0,

                    keepAlive: true,

                    title: '组件1'

                },

                component: Vue1

            },

            {

                path: '/vue2',

                name: 'Vue2',

                meta: {

                    index: 1,

                    keepAlive: false,

                    title: '组件2'

                },

                component: Vue2

            }

        ]

    })

    router.beforeEach((to, from, next) => {

        const toDepth = to.meta.index;

        const fromDepth = from.meta.index;

        if (to.meta.title) {

            document.title = to.meta.title;

        }

        if (toDepth < fromDepth) { //返回

            from.meta.keepAlive = false;

            to.meta.keepAlive = true; //相当于缓存

        }

        next()

    })

    // 4. 创建和挂载根实例。

    // 记得要通过 router 配置参数注入路由,

    // 从而让整个应用都有路由功能

    const app = new Vue({

        el: '#app',

        data: {

            transitionName: ''

        },

        watch: {

            $route(to, from) {

                if (to.meta.index > from.meta.index) {

                    this.transitionName = 'slide-left';

                } else {

                    this.transitionName = 'slide-right';

                }

            }

        },

        router

    }).$mount('#app')

})
css
.child-view {

    position: absolute;

    width: 100%;

    transition: all .5s cubic-bezier(.55, 0, .1, 1);

}

.slide-left-enter,

.slide-right-leave-active {

    opacity: 0;

    -webkit-transform: translate(50px, 0);

    transform: translate(50px, 0);

}

.slide-left-leave-active,

.slide-right-enter {

    opacity: 0;

    -webkit-transform: translate(-50px, 0);

    transform: translate(-50px, 0);

}

body,

div,

p {

    margin: 0;

    padding: 0;

    color: #fff;

    text-align: center;

    font-weight: 500 !important;

}

[v-cloak] {

    display: none

}

p {

    margin-top: .5rem;

}

.redBc {

    background-color: red;

}

.orangeBc {

    background-color: orange;

}

.greenBc {

    background-color: green;

}
若需请求接口,html增加引入:
<script src="https://cdn.staticfile.org/axios/0.18.0/axios.min.js"></script>
使用:
function getData(){

       var param1 = {

           param: {

                  id:'1',

                     sex:'male'

                }

       }

        axios.get( "url", {params: param1}).then(function (res) { //url为请求接口, 当请求需要参数为JSON数据时

        // axios.get( "url?param2="+"XXX").then(function (res) {  //当请求参数无需用JSON时,param2为请求需要参数

                if (res.status == 200 && res.data.result == 0) {

                 var _data = res.data.message;

            }else{}

        })

        .catch(function (error) {

             console.log(error);

         });

}
js 引入Vue.js实现vue效果的更多相关文章
- 如何在其他js 引入main.js 中 vue 的实例?
1.原因解析 经测试发现,代码先执行了 index.js >> main.js >> Home.vue scr/api/index.js src/main.js src/co ...
- Vue.js 引入外部js方法
1.外部文件config.js 第一种写法 //常量的定义 const config = { baseurl:'http://172.16.114.5:8088/MGT2' } //函数的定义 fun ...
- js引入,js变量和运算符等
页面级的js不管写在页面的哪里都可以 企业项目开发要求:结构(html),样式(css),行为(js)相分离 不要既写外部js,又写内部js:如果两个都写,则外部js生效 声明多个变量时,每个变量之间 ...
- 第10章-Vue.js 项目实战
一.本节内容 掌握项目环境中路由的配置方法 ***** 熟练掌握编写单文件组件的编写 *** 能够使用swiper.js进行轮播图组件的封装 能够使用axios进行数据请求 二.webpack项目的目 ...
- 【实战】Vue全家桶(vue + axios + vue-router + vuex)搭建移动端H5项目
使用Vue全家桶开发移动端页面. 本博文默认已安装node.js. github链接 一.准备工作 安装vue npm install vue 安装脚手架vue-cli npm install -g ...
- vue引入swiper vue使用swiper vue脚手架使用swiper /引入js文件/引入css文件
vue引入swiper vue使用swiper vue脚手架使用swiper /引入js文件/引入css文件 ------------------------------------------- ...
- Vue.js实现tab切换效果
利用Vue实现简易tab切换效果 1.1 在我们平时浏览网站的时候,经常看到的特效有图片轮播.导航子菜单的隐藏.tab标签的切换等等.这段时间学习了vue后,开始要写出一些简单的特效. 1.2 实现思 ...
- js 仿微信投诉—引入vue.js,拆分组件为单个js
效果 页面目录 index.html <!DOCTYPE html > <html> <head> <meta charset="UTF-8&quo ...
- vue.js引入
开始学习vue.js,引入vue.vue.js一定要在head里面引入,实际开发中我们可能在body中引入,但是可能存在抖屏现象. 为了避免出现抖屏现象,我们引入vue.js或者jquery.js 最 ...
随机推荐
- 随笔记录 linux命令 2019.7.29
系统命令 一. type 查看命令是内部命令还是内部命令 help 帮助 man 在线帮助 cd 切换目录 pwd 查看所在路径 stat 查看文件详细信息 ls ...
- XMLHTTPRequest状态status完整列表
当用户试图通过 HTTP 访问一台正在运行 Internet 信息服务 (IIS) 的服务器上的内容时,IIS 返回一个表示该请求的状态的数字代码.状态代码可以指明具体请求是否已成功,还可以揭示请求失 ...
- 【FHQ-Treap】P4146 序列终结者
题意: 给定一个序列,支持区间加,区间反转,区间max询问 裸的平衡树题,这里采用FHQ-Treap 每个节点多记录一个max值和两个lazy_tag,暴力Push_Down即可(大常数选手) 打完这 ...
- VGDB提示
由于之前地址的版本在未安装.Net 4.0的电脑上安装会出现插件使用装载失败的问题,已更新,新地址为:http://pan.baidu.com/s/1xdnuD,此版本需要.Net 2.0.
- FCC——相关练习
算法题目1:Seek and Destroy(摧毁数组) 金克斯的迫击炮! 实现一个摧毁(destroyer)函数,第一个参数是待摧毁的数组,其余的参数是待摧毁的值. 帮助资源: Arguments ...
- RabbitMQ探索之路(二):RabbitMQ在Linux下的安装
引言 消息队列现在在互联网项目中应用的还是非常多的,在接下来的博客中小编会深入的了解MQ的实现过程,在此博客中将介绍如何在centos7下面安装MQ以及遇到的问题. 第一步:安装Erlang 因为ra ...
- C++如何判断某一文件是否存在
函数名: access 功 能: 确定文件的访问权限 用 法: int access(const char *filename, int amode); 程序例: #include <stdio ...
- net.sf.jsqlparser.statement.select.PlainSelect.getGroupBy()Lnet/sf/jsqlparse
添加pom依赖 <dependency> <groupId>com.github.jsqlparser</groupId> <artifactId>js ...
- php 扫描url死链接 \033[31m ANSI Linux终端输出带颜色
* 从Packagist上搜索需要的包 https://packagist.org/ * 通过composer下载依赖包 composer require guzzlehttp/guzzlecompo ...
- System.Drawing.Graphics.cs
ylbtech-System.Drawing.Graphics.cs 1.程序集 System.Drawing, Version=4.0.0.0, Culture=neutral, PublicKey ...