logstash收集nginx日志
(1)安装nginx
1.安装nginx
yum install epel-release -y

yum install nginx -y
2.修改日志文件格式为json
#vim /etc/nginx/nginx.conf

http {

    log_format access_json '{"@timestamp":"$time_iso8601",'

                           '"host":"$server_addr",'

                           '"clientip":"$remote_addr",'

                           '"size":$body_bytes_sent,'

                           '"responsetime":$request_time,'

                           '"upstreamtime":"$upstream_response_time",'

                           '"upstreamhost":"$upstream_addr",'

                           '"http_host":"$host",'

                           '"url":"$uri",'

                           '"domain":"$host",'

                           '"xff":"$http_x_forwarded_for",'

                           '"referer":"$http_referer",'

                           '"status":"$status"}';

    access_log  /var/log/nginx/access.log  access_json;

	}
3.启动nginx
systemctl start nginx

systemctl enable nginx
4.压测
ab -n 1000 -c 1 http://192.168.1.31/index.html
5.查看日志
# tail -1 /var/log/nginx/access.log

{"@timestamp":"2018-05-29T14:56:35+08:00","host":"192.168.1.31","clientip":"192.168.1.31","size":3700,"responsetime":0.000,"upstreamtime":"-","upstreamhost":"-","http_host":"192.168.1.31","url":"/index.html","domain":"192.168.1.31","xff":"-","referer":"-","status":"200"}
(2)logstash配置
1.logstash配置
#vim /etc/logstash/conf.d/nginx-access-log.conf

input {

        file {

                path => "/var/log/nginx/access.log"

                type => "nginx-access-log"

                start_position => "beginning"

                stat_interval => "2"

                }

        }

output {

        if [type] == "nginx-access-log" {

                elasticsearch {

                        hosts => ["192.168.1.31:9200"]

                        index => "nginx-access-log-%{+YYYY.MM.dd}"

                }

        }

        file {

        path => "/tmp/logstash-nginx-access-log-%{+YYYY.MM.dd}"

         }

}
2.检测配置文件语法和启动
logstash -f /etc/logstash/conf.d/nginx-access-log -t

systemctl restart logstash
3.head插件查看索引

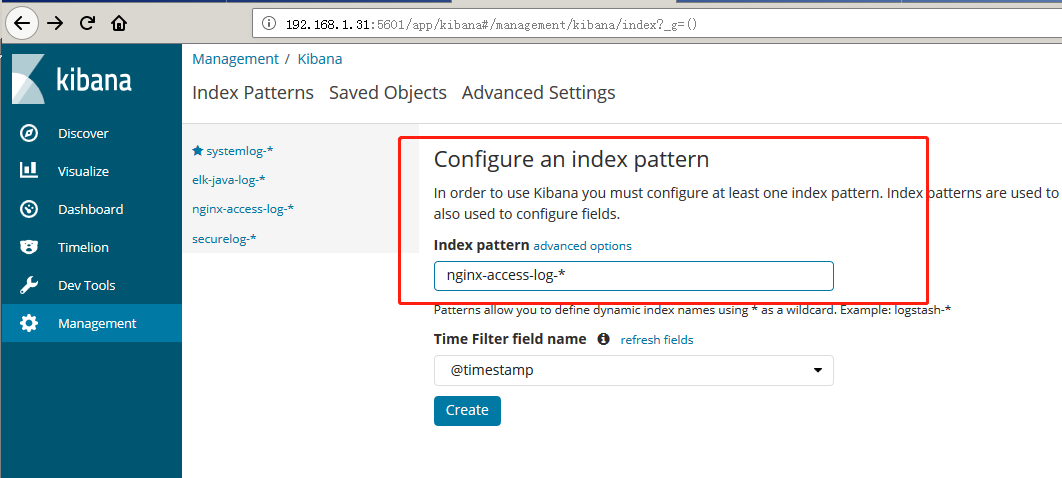
4.kibana查看
logstash收集nginx日志的更多相关文章
- Logstash收集nginx日志之使用grok过滤插件解析日志
grok作为一个logstash的过滤插件,支持根据模式解析文本日志行,拆成字段. nginx日志的配置: log_format main '$remote_addr - $remote_user [ ...
- logstash收集Nginx日志,转换为JSON格式
Nginx日志处理为JSON格式,并放置在http区块: log_format json '{"@timestamp":"$time_iso8601",' '& ...
- 第七章·Logstash深入-收集NGINX日志
1.NGINX安装配置 源码安装nginx 因为资源问题,我们先将nginx安装在Logstash所在机器 #安装nginx依赖包 [root@elkstack03 ~]# yum install - ...
- logstash收集nginx访问日志
logstash收集nginx访问日志 安装nginx #直接yum安装: [root@elk-node1 ~]# yum install nginx -y 官方文档:http://nginx.org ...
- logstash收集syslog日志
logstash收集syslog日志注意:生产用syslog收集日志!!! 编写logstash配置文件 #首先我用rubydebug测试数据 [root@elk-node1 conf.d]# cat ...
- ELK Stack (2) —— ELK + Redis收集Nginx日志
ELK Stack (2) -- ELK + Redis收集Nginx日志 摘要 使用Elasticsearch.Logstash.Kibana与Redis(作为缓冲区)对Nginx日志进行收集 版本 ...
- ELK filter过滤器来收集Nginx日志
前面已经有ELK-Redis的安装,此处只讲在不改变日志格式的情况下收集Nginx日志. 1.Nginx端的日志格式设置如下: log_format access '$remote_addr - $r ...
- ELK日志系统之使用Rsyslog快速方便的收集Nginx日志
常规的日志收集方案中Client端都需要额外安装一个Agent来收集日志,例如logstash.filebeat等,额外的程序也就意味着环境的复杂,资源的占用,有没有一种方式是不需要额外安装程序就能实 ...
- 安装logstash5.4.1,并使用grok表达式收集nginx日志
关于收集日志的方式,最简单性能最好的应该是修改nginx的日志存储格式为json,然后直接采集就可以了. 但是实际上会有一个问题,就是如果你之前有很多旧的日志需要全部导入elk上查看,这时就有两个问题 ...
随机推荐
- STM32自动生成精美图案
http://note.youdao.com/noteshare?id=65f237225624d22fe18f4aaaeec8db07
- C语言 ------ #undef 的使用
#undef 是在后面取消以前定义的宏定义 该指令的形式为 #undef 标识符 其中,标识符是一个宏名称.如果标识符当前没有被定义成一个宏名称,那么就会忽略该指令. 一旦定义预处理器标识符,它将保持 ...
- re正则模块
1.正则表达式的常用符号 '.' 默认匹配除\n之外的任意一个字符,若指定flag DOTALL,则匹配任意字符,包括换行 '^' 匹配字符开头,若指定flags MULTILINE,这种也可以匹配上 ...
- win32/linux 线程 log
原文 #include <stdio.h> #include <stdlib.h> #include <string.h> #ifdef WIN32 #includ ...
- 新生代Eden与两个Survivor区的解释
文章出处:http://ifeve.com/jvm-yong-generation/ 聊聊JVM的年轻代 1.为什么会有年轻代 我们先来屡屡,为什么需要把堆分代?不分代不能完成他所做的事情么?其实不分 ...
- NOIP模拟赛14
期望得分:0+100+100=200 实际得分:0+100+100=200 T1 [Ahoi2009]fly 飞行棋 http://www.lydsy.com/JudgeOnline/problem. ...
- NOIP 2014 提高组 Day2
期望得分:100+60+30=190 实际得分:70+60+30=160 https://www.luogu.org/problem/lists?name=&orderitem=pid& ...
- 还不会做! 树上的gcd 树分治 UOJ33
题目链接:http://uoj.ac/problem/33 题解链接:http://vfleaking.blog.uoj.ac/blog/38 现在感觉到了做OI的层层递进的思路的伟大之处,作为一个大 ...
- HDU 2157 How many ways?? 临接矩阵+快速幂
Problem Description 春天到了, HDU校园里开满了花, 姹紫嫣红, 非常美丽. 葱头是个爱花的人, 看着校花校草竞相开放, 漫步校园, 心情也变得舒畅. 为了多看看这迷人的校园, ...
- javascript在IE下不能用 trim函数解决方法
javascript 的trim 函数在firefox 下面使用没有问题 <script language="javascript"> var test1 = &quo ...