SpringBoot+ Mybatis 搭建
spring boot+mybatis整合
LZ今天自己搭建了下Spring boot+Mybatis,比原来的Spring+SpringMVC+Mybatis简单好多。其实只用Spring boot也可以开发,但是对于多表多条件分页查询,Spring boot就有点力不从心了,所以LZ把Mybatis整合进去,不得不说,现在的框架搭建真的是方便。话不多说,进入正题。
一、java web开发环境搭建
网上有很多教程,参考教程:http://www.cnblogs.com/Leo_wl/p/4752875.html
二、Spring boot搭建
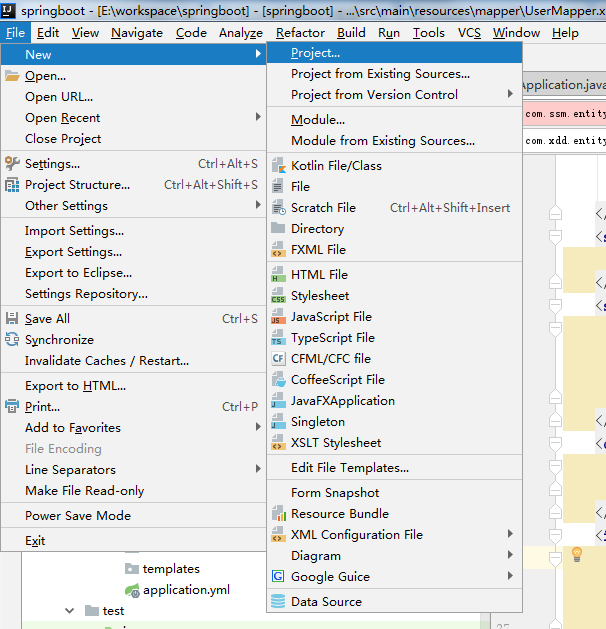
1、Intellij idea菜单栏File->new->project。
2、选择左侧栏中spring initializr,右侧选择jdk版本,以及默认的Service URL,点击next。

/3、然后填写项目的Group、Artifact等信息,helloworld阶段选默认就可以了,点击next。

4、左侧点击Web,中间一侧选择Web,然后左侧选择SQL,中间一侧选择JPA、Mybatis、MYSQL(LZ数据库用的是mysql,大家可以选择其他DB),点击next。

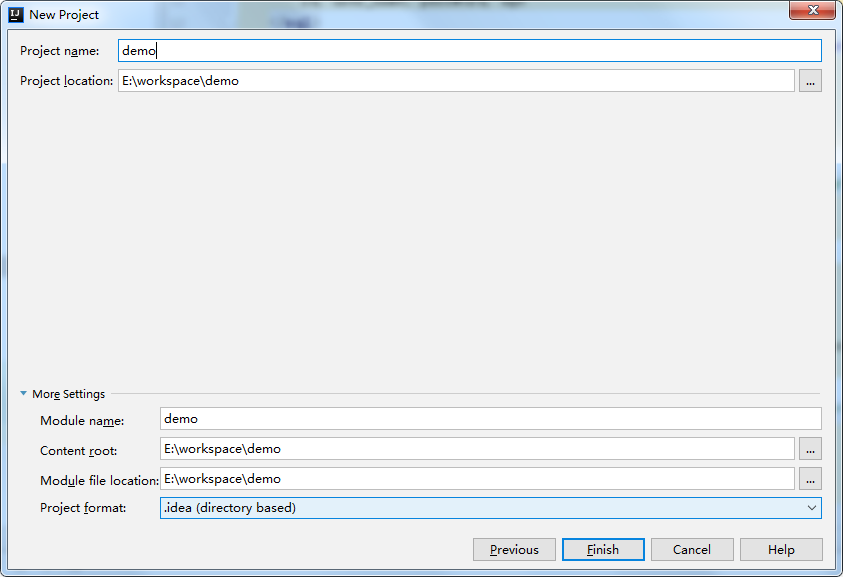
5、填写Project name 等信息,然后点击Finish。
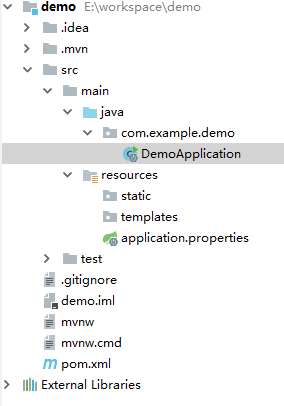
至此,一个maven web项目就创建好了,目录结构如下:
这样,Spring boot就搭建好了,pom.xml里已经有了Spring boot的jar包,包括我们的mysql数据连接的jar包。Spring boot内置了类似tomcat这样的中间件,所以,只要运行DemoApplication中的main方法就可以启动项目了。我们测试一下。
在src/main/java下新建目录com/demo/entity/User。

package com.demo.entity;

public class User {

    private String name;

    public String getName() {

        return name;

    }

    public void setName(String name) {

        this.name = name;

    }

}
相同目录下新建com/demo/controller/TestBootController。
package com.demo.controller;

import com.demo.entity.User;

import org.springframework.boot.autoconfigure.EnableAutoConfiguration;

import org.springframework.web.bind.annotation.RequestMapping;

import org.springframework.web.bind.annotation.RestController;

@RestController

@EnableAutoConfiguration

@RequestMapping("/testboot")

public class TestBootController {

    @RequestMapping("getuser")

    public User getUser() {

        User user = new User();

        user.setName("test");

        return user;

    }

}
spring boot启动DemoAplication是需要扫描它下面的Controller等类的,所以将DemoApplication移动到com/demo目录下。还有就是Spring boot启动默认是要加载数据源的,所以我们在src/main/resources下新建application.yml:
#默认使用配置

spring:

  profiles:

    active: dev

#公共配置与profiles选择无关

mybatis:

  typeAliasesPackage: com.xdd.entity

  mapperLocations: classpath:mapper/*.xml

---

#开发配置

spring:

  profiles: dev

  datasource:

    url: jdbc:mysql://localhost:3306/test

    username: root

    password: root

    driver-class-name: com.mysql.jdbc.Driver
或者将pom.xml中加载数据源的jar包先注释掉也可以。
/*<dependency>

   <groupId>org.mybatis.spring.boot</groupId>

   <artifactId>mybatis-spring-boot-starter</artifactId>

   <version>1.3.0</version>

</dependency>*/
最终的目录结构如下,

启动DemoApplication的main方法,访问http://localhost:8080/testboot/getuser即可。

三、整合Mybatis
1、集成druid,使用连接池。pom.xml中添加:
<dependency>

    <groupId>com.alibaba</groupId>

    <artifactId>druid</artifactId>

    <version>1.1.0</version>

</dependency>
最终的pom.xml文件:
<?xml version="1.0" encoding="UTF-8"?>

<project xmlns="http://maven.apache.org/POM/4.0.0" xmlns:xsi="http://www.w3.org/2001/XMLSchema-instance"

    xsi:schemaLocation="http://maven.apache.org/POM/4.0.0 http://maven.apache.org/xsd/maven-4.0.0.xsd">

    <modelVersion>4.0.0</modelVersion>

    <groupId>com.arm</groupId>

    <artifactId>demo</artifactId>

    <version>0.0.1-SNAPSHOT</version>

    <packaging>jar</packaging>

    <name>demo</name>

    <description>Demo project for Spring Boot</description>

    <parent>

        <groupId>org.springframework.boot</groupId>

        <artifactId>spring-boot-starter-parent</artifactId>

        <version>1.5.8.RELEASE</version>

        <relativePath/> <!-- lookup parent from repository -->

    </parent>

    <properties>

        <project.build.sourceEncoding>UTF-8</project.build.sourceEncoding>

        <project.reporting.outputEncoding>UTF-8</project.reporting.outputEncoding>

        <java.version>1.8</java.version>

    </properties>

    <dependencies>

        <dependency>

            <groupId>org.springframework.boot</groupId>

            <artifactId>spring-boot-starter-data-jpa</artifactId>

        </dependency>

        <dependency>

            <groupId>org.mybatis.spring.boot</groupId>

            <artifactId>mybatis-spring-boot-starter</artifactId>

            <version>1.3.1</version>

        </dependency>

        <dependency>

            <groupId>org.springframework.boot</groupId>

            <artifactId>spring-boot-starter-web</artifactId>

        </dependency>

        <dependency>

            <groupId>mysql</groupId>

            <artifactId>mysql-connector-java</artifactId>

            <scope>runtime</scope>

        </dependency>

        <dependency>

            <groupId>org.springframework.boot</groupId>

            <artifactId>spring-boot-starter-test</artifactId>

            <scope>test</scope>

        </dependency>

        <dependency>

            <groupId>com.alibaba</groupId>

            <artifactId>druid</artifactId>

            <version>1.1.0</version>

        </dependency>

    </dependencies>

    <build>

        <plugins>

            <plugin>

                <groupId>org.springframework.boot</groupId>

                <artifactId>spring-boot-maven-plugin</artifactId>

            </plugin>

        </plugins>

    </build>

</project>
在application.yml中添加数据源、Mybatis的实体和配置文件位置。
#默认使用配置

spring:

  profiles:

    active: dev

#公共配置与profiles选择无关 mapperLocations指的路径是src/main/resources

mybatis:

  typeAliasesPackage: com.xdd.entity

  mapperLocations: classpath:mapper/*.xml

---

#开发配置

spring:

  profiles: dev

  datasource:

    url: jdbc:mysql://localhost:3306/test

    username: root

    password: root

    driver-class-name: com.mysql.jdbc.Driver

    # 使用druid数据源

    type: com.alibaba.druid.pool.DruidDataSource
就这样就整合完成了!我们测试一下。
用MyBatis Generator自动生成代码,参考博文:http://blog.csdn.net/zhshulin/article/details/23912615 这里列一下自动生成的代码。
import com.xdd.entity.User;

import org.springframework.stereotype.Component;

public interface UserDao {

    int deleteByPrimaryKey(Integer id);

    int insert(User record);

    int insertSelective(User record);

    User selectByPrimaryKey(Integer id);

    int updateByPrimaryKeySelective(User record);

    int updateByPrimaryKey(User record);

}
UserMapper.xml
<?xml version="1.0" encoding="UTF-8" ?>

<!DOCTYPE mapper PUBLIC "-//mybatis.org//DTD Mapper 3.0//EN" "http://mybatis.org/dtd/mybatis-3-mapper.dtd" >

<mapper namespace="com.xdd.dao.UserDao" >

    <resultMap id="BaseResultMap" type="com.xdd.entity.User" >

        <id column="id" property="id" jdbcType="INTEGER" />

        <result column="user_name" property="userName" jdbcType="VARCHAR" />

        <result column="password" property="password" jdbcType="VARCHAR" />

        <result column="age" property="age" jdbcType="INTEGER" />

    </resultMap>

    <sql id="Base_Column_List" >

        id, user_name, password, age

    </sql>

    <select id="selectByPrimaryKey" resultMap="BaseResultMap" parameterType="java.lang.Integer" >

        select

        <include refid="Base_Column_List" />

        from user_t

        where id = #{id,jdbcType=INTEGER}

    </select>

    <delete id="deleteByPrimaryKey" parameterType="java.lang.Integer" >

        delete from user_t

        where id = #{id,jdbcType=INTEGER}

    </delete>

    <insert id="insert" parameterType="com.xdd.entity.User" >

        insert into user_t (id, user_name, password,

        age)

        values (#{id,jdbcType=INTEGER}, #{userName,jdbcType=VARCHAR}, #{password,jdbcType=VARCHAR},

        #{age,jdbcType=INTEGER})

    </insert>

    <insert id="insertSelective" parameterType="com.xdd.entity.User" >

        insert into user_t

        <trim prefix="(" suffix=")" suffixOverrides="," >

            <if test="id != null" >

                id,

            </if>

            <if test="userName != null" >

                user_name,

            </if>

            <if test="password != null" >

                password,

            </if>

            <if test="age != null" >

                age,

            </if>

        </trim>

        <trim prefix="values (" suffix=")" suffixOverrides="," >

            <if test="id != null" >

                #{id,jdbcType=INTEGER},

            </if>

            <if test="userName != null" >

                #{userName,jdbcType=VARCHAR},

            </if>

            <if test="password != null" >

                #{password,jdbcType=VARCHAR},

            </if>

            <if test="age != null" >

                #{age,jdbcType=INTEGER},

            </if>

        </trim>

    </insert>

    <update id="updateByPrimaryKeySelective" parameterType="com.xdd.entity.User" >

        update user_t

        <set >

            <if test="userName != null" >

                user_name = #{userName,jdbcType=VARCHAR},

            </if>

            <if test="password != null" >

                password = #{password,jdbcType=VARCHAR},

            </if>

            <if test="age != null" >

                age = #{age,jdbcType=INTEGER},

            </if>

        </set>

        where id = #{id,jdbcType=INTEGER}

    </update>

    <update id="updateByPrimaryKey" parameterType="com.xdd.entity.User" >

        update user_t

        set user_name = #{userName,jdbcType=VARCHAR},

        password = #{password,jdbcType=VARCHAR},

        age = #{age,jdbcType=INTEGER}

        where id = #{id,jdbcType=INTEGER}

    </update>

</mapper>
public class User {

    private Integer id;

    private String userName;

    private String password;

    private Integer age;

    public Integer getId() {

        return id;

    }

    public void setId(Integer id) {

        this.id = id;

    }

    public String getUserName() {

        return userName;

    }

    public void setUserName(String userName) {

        this.userName = userName == null ? null : userName.trim();

    }

    public String getPassword() {

        return password;

    }

    public void setPassword(String password) {

        this.password = password == null ? null : password.trim();

    }

    public Integer getAge() {

        return age;

    }

    public void setAge(Integer age) {

        this.age = age;

    }

}
最后将DemoApplication.java修改一下,让其扫描dao层接口。
import org.mybatis.spring.annotation.MapperScan;

import org.springframework.boot.SpringApplication;

import org.springframework.boot.autoconfigure.SpringBootApplication;

import org.springframework.boot.web.support.SpringBootServletInitializer;

@SpringBootApplication

@MapperScan("com.xdd.dao")

public class DemoApplication extends SpringBootServletInitializer{

    public static void main(String[] args) {

        SpringApplication.run(DemoApplication.class,args);

    }

}
自己添加controller和service
import java.util.List;

import java.util.Map;

public interface UserService {

    public User getUserById(int userId);

    boolean addUser(User record);

}
import org.springframework.beans.factory.annotation.Autowired;

import org.springframework.stereotype.Service;

import javax.annotation.Resource;

import java.util.List;

import java.util.Map;

@Service("userService")

public class UserServiceImpl implements UserService {

    @Resource

    private UserDao userDao;

    public User getUserById(int userId) {

        return userDao.selectByPrimaryKey(userId);

    }

    public boolean addUser(User record){

        boolean result = false;

        try {

            userDao.insertSelective(record);

            result = true;

        } catch (Exception e) {

            e.printStackTrace();

        }

        return result;

    }

}
@Controller

@RequestMapping("/user")

public class UserController {

    @Resource

    private UserService userService;

    @RequestMapping("/showUser")

    @ResponseBody

    public User toIndex(HttpServletRequest request, Model model){

        int userId = Integer.parseInt(request.getParameter("id"));

        User user = this.userService.getUserById(userId);

        return user;

    }

}
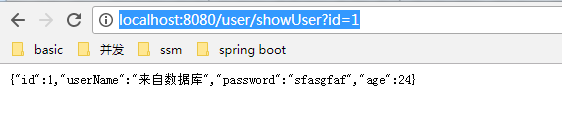
浏览器访问http://localhost:8080/user/showUser?id=1
由于比较好,我复制的收藏。
SpringBoot+ Mybatis 搭建的更多相关文章
- springboot +mybatis 搭建完整项目
springboot + mybatis搭建完整项目 1.springboot整合mybatis注解版 转:https://blog.csdn.net/u013187139/article/detai ...
- 使用idea+springboot+Mybatis搭建web项目
使用idea+springboot+Mybatis搭建web项目 springboot的优势之一就是快速搭建项目,省去了自己导入jar包和配置xml的时间,使用非常方便. 1.创建项目project, ...
- idea+springboot+Mybatis搭建web项目
使用idea+springboot+Mybatis搭建一个简单的web项目. 首先新建一个项目: 在这里选择Maven项目也可以,但是IDEA为我们提供了一种更方便快捷的创建方法,即Spring In ...
- springboot+mybatis搭建web项目
使用idea+springboot+Mybatis搭建一个简单的web项目. 首先新建一个项目: 在这里选择Maven项目也可以,但是IDEA为我们提供了一种更方便快捷的创建方法,即Spring In ...
- 基于IDEA采用springboot+Mybatis搭建ssm框架简单demo项目的搭建配置流程
一.通过对比可以原始SSM搭建流程,spring boot省去了大量的配置,极大提高了开发者的效率.原始SSM框架搭建流程见博客: https://www.cnblogs.com/No2-explor ...
- SpringBoot + Mybatis搭建完整的项目架构
准备工作: Java开发环境 已安装 springboot 插件(STS)的 Eclipse MySQL服务 一. 创建 springboot 项目 1. 打开Eclipse --> 左上角 ...
- springboot mybatis搭建
非常easy直接写,没有搭建成分 1.目录 2. @RestController public class UserController { @RequestMapping("/hello& ...
- 基于SpringBoot+Mybatis+MySQL5.7的轻语音乐网
一个基于SpringBoot+Mybatis+MySQL5.7的轻语音乐网站项目 1.主要用到的技术: 使用maven进行项目构建 使用Springboot+Mybatis搭建整个系统 使用ajax连 ...
- 基于Maven的Springboot+Mybatis+Druid+Swagger2+mybatis-generator框架环境搭建
基于Maven的Springboot+Mybatis+Druid+Swagger2+mybatis-generator框架环境搭建 前言 最近做回后台开发,重新抓起以前学过的SSM(Spring+Sp ...
随机推荐
- web前端效率提升之浏览器与本地文件的映射-遁地龙卷风
1.chrome浏览器,机制是拦截url, 1.在浏览器Element中调节的css样式可以直接同步到本地文件,反之亦然,浏览器会重新加载css,省去刷新 2.在source面板下对js的编辑可以同步 ...
- Learning Feature Pyramids for Human Pose Estimation(理解)
0 - 背景 人体姿态识别是计算机视觉的基础的具有挑战性的任务,其中对于身体部位的尺度变化性是存在的一个显著挑战.虽然金字塔方法广泛应用于解决此类问题,但该方法还是没有很好的被探索,我们设计了一个Py ...
- 多线程/多进程/异步IO
SOCK_STREAM :TCPSOCK_Dgram :UDP family=AF_INET: 服务器之间的通信AF_INET6: 服务器之间的通信AF_UNIX: Unix不同进程间的通信 永远遵循 ...
- 004 使用scrapy框架爬虫
0. 建立housePro的scrapy爬虫框架 # 1. 在终端输入,建立housePro项目scrapy startproject housePro# 2. 进入houseProcd houseP ...
- Interface Comparable<T>
Interface Comparable<T> : 该接口对实现它的每个类的对象强加一个整体排序. 这个排序被称为类的自然排序 ,类的compareTo方法被称为其自然比较方法 . 参数 ...
- 【转】Setting up SDL 2 on Visual Studio 2010 Ultimate
from: Lazy Foo'Productions - Setting up SDL 2 on Visual Studio 2010 Ultimate 1)First thing you need ...
- Python爬虫基础之UrlError
一.urllib.error python的urllib.error模块主要是应对urllib.request在网络请求过程中出现的异常而定义的异常处理类.主要有URLError和HTTPError两 ...
- Cyclone IV FPGA 器件笔记
LE(逻辑单元)操作模式 1) 正常模式 2)算术模式 可以看到对于Cy4来说正常模式和算术模式的区别就是正常模式有一个4输入LUT没有cout进位输出,而算术模式有两个3输入LUT有cout进位输出 ...
- Python env使用(virtualenv)
前言 Python 的 virualenv 模块闻名已久,乘着有点时间,学习一下 变更记录 # 19.3.26 创建文章 # 19.3.27 完善文章 正文 安装 pip install virt ...
- Image Pipeline
Image Pipeline Scrapy 提供了专门下载文件或者图片的Pipeline,下载图片与文件的原理同抓取网页的原理是一样的,所以他们的下载过程支持多线程与异步,十分的高效 Image Pi ...