springboot自定义starter
1,创建一个空工程 new - project - emptyproject
2,new一个Modules ---------------- maven (启动器) :
springboottest-spring-boot-starter
3,new一个Modules ---------------- spring(做自动配置的):
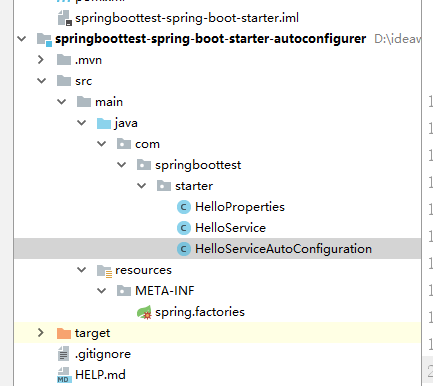
springboottest-spring-boot-starter-autoconfigurer spring版本:1.5.10
4,启动器pom文件中引入自动配置模块:
    <!--启动器-->

     <dependencies>

         <!--引入自动配置模块-->

          <dependency>

              <groupId>com.springboottest.starter</groupId>

              <artifactId>springboottest-spring-boot-starter-autoconfigurer</artifactId>

              <version>0.0.1-SNAPSHOT</version>

          </dependency>

     </dependencies>
5,自动配置器中,删除主主程序等不需要的内容,以及项目的启动类。并编写启动器:
- pom文件中引入启动器(所有starter的基本配置):
<dependencies>
<!--引入spring-boot-starter-->
<dependency>
<groupId>org.springframework.boot</groupId>
<artifactId>spring-boot-starter</artifactId>
</dependency> </dependencies> - 编写会被调用的service
package com.springboottest.starter;

import org.springframework.boot.context.properties.ConfigurationProperties;

//绑定文件中所有以springboottest.hello 开始的配置

@ConfigurationProperties(prefix = "springboottest.hello")

public class HelloProperties {

    private String prefix;

    private String suffix;

    public String getPrefix() {

        return prefix;

    }

    public void setPrefix(String prefix) {

        this.prefix = prefix;

    }

    public String getSuffix() {

        return suffix;

    }

    public void setSuffix(String suffix) {

        this.suffix = suffix;

    }

}
package com.springboottest.starter; public class HelloService {
HelloProperties helloProperties; public HelloProperties getHelloProperties() {
return helloProperties;
} public void setHelloProperties(HelloProperties helloProperties) {
this.helloProperties = helloProperties;
} public String sayHello(String name){
return helloProperties.getPrefix()+"-"+ name + helloProperties.getSuffix();
};
}package com.springboottest.starter; import org.springframework.beans.factory.annotation.Autowired;
import org.springframework.boot.autoconfigure.condition.ConditionalOnWebApplication;
import org.springframework.boot.context.properties.EnableConfigurationProperties;
import org.springframework.context.annotation.Bean;
import org.springframework.context.annotation.Configuration; @Configuration
@ConditionalOnWebApplication//web应用才生效
@EnableConfigurationProperties(HelloProperties.class)//让属性生效 HelloProperties helloProperties;
public class HelloServiceAutoConfiguration { //让属性生效 HelloProperties helloProperties;
@Autowired
HelloProperties helloProperties;
@Bean
public HelloService helloService(){
HelloService service = new HelloService();
service.setHelloProperties(helloProperties);
return service;
} }- 配置spring.factories让自动配置类生效
org.springframework.boot.autoconfigure.EnableAutoConfiguration=\

com.springboottest.starter.HelloServiceAutoConfiguration - springboottest-spring-boot-starter 启动器编写完成
- 两个项目分别install

- 加载完成,现在可以在别的项目里面调用
6,新建项目,调用自定义启动器的方法
- pom文件引入自定义启动器
<!--引入自定义starter-->

        <dependency>

            <groupId>com.springboottest.starter</groupId>

            <artifactId>springboottest-spring-boot-starter</artifactId>

            <version>1.0-SNAPSHOT</version>

</dependency> - 按照规则编写properties,增加前后缀
springboottest.hello.prefix=SPRINGBOOT

springboottest.hello.suffix=HELLO WORLD - 调用方法

springboot自定义starter的更多相关文章
- SpringBoot --- 自定义 Starter
SpringBoot --- 自定义 Starter 创建 1.需要创建一个新的空工程 2.新的工程需要引入两个模块 一个Maven 模块 作为启动器 一个SpringBoot 模块 作为自动配置模块 ...
- SpringBoot自定义starter及自动配置
SpringBoot的核心就是自动配置,而支持自动配置的是一个个starter项目.除了官方已有的starter,用户自己也可以根据规则自定义自己的starter项目. 自定义starter条件 自动 ...
- SpringBoot自定义Starter实现
自定义Starter: Starter会把所有用到的依赖都给包含进来,避免了开发者自己去引入依赖所带来的麻烦.Starter 提供了一种开箱即用的理念,其中核心就是springboot的自动配置原理相 ...
- springboot 自定义starter之AutoConfiguration【原】
八.自定义starter AutoConfiguration: 1.这个场景需要使用到的依赖是什么? 没有特别依赖的配置 2.如何编写自动配置 @Configuration //指定这个类是一个配置类 ...
- SpringBoot自定义starter开发分布式任务调度实践
概述 需求 在前面的博客<Java定时器演进过程和生产级分布式任务调度ElasticJob代码实战>中,我们已经熟悉ElasticJob分布式任务的应用,其核心实现为elasticjob- ...
- SpringBoot系列三:SpringBoot自定义Starter
在前面两章 SpringBoot入门 .SpringBoot自动配置原理 的学习后,我们对如何创建一个 SpringBoot 项目.SpringBoot 的运行原理以及自动配置等都有了一定的了解.如果 ...
- Springboot自定义starter打印sql及其执行时间
前面写到了通过实现mybatis提供的org.apache.ibatis.plugin.Interceptor接口实现了打印SQL执行时间,并格式化SQL及其参数,如果我们使用的是ssm还得再配置文件 ...
- Spring-Boot自定义Starter实践
此文已由作者王慎为授权网易云社区发布. 欢迎访问网易云社区,了解更多网易技术产品运营经验. disconf-spring-boot-starter 使用方法: 引入maven依赖: <depen ...
- SpringBoot之旅第六篇-启动原理及自定义starter
一.引言 SpringBoot的一大优势就是Starter,由于SpringBoot有很多开箱即用的Starter依赖,使得我们开发变得简单,我们不需要过多的关注框架的配置. 在日常开发中,我们也会自 ...
随机推荐
- 关于PL/SQL Developer与Oracle客户端
这是一个很简单的知识点,但这些年遇到过太多初学者反而受其困扰,所以还是决定记录一下. 背景:国内使用Oracle的群体,几乎都会使用PL/SQL Developer这个图形化的工具进行日常数据维护.这 ...
- php实现栈操作(不用push pop 库函数)
直接上代码 <?php /*php不用库函数实现栈操作 * @author Geyaru 2019-04-20 */ class stack{ private $top = -1; //栈指针初 ...
- java操作JacocClient下载dump文件
记录瞬间 import org.jacoco.core.data.ExecutionDataWriter; import org.jacoco.core.runtime.RemoteControlRe ...
- python之xml模块
# XML 模块的操作参考链接 # http://www.cnblogs.com/yuanchenqi/articles/5732581.html
- EXCEL对比在职员工与离职员工
EXCEL 在B1中 填写这个 =VLOOKUP(A1,C:C,1,0) 然后往下拉 只要有出现#N/A 说明已经离职了 公司需要
- nodejs:导出Excel和解析导入的Excel
用的是koa2框架,但好好处理一下,用express框架也是可以的.导出的Excel是xlsx的格式,解析导入Excel的有xlsx和csv格式.通常导入Excel是要上传的,然后获取文件的路径,这里 ...
- LR12脚本录制流程
准备工作: 工具:win7系统.loadrunner 12.Firefox浏览器.飞机订票系统. 打开飞机订票系统 开始录制脚本 步骤一:打开loadrunner(Virtual User Gener ...
- 安利一款强大的学习软件XMind(顺便放上这几天制作的JavaSE的思维导图day1-day4)
最近在学习Java,并且在使用一款非常酷炫无敌吊炸天的软件,思维导图制作神器-XMind,然后就像分享给大家,至于XMind是什么大家自行百度,在这里我就不赘述了 我这里说下我认为的好的实用的常用快捷 ...
- 网络-04-端口号-linux端口详解大全--TCP注册端口号大全
# John Murphy <john.m.murphy&mci.com>afs3-fileserver 7000/tcp file server itselfafs3-files ...
- WinForm窗体权限控制的简单实现
一.建立两张表 //存放要控制的窗体控件 CREATE TABLE [dbo].[AuthControl] ( [Id] INT IDENTITY (1, 1) NOT NULL, [NiceName ...