SpringMVC实现上传下载功能
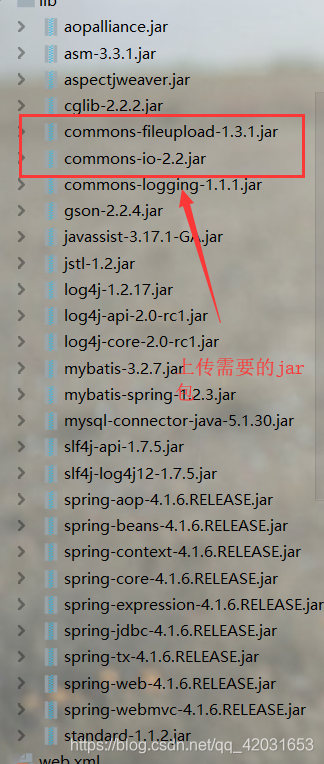
配置资源(jar包)
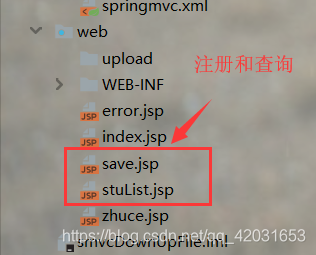
将前端页面整理好:
写核心的几个配置文件(applicationContext+wed.xml+jdbc.properties+log4j+springMVC.xml)
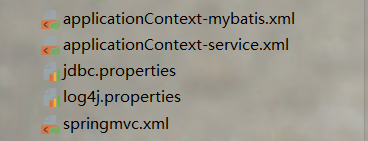
都是在src目录下:
applicationContext-mybatis.xml(配置和mybatis关联的文件)
<?xml version="1.0" encoding="UTF-8"?>

<beans xmlns="http://www.springframework.org/schema/beans"

       xmlns:xsi="http://www.w3.org/2001/XMLSchema-instance"

       xmlns:aop="http://www.springframework.org/schema/aop"

       xmlns:context="http://www.springframework.org/schema/context"

       xmlns:tx="http://www.springframework.org/schema/tx"

       xsi:schemaLocation="http://www.springframework.org/schema/beans

        http://www.springframework.org/schema/beans/spring-beans.xsd

        http://www.springframework.org/schema/aop

        http://www.springframework.org/schema/aop/spring-aop.xsd

        http://www.springframework.org/schema/context

        http://www.springframework.org/schema/context/spring-context.xsd

        http://www.springframework.org/schema/tx

        http://www.springframework.org/schema/tx/spring-tx.xsd">

    <context:property-placeholder location="classpath:jdbc.properties"></context:property-placeholder>

    <!--连接数据库-->

    <bean id="ds" class="org.springframework.jdbc.datasource.DriverManagerDataSource">

        <property name="driverClassName" value="${driver1}"/>

        <property name="url" value="${url1}"/>

        <property name="username" value="root"/>

        <property name="password" value="root"/>

    </bean>

    <!--获得sqlsession-->

    <bean id="factory" class="org.mybatis.spring.SqlSessionFactoryBean">

        <property name="dataSource" ref="ds"/>

        <property name="typeAliasesPackage" value="com.bjsxt.pojo"/>

    </bean>

    <!--扫描mapper文件-->

    <bean id="mapper" class="org.mybatis.spring.mapper.MapperScannerConfigurer">

        <property name="sqlSessionFactoryBeanName" value="factory"/>

        <property name="basePackage" value="com.bjsxt.mapper"/>

    </bean>

</beans>
applicationContext-service.xml(配置service层):
<!--扫描业务层注解-->

    <context:component-scan base-package="com.bjsxt.service.impl"></context:component-scan>
如果需要进行事务操作:
<!--配置声明事务-->

    <bean id="TransactionManager" class="org.springframework.jdbc.datasource.DataSourceTransactionManager">

        <property name="dataSource" ref="ds"></property>

    </bean>

    <!--扫描事务注解-->

    <tx:annotation-driven></tx:annotation-driven>
web.xml
<?xml version="1.0" encoding="UTF-8"?>

<web-app xmlns="http://xmlns.jcp.org/xml/ns/javaee"

         xmlns:xsi="http://www.w3.org/2001/XMLSchema-instance"

         xsi:schemaLocation="http://xmlns.jcp.org/xml/ns/javaee http://xmlns.jcp.org/xml/ns/javaee/web-app_4_0.xsd"

         version="4.0">

    <servlet>

        <servlet-name>mvc</servlet-name>

        <servlet-class>org.springframework.web.servlet.DispatcherServlet</servlet-class>

        <init-param>

            <param-name>contextConfigLocation</param-name>

            <param-value>classpath:springmvc.xml</param-value>

        </init-param>

    </servlet>

    <servlet-mapping>

        <servlet-name>mvc</servlet-name>

        <!--处理jsp都可以使用-->

        <url-pattern>/</url-pattern>

    </servlet-mapping>

    <context-param>

        <param-name>contextConfigLocation</param-name>

        <param-value>classpath:applicationContext-*.xml</param-value>

    </context-param>

    <!--配置监听器-->

    <listener>

        <listener-class>org.springframework.web.context.ContextLoaderListener</listener-class>

    </listener>

</web-app>
MVC分层:
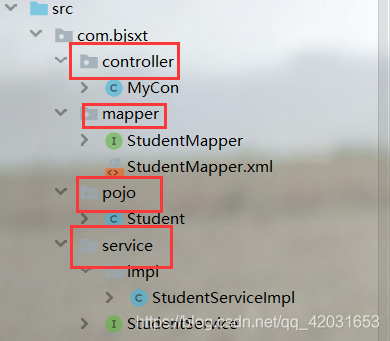
控制层(controller):
由于是为了测试上传下载的功能,我并没有将功能对应的控制层分开写,就写了一个文件,用注解去访问
package com.bjsxt.controller;

import com.bjsxt.pojo.Student;

import com.bjsxt.service.StudentService;

import org.apache.commons.io.IOUtils;

import org.springframework.beans.factory.annotation.Autowired;

import org.springframework.stereotype.Controller;

import org.springframework.web.bind.annotation.RequestMapping;

import org.springframework.web.multipart.MultipartFile;

import javax.servlet.ServletOutputStream;

import javax.servlet.http.HttpServletRequest;

import javax.servlet.http.HttpServletResponse;

import java.awt.font.MultipleMaster;

import java.io.*;

import java.util.List;

import java.util.UUID;

@Controller

public class MyCon {

    @Autowired

    StudentService ss;

    //下载图片操作

    @RequestMapping("download")

    public void download(String filename, String filetype, HttpServletRequest req, HttpServletResponse resp) throws IOException {

        //获取服务器的图片路径

        String realPath = req.getServletContext().getRealPath("/upload");

        //获取图片的名称和类型 String filename,String filetype

        File file=new File(realPath+"/"+filename);

        //将文件写入

        InputStream inputStream=new FileInputStream(file);

        //设置属性下载到本地

        //1.设置长度

        resp.setContentLength((int)file.length());

        //2.设置类型

        resp.setContentType(filetype);

        //3.设置响应头

        resp.setHeader("Content-Disposition","attachment;filename="+filename);

        //将读取的文件写入本地

        OutputStream outputStream = resp.getOutputStream();

        IOUtils.copy(inputStream,outputStream);

        //关闭流

        outputStream.close();

        inputStream.close();

    }

    @RequestMapping("filee")

    public String filee(String uname, String pwd, MultipartFile fil) throws IOException {

        System.out.println(uname+":"+pwd);

        System.out.println(fil.getName()+"---"+fil.getSize()+"---"+fil.getContentType()+"---"+fil.getOriginalFilename());

        fil.transferTo(new File("F:/img/"+fil.getOriginalFilename()));

        return "redirect:/index.jsp";

    }

    @RequestMapping("insertStu")

    public String insertStu(String name,int age,Double score, MultipartFile filename, HttpServletRequest req) throws IOException {

        /*System.out.println(uname+":"+pwd);

        System.out.println(fil.getName()+"---"+fil.getSize()+"---"+fil.getContentType()+"---"+fil.getOriginalFilename());*/

       /* if (fil.getSize()>2*1024){

            req.setAttribute("error","最大的上传文件是2kb");

            return "forward:/zhuce.jsp";

       }*/

        String realPath = req.getServletContext().getRealPath("/upload");

        /*为了防止文件名相同,覆盖原文件*/

        String uuid = UUID.randomUUID().toString();

        //截取图片的后缀名

        String filname = filename.getOriginalFilename().substring(filename.getOriginalFilename().lastIndexOf("."));

        String fname=uuid+filname;

        File file=new File(realPath);

        if (!file.exists()){

            file.mkdirs();

        }

        //文件上传完毕

        filename.transferTo(new File(file,fname));

        Student student=new Student();

        student.setAge(age);

            student.setFilename(fname);

        student.setName(name);

        student.setScore(score);

        student.setFiletype(filename.getContentType());

        //调用业务层

        int addstu = ss.addstu(student);

        if (addstu>0){

            //插入成功

            return "redirect:/findall";

        }else {

            //插入失败

            req.setAttribute("error","插入失败");

            return "forward:/save.jsp";

        }

    }

    @RequestMapping("findall")

    public String findall(HttpServletRequest req){

        List<Student> students = ss.finall();

        req.setAttribute("students",students);

        return "forward:/stuList.jsp";

    }

}
Mapper接口:
package com.bjsxt.mapper;

import com.bjsxt.pojo.Student;

import java.util.List;

public interface StudentMapper {

    int insetstu(Student student);

    List<Student> selAll();

}
Mapper.xml:
<?xml version="1.0" encoding="UTF-8" ?>

<!DOCTYPE mapper

        PUBLIC "-//mybatis.org//DTD Mapper 3.0//EN"

        "http://mybatis.org/dtd/mybatis-3-mapper.dtd">

<mapper namespace="com.bjsxt.mapper.StudentMapper">

    <insert id="insetstu" parameterType="student" >

        insert into student values(default,#{name},#{age},#{score},#{filename},#{filetype})

    </insert>

    <select id="selAll" resultType="Student">

        select * from student

    </select>

</mapper>
Service接口:
package com.bjsxt.service;

import com.bjsxt.pojo.Student;

import java.util.List;

public interface StudentService {

    public int addstu(Student student);

    public List<Student> finall();

}
Service实现类
package com.bjsxt.service.impl;

import com.bjsxt.mapper.StudentMapper;

import com.bjsxt.pojo.Student;

import com.bjsxt.service.StudentService;

import org.springframework.beans.factory.annotation.Autowired;

import org.springframework.stereotype.Service;

import java.util.List;

@Service("ssi")

public class StudentServiceImpl implements StudentService {

    @Autowired

    StudentMapper studentMapper;

    @Override

    public int addstu(Student student) {

        int insetstu = studentMapper.insetstu(student);

        return insetstu;

    }

    @Override

    public List<Student> finall() {

        List<Student> students = studentMapper.selAll();

        return students;

    }

}
pojo实体类:
package com.bjsxt.pojo;

import java.io.Serializable;

public class Student implements Serializable {

    private  int id;

    private  String name;

    private  int age;

    private  double score;

    private  String filename;

    private  String filetype;

    public Student(int id, String name, int age, double score, String filename, String filetype) {

        this.id = id;

        this.name = name;

        this.age = age;

        this.score = score;

        this.filename = filename;

        this.filetype = filetype;

    }

    public Student() {

    }

    public int getId() {

        return id;

    }

    public void setId(int id) {

        this.id = id;

    }

    public String getName() {

        return name;

    }

    public void setName(String name) {

        this.name = name;

    }

    public int getAge() {

        return age;

    }

    public void setAge(int age) {

        this.age = age;

    }

    public double getScore() {

        return score;

    }

    public void setScore(double score) {

        this.score = score;

    }

    public String getFilename() {

        return filename;

    }

    public void setFilename(String filename) {

        this.filename = filename;

    }

    public String getFiletype() {

        return filetype;

    }

    public void setFiletype(String filetype) {

        this.filetype = filetype;

    }

    @Override

    public String toString() {

        return "Student{" +

                "id=" + id +

                ", name='" + name + '\'' +

                ", age=" + age +

                ", score=" + score +

                ", filename='" + filename + '\'' +

                ", filetype='" + filetype + '\'' +

                '}';

    }

}
实现效果:

SpringMVC实现上传下载功能的更多相关文章
- springmvc文件上传下载简单实现案例(ssm框架使用)
springmvc文件上传下载实现起来非常简单,此springmvc上传下载案例适合已经搭建好的ssm框架(spring+springmvc+mybatis)使用,ssm框架项目的搭建我相信你们已经搭 ...
- SpringMVC文件上传下载(单文件、多文件)
前言 大家好,我是bigsai,今天我们学习Springmvc的文件上传下载. 文件上传和下载是互联网web应用非常重要的组成部分,它是信息交互传输的重要渠道之一.你可能经常在网页上传下载文件,你可能 ...
- JavaWeb实现文件上传下载功能实例解析
转:http://www.cnblogs.com/xdp-gacl/p/4200090.html JavaWeb实现文件上传下载功能实例解析 在Web应用系统开发中,文件上传和下载功能是非常常用的功能 ...
- 【转】Android 服务器之SFTP服务器上传下载功能
原文网址:http://blog.csdn.net/tanghua0809/article/details/47056327 本文主要是讲解Android服务器之SFTP服务器的上传下载功能,也是对之 ...
- 【转】Android 服务器之SFTP服务器上传下载功能 -- 不错
原文网址:http://blog.csdn.net/tanghua0809/article/details/47056327 本文主要是讲解Android服务器之SFTP服务器的上传下载功能,也是对之 ...
- JavaWeb实现文件上传下载功能实例解析 (好用)
转: JavaWeb实现文件上传下载功能实例解析 转:http://www.cnblogs.com/xdp-gacl/p/4200090.html JavaWeb实现文件上传下载功能实例解析 在Web ...
- SpringMVC文件上传下载
在Spring MVC的基础框架搭建起来后,我们测试了spring mvc中的返回值类型,如果你还没有搭建好springmvc的架构请参考博文->http://www.cnblogs.com/q ...
- SpringMVC 文件上传下载
目录 文件上传 MultipartFile对象 文件下载 上传下载示例 pom.xml增加 创建uploadForm.jsp 创建uploadForm2.jsp 创建userInfo.jsp spri ...
- java中文上传下载功能实现(自己测试项目)
1.新建maven项目打war包 2.搭建springMVC框架 web.xml文件配置 <?xml version="1.0" encoding="UTF-8&q ...
随机推荐
- H5+app -- 关于ajax提交问题
1.前阵子在做系统的h5+ app为满足手机端也能进行业务操作,例如:提货,扫描入库之类的.所以就要将做接口,从手机端调用后台系统的方法. 2.例如这样的请求格式,但是呢,每次请求它都直接跳到erro ...
- HTTP的请求方式
GET 请求获取 Request-URI 所标识的资源POST 在 Request-URI 所标识的资源后附加新的数据HEAD 请求获取由 Request-URI 所标识的资源的响应消息报头PUT ...
- vue根据不同环境进行编译打包
工作中我们在开发过程中,有很多的开发环境,如果我们不进行统一配置,那么我们只能手动进行更改,这样会给我们带来诸多不便,所以我们要配置根据不同的环境来进行编译打包. 先看一下我的项目目录: 在confi ...
- Python3.7.1学习(二)使用schedule模块定时执行任务
python中有一个轻量级的定时任务调度的库:schedule.他可以完成每分钟,每小时,每天,周几,特定日期的定时任务.因此十分方便我们执行一些轻量级的定时任务. 1 安装 1.1在cmd中输入p ...
- vc在x64体系的一般传参数方式
前篇分析过在objc中函数调用传参的一般方式,本篇分析vc在x64体系中的一般传参方式.手头上因为没有64位的vc编译器,只好用windbg看ms自身的函数是怎么样调用的. 首先看两个再熟悉不过的ap ...
- linux后台运行程序--nobup
用途:不挂断地运行命令. 语法:nohup Command [ Arg - ] [ & ] 描述:nohup 命令运行由 Command 参数和任何相关的 Arg 参数指定的命令,忽略所有挂断 ...
- 理解Redis单线程运行模式
本文首发于:https://mp.weixin.qq.com/s/je4nqCIq6ARhSV2V5Ymmtg 微信公众号:后端技术指南针 0.概述 通过本文将了解到以下内容: Redis服务器采用单 ...
- echarts绘制彩虹色背景
大致成品如图所示 关键的步骤: var dom = document.getElementById("myChart"); var myChart = echarts.init(d ...
- WPF 修改屏幕DPI,会触发控件重新加载Unload/Load
修改屏幕DPI,会触发控件的Unloaded/Loaded 现象/重现案例 对Unloaded/Loaded的印象: FrameworkElement, 第一次加载显示时,会触发Loaded.元素被释 ...
- .NET Core 3.0 使用Nswag生成Api文档和客户端代码
摘要 在前后端分离.Restful API盛行的年代,完美的接口文档,成了交流的纽带.在项目中引入Swagger (也称为OpenAPI),是种不错的选择,它可以让接口数据可视化.下文将会演示 利用N ...