
IdentityServer4 保护.net framework webapi
一、IS4服务器配置
1、新建一个Asp.net Core MVC程序,模板选择 Empty

2、Nuget添加 IdentityServer4,我这里添加的是2.5.3
3、添加Config文件,配置clients和scopes等信息,需要持久化配置的可以看 https://www.cnblogs.com/fengchao1000/p/10184921.html
public class Config

    {

        // scopes define the resources in your system

        public static IEnumerable<IdentityResource> GetIdentityResources()

        {

            return new List<IdentityResource>

            {

                new IdentityResources.OpenId(),

                new IdentityResources.Profile()

            };

        }

        public static IEnumerable<ApiResource> GetApis()

        {

            return new List<ApiResource>

            {

                new ApiResource("FrameworkAPI",new List<string>(){JwtClaimTypes.Subject})

            };

        }

        public static IEnumerable<Client> GetClients()

        {

            return new List<Client>

            {

                //Implicit模式Client配置,适用于SPA

                new Client

                {

                    ClientId = "Test",

                    ClientName = "Test",

                    AllowedGrantTypes = GrantTypes.Implicit,

                    AllowAccessTokensViaBrowser = true,

                    AccessTokenLifetime = *,

                    AccessTokenType = AccessTokenType.Jwt,

                    RedirectUris =

                    {

                        "https://localhost:5003/signin-callback.html",

                        "https://localhost:5003/silent-callback.html"

                    },

                    PostLogoutRedirectUris = { "https://localhost:5003" },

                    AllowedCorsOrigins = { "https://localhost:5003" },

                    RequireConsent = false,

                    AllowedScopes =

                    {

                        IdentityServerConstants.StandardScopes.OpenId,

                        IdentityServerConstants.StandardScopes.Profile,

                        "FrameworkAPI"//对应webapi里面的scope配置

                    }

                },

                //ResourceOwnerPassword模式Client配置,适用于App、winform

                new Client

                {

                    ClientId = "App",

                    ClientName = "App",

                    ClientSecrets = { new Secret("".Sha256()) },

                    AccessTokenLifetime = *,//单位s

                    AllowedGrantTypes = GrantTypes.ResourceOwnerPassword,

                    SlidingRefreshTokenLifetime =  ,

                    AllowOfflineAccess = true,

                    AllowedScopes = new List<string>

                    {

                        "FrameworkAPI",//对应webapi里面的scope配置

                        StandardScopes.OfflineAccess,

                        StandardScopes.OpenId,

                        StandardScopes.Profile

                    }

                }

            };

        }

    }
4、添加ProfileService文件,用于自定义登录返回信息
/// <summary>

    /// 自定义用户登录返回的信息claims

    /// </summary>

    public class ProfileService : IProfileService

    {

        private readonly ILogger logger;

        public ProfileService(ILogger<ProfileService> logger)

        {

            this.logger = logger;

        }

        public async Task GetProfileDataAsync(ProfileDataRequestContext context)

        {

            try

            {

                var claims = context.Subject.Claims.ToList();

                context.IssuedClaims = claims.ToList();

            }

            catch (Exception ex)

            {

                logger.LogError(ex.ToString());

            }

        }

        public async Task IsActiveAsync(IsActiveContext context)

        {

            context.IsActive = true;

        }

    }
5、添加ResourceOwnerPasswordValidator文件,在ResourceOwnerPassword模式下用于自定义登录验证
/// <summary>

    ///ResourceOwnerPassword模式下用于自定义登录验证

    /// </summary>

    public class ResourceOwnerPasswordValidator : IResourceOwnerPasswordValidator

    {

        private readonly IConfiguration config;

        public ResourceOwnerPasswordValidator(IConfiguration config)

        {

            this.config = config;

        }

        public Task ValidateAsync(ResourceOwnerPasswordValidationContext context)

        {

            //根据context.UserName和context.Password与数据库的数据做校验,判断是否合法

            if (context.UserName == "test" && context.Password == "test")

            {

                context.Result = new GrantValidationResult(

                 subject: context.UserName,

                 authenticationMethod: OidcConstants.AuthenticationMethods.Password);

            }

            else

            {

                //验证失败

                context.Result = new GrantValidationResult(

                    TokenRequestErrors.InvalidGrant,

                    "invalid custom credential"

                    );

            }

            return Task.FromResult();

        }

    }
6、在 Startup 配置IdentityServer
public class Startup

    {

        // This method gets called by the runtime. Use this method to add services to the container.

        // For more information on how to configure your application, visit https://go.microsoft.com/fwlink/?LinkID=398940

        public void ConfigureServices(IServiceCollection services)

        {

            services.AddIdentityServer()

                   //配置证书

                   .AddDeveloperSigningCredential()

                   //配置API资源

                   .AddInMemoryApiResources(Config.GetApis())

                   //配置身份资源

                   .AddInMemoryIdentityResources(Config.GetIdentityResources())

                   //预置Client

                   .AddInMemoryClients(Config.GetClients())

                   .AddProfileService<ProfileService>()

                   .AddResourceOwnerValidator<ResourceOwnerPasswordValidator>();

            services.AddAuthentication()

            .AddCookie(options =>

            {

                options.ExpireTimeSpan = System.TimeSpan.FromMinutes();

                options.SlidingExpiration = true;

            });

        }

        // This method gets called by the runtime. Use this method to configure the HTTP request pipeline.

        public void Configure(IApplicationBuilder app, IHostingEnvironment env)

        {

            if (env.IsDevelopment())

            {

                app.UseDeveloperExceptionPage();

            }

            app.UseIdentityServer();//IdentityServer4中间件

            app.Run(async (context) =>

            {

                await context.Response.WriteAsync("IdentityServer4");

            });

        }

    }
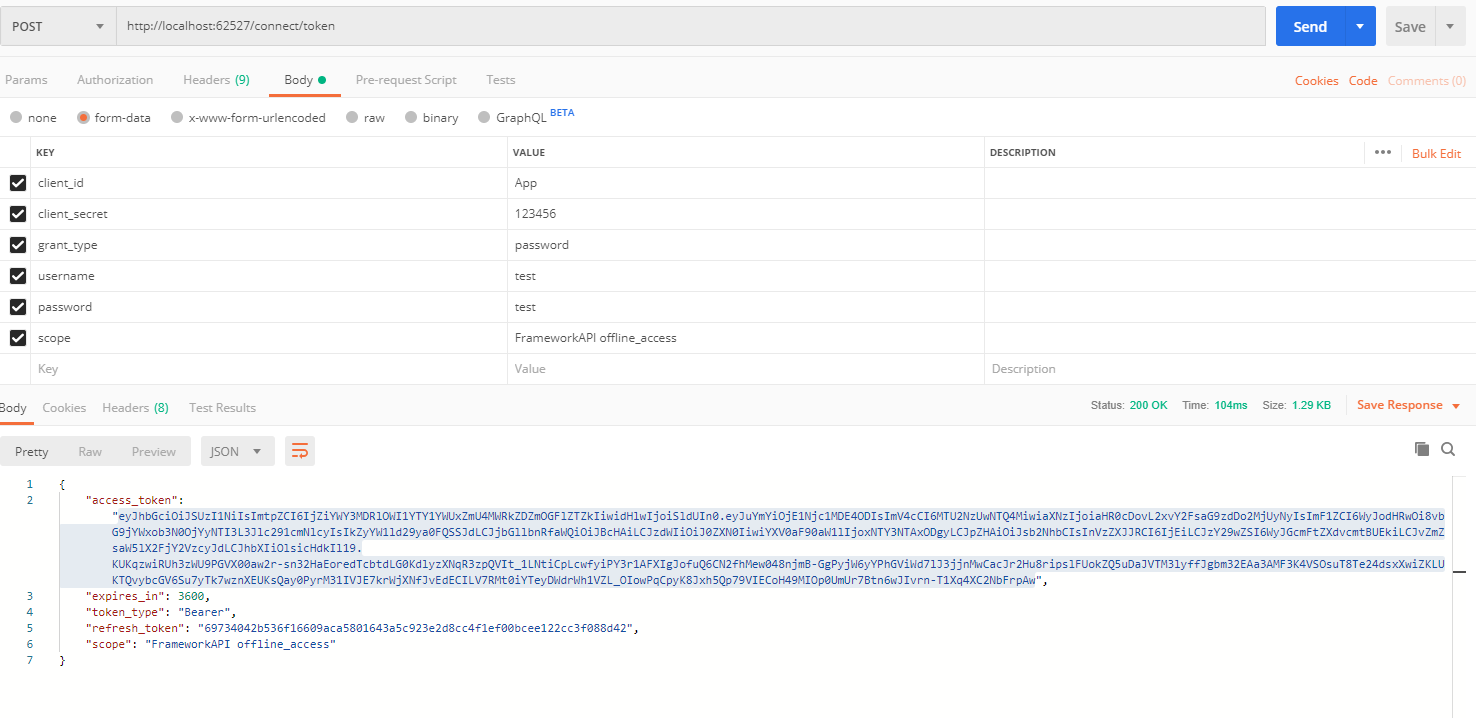
到这里我们IdentityServer4服务端已经搭建好了,我们用postman测试下,这里调用的是ResourceOwnerPassword模式
二、.net framework webapi 配置
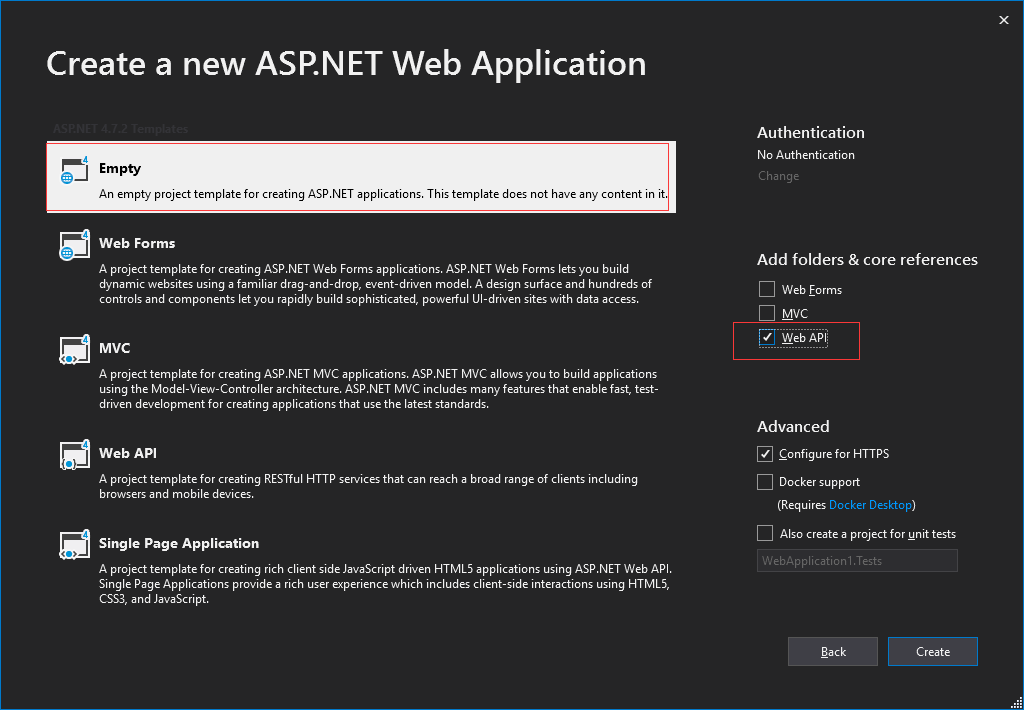
1、新建一个 .net framework webapi 程序
 \
\
2、由于webapi是.net Framework版本的,所以我们需要引用 IdentityServer3.AccessTokenValidation 作为api端token的验证组件。
Nuget添加:
IdentityServer3.AccessTokenValidation
IdentityModel
Microsoft.Owin.Host.SystemWeb
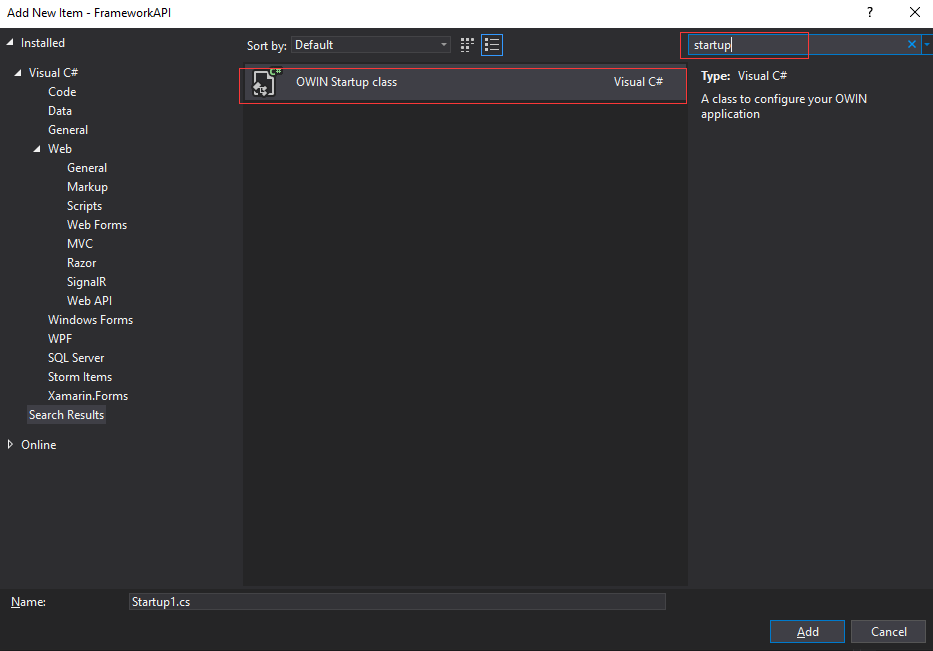
3、添加一个 Owin Startup.cs ,最好是用现有的startup类,而不要自己去新建一个类,然后修改名称。
4、在Startup中配置 IdentityServer AccessToken 验证参数
    public class Startup

    {

        public void Configuration(IAppBuilder app)

        {

            app.UseIdentityServerBearerTokenAuthentication(new IdentityServerBearerTokenAuthenticationOptions

            {

                Authority = "http://localhost:62527/",

                RequiredScopes = new[] { "FrameworkAPI" },//对应Client中配置的AllowedScopes和ApiResource

                DelayLoadMetadata = true

            });

        }

    }
5、在 WebAPIConfig 中加入 config.Filters.Add(new AuthorizeAttribute()) 来启用授权验证
config.Filters.Add(new AuthorizeAttribute());
6、添加TestController
    public class TestController : ApiController

    {

        public IHttpActionResult Get()

        {

            var user = User as ClaimsPrincipal;

            var claims = from c in user.Claims

                         select new

                         {

                             type = c.Type,

                             value = c.Value

                         };

            return Json(claims);

        }

    }
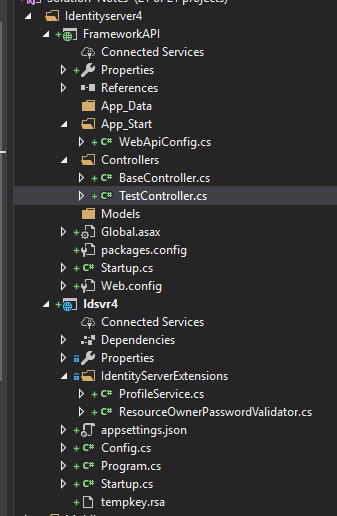
最后项目结构如下:
三、测试
我们的服务端和webapi都已经配置好了,我们用postman测试下
1、直接访问api地址 http://localhost:44387/test ,不加入token ,得到如下结果,返回401
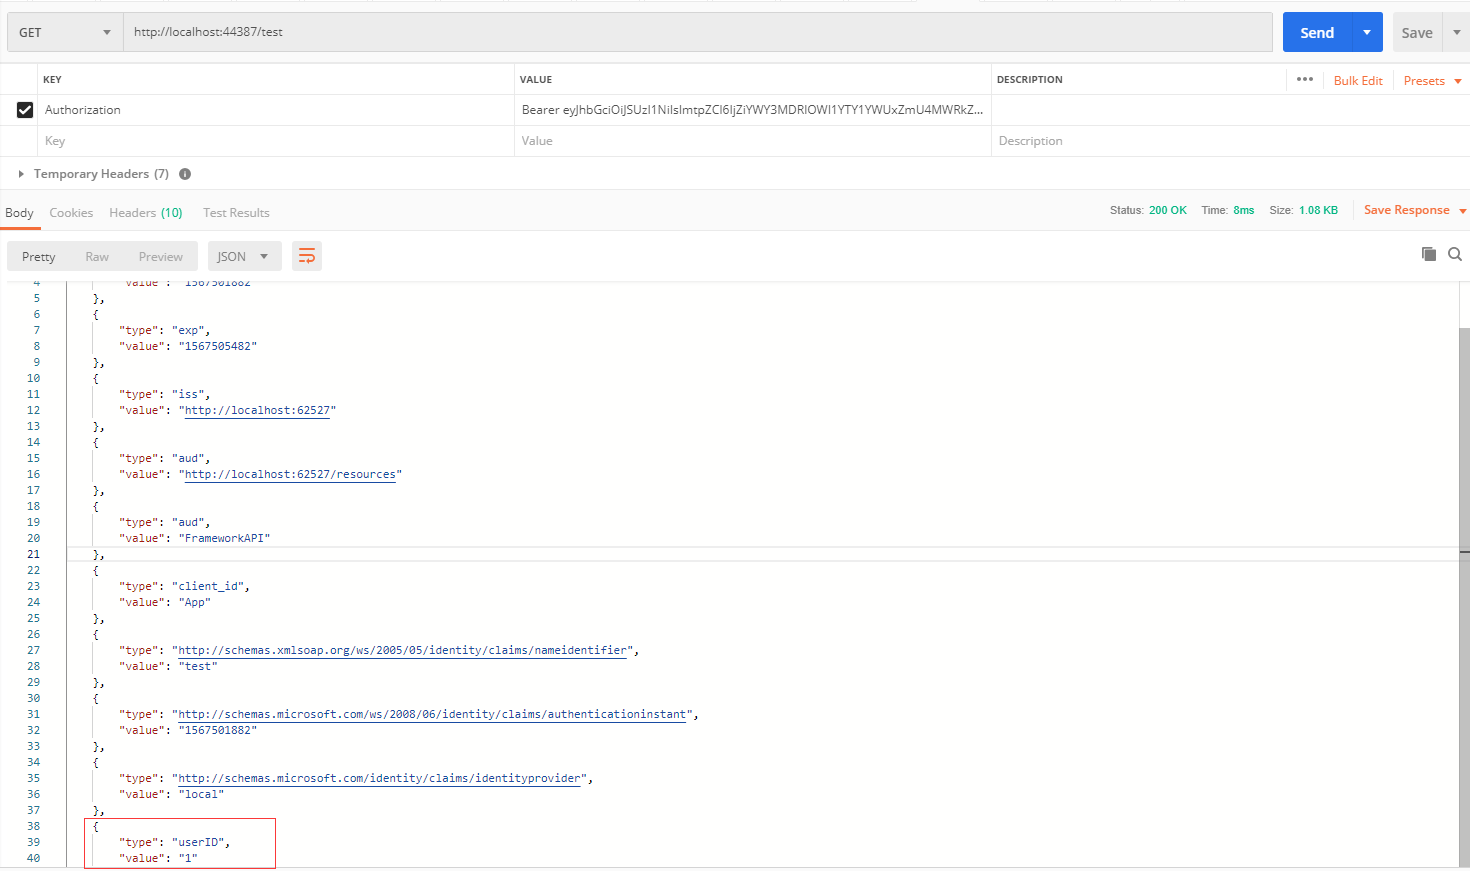
2、加入token ,验证通过,返回200
IdentityServer4 保护.net framework webapi的更多相关文章
- 大话IdentityServer4之使用 IdentityServer4 保护 ASP.NET Core 应用
这几天一直在研究IdentityServer4在asp.net core3.0中的应用,下面说说我的理解: 我们每一个.net core 项目大家可以理解为我新建了一个动物园或者植物园等,注册用户想要 ...
- C# Autofac集成之Framework WebAPI
Web API 2集成需要Autofac.WebApi2 NuGet包. Web API集成需要Autofac.WebApi NuGet包. Web API集成为控制器,模型绑定器和操作过滤器提供了依 ...
- 创建.net framework webapi出现“Web 服务器被配置为不列出此目录的内容。”错误
接了一个新任务,要求写一个web api.于是我创建了一个.net framework的web api,结果在运行的时候,出现了以下页面: 解决方法: 在web.config文件中添加<dire ...
- asp.net core使用identity+jwt保护你的webapi(一)——identity基础配置
前言 用户模块几乎是每个系统必备的基础功能,如果每次开发一个新项目时都要做个用户模块,确实非常无聊.好在asp.net core给我们提供了Identity,使用起来也是比较方便,如果对用户这块需求不 ...
- asp.net core使用identity+jwt保护你的webapi(二)——获取jwt token
前言 上一篇已经介绍了identity在web api中的基本配置,本篇来完成用户的注册,登录,获取jwt token. 开始 开始之前先配置一下jwt相关服务. 配置JWT 首先NuGet安装包: ...
- asp.net core使用identity+jwt保护你的webapi(三)——refresh token
前言 上一篇已经介绍了identity的注册,登录,获取jwt token,本篇来完成refresh token. 开始 开始之前先说明一下为什么需要refresh token. 虽然jwt toke ...
- AspNetCore网关集成Swagger访问使用IdentityServer保护的webapi项目
创建webapi项目 创建四个webapi项目,两个处理业务,一个网关,一个验证中心.四个项目对应的端口如下, ApiGateway:1999 IdentityServer:16690 Service ...
- Angular SPA基于Ocelot API网关与IdentityServer4的身份认证与授权(一)
好吧,这个题目我也想了很久,不知道如何用最简单的几个字来概括这篇文章,原本打算取名<Angular单页面应用基于Ocelot API网关与IdentityServer4+ASP.NET Iden ...
- IdentityServer4系列 | 快速搭建简易项目
一 .前言 从上一篇关于 常见术语说明中,主要是对IdentityServer4的说明,以及其中涉及常见的术语的表述说明,包括对身份认证服务器.用户.客户端.资源以及各个令牌等进行对比区别说明. 而在 ...
随机推荐
- SpringCloud之Zuul过滤器实现登录鉴权实战(十一)
自定义zuul过滤器实现登录鉴权实战 1.新建filter包 2.新建类继承ZuulFilter,重写方法 3.在类顶部加注解@Comment让spring扫描 /** * @author WGR * ...
- AB实验的高端玩法系列3 - AB组不随机?观测试验?Propensity Score
背景 都说随机是AB实验的核心,为什么随机这么重要呢?有人说因为随机所以AB组整体不存在差异,这样才能准确估计实验效果(ATE) \[ ATE = E(Y_t(1) - Y_c(0)) \] 那究竟随 ...
- Java8系列 (六) 新的日期和时间API
概述 在Java8之前, 我们一般都是使用 SimpleDateFormat 来解析和格式化日期时间, 但它是线程不安全的. @Test public void test() { SimpleDate ...
- Luogu P2668 斗地主(NOIP2015)
还记得那道我只用特判得了30分的"斗地主"吗? 我今天脑抽打算把它改A掉.为什么不用这大好时光去干些更有意义的事 于是我就挖了这个坑. 题解: 题目链接:P2668 斗地主 本题就 ...
- [2018-06-28] django项目 实例
实例一.显示一个基本的字符串在网页中 首先先进入views.py def home(request): string = u'随便写' return render(request, 'home.htm ...
- 最小生成树两个经典算法(Prime算法、Kruskal算法) - biaobiao88
经典的最小生成树例子,Prime算法,具体的步骤及其注释本人均在代码中附加,请仔细阅读与品味,要求,可以熟练的打出. //Prime算法基础 #include<iostream> usin ...
- [考试反思]1019csp-s模拟测试80(a):天遣
A组题,所以把榜粘全了. 第6名,被卡在刚好正中间. 我最近干什么伤天害理的事了?(例如说没有在skyh去上厕所的时候捶他) 上来看T1,非常贴心出题人直接把递推式子给你了,然后就和斐波数的递推一样了 ...
- JS 接口定义及实现的例子
//定义一个函数,目的是将参数中的第二个函数所有属性放到第一个参数中,目的是将接口中所有方法放到实现类中 Object.extend=function(destination,source){ for ...
- 洛谷 P 5 3 0 4 [GXOI/GZOI2019]旅行者
题目描述 J 国有 n 座城市,这些城市之间通过 m 条单向道路相连,已知每条道路的长度. 一次,居住在 J 国的 Rainbow 邀请 Vani 来作客.不过,作为一名资深的旅行者,Vani 只对 ...
- 在linux上使用ssh登录服务器,Linux权限
本文是作者原创,版权归作者所有.若要转载,请注明出处 ssh为Secure Shell(安全外壳协议)的缩写. 很多ftp.pop和telnet在本质上都是不安全的. 我们使用的Xshell6就是基于 ...