Overview to “Toon/Cel shading”
转自:https://blog.felixkate.net/2017/01/19/toon-shading/
For the last couple of weeks I often had discussions about toon / anime esque shading.
In this post I want to list a few approaches I tried out.
Shading Methods
Flat shading / Unlit
This is not directly shading but it should still be mentioned since this is obviously the cheapest way and is often used for weak performance platforms like mobile.
If you go for this approach you should also paint in the shadows.
MatCap

You might have heared of this before if you have looked into ZBrush or Mudbox.
By sampling a round spherical texture we can fake light distribution from a locked perspective (turning the object will move the “lightsource” / view too.
It is useful if you have a locked perspective and lightsource as it is pretty cheap but that is the limit on what it can do.
For this approach we only want a light distribution grayscale map instead of the full material so we can later use it together with our main textures:

The calculation for getting the coordinates for sampling the map simply require us to calculate the view normal in the vertex shader:
float2 matCapCoord = ((mul((float3x3) Matrix_Inverse_WorldView, normal) + ) * 0.5).xy; // "normal" is the unmodified input normal

matCapCoord.y =  - matCapCoord.y; // Depending on our environment we need to invert the y coordinate
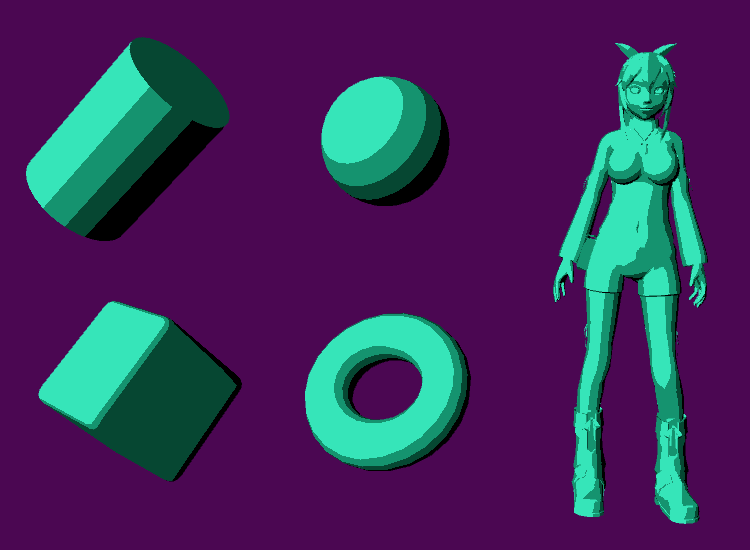
Step shading
A really simple approach.
We start of by doing a simple nDotL calculation to get the basic light information. Casted shadows can also be multiplied into it.
From here on we use a simple calculation to remap the light/shadow gradient into multiple steps.
float nDotL = dot(wNormal, lightVector);

float light = floor(nDotL * _StepCount) / stepcount; // _Stepcount is an input value that depends on how many color tones we want
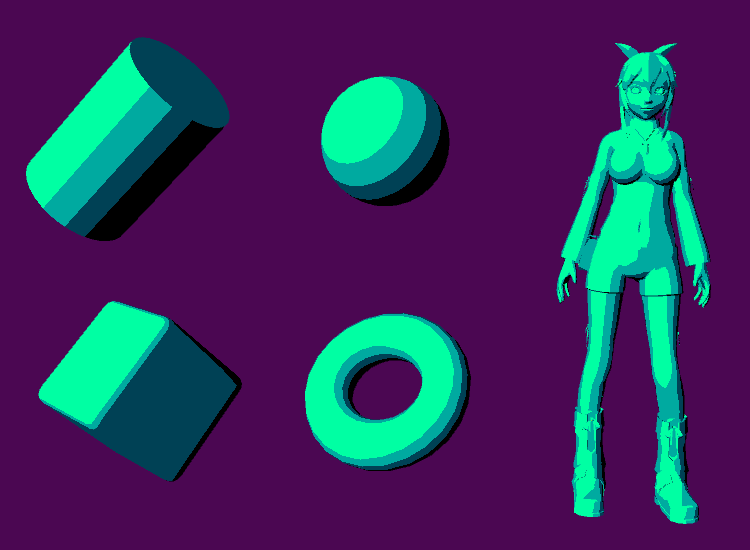
Gradient shading

The last approach I list here uses a gradient texture to define our steps.
We simply use our NdotL calculation as x coordinate input for sampling the gradient texture.

float nDotL = dot(wNormal, lightVector);

float light = tex2D(_GradientSampler, float2(NdotL, 0.5));
Fresnel
This is not used for the light calculation itself but can add a nice touch depending on what kind of style we want to go for.
It can either be used together with the basic shading or be added ontop afterwards.
The example below is just for getting the basic outside glow. Fresnels mostly use a pow() node to manipulate the falloff but a smoothstep could also be used.
float nDotL = dot(wNormal, lightVector);

float nDotV = dot(wNormal, viewVector); // The basic view dot normal calculation

float fresnel =  - nDotV; // We want to invert our fresnel here so that the glow goes to the outside
Applying color
Multiply
The probably most common approach for coloring.
By multiplying our color / texture with one of the light calculations of the previous section we can get a basic cel shading effect.
There are a few options here as to multiply the texture by itself to colorize darker areas a bit more.
Shift hue
An alteration to the multiply. By calculating a hue shift we try bringing more variation into our shadows.
It might look more interesting but is not really a practical approach as we need to make a lot of calcluations to get the color to hsv space and then back to rgb after the hue shift which is a bit expensive.
Gradient

This one is a bit special and can’t be used in all kind of situations.
It is similar to the gradient shading process I described above but can use a palette of multiple gradients. (Not in this example since it would require some work to make the index texture)
At the time we are sampling our gradient texture the y coordinate will be used to decide which palette we want to use.
This gives us the ultimate freedom over how our shadows should look but at the same time limits us in many ways.
Blending multiple gradients is a bit problematic so we can either limit it to hard edges only or use another “outline” mask to hide borders between colors.
Ways to assign the palette index could be either by directly vertex painting it into the red channel of our mesh or having a grayscale lookup texture. (No bilinear filtering for that texture since it would blend borders)
float index = tex2D(_MainTex, texcoord); // Or vertexcolor.r depending on our setup

float color = tex2D(_GradientSampler, float2(light, _Index));
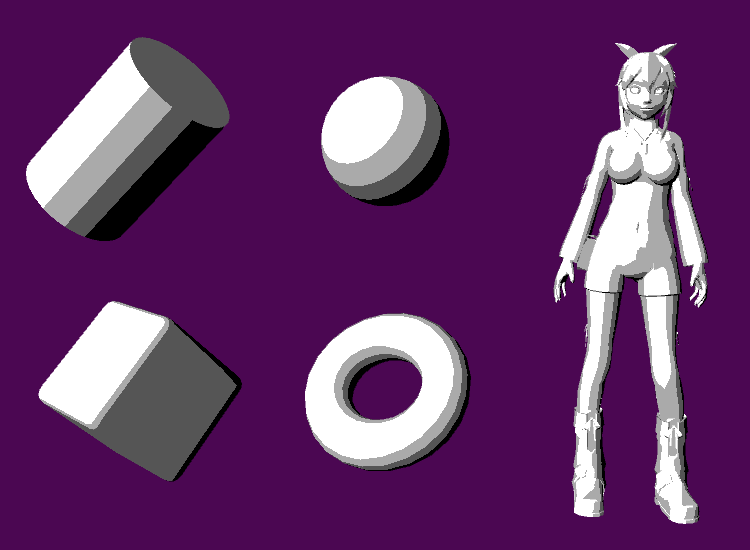
Shadow textures

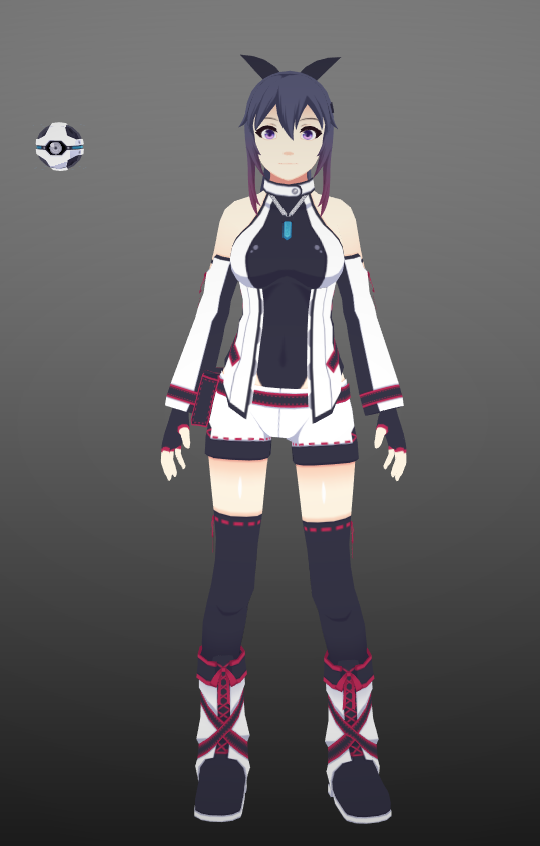
A really simple but effective way to solve our problem and the approach I used for this character.
By providing a second texture that holds a fully shadowed version of our main texture we can gain full control over our shadows.
This obviously only works when we have a clear shadow/light situation and comes at the cost of that second texture.
A clear advantage of it is that we can already pre-paint shadow areas into our main texture and blend them together with the calculated ones without getting any visible borders.
float mainTex = tex2D(_MainTex, texcoord);

float shadowTex = tex2D(_ShadowTex, texcoord);

float color = lerp(shadowTex, mainTex, light);
Outlines
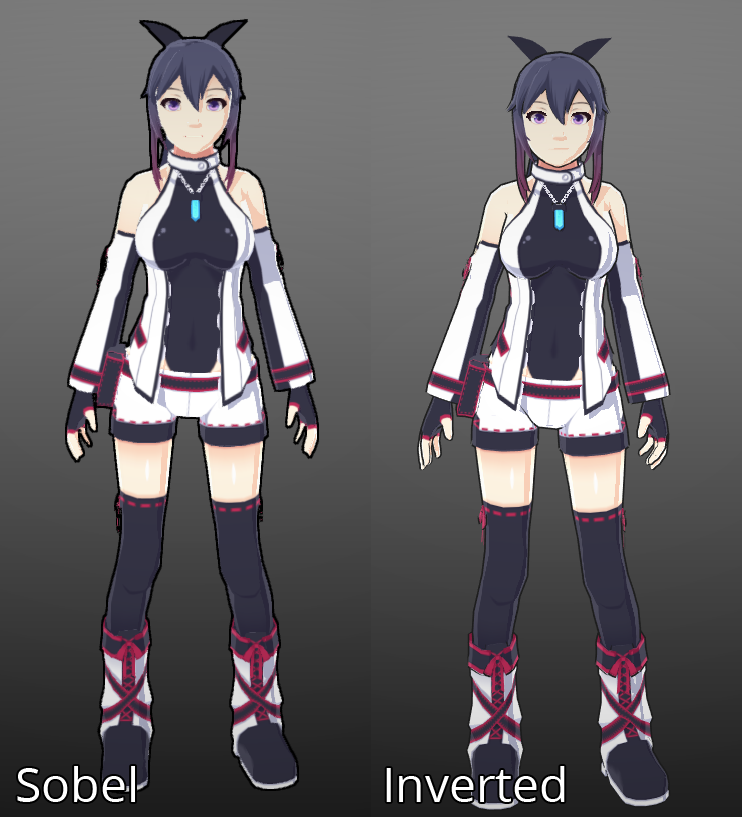
The sobel part is a bit blurry since I had to use an AntiAliasing image effect to get rid of jagged borders.
Inverted mesh
An often used method for creating outlines. By using an extra pass we calculate a copy of our geometry that has it’s cull mode inverted so that the faces look inside.
Then we need to push our vertices out inside the vertex shader.
We can either return 0 for a black outline in our fragment/pixel shader or sample our texture again and make it darker to have outlines similar to the “inside” colors.
This method requires us to have smooth normals or holes will appear when we push the vertices out. Another problem is that certain details like mouth or eyes can get outlines we don’t actually want.
float4 pos = mul( MVP_Matrix, vertexPos ); // Calculate our basic rendering position like usual

pos = pos + lineThickness * mul( MVP_Matrix, normalize(normal)); // Make the outline by pushing it into the normals direction; We can also multiply the distance to the camera here to render a thicker line the farther we zoom out
Sobel
A post process way to do outlines.
This works by sampling a scene texture (either colors, normals, depth) multiple times with an offset into different directions.
Then it compares the overlying pixels and if the difference is bigger then a threshold it is considered to be an outline.
If we want only certain objects to have an outline we have to provide some kind of mask beforehand.
I won’t include a code example in here but if you are using Unity you can look into the standard ImageEffects package to see their edge detection effect implementation for it.
For an Unreal implementation (that also takes colors into account) you can take a look at the node network in the last part of the Unreal shading model blog post.
Other useful hints
Prepaint shadow areas
If we provide a grayscale texture or vertexpaint beforehand we can manipulate the light calculation a bit.
This texture would hold informations about how much the NdotL calculation would affect certain areas and can guide the shadows a bit.
Check your geometry
The hard borders between light and shadow in most toon shading approaches make hard angle switches in the geometry really apparent.
If you have a character try to model it so that the mesh flow is really smootlh and try to avoid abrupt changes in the angle.
Usually more vertices here mean you get a better looking lighting.
Normal maps
Another really nice addition. Using normal maps for toon shading works fine but is often less apparent.
It can’t completly replace geometry but can still be used to add a bit of detail.
Multiple lightsources (multi pass)
This might be a bit tricky because we can’t rely on additive blending. (It would break our “handpicked” colors)
One way to do it is by using a hard zero/one alpha blending to only add light areas ontop of the previous passes.
Another a bit difficult way is to calculate a grayscale light situation first and apply our colors in a post process.
Using a deferred pipeline here could greatly help us with the second one.
Hatching

Sometimes you want to use hatching textures instead of shadows. This is pretty easy.
We need to input a hatching texture (grayscale) into our shader and scale it not with the texture coordinates of the object but the screen coordinates.
We also need to repeat it depending on the resolution. The last step is simply to use our shadow as a mask for the hatching texture.
Smoothstep
A really handy function to remap a gradient. You can use this to bring the gradient down to a really thin line to avoid too hard edges at the light / shadow borders.
That’s it for now. I will try adding more information to it at a later date if I find something interesting.
Overview to “Toon/Cel shading”的更多相关文章
- UE4 Cel Shading(卡通渲染)
转自:https://dawnarc.com/2018/01/ue4cel-shading%E5%8D%A1%E9%80%9A%E6%B8%B2%E6%9F%93/ Cel Shading Post ...
- Simple Cel Shading 钟馗
Made with Unity Unannouced project Character Art by Chris P
- (转) Unreal Engine 4 Custom Shaders Tutorial
说明: 1.这里的Custom Shaders 为且仅为 Custom Node的使用和USF的包含.并非全局Shader和Material Shader. 2.原文来源:https://www.ra ...
- 翻译:非常详细易懂的法线贴图(Normal Mapping)
翻译:非常详细易懂的法线贴图(Normal Mapping) 本文翻译自: Shaders » Lesson 6: Normal Mapping 作者: Matt DesLauriers 译者: Fr ...
- 【NPR】非真实感渲染实验室
写在前面 前几天在知乎看到一个问题--关于非实感图形学或者风格化渲染有哪些好的书或者paper,我刚好接触过一些就去里面回答了一下.答完以后突然想在Unity里搞一个这样的集锦,把一些简单的NPR论文 ...
- Unity3d shader之卡通着色Toon Shading
卡通着色的目的是为了让被着色物体显得过渡的不那么好,明暗交界线很明显,等等卡通风格的一系列特征, 也叫Non-photorealisticrendering非真实渲染 重点要做到两点: 1. 描 ...
- [UE4] Adding a custom shading model
转自:https://blog.felixkate.net/2016/05/22/adding-a-custom-shading-model-1/ This was written in Februa ...
- Overview of OpenCascade Library
Overview of OpenCascade Library eryar@163.com 摘要Abstract:对OpenCascade库的功能及其实现做简要介绍. 关键字Key Words:Ope ...
- Unity Lighting - Lighting overview 照明概述
Lighting overview 照明概述 In order to calculate the shading of a 3D object, Unity needs to know the ...
随机推荐
- 音视频RTP数据包封装
对于语音通信而言,语音码率较低,添加适当冗余是对抗网络丢包的常见方式.冗余方式有多种,包括RED,FEC等都是冗余的一种,如果冗余份数较多,可以采取交织的方式实现.RFC 3350是RTP的基础标准协 ...
- Is Safari on iOS 6 caching $.ajax results? post Cache
https://stackoverflow.com/questions/12506897/is-safari-on-ios-6-caching-ajax-results Since the upgra ...
- EJS的个人总结
什么是模板引擎? 用于Web开发的模板引擎是为了使用用户界面与业务数据(内容)分离而产生的,使用模板语法编写的模板代码通常放在具有特的格式的文档中,经过模板引擎编译之后就会生成一个标准的HTML文档. ...
- 电商平台+keepalived高可用
192.168.189.131 电商平台 192.168.189.129 MySQL主192.168.189.130 MySQL备192.168.189.181 VIP 配置MySQL为互为主从并结合 ...
- netflix conductor 2.x 版本新功能简单说明
netflix conductor 2.x 已经发布很长时间了,同时官方也发布了关于2.x 新特性的说明,当前github 行的release 版本为2.14.4 新特性 grpc 框架支持 一个可选 ...
- vuex传递数据的流程
当组件修改数据的时候必须通过store.dispatch来调用actions中的方法,当actions中的方法被触发的时候通过调用commit的方法来触发mutations里面的方法,mutation ...
- C++后端工程师需要看的书籍
C++基础书籍<C++ primer><深度探索C++对象模型><Effective C++><more effective C++><STL源码 ...
- 从Hello World 来讲解线程
从一个经典的例子开始:一个打印“Hello World.”的程序.一个非常简单的在单线程中运行的Hello World程序如下所示,当我们谈到多线程时,它可以作为一个基准. #include<i ...
- ACM数据结构-树状数组
模板: int n; int tree[LEN]; int lowbit(int x){ return x&-x; } void update(int i,int d){//index,del ...
- Java接口、lambda的学习
接口的实现 : 使用interface定义:形式如下 interface Printable{ final int MAX = 100; void add(); float sum(float x ...