SpringBoot源码分析-编译环境与新建测试模块
建议
分析源码建议不要使用Idea或者Eclipse等IDE工具的反编译功能或者导入源码包的方式看源码,那样不能给框架的源码做注释,所以分析源码之前都得先下载源码并构建,然后在项目中新建一个Module看代码是否能够正常启动与运行。
另外因为博客是在看源码后写的,我自己看的源码版本是2.1.X,这里演示的2.2.X,方法和2.1.X是一样的。
备注:无意中发现一个比较优质的博客:https://blog.csdn.net/qq_26000415/article/list/7,速览了一下他的文章列表,都是挺高级的货,推广一下(当然每个博主写的文章都可能有误,建议大家在阅读的时候一定要自己验证)
官方BUILD SOURCE建议
下面这段英文对于想要快速构建编译环境的同学就不要尝试了,因为它会下载一个Maven,使用默认的配置重新下载一些依赖包,下载Maven耗时,下载你之前已经下载过的包更耗时。。。但是它有应该有一个优点简单一步构建成功,否则就不是官方文档。
You don’t need to build from source to use Spring Boot (binaries in repo.spring.io), but if you want to try out the latest and greatest, Spring Boot can be easily built with the maven wrapper. You also need JDK 1.8.
$ ./mvnw clean install
If you want to build with the regular mvn command, you will need Maven v3.5.0 or above.
| Note | You may need to increase the amount of memory available to Maven by setting a MAVEN_OPTS environment variable with the value -Xmx512m. Remember to set the corresponding property in your IDE as well if you are building and running tests there (e.g. in Eclipse go to Preferences→Java→Installed JREs and edit the JRE definition so that all processes are launched with those arguments). This property is automatically set if you use the maven wrapper. |
|---|---|
Also see CONTRIBUTING.adoc if you wish to submit pull requests, and in particular please fill out the Contributor’s Agreement before your first change, however trivial.
Building reference documentation
First of all, make sure you have built the project:
$ ./mvnw clean install
The reference documentation requires the documentation of the Maven plugin to be available so you need to build that first since it’s not generated by default.
$ ./mvnw clean install -pl spring-boot-project/spring-boot-tools/spring-boot-maven-plugin -Pdefault,full
The documentation also includes auto-generated information about the starters. You might have that in your local repository already (per the first step) but if you want to refresh it:
$ ./mvnw clean install -f spring-boot-project/spring-boot-starters
Once this is done, you can build the reference documentation with the command below:
$ ./mvnw clean prepare-package -pl spring-boot-project/spring-boot-docs -Pdefault,full
使用已有Maven构建
下载
地址:https://github.com/spring-projects/spring-boot/tree/2.2.x

修改Maven配置
有的同学从来没有使用过Maven命令行编译过代码,那么使用命令行编译,Maven读取的还是Maven自己目录下的setting.xml文件,所以要修改里面的内容
修改1,将Maven本地仓库目录修改为IDE工具中Maven本地仓库目录,比如:
<localRepository>F:\data\maven\repository</localRepository>
修改2:为了能更快的下载,可以将配置文件中的Maven仓库镜像设置为阿里云的
   <mirrors>

        <!-- 阿里云仓库 central-->

        <mirror>

            <id>alimaven</id>

            <mirrorOf>central</mirrorOf>

            <name>aliyun maven</name>

            <url>http://maven.aliyun.com/nexus/content/repositories/central/</url>

        </mirror>

        <!-- 中央仓库1 -->

        <mirror>

            <id>repo1</id>

            <mirrorOf>central</mirrorOf>

            <name>Human Readable Name for this Mirror.</name>

            <url>http://repo1.maven.org/maven2/</url>

        </mirror>

        <!-- 中央仓库2 -->

        <mirror>

            <id>repo2</id>

            <mirrorOf>central</mirrorOf>

            <name>Human Readable Name for this Mirror.</name>

            <url>http://repo2.maven.org/maven2/</url>

        </mirror>

        <!-- 阿里云的maven-public路径 -->

        <mirror>

            <id>nexus-aliyun</id>

            <mirrorOf>*</mirrorOf>

            <name>Nexus aliyun</name>

            <url>http://maven.aliyun.com/nexus/content/groups/public</url>

        </mirror>

    </mirrors>
如果嫌这个比较麻烦,直接将自己IDE中指定的setting.xml文件覆盖MAVEN_HOME/conf/setting.xml
构建
使用命令构建,使用skipTests跳过SpringBoot中的测试,
mvn clean install -DskipTests -Pfast
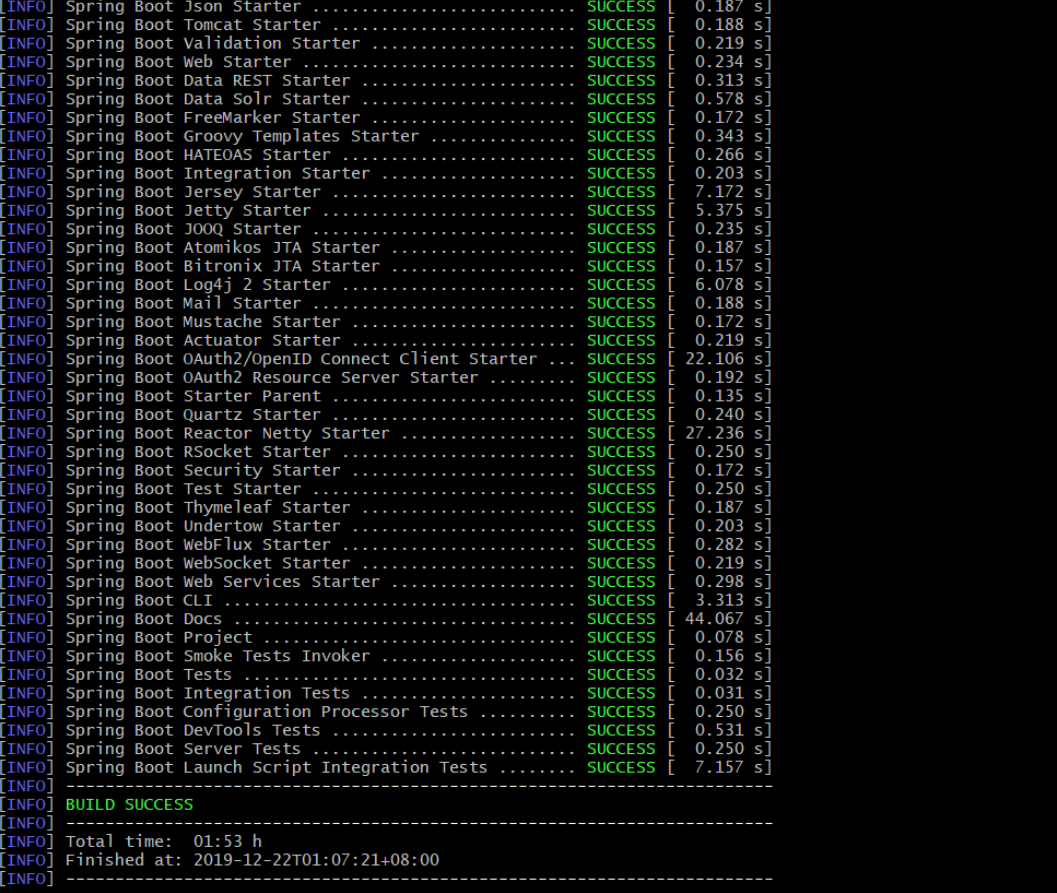
整个构建过程花的时间比较长,我自己使用了1小时53分钟,构建成功的结果页

导入项目
打开Idea,选择File-open file-选择构建成功目录下pom.xml,然后选择open as project选项

最后等待导入成功

新建测试工程
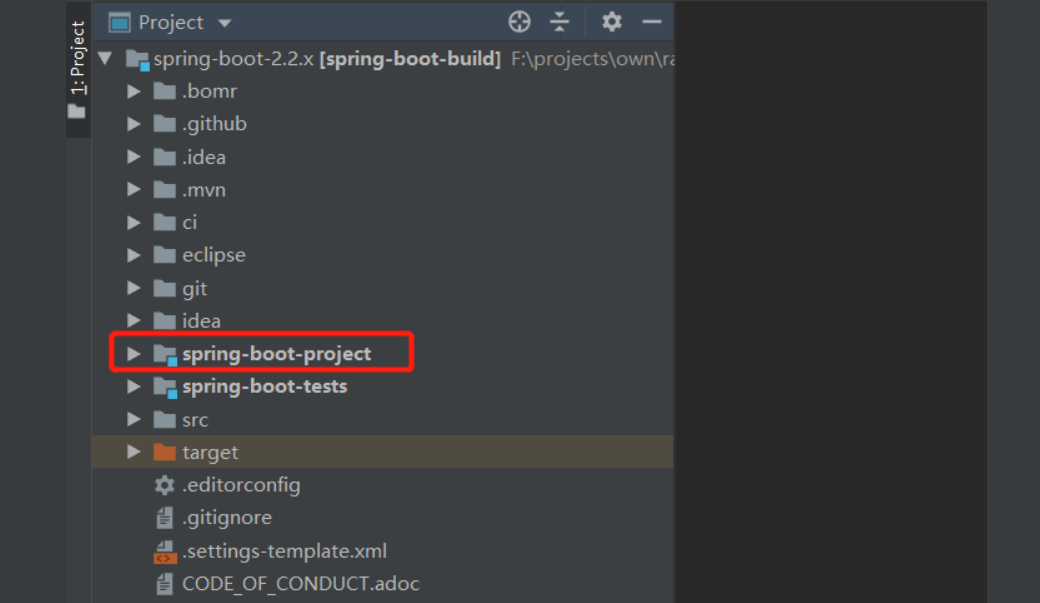
在spring-boot-project目录下新建一个工程

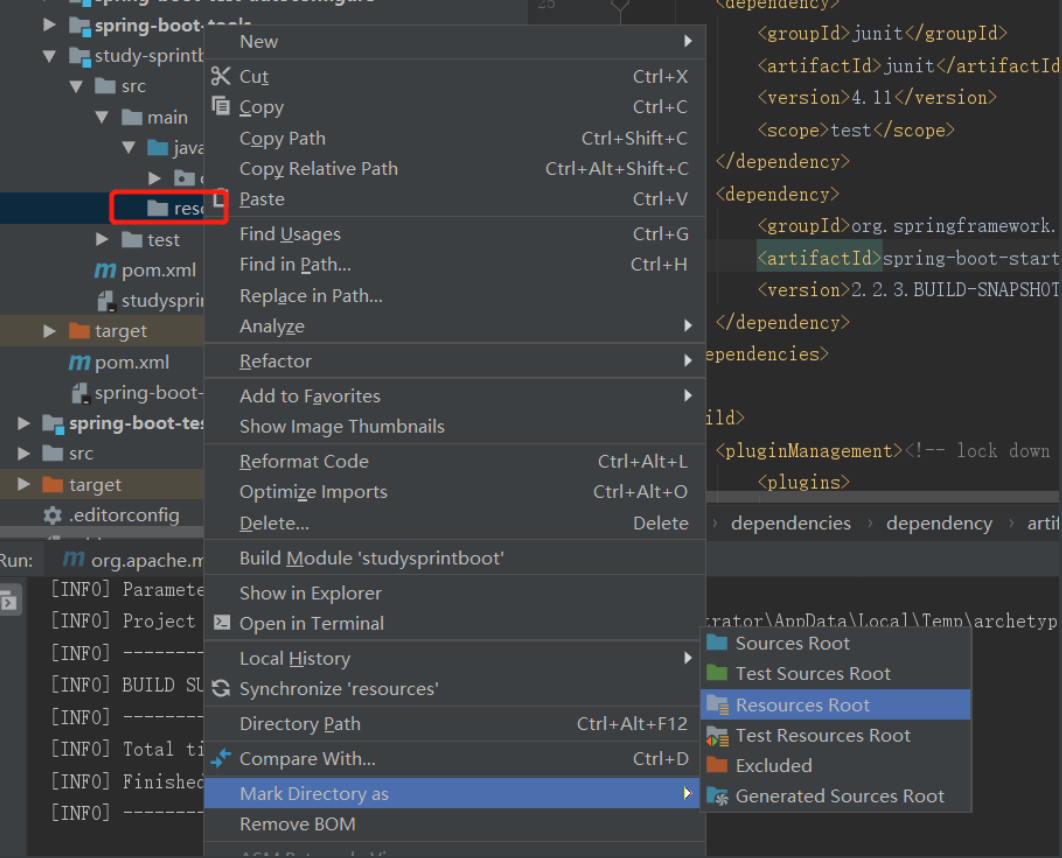
在main目录下新建一个resources目录,并标记为“Resources root”

导入spring-boot-starter-web依赖
<dependencies>

        <dependency>

            <groupId>junit</groupId>

            <artifactId>junit</artifactId>

            <version>4.11</version>

            <scope>test</scope>

        </dependency>

        <dependency>

            <groupId>org.springframework.boot</groupId>

            <artifactId>spring-boot-starter-web</artifactId>

            <version>2.2.3.BUILD-SNAPSHOT</version>

        </dependency>

        <dependency>

            <groupId>org.projectlombok</groupId>

            <artifactId>lombok</artifactId>

            <version>1.18.0</version>

            <scope>provided</scope>

        </dependency>

    </dependencies>
新建启动类和Controller
@SpringBootApplication

public class BootApplication {

    public static void main(String[] args) {

        SpringApplication.run(BootApplication.class,args);

    }

}
@RestController
public class UserController {
@RequestMapping("/query")
public User query(){
return new User("Messi",33);
}
}
@Setter
@Getter
public class User {
private String userName;
private Integer age;
public User(){}
public User(String userName,Integer age){
this.userName=userName;
this.age=age;
}
}
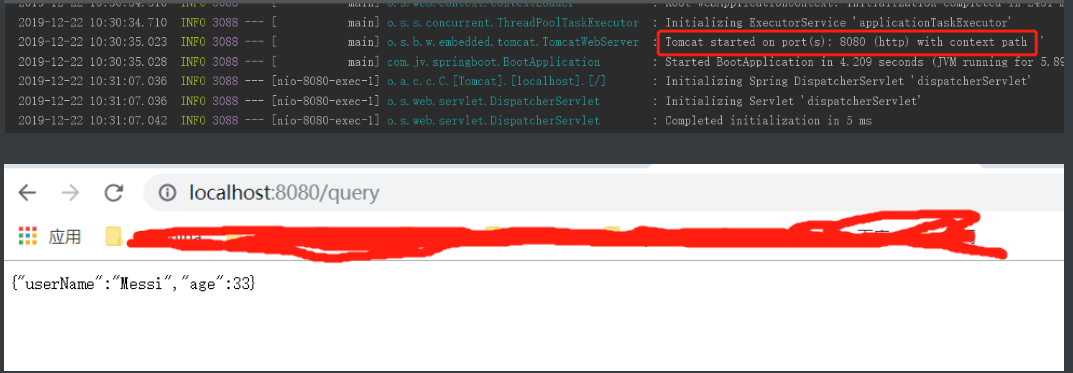
启动-测试

那么恭喜,接下来就可以开始分析源码之旅了
来源:沈阳网站优化
SpringBoot源码分析-编译环境与新建测试模块的更多相关文章
- 鸿蒙内核源码分析(编译环境篇) | 编译鸿蒙看这篇或许真的够了 | 百篇博客分析OpenHarmony源码 | v50.06
百篇博客系列篇.本篇为: v50.xx 鸿蒙内核源码分析(编译环境篇) | 编译鸿蒙防掉坑指南 | 51.c.h.o 编译构建相关篇为: v50.xx 鸿蒙内核源码分析(编译环境篇) | 编译鸿蒙防掉 ...
- 鸿蒙内核源码分析(编译脚本篇) | 如何防编译环境中的牛皮癣 | 百篇博客分析OpenHarmony源码 | v58.01
百篇博客系列篇.本篇为: v58.xx 鸿蒙内核源码分析(环境脚本篇) | 编译鸿蒙原来如此简单 | 51.c.h.o 本篇用两个脚本完成鸿蒙(L1)的编译环境安装/源码下载/编译过程,让编译,调试鸿 ...
- 鸿蒙内核源码分析(编译过程篇) | 简单案例窥视GCC编译全过程 | 百篇博客分析OpenHarmony源码| v57.01
百篇博客系列篇.本篇为: v57.xx 鸿蒙内核源码分析(编译过程篇) | 简单案例窥视编译全过程 | 51.c.h.o 编译构建相关篇为: v50.xx 鸿蒙内核源码分析(编译环境篇) | 编译鸿蒙 ...
- SpringBoot源码分析之SpringBoot的启动过程
SpringBoot源码分析之SpringBoot的启动过程 发表于 2017-04-30 | 分类于 springboot | 0 Comments | 阅读次数 SpringB ...
- 从SpringBoot源码分析 配置文件的加载原理和优先级
本文从SpringBoot源码分析 配置文件的加载原理和配置文件的优先级 跟入源码之前,先提一个问题: SpringBoot 既可以加载指定目录下的配置文件获取配置项,也可以通过启动参数( ...
- Springboot源码分析之项目结构
Springboot源码分析之项目结构 摘要: 无论是从IDEA还是其他的SDS开发工具亦或是https://start.spring.io/ 进行解压,我们都会得到同样的一个pom.xml文件 4. ...
- zrender源码分析3--初始化Painter绘图模块
接上次分析到初始化ZRender的源码,这次关注绘图模块Painter的初始化 入口1:new Painter(dom, this.storage); // zrender.js /** * ZRen ...
- Spring源码分析——(001)环境搭建
1.官方参考 spring-framework的github链接:https://github.com/spring-projects/spring-framework 源码环境搭建官方参考1:考如何 ...
- SpringBoot源码分析(二)启动原理
Springboot的jar启动方式,是通过IOC容器启动 带动了Web容器的启动 而Springboot的war启动方式,是通过Web容器(如Tomcat)的启动 带动了IOC容器相关的启动 一.不 ...
随机推荐
- 线程池不允许使用Executors去创建,而是通过ThreadPoolExecutor的方式
1. 通过Executors创建线程池的弊端 在创建线程池的时候,大部分人还是会选择使用Executors去创建. 下面是创建定长线程池(FixedThreadPool)的一个例子,严格来说,当使用如 ...
- fineui 实现下拉框模糊查询
官网下拉框模糊查询只能实现首字母模糊匹配,如果实现类似这样的 like '%'+关键字+'%',却没有. 今天群里的没想好同学分享了,前后模糊匹配代码. 代码示例: <body> ...
- 个人GitHub资源分享仓库
个人GitHub资源分享仓库 门牌号:https://github.com/ZeroPhong/Learning-Resource 2019年10月27日 注册GitHub账号,仓库建立: 当天上 ...
- python 2种创建多线程的方法
多个线程是可以操作同一个全局变量的,因此,可以通过这种方式来判断所有线程的执行进度 # 第一种方法:将要执行的方法作为参数传给Thread的构造方法 import threading import t ...
- Docker容器跨主机通信之:OVS+GRE
一.概述 由于docker自身还未支持跨主机容器通信,需要借助docker网络开源解决方案 OVS OpenVSwich即开放式虚拟交换机实现,简称OVS,OVS在云计算领域应用广泛,值得我们去学习使 ...
- mPass多租户系统微服务开发平台
目录 项目总体架构图 基于SpringBoot2.x.SpringCloud并采用前后端分离的企业级微服务,多租户系统架构微服务开发平台 mPaaS(Microservice PaaS)为租户业务开发 ...
- 《JAVA高并发编程详解》-wait和sleep
- Ambari调整日志级别:How to enable debug logging in Ambari Server and Ambari Agent ?
PURPOSE When troubleshooting Ambari issues, it may be necessary to enable debug logging in the Ambar ...
- java实现顺序表、链表、栈 (x)->{持续更新}
1.java实现节点 /** * 节点 * @luminous-xin * @param <T> */ public class Node<T> { T data; Node& ...
- java基本结构
前言 Java文件的运行过程: 1,javac.exe:编译器 2,java.exe:解释器 微软shell下运行实例: C:\Users\Administrator>cd D:\文档\JAVA ...
