
SpringBoot源码分析(二)启动原理
Springboot的jar启动方式,是通过IOC容器启动 带动了Web容器的启动
而Springboot的war启动方式,是通过Web容器(如Tomcat)的启动 带动了IOC容器相关的启动
一、不可不说的Web容器(如Tomcat)
不管是jar启动还是war包启动,都绕不开web容器相关。先了解这个怎么工作的,以Tomcat为例,
看看Springboot 怎么来自动装配tomcat 相关的组件?
1.1 相关类
相关包org.springframework.boot.autoconfigure.web,在springboot的自动配置包的web下(自动配置功能都在这个autoconfigure包下)。
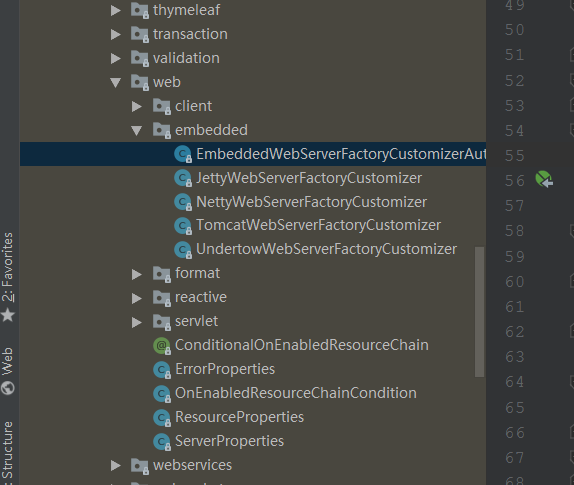
embedded(内嵌)里面四个类一个A四B,一个:
EmbeddedWebServerFactoryCustomizerAutoConfiguration(内嵌web容器工厂自定义定制器装配类)
四个具体容器相关:
JettyWebServerFactoryCustomizer、NettyWebServerFactoryCustomizer、TomcatWebServerFactoryCustomizer、UndertowWebServerFactoryCustomizer
一个自动配置类+四个常用web容器定制器
1.2.工作流程
以Tomcat定制器切入,断点落在构造器上,启动。
总结出它的工作流程:
1.启动=》2.createWebServer=》
3.拿TomcatServletWebServerFactory(tomcatWeb容器工厂)=》
4.拿WebServerFactoryCustomizer(工厂定制器)
也就是拿工厂定制器获取工厂,再拿工厂获取web容器,这么个流程
1.3.具体工作
可以仔细看下相关工厂是如何配置创建容器运行的
TomcatServletWebServerFactory的创建Tomcat方法
	public WebServer getWebServer(ServletContextInitializer... initializers) {

		Tomcat tomcat = new Tomcat();

		File baseDir = (this.baseDirectory != null) ? this.baseDirectory

				: createTempDir("tomcat");

		tomcat.setBaseDir(baseDir.getAbsolutePath());

		Connector connector = new Connector(this.protocol);

		tomcat.getService().addConnector(connector);

		customizeConnector(connector);

		tomcat.setConnector(connector);

		tomcat.getHost().setAutoDeploy(false);

		configureEngine(tomcat.getEngine());

		for (Connector additionalConnector : this.additionalTomcatConnectors) {

			tomcat.getService().addConnector(additionalConnector);

		}

		prepareContext(tomcat.getHost(), initializers);

		return getTomcatWebServer(tomcat);

	}
创建Tocmat类并设置相关这些组件,应该很熟悉(以后出Tomcat源码分析)。
TomcatWebServerFactoryCustomizer的customize定制方法,通过类serverProperties配置文件设置工厂的属性
二、SpringBoot的jar启动方式
来自:
    public static void main(String[] args) {

        SpringApplication.run(StudySpringbootApplication.class, args);

    }
打开源码:
	public static ConfigurableApplicationContext run(Class<?>[] primarySources,

			String[] args) {

		return new SpringApplication(primarySources).run(args);

	}
其实两步,一步创建SpringApplication ,一步run运行。
创建类做的事情比较简单,主要包括判断web应用类型、用SpringFactories技术从 spring.factories 文件里获取ApplicationContextInitializer 对应类和ApplicationListener,最后获取当前应用的启动类的类对象。
2.1 run方法
	public ConfigurableApplicationContext run(String... args) {

        //StopWatch是记录时间的工具,为了打印那句SpringBoot启动耗时的

		StopWatch stopWatch = new StopWatch();

		stopWatch.start();

		ConfigurableApplicationContext context = null;

		Collection<SpringBootExceptionReporter> exceptionReporters = new ArrayList<>();

        //系统设置,在缺失显示屏、鼠标或者键盘时也让这个java应用相关正常工作

		configureHeadlessProperty();

        //去meta-info/spring.factories中获取SpringApplicationRunListener 监听器(事件发布监听器)

		SpringApplicationRunListeners listeners = getRunListeners(args);

        //发布容器 starting事件(for循环一个个调用,通过spring的事件多播器)

		listeners.starting();

		try {

            //封装命令行参数

			ApplicationArguments applicationArguments = new DefaultApplicationArguments(

					args);

            //准备容器环境

            //1:获取或者创建环境

            //2:把命令行参数设置到环境中

            //3:通过监听器发布环境准备事件

			ConfigurableEnvironment environment = prepareEnvironment(listeners,

					applicationArguments);

            //配置是否跳过搜索BeanInfo类,默认忽略跳过

			configureIgnoreBeanInfo(environment);

            //打印控制台那个SpringBoot图标

			Banner printedBanner = printBanner(environment);

            //根据类型(servlet或者reactive?)创建应用上下文ApplicationContext

			context = createApplicationContext();

            //到spring.factoris文件里拿springboot异常报告类的集合

			exceptionReporters = getSpringFactoriesInstances(

					SpringBootExceptionReporter.class,

					new Class[] { ConfigurableApplicationContext.class }, context);

            //准备环境

            //1:把应用上下文ApplicationContext环境设置到容器中

            //2:循环调用AppplicationInitnazlier 进行容器初始化工作

            //3:发布 容器上下文准备 完成事件

            //4:注册关于springboot特定特性的相关单例Bean

            //5:BeanDefinitionLoader加载资源源码,将启动类注入容器

            //6:发布 容器上下文加载 完毕事件

			prepareContext(context, environment, listeners, applicationArguments,

					printedBanner);

            //IOC容器refresh,见以前IOC源码分析

			refreshContext(context);

            //springboot2.x已经改成空方法,以前里面是后面的callRunners

			afterRefresh(context, applicationArguments);

            //计时(耗时统计)停止

			stopWatch.stop();

            //打印那句springboot在多少秒内启动了

			if (this.logStartupInfo) {

				new StartupInfoLogger(this.mainApplicationClass)

						.logStarted(getApplicationLog(), stopWatch);

			}

            //发布容器启动事件

			listeners.started(context);

            //运行 ApplicationRunner 和CommandLineRunner

			callRunners(context, applicationArguments);

		}

		catch (Throwable ex) {

			handleRunFailure(context, ex, exceptionReporters, listeners);

			throw new IllegalStateException(ex);

		}

		try {

            //发布容器运行事件

			listeners.running(context);

		}

		catch (Throwable ex) {

			handleRunFailure(context, ex, exceptionReporters, null);

			throw new IllegalStateException(ex);

		}

		return context;

	}
其实大多是准备、工具、事件等,最核心的还是里面的refreshContext(context);带动了IOC容器启动
2.2 refreshContext(context)
其实大部分内容在之前IOC容器源码写过,唯一的区别在于:
SpringIOC的refresh方法里的onRefresh方法是空的,而SpringBoot继承重写了这个方法!
SpringBoot的onRefresh:
	@Override

	protected void onRefresh() {

		super.onRefresh();

		try {

			createWebServer();

		}

		catch (Throwable ex) {

			throw new ApplicationContextException("Unable to start web server", ex);

		}

	}
SpringBoot里应用上下文是用的新的ServletWebServerApplicationContext类(更具体实现之一是AnnotationConfigServletWebServerApplicationContext)
这里就开始和上面说过的Web容器相关知识衔接上了,这里进行的Web容器(Tomcat)的创建运行!
createWebServer:
	private void createWebServer() {

		WebServer webServer = this.webServer;

		ServletContext servletContext = getServletContext();

		if (webServer == null && servletContext == null) {

			ServletWebServerFactory factory = getWebServerFactory();

			this.webServer = factory.getWebServer(getSelfInitializer());

		}

		else if (servletContext != null) {

			try {

				getSelfInitializer().onStartup(servletContext);

			}

			catch (ServletException ex) {

				//...

			}

		}

		initPropertySources();

	}
这里就是判断有没有Server以及环境,没有的话就获取web容器制造工厂,最后通过工厂获取Tomcat赋值。
实际上获取Tomcat创建的时候,此时构造器最后的代码就是启动,TomcatWebServer类构造器如下:
	public TomcatWebServer(Tomcat tomcat, boolean autoStart) {

		Assert.notNull(tomcat, "Tomcat Server must not be null");

		this.tomcat = tomcat;

		this.autoStart = autoStart;

		initialize();

	}
TomcatWebServer的initialize:
private void initialize() throws WebServerException {

		logger.info("Tomcat initialized with port(s): " + getPortsDescription(false));

		synchronized (this.monitor) {

			try {

				addInstanceIdToEngineName();

				Context context = findContext();

				context.addLifecycleListener((event) -> {

					if (context.equals(event.getSource())

							&& Lifecycle.START_EVENT.equals(event.getType())) {

						removeServiceConnectors();

					}

				});

				this.tomcat.start();

				rethrowDeferredStartupExceptions();

				try {

					ContextBindings.bindClassLoader(context, context.getNamingToken(),

							getClass().getClassLoader());

				}

				catch (NamingException ex) {

				}

				startDaemonAwaitThread();

			}

			catch (Exception ex) {

				stopSilently();

				throw new WebServerException("Unable to start embedded Tomcat", ex);

			}

		}

	}
最终在IOC 容器中的 org.springframework.context.support.AbstractApplicationContext的refresh 的
onReFresh方法带动了Tomcat启动
三、SpringBoot的war包启动方式
@SpringBootApplication

public class StudySpringbootApplication extends SpringBootServletInitializer {

    @Override

    protected SpringApplicationBuilder configure(SpringApplicationBuilder builder) {

        return builder.sources(StudySpringbootApplication.class);

    }

}
Springboot的war启动方式,是通过Web容器(如Tomcat)的启动 带动了IOC容器相关的启动
3.1 Tomcat加载war
要说Tomcat怎么加载war包就不得不从servlet3.0的特性说起:
1.web应用启动,会创建当前Web应用导入jar包中的 ServletContainerInitializer类的实例
2.ServletContainerInitializer 类必须放在jar包的 META-INF/services目录下,文件名称为javax.servlet.ServletContainerInitializer
3.文件的内容指向ServletContainerInitializer实现类的全路径
4.ServletContainerInitializer实现类使用@HandlesTypes注解, 在我们应用启动的时候,加载注解指定的的类
3.2 Spring中的ServletContainerInitializer
Spring中实现ServletContainerInitializer的类是SpringServletContainerInitializer
@HandlesTypes(WebApplicationInitializer.class)

public class SpringServletContainerInitializer implements ServletContainerInitializer {

	@Override

	public void onStartup(@Nullable Set<Class<?>> webAppInitializerClasses, ServletContext servletContext) {

		//创建保存需要加载的类的集合

		List<WebApplicationInitializer> initializers = new LinkedList<>();

		if (webAppInitializerClasses != null) {

			for (Class<?> waiClass : webAppInitializerClasses) {

                //判断需要加载的类不是接口不是抽象类

				if (!waiClass.isInterface() && !Modifier.isAbstract(waiClass.getModifiers()) &&

						WebApplicationInitializer.class.isAssignableFrom(waiClass)) {

					try {

                        //通过反射创建实例并且加入到集合中

						initializers.add((WebApplicationInitializer)

						ReflectionUtils.accessibleConstructor(waiClass).newInstance());

					}

					catch (Throwable ex) {

						//...

					}

				}

			}

		}

		if (initializers.isEmpty()) {

			return;

		}

		AnnotationAwareOrderComparator.sort(initializers);

        //循环调用集合中的感兴趣类对象的onstartup的方法

		for (WebApplicationInitializer initializer : initializers) {

			initializer.onStartup(servletContext);

		}

	}

}
总结:HandlesTypes指定了WebApplicationInitializer类,并在onStartup方法中,创建这些需要加载的类的实例,并且循环调用他们的onStartup方法。
3.2 工作过程
1.Tomcat启动,war包应用的jar包里找ServletContainerInitializer 文件,然后找到spring-web-5.1.2.RELEASE.jar这个jar包里的META-INF\services\javax.servlet.ServletContainerInitializer 文件指向自己实现的SpringServletContainerInitializer并执行它
2.将@HandlesTypes标注的类(WebApplicationInitializer)都传入到 onStartup()的方法中Set<Class<?>>参数中
,通过 ReflectionUtils.accessibleConstructor(waiClass).newInstance());,为这些类创建实例
3.调用WebApplicationInitializer的onStartup方法
4.而Springboot启动类继承了SpringBootServletInitializer(实现了接口WebApplicationInitializer)
5.而我们的启动类StudySpringbootApplication没有重写onStartup,调的SpringBootServletInitializer的onStartup
6.而SpringBootServletInitializer的onStartup方法调了我们重写的configure方法,加载启动。
4.1 实战调试细节
@SpringBootApplication

public class StudySpringbootApplication extends SpringBootServletInitializer {

    @Override

    protected SpringApplicationBuilder configure(SpringApplicationBuilder builder) {

        return builder.sources(StudySpringbootApplication.class);

    }

}
可以把断点打到第六行里builder.sources,通过断点一看调用栈和代码,逻辑就全出来了:
StudySpringbootApplication.configure <<==== 父类SpringBootServletInitializer(主类继继承的这个类).createRootApplicationContext
父类SpringBootServletInitializer.createRootApplicationContext:
	protected WebApplicationContext createRootApplicationContext(

			ServletContext servletContext) {

        //创建spring应用的构建器

		SpringApplicationBuilder builder = createSpringApplicationBuilder();

		builder.main(getClass());

        //设置环境

		ApplicationContext parent = getExistingRootWebApplicationContext(servletContext);

		if (parent != null) {

			servletContext.setAttribute(

					WebApplicationContext.ROOT_WEB_APPLICATION_CONTEXT_ATTRIBUTE, null);

			builder.initializers(new ParentContextApplicationContextInitializer(parent));

		}

		builder.initializers(

				new ServletContextApplicationContextInitializer(servletContext));

		builder.contextClass(AnnotationConfigServletWebServerApplicationContext.class);

        //调用我们自己启动类上的confiure方法 传入我们自己的主启动类

		builder = configure(builder);

		builder.listeners(new WebEnvironmentPropertySourceInitializer(servletContext));

		SpringApplication application = builder.build();

		if (application.getAllSources().isEmpty() && AnnotationUtils

				.findAnnotation(getClass(), Configuration.class) != null) {

			application.addPrimarySources(Collections.singleton(getClass()));

		}

		if (this.registerErrorPageFilter) {

			application.addPrimarySources(

					Collections.singleton(ErrorPageFilterConfiguration.class));

		}

        //调用我们类上的run方法

		return run(application);

	}
注意重点是 调用了自己的方法(传入主类)和 run方法
run源码:
	protected WebApplicationContext run(SpringApplication application) {

		return (WebApplicationContext) application.run();

	}
继续打开run源码:
	public ConfigurableApplicationContext run(String... args) {

		StopWatch stopWatch = new StopWatch();

		stopWatch.start();

		ConfigurableApplicationContext context = null;

		Collection<SpringBootExceptionReporter> exceptionReporters = new ArrayList<>();

		configureHeadlessProperty();

		SpringApplicationRunListeners listeners = getRunListeners(args);

		listeners.starting();

		try {

			ApplicationArguments applicationArguments = new DefaultApplicationArguments(

					args);

			ConfigurableEnvironment environment = prepareEnvironment(listeners,

					applicationArguments);

			configureIgnoreBeanInfo(environment);

			Banner printedBanner = printBanner(environment);

			context = createApplicationContext();

			exceptionReporters = getSpringFactoriesInstances(

					SpringBootExceptionReporter.class,

					new Class[] { ConfigurableApplicationContext.class }, context);

			prepareContext(context, environment, listeners, applicationArguments,

					printedBanner);

			refreshContext(context);

			afterRefresh(context, applicationArguments);

			stopWatch.stop();

			if (this.logStartupInfo) {

				new StartupInfoLogger(this.mainApplicationClass)

						.logStarted(getApplicationLog(), stopWatch);

			}

			listeners.started(context);

			callRunners(context, applicationArguments);

		}

		catch (Throwable ex) {

			handleRunFailure(context, ex, exceptionReporters, listeners);

			throw new IllegalStateException(ex);

		}

		try {

			listeners.running(context);

		}

		catch (Throwable ex) {

			handleRunFailure(context, ex, exceptionReporters, null);

			throw new IllegalStateException(ex);

		}

		return context;

	}
是不是很熟悉,和jar启动的run IOC一样!所以最终还是殊途同归,还是走了application.run()方法,走了IOC容器启动Refresh!
SpringBoot源码分析(二)启动原理的更多相关文章
- 带着萌新看springboot源码12(启动原理 下)
先继续接上一篇,那个启动原理还有一点没说完. 6. afterRefresh(context, applicationArguments); 看这个名字就知道,应该就是ioc容器刷新之后的一些操作了, ...
- 从SpringBoot源码分析 配置文件的加载原理和优先级
本文从SpringBoot源码分析 配置文件的加载原理和配置文件的优先级 跟入源码之前,先提一个问题: SpringBoot 既可以加载指定目录下的配置文件获取配置项,也可以通过启动参数( ...
- 深入源码分析SpringMVC底层原理(二)
原文链接:深入源码分析SpringMVC底层原理(二) 文章目录 深入分析SpringMVC请求处理过程 1. DispatcherServlet处理请求 1.1 寻找Handler 1.2 没有找到 ...
- SpringBoot源码分析之SpringBoot的启动过程
SpringBoot源码分析之SpringBoot的启动过程 发表于 2017-04-30 | 分类于 springboot | 0 Comments | 阅读次数 SpringB ...
- Kafka源码分析及图解原理之Producer端
一.前言 任何消息队列都是万变不离其宗都是3部分,消息生产者(Producer).消息消费者(Consumer)和服务载体(在Kafka中用Broker指代).那么本篇主要讲解Producer端,会有 ...
- 十、Spring之BeanFactory源码分析(二)
Spring之BeanFactory源码分析(二) 前言 在前面我们简单的分析了BeanFactory的结构,ListableBeanFactory,HierarchicalBeanFactory,A ...
- Appium Server 源码分析之启动运行Express http服务器
通过上一个系列Appium Android Bootstrap源码分析我们了解到了appium在安卓目标机器上是如何通过bootstrap这个服务来接收appium从pc端发送过来的命令,并最终使用u ...
- Appium Android Bootstrap源码分析之启动运行
通过前面的两篇文章<Appium Android Bootstrap源码分析之控件AndroidElement>和<Appium Android Bootstrap源码分析之命令解析 ...
- php中foreach源码分析(编译原理)
php中foreach源码分析(编译原理) 一.总结 编译原理(lex and yacc)的知识 二.php中foreach源码分析 foreach是PHP中很常用的一个用作数组循环的控制语句.因为它 ...
- Springboot源码分析之项目结构
Springboot源码分析之项目结构 摘要: 无论是从IDEA还是其他的SDS开发工具亦或是https://start.spring.io/ 进行解压,我们都会得到同样的一个pom.xml文件 4. ...
随机推荐
- 快速入门和查询Python
评分: 4.5 作者: Ryan Lu 类别:Python 时间: 1. 注释 三种方式: 单行注释以 # 开头 多行注释用三个单引号 ''' 将注释括起来 多行注释用三个双引号 "&quo ...
- 函数节流throttle和防抖debounce
throttle 函数节流 不论触发函数多少次,函数只在设定条件到达时调用第一次函数设定,函数节流 1234567891011 let throttle = function(fn,intervalT ...
- js操作复选框
js操作复选框 JavaScript 代码: //复选框全选 $(function () { $("#select_all").click(function () { $(&quo ...
- .NET微服务从0到1:服务注册与发现(Consul)
目录 Consul搭建 基于Docker搭建Consul 基于Windows搭建Consul ServiceA集成Consul做服务注册 Ocelot集成Consul做服务发现 更多参考 Consul ...
- SpringBoot1.5.10.RELEASE项目如何在tomcat容器中运行
一. SpringBoot内嵌容器的部署方式 SpringBoot内部默认提供内嵌的tomcat容器,所以可以直接打成jar包,丢到服务器上的任何一个目录,然后在当前目录下执行java -jar de ...
- 【OO第三次课下讨论】农场主的饲料分配问题
需求分析与项目设计 本思考题的设计需求是力图找到一个简单且可行的饲料分配方案,由于不涉及到饲料价格或者是营养均衡之类的优化问题,因此在假设总的饲料量必能满足所有动物的热量需求的前提下,我们只需要采 ...
- Vuex的理解以及它的辅助函数
理解:vue中的“单向数据流”,这里借用官网的图示: Vue是单向数据流,v-model只是语法糖而已.单向数据流就是:数据总是[向下传递]从父级组件传递给子组件,只能单向绑定.子组件内部不能直接修改 ...
- 什么是data:image/png;base64,?一道关于Data URI Scheme的入门级CTF_Web题
一道关于Data URI Scheme的入门级CTF_Web题 0x00 题目描述 这是偶尔遇到的某网安交流群的入群题,题目没有任何的提示,直接给了一个txt文件. 0x01 解题过程 通过给的这个文 ...
- 【MySQL】Docker搭建MySQL8.0
目录 Docker搭建MySQL8.0 目的: 1.安装Docker 2.查看docker镜像 3.拉取mysql官方镜像 4. 查看目前的镜像 5.运行docker mysql镜像 6.查看目前运行 ...
- Simulink仿真入门到精通(十六) Simulink基于模型设计的工业应用概述
16.1 Simulink用途概述 在基于模型设计广泛应用于汽车电子嵌入式开发的今天,MBD(Model Besed Design)技术也逐步推广到各种嵌入式控制方面.与传统的嵌入式开发相比,BMD以 ...