Diycode开源项目 LoginActivity分析
1.首先看一下效果
1.1.预览一下真实页面

1.2.分析一下:
要求输入Email或者用户名,点击编辑框,弹出键盘,默认先进入输入Email或用户名编辑框。
点击密码后,密码字样网上浮动一段距离,Email编辑框也是一样的,不过第一次默认是第一个。
没有账号?点击注册后跳转到一个网页,采用手机默认浏览器跳转。
2.LoginActivity布局分析
2.1.首先看一下activity_login源代码
<?xml version="1.0" encoding="utf-8"?>

<!--

  ~ Copyright 2017 GcsSloop

  ~

  ~ Licensed under the Apache License, Version 2.0 (the "License");

  ~ you may not use this file except in compliance with the License.

  ~ You may obtain a copy of the License at

  ~

  ~    http://www.apache.org/licenses/LICENSE-2.0

  ~

  ~ Unless required by applicable law or agreed to in writing, software

  ~ distributed under the License is distributed on an "AS IS" BASIS,

  ~ WITHOUT WARRANTIES OR CONDITIONS OF ANY KIND, either express or implied.

  ~ See the License for the specific language governing permissions and

  ~ limitations under the License.

  ~

  ~ Last modified 2017-03-19 01:27:22

  ~

  ~ GitHub:  https://github.com/GcsSloop

  ~ Website: http://www.gcssloop.com

  ~ Weibo:   http://weibo.com/GcsSloop

  -->

<LinearLayout

    xmlns:android="http://schemas.android.com/apk/res/android"

    xmlns:app="http://schemas.android.com/apk/res-auto"

    xmlns:tools="http://schemas.android.com/tools"

    android:id="@+id/activity_login"

    android:layout_width="match_parent"

    android:layout_height="match_parent"

    android:orientation="vertical"

    tools:context="com.gcssloop.diycode.activity.LoginActivity">

    <android.support.v7.widget.Toolbar

        android:id="@+id/toolbar"

        android:layout_width="match_parent"

        android:layout_height="wrap_content"/>

    <LinearLayout

        android:layout_width="match_parent"

        android:layout_height="match_parent"

        android:orientation="vertical"

        android:paddingLeft="14dp"

        android:paddingRight="14dp">

        <View

            android:id="@+id/span1"

            android:layout_width="0dp"

            android:layout_height="10dp"

            android:visibility="invisible"/>

        <ImageView

            android:layout_width="match_parent"

            android:layout_height="40dp"

            android:scaleType="centerInside"

            android:src="@drawable/ic_logo"/>

        <View

            android:id="@+id/span2"

            android:layout_width="0dp"

            android:layout_height="80dp"

            android:visibility="invisible"/>

        <android.support.design.widget.TextInputLayout

            android:layout_width="match_parent"

            android:layout_height="wrap_content"

            android:layout_marginTop="10dp"

            >

            <EditText

                android:id="@+id/username"

                android:layout_width="match_parent"

                android:layout_height="36dp"

                android:layout_marginLeft="6dp"

                android:background="@null"

                android:hint="Email / 用户名"

                android:inputType="textEmailAddress|text"

                android:textSize="16sp"/>

            <View

                android:layout_width="match_parent"

                android:layout_height="1dp"

                android:layout_below="@id/username"

                android:layout_marginTop="2dp"

                android:background="@drawable/horizontal_line"/>

        </android.support.design.widget.TextInputLayout>

        <android.support.design.widget.TextInputLayout

            android:layout_width="match_parent"

            android:layout_height="wrap_content"

            android:layout_marginTop="10dp"

            >

            <EditText

                android:id="@+id/password"

                android:layout_width="match_parent"

                android:layout_height="36dp"

                android:layout_marginLeft="6dp"

                android:background="@null"

                android:hint="密码"

                android:inputType="textPassword"

                android:textSize="16sp"/>

            <View

                android:layout_width="match_parent"

                android:layout_height="1dp"

                android:layout_below="@id/password"

                android:layout_marginTop="2dp"

                android:background="@drawable/horizontal_line"/>

        </android.support.design.widget.TextInputLayout>

        <View

            android:id="@+id/span3"

            android:layout_width="0dp"

            android:layout_height="20dp"

            android:visibility="invisible"/>

        <Button

            android:id="@+id/login"

            android:layout_width="match_parent"

            android:layout_height="48dp"

            android:layout_marginTop="6dp"

            android:background="@drawable/bg_longin_btn"

            android:text="登  录"

            android:textColor="@color/diy_white"

            android:textSize="18sp"/>

        <TextView

            android:layout_marginTop="20dp"

            android:padding="12dp"

            android:layout_gravity="center_horizontal"

            android:id="@+id/sign_up"

            android:text="没有账号?点击注册"

            android:layout_width="wrap_content"

            android:layout_height="wrap_content"/>

    </LinearLayout>

</LinearLayout>
2.2.代码和布局对应关系

2.3.从上之下分析布局
最外层是一个LinearLayout==>一个线性布局,一般登录都是这样做的。
然后是一个toolbar,自带返回按钮的标题栏。
标题栏下面的布局也是一个线性布局,它将标题栏和下方登录界面分隔开了。
下方的线性布局就很简单了。
首先是一个view,就是一个最基本的视图,这里用作类似于占空间控件。
有时候view可以当做一条分割线,这里讲将宽度设置为0,高度不等,巧妙利用了这个特点。
2.4.值得关注的是编辑框外层的一个TextInputLayout布局
这里的编辑框布局都是外层的TextInputLayout,然后里面是一个EditText+View。
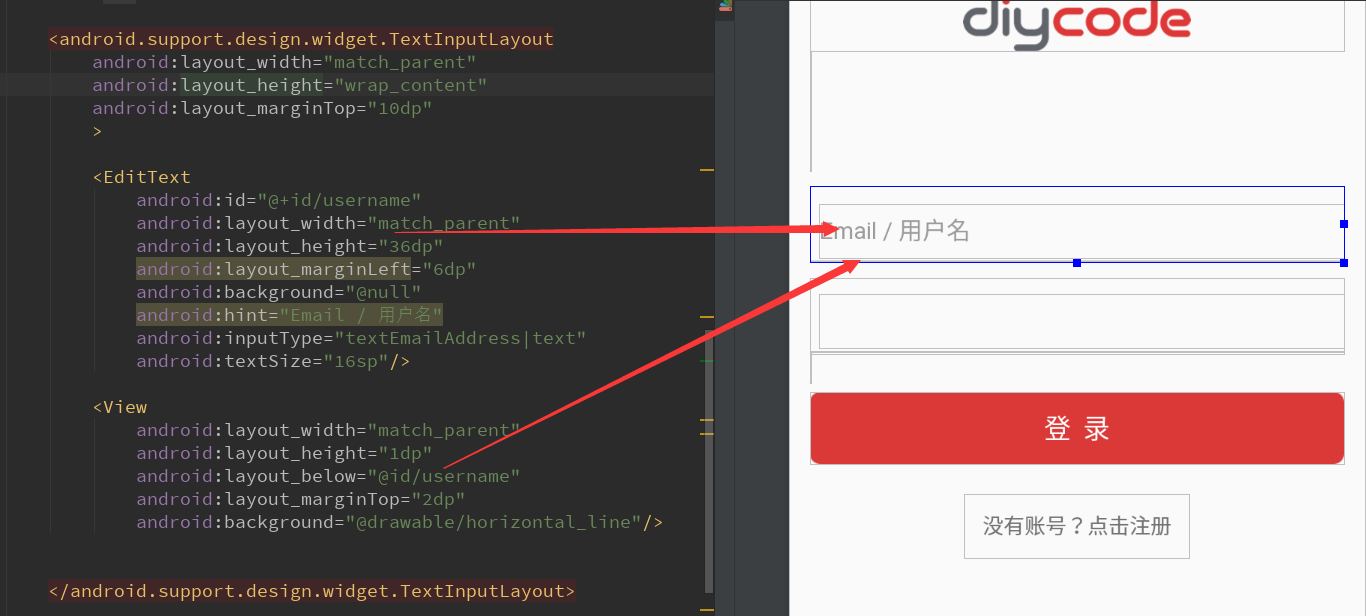
TextInputLayout支持悬浮实现hint效果。给用户体验比较好。
一个TextInputLayout只能包含一个EditText。
3.LoginActivity活动源代码分析
3.1.成员变量分析

这里仅仅需要两个变量。一个是用户名的编辑框,一个是密码的编辑框。
3.2.实现两个在BaseActivity中定义的抽象方法
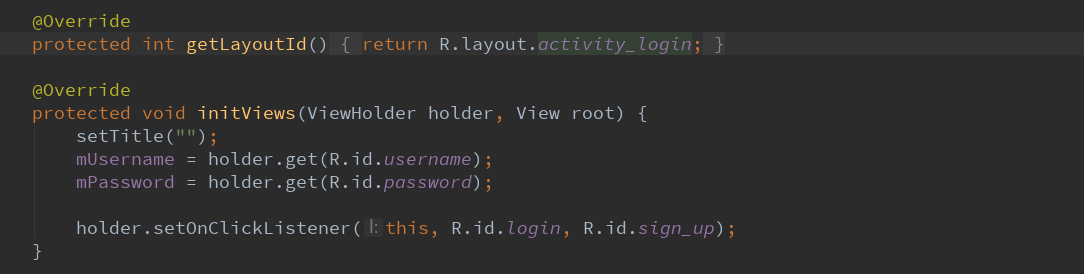
首先确定登录活动的布局==>activity_login.xml
然后将标题栏设空,获得用户名+密码的资源id
最后将这两个资源id添加监听器。
3.3.实现登录接口,利用EventBus实现。

这个onLogin其实是只在点击了登录按钮后才执行。
这里我思考了一下EventBus执行方式。
首先在活动开始即onStart中注册EventBus.getDefault().register(this)即可。
然后在活动的停止或者销毁中反注册EventBus.getDefault().unregister(this)即可。
然后就是写一些只会在UI线程中执行的函数--要用@Subscribe(threadMode=ThreadMode.MAIN)定义。
因为之前也碰到这种类似的方法,我还以为是多余,不会执行呢。
没想到就是要执行的,只是换了一种方式。
安装完Android Studio3.0之后,这个this前面也自动添加了subscriber字样。
这里从SDK的API中获得了个人信息之后,直接finish,交给MainActivity来处理。
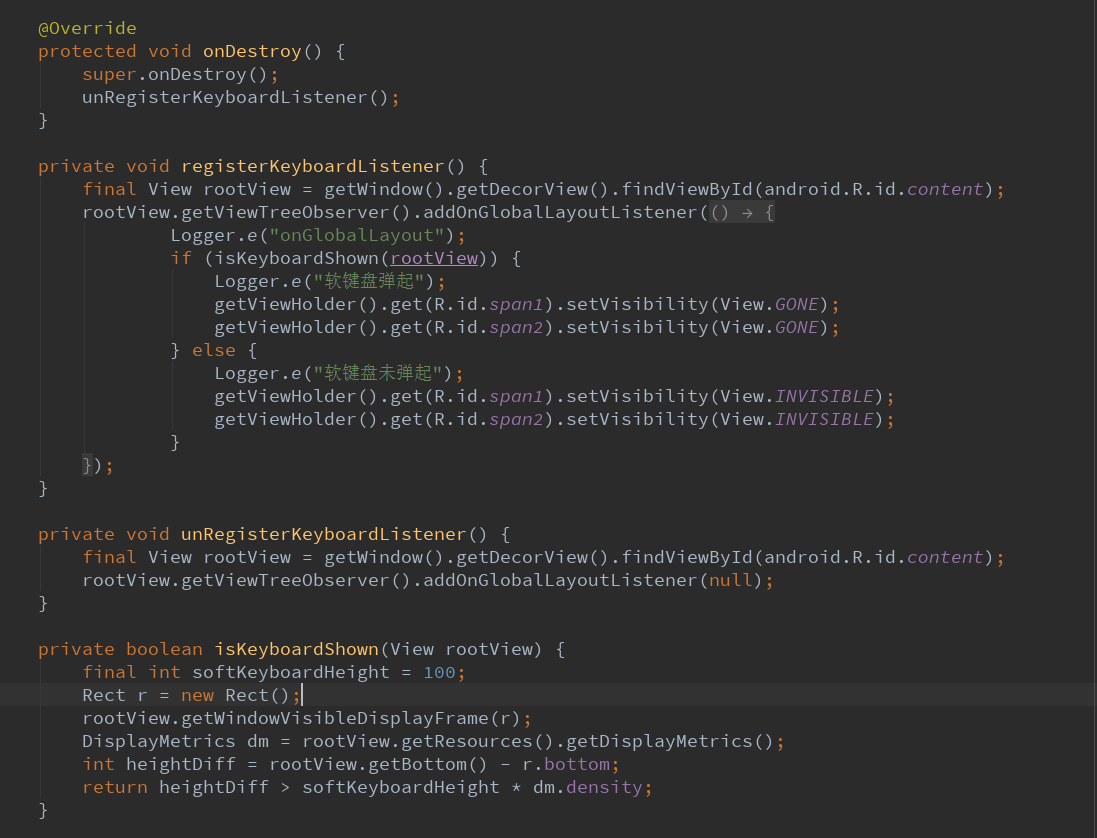
3.4.处理软键盘弹起
在onStart中,就是默认点开之后,会弹出软键盘,用户即可输入用户名。
注意点:获取当前布局的根布局用下面这种方法。

如何理解ViewTreeObserver.OnGlobalLayoutListener?
参考一下这篇文章:android利用OnGlobalLayoutListener获取视图高度。

作用:当视图树中全局视图发生改变,配合View.GONE和View.INVISIBLE来实现布局上下移动。
本例就是点击了第一个编辑框,整个布局会往上移动,不过这是利用视图的隐藏和显示完成的。
具体的判断软键盘是否显示==>

首先根布局已经获取,且已经作为一个参数了。
这里如何获取根布局可视区域大小,这里采用了一个函数:
rootView.getWindowVisibleDisplayFrame(存放到一个矩形)
打印了一下:
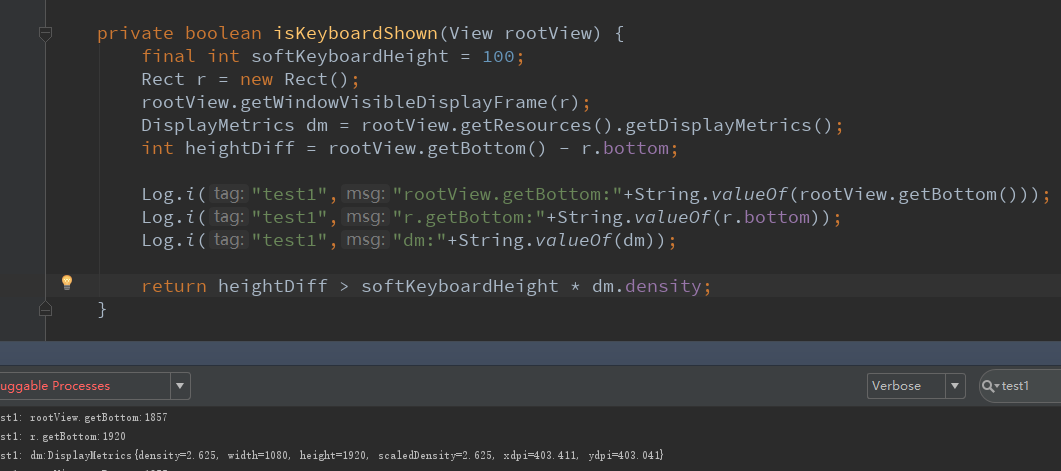
根布局获取到的getBottom:1857
矩形获取到的getBottom:1920
所以两者相减<软键盘高度,所有这里就没有弹出软键盘
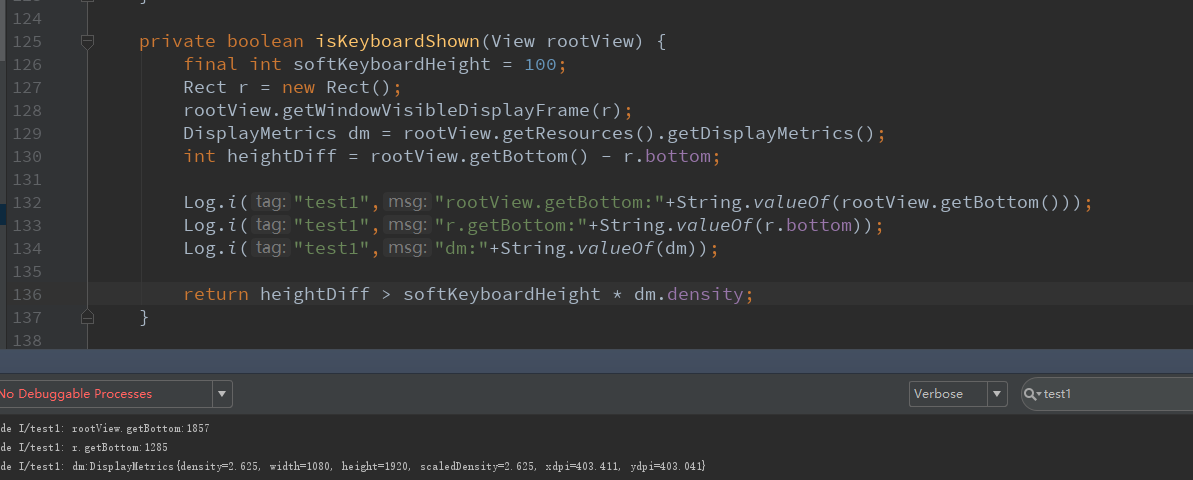
根布局获取到的getBottom:1857
矩形获取到的getBottom:1285
所以两者相减>软键盘高度,所有这里就弹出软键盘
3.5.处理点击事件

这里我发现我上面写错了一点。
就是处理登录接口的函数,就是点击登录之后,会执行这个API函数,而不是上面那个EventBus的onLogin。
上面那个onLogin其实应该类似于回调效果吧。可能EventBus就是处理类似回调的东西吧。
然后另外一个点击事件是注册,打开网页版才能注册,所以这里直接是打开一个链接。
4.总结一下
4.1.终于对EventBus有一定了解了。本篇文章一开始对于EventBus的了解是错误的,之后才发现EventBus就是用于
SDK的API的函数回调效果,比如登录,首先去请求一个接口,API提供的login接口,然后后台通过Event来回调
结果,之前我处理的都是网络请求,但是这个是采用Event事件的方式来回调,更加简单易懂。注意:有那个注
解的地方@Subscribe(threadMode=ThreadMode.MAIN)的地方一定就是用了Event的地方,这里便是回调。
4.2.然后就是对于EventBus一定要先注册,一般在onStart中注册,然后反注册,一般在onStop或者onDestroy中反
注册。
4.3.然后就是对于软键盘的弹起方式有了新的理解,这里采用view的invisible或者gone来实现,当然同时要确定
什么时候invisible,什么时候gone,这里用了一个视图树来配合。如果视图树中某个视图发生改变,采用了
addOnGlobalLayoutListener的方式复写了一个onGlobalLayout的方法来确定什么时候。
4.4.问题在于怎么确定软键盘是否弹起。这里也是采用了根布局rootView和Rect矩形和屏幕分辨率dm来配合,首先
设软键盘高度为100,然后将根视图的可视区域存放到一个Rect中,然后根视图的bottom和矩形的bottom之差
和软键盘高度的大小互相比较,以此为依据确定键盘是否弹出。
4.5.点击事件相对来说,更加容易一些,记得要判断String是否为空,这里直接用.isEmpty即可。然后注册采用了
请求一个网址,用手机默认浏览器打开即进入相应页面。这个IntentUtil基本上每个项目都可以参考。
Diycode开源项目 LoginActivity分析的更多相关文章
- Diycode开源项目 BaseApplication分析+LeakCanary第三方+CrashHandler自定义异常处理
1.BaseApplication整个应用的开始 1.1.看一下代码 /* * Copyright 2017 GcsSloop * * Licensed under the Apache Licens ...
- DiyCode开源项目 BaseActivity 分析
1.首先将这个项目的BaseActivity源码拷贝过来. /* * Copyright 2017 GcsSloop * * Licensed under the Apache License, Ve ...
- Diycode开源项目 MainActivity分析
1.分析MainActivity整体结构 1.1.首先看一下这个界面的整体效果. 1.2.活动源代码如下 /* * Copyright 2017 GcsSloop * * Licensed under ...
- Diycode开源项目 ImageActivity分析
1.首先看一下效果 1.1做成了一个GIF 1.2.我用格式工厂有点问题,大小无法调到手机这样的大小,目前还没有解决方案. 1.3.网上有免费的MP4->GIF,参考一下这个网站吧. 1.4.讲 ...
- Diycode开源项目 UserActivity分析
1.效果预览 1.1.实际界面预览 1.2. 这是MainActivity中的代码 这里执行了跳转到自己的用户界面的功能. 1.3.点击头像或者用户名跳转到别人的页面 UserActivity的结构由 ...
- Diycode开源项目 TopicContentActivity分析
1.效果预览以及布局分析 1.1.实际效果预览 左侧话题列表的布局是通过TopicProvider来实现的,所以当初分析话题列表就没有看到布局. 这里的话题内容不是一个ListView,故要自己布局. ...
- DiyCode开源项目 AboutActivity分析
1.首先看一下效果 这是手机上显示的效果: 1.1首先是一个标题栏,左侧一个左箭头,然后一个图标. 1.2然后下方是一个可以滑动的页面. 1.3分成了7个部分. 1.4DiyCode的图标. 1.5然 ...
- DiyCode开源项目 TopicActivity 分析
1.首先看看TopActivity效果. 2.TopicActivity是一个继承BaseActivity的.前面分析过BaseActivity了.主要有一个标题栏,有返回的图标. 3.贴一下T ...
- Diycode开源项目 SitesListFragment分析
1.效果预览 1.1.网站列表实际界面 1.2.注意这个界面没有继承SimpleRefreshRecycleFragment 前面的话题和新闻继承了SimpleRefreshRecyclerFragm ...
随机推荐
- linq 读取xml
xml 文件如下: <?xml version="1.0" encoding="utf-8" ?><nodes> <node> ...
- hibernate课程 初探单表映射1-9 创建关系映射文件
创建关系映射文件:(把实体类映射成一个表) 1 右键src==>new==>other==>hibernate==>hbm.xml==>Student==>Fini ...
- Java正则表达式—小应用—简易爬虫
在上一篇中,学习了正则表达式的四个功能.即匹配.分割.替换.获取. 利用获取功能,可以实现简单的网页爬虫. 4,获取:将字符串中的符合规则的子串取出. 获取功能的操作步骤: 1,将正则表达式 ...
- URL最大长度问题
在http协议中,其实并没有对url长度作出限制,往往url的最大长度和用户浏览器和Web服务器有关,不一样的浏览器,能接受的最大长度往往是不一样的,当然,不一样的Web服务器能够处理的最大长度的UR ...
- uLua学习之使用协程(终)
前言 今天是本系列的第六篇文章,也是最后一篇,我们来看看uLua中如何来实现协程吧.首先,让我们明确协程的概念.在百度百科上的是这样说的,协程更适合于用来实现彼此熟悉的程序组件,如合作式多任务,迭代器 ...
- JS中的toString()和valueOf()方法
1.toString()方法:主要用于Array.Boolean.Date.Error.Function.Number等对象转化为字符串形式.日期类的toString()方法返回一个可读的日期和字符串 ...
- Finite Encyclopedia of Integer Sequences(找规律)
6617: Finite Encyclopedia of Integer Sequences 时间限制: 1 Sec 内存限制: 128 MB提交: 375 解决: 91[提交] [状态] [讨论 ...
- .net网站的下载地址
.net4.0网址:http://www.crsky.com/soft/6959.htmlsql server r2: http://pan.baidu.com/share/link?shareid= ...
- python_55_局部和全局变量
school='Hebut'#school为全局变量 sex='male'#全局变量 names=['Wang Yu','Bai Jingyi','Zhang Yu'] hobby='姑娘' def ...
- python_26_dictionary
#key-value 字典无下标 所以乱序,key值尽量不要取中文 info={ 'stu1101':'Liu Guannan', 'stu1102':'Wang Ruipu', 'stu1103': ...