
3. Netbackup 7.6客户端的安装(windows/linux)
1 客户端的安装
1.1 Windows客户端安装
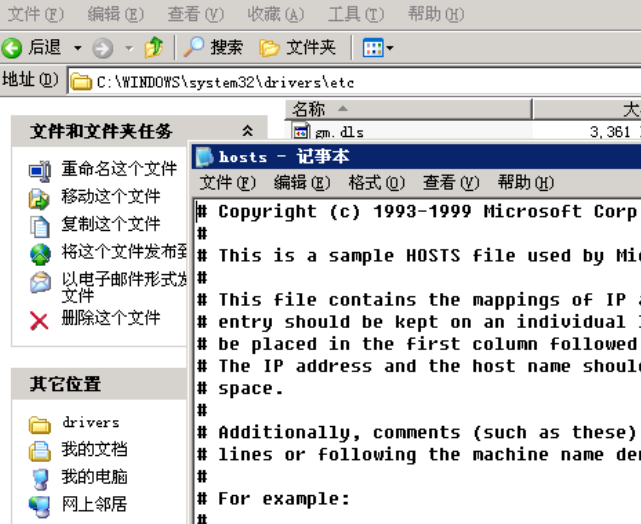
1.1.1 客户端hosts修改
windows xp/2003/vista/2008/7/8用户HOSTS文件是在“c:\windows\system32\drivers\etc,
1.1.2 客户端软件安装
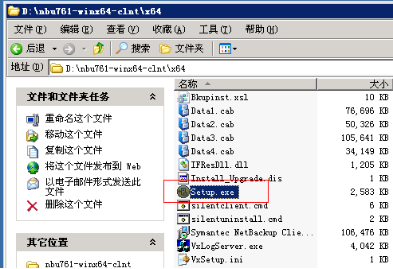
执行安装
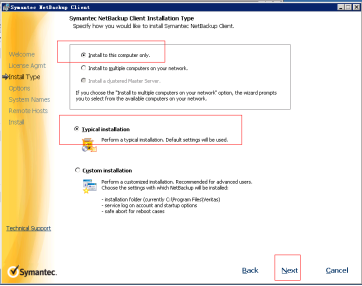
选择安装类型
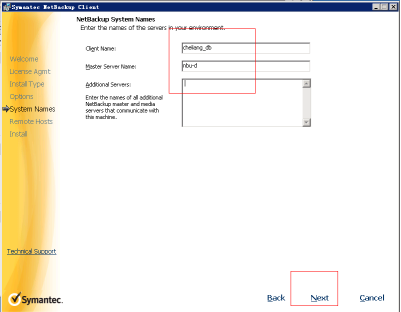
输入NBU信息
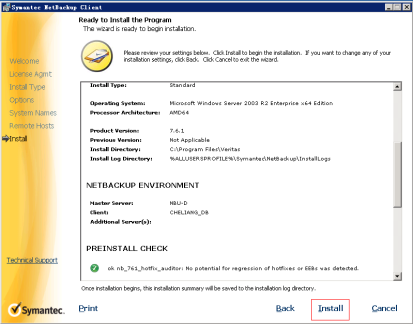
确认安装
1.1.3 安装完成退出
1.2 Linux客户端安装
1.2.1 修改hosts文件
在主服务器添加客户端解析
在客户端主机添加主服务器解析
1.2.2 客户端环境变量
|
[root@vspnod2 ~]# vi /etc/profile #在文件末尾增加如下: PATH=$PATH:/usr/openv/netbackup/bin:/usr/openv/netbackup/bin/goodies:/usr/openv/netbackup/bin/admincmd:/usr/openv/volmgr/bin export PATH [root@vspnod2 ~]# |
2个节点都需要修改。
1.2.3 解压软件
|
[root@vspnod1 nbu_soft]# tar xf NetBackup_7.6.1_CLIENTS2.tar.gz |
1.2.4 客户端软件安装
|
[root@vspnod1 NetBackup_7.6.1_CLIENTS2]# ./install Symantec Installation Script Copyright 1993 - 2014 Symantec Corporation, All Rights Reserved. Installing NetBackup Client Software Please review the SYMANTEC SOFTWARE LICENSE AGREEMENT located on the installation media before proceeding. The agreement includes details on the NetBackup Product Improvement Program. For NetBackup installation and upgrade information specific to your platform and to find out if your installed EEBs or hot fixes are contained in this release, check out the Symantec Operations Readiness Tools (SORT) Installation and Upgrade Checklist and Hot fix and EEB Release Auditor, respectively, at https://sort.symantec.com/netbackup. Do you wish to continue? [y,n] (y) Checking for required system conditions... Checking for recommended system conditions... ok nb_761_hotfix_auditor: No potential for regression of hotfixes or EEBs was detected. Do you want to install the NetBackup client software for this client? [y,n] (y) This package will install Linux/RedHat2.6.18 client. This package will install NetBackup client 7.6.1. Enter the name of the NetBackup master server : nbu-d Would you like to use "vspnod1" as the configured name of the NetBackup client? [y,n] (y) Client binaries are located in /oracle/nbu_soft/NetBackup_7.6.1_CLIENTS2/NBClients/anb/Clients/usr/openv/netbackup/client/Linux/RedHat2.6.18. Starting NetBackup Deduplication installer testing: /tmp/pdde_pkg_dir_32641 NetBackup Deduplication preinstall check passed Saving client binaries for Linux/RedHat2.6.18. Installing PBX... Please wait while installation is in progress... Installation completed Successfully Installation log located here: /var/tmp/installpbx-32919-070915143017.log Unpacking SYMCnbclt package. Checking for pre-existing SYMCnbclt package. Installing SYMCnbclt package. Installation of SYMCnbclt was successful. More details regarding SYMCnbclt can be found in file /tmp/install_cltpkg_trace.32629 on vspnod1. Terminating NetBackup and/or Media Manager processes. Installing NB-Java. Unpacking SYMCnbjava package. Checking for pre-existing SYMCnbjava package. Installing SYMCnbjava package. Installation of SYMCnbjava was successful. More details regarding SYMCnbjava can be found in file /tmp/install_javapkg_trace.33902 on vspnod1. Unpacking SYMCnbjre package. Checking for pre-existing SYMCnbjre package. Installing SYMCnbjre package. Installation of SYMCnbjre was successful. More details regarding SYMCnbjre can be found in file /tmp/install_jrepkg_trace.33902 on vspnod1. + /bin/cp ./nbj.conf /usr/openv/java Directory /usr/openv/logs does not exist. No log files to migrate. Checking network connections. bp.conf: IP_ADDRESS_FAMILY = AF_INET: default value, no update needed No [x]inetd process found. Starting NetBackup Deduplication installer testing: /tmp/pdde_pkg_dir_34146 Checking for SYMCpddea package... Installing NetBackup Deduplication agent package (/oracle/nbu_soft/NetBackup_7.6.1_CLIENTS2/NBClients/anb/Clients/usr/openv/netbackup/client/Linux/RedHat2.6.18/pddeagent.tar.gz)... Extracting package SYMCpddea in /tmp/pdde_pkg_dir_34146. Package SYMCpddea extracted to /tmp/pdde_pkg_dir_34146. Installing package SYMCpddea. Package SYMCpddea installed. Running NetBackup Deduplication upgrade script (agent mode)... NetBackup Deduplication install finished successfully. Version now installed: 8.0100.0014.1016 Full NetBackup Deduplication installation log saved to: /var/log/puredisk/2015-07-09_14:30-pdde-install.log The following automatic startup and shutdown scripts (respectively) have been installed. They will cause the NetBackup daemons to be automatically shut down and restarted each time the system boots. /etc/rc.d/rc2.d/S77netbackup /etc/rc.d/rc3.d/S77netbackup /etc/rc.d/rc5.d/S77netbackup /etc/rc.d/rc0.d/K01netbackup /etc/rc.d/rc1.d/K01netbackup /etc/rc.d/rc6.d/K01netbackup Successfully updated the session cache parameters. Starting vnetd... Starting bpcd... Starting nbftclnt... Starting nbdisco... Starting mtstrmd... Starting bmrbd... Installation of Java LiveUpdate agent succeeded. Refer to file /tmp/JLU-Log/JavaLiveUpdate-Install.log on vspnod1 for installation details. Checking LiveUpdate registration for the following products: CLT This may take a few minutes. Product CLT is installed and will be registered. Updating LiveUpdate registration now...this may take some time. File /usr/openv/tmp/install_trace.32057 contains a trace of this install. That file can be deleted after you are sure the install was successful. [root@vspnod1 NetBackup_7.6.1_CLIENTS2]# |
第二节点安装客户端的方法也一样操作。
3. Netbackup 7.6客户端的安装(windows/linux)的更多相关文章
- 笔记本在安装Windows+Linux双系统后,进入Windows时花屏的解决办法
问题:在笔记本安装双系统(Windows7+Ubuntu14.04)[先安装Windows,后安装Ubuntu]后,进入Windows时出现了花屏. 问题原因:笔记本只有集显,在系统启动时会先加载Ub ...
- elasticsearch 安装 windows linux macOS
导读 在上一章节我们介绍Elasticsearch基本概念,今天我们继续进行本章内容,Elasticsearch在各种环境下安装,下面将逐一讲解在各种操作系统或不同安装在不同环境中注意事项. 安装 E ...
- Git 安装 windows && linux
一.安装: windows下安装Git: 1.下载Git:https://git-scm.com/download/win 2.安装Git:默认安装,一直回车 Linux下安装Git: yum安装: ...
- JDK安装(windows/linux)
双击安装...安装之后需要进行一些相关的配置工作...下面是我自己总结的安装和配置步骤: (1)非Win7系统 第一步:安装jdk,下载地址:http://www.oracle.com/technet ...
- Windows系统下Memcached缓存系列一:Couchbase(服务器端)和CouchbaseClient(c#客户端)的安装教程
一:服务器端的安装 官网 http://www.couchbase.com/download 我的电脑是64位的win7,找到对应下载windows版本的服务器端缓存,大概90M的样子 运行期间可 ...
- Windows 环境Oracle客户端下载安装
Windows 环境Oracle客户端下载安装 1.官方网站下载Oracle客户端 64位下载地址 http://www.oracle.com/technetwork/database/enterpr ...
- [转载+补充]windows下SVN客户端的安装
来源:TortoiseSVN新人使用指南 1. 首先安装SVN客户端,windows一般选择乌龟客户端https://tortoisesvn.net/downloads.html. 2. 根据系统位数 ...
- 烂泥:KVM安装Windows Server 2008 R2使用virtio硬盘
本文首发于烂泥行天下. 在上一篇文章中,我们介绍了使用IDE硬盘来安装Windows Server 2008 R2,这篇文章我们来介绍使用virtio硬盘来安装Windows Server 2008 ...
- Git客户端TortoiseGit(Windows系统)的使用方法
本文环境: 操作系统:Windows XP SP3 Git客户端:TortoiseGit-1.8.8.0-32bit 一.安装Git客户端 全部安装均采用默认! 1. 安装支撑软件 msysgit: ...
随机推荐
- Codeforces Round #459 (Div. 2):D. MADMAX(记忆化搜索+博弈论)
题意 在一个有向无环图上,两个人分别从一个点出发,两人轮流从当前点沿着某条边移动,要求经过的边权不小于上一轮对方经过的边权(ASCII码),如果一方不能移动,则判负.两人都采取最优策略,求两人分别从每 ...
- 【转】insert忽略重复、mysql插入操作跳过、插入覆盖覆盖、mysql更新重复
需求背景:一般情况,插入数据的时候,有脏数据的情况,主键重复的话,直接insert into 会报错的,然后下面的sql都不再执行了,如果可以确定后面的数据可以覆盖前面的数据,直接用replace i ...
- base64编码后的pdf文件前端页面展示--pdf.js的应用
最近在整理项目中用到的插件或者使用心得,感觉还是写成博客,能加深新一层的理解. 我先说一下我的需求:由于java后台编译的文件流在手机端加载速度太慢,所以想着可以在前端解析,放在页面展示给用户. 所以 ...
- IT兄弟连 JavaWeb教程 AJAX的技术构成
Ajax并不是新的技术,而是之前技术的整合,其中包括JavaScript.HTML.CSS.DOM.XMLHttpRequest.XML和JSON是构成Ajax技术体系技术基石. JavaScript ...
- Docker 安装部署RabbitMQ
获查询镜像 docker search rabbitmq:management 可以看到如下结果: 获取镜像 docker pull rabbitmq:management 运行镜像 docker r ...
- eclipse svn 忽略target .project .classpath等目录文件
这个build失败的解决方案就是不要把你项目的 target目录放在src repository 里面,还有 .project 和 .classpath 最好也别放到src repository 里. ...
- 从各处收集的switch语句
重构之重复代码: 1.(重复代码是)语义一致的逻辑 反例:语义一致的逻辑产生了多个实体 缺点:如果你为语义一致的逻辑产生了多个实体,那么当需要修改这个逻辑时,你必须保证同时修改所有的实体,并确保它们是 ...
- DRF教程8-过滤
在写后端api时,经常需要使用各种过滤条件,可以使用Q对查询集进行过滤,这里介绍一个新玩意儿 以下是基础文档 https://django-filter.readthedocs.io/en/maste ...
- HDU-1845-Jimmy's Assignment
链接:https://vjudge.net/problem/HDU-1845 题意: 给一个有向图,求最大匹配. 思路: 有相图的最大匹配,可以通过加上反向边, 求这个无向图的最大匹配, 原图的最大匹 ...
- 075 Sort Colors 分类颜色
给定一个包含红色.白色和蓝色,且含有 n 个元素的数组,对它们进行排序,使得相同颜色的元素相邻,颜色顺序为红色.白色.蓝色.此题中,我们使用整数 0, 1 和 2 分别表示红色,白色和蓝色.注意:不能 ...