jtree(选择框)
jtree一般的用法是:
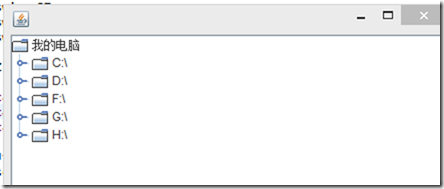
1. 展示电脑中文件的层次结构,如图所示.
具体的代码:
package jtree;

import java.io.File;

import javax.swing.JTree;

import javax.swing.tree.DefaultMutableTreeNode;

import javax.swing.tree.DefaultTreeModel;

public class ZJtree extends JTree {

    private static final long serialVersionUID = -581164150235777786L;

    private static final String ROOT_NAME = "我的电脑";

    private static final int levelUp = 3;

     public ZJtree() {

        this.setModel(new DefaultTreeModel(createRootNode()));

    }

     public  DefaultMutableTreeNode createRootNode(){

          DefaultMutableTreeNode treeNode = null;

          DefaultMutableTreeNode rootNode = new DefaultMutableTreeNode(ROOT_NAME);

          for(int i = 0; i < File.listRoots().length ; i++){

              if(File.listRoots()[i].isDirectory()){

                  String rootPath = File.listRoots()[i].getPath();

                  treeNode  = creatDefaultMutableTreeNode(rootPath,0);

                  rootNode.add(treeNode);

                  treeNode = null;

              }

          }

            return rootNode;

        }

    private DefaultMutableTreeNode creatDefaultMutableTreeNode(String nodePath,int level) {

        DefaultMutableTreeNode node = new DefaultMutableTreeNode(nodePath);

        DefaultMutableTreeNode treeNode = null;

        level = level+1;

        File file = new File(nodePath);

        if(file.isDirectory() && file.listFiles() != null){

             for(int i = 0; i < file.listFiles().length && level < levelUp; i++){

                  if(file.listFiles()[i].isDirectory()){

                      String rootPath = file.listFiles()[i].getPath();

                      treeNode  = creatDefaultMutableTreeNode(rootPath,level);

                      node.add(treeNode);

                      treeNode = null;

                  }

              }

        }

        return node;

    }

}
说明:限制层次的原因是因为电脑中文件过多,一直加载会比较的慢,以后我们会在处理这个问题。
看到上面的那个界面的第一个反应,就是好丑啊,我们慢慢的优化。在树节点的选择上面,增加combox,一步一步的来。
首先我们新建一个扩展自Jtree的自定义类:
public class ZTreeCheckBox extends JTree {

    private static final long serialVersionUID = -581164150235777786L;

    private static final String ROOT_NAME = "p";

    private static final int levelUp = 3;

     public ZTreeCheckBox() {

        this.setModel(new DefaultTreeModel(createRootNode()));

        this.setCellRenderer(new ChectBoxTreeCellRender());

        this.addCheckSelectListender();

    }

     private void addCheckSelectListender() {

         this.addMouseListener(new CheckBoxTreeNodeListender(this));

    }

    public  CheckBoxTreeNode createRootNode(){

         CheckBoxTreeNode treeNode = null;

         CheckBoxTreeNode rootNode = new CheckBoxTreeNode(ROOT_NAME);

          for(int i = 0; i < File.listRoots().length ; i++){

              if(File.listRoots()[i].isDirectory()){

                  String rootPath = File.listRoots()[i].getPath();

                  treeNode  = creatDefaultMutableTreeNode(rootPath,0);

                  rootNode.add(treeNode);

                  treeNode = null;

              }

          }

            return rootNode;

        }

    private CheckBoxTreeNode creatDefaultMutableTreeNode(String nodePath,int level) {

        CheckBoxTreeNode node = new CheckBoxTreeNode(nodePath);

        CheckBoxTreeNode treeNode = null;

        level = level+1;

        File file = new File(nodePath);

        if(file.isDirectory() && file.listFiles() != null){

             for(int i = 0; i < file.listFiles().length && level < levelUp; i++){

                  if(file.listFiles()[i].isDirectory()){

                      String rootPath = file.listFiles()[i].getPath();

                      treeNode  = creatDefaultMutableTreeNode(rootPath,level);

                      node.add(treeNode);

                      treeNode = null;

                  }

              }

        }

        return node;

    }

}
tree 的数据的组织形式,还和原来一样,但是我们需要tree的节点的形式是Combox形式的,最起码前面要是一个可选的样子,所以我们自定义一个TreeCellRenderer,我们在显示的时候可以是一个Jpanel,其中包含一个combox,一个Jlabel代码如下:
public class ChectBoxTreeCellRender extends JPanel implements

        TreeCellRenderer {

    private static final long serialVersionUID = 4676667399191240255L;

    protected JCheckBox check;

    protected CheckBoxTreeLabel label;

//    protected JLabel label;

    public ChectBoxTreeCellRender() {

        setLayout(null);

        add(check = new JCheckBox());

        add(label = new CheckBoxTreeLabel());

//        add(label = new JLabel());

        check.setBackground(UIManager.getColor("Tree.textBackground"));

        label.setForeground(UIManager.getColor("Tree.textForeground"));

        this.setPreferredSize(new Dimension(100, 20));

    }

    /* (non-Javadoc)

     * @see javax.swing.tree.TreeCellRenderer#getTreeCellRendererComponent(javax.swing.JTree, java.lang.Object, boolean, boolean, boolean, int, boolean)

     */

    @Override

    public Component getTreeCellRendererComponent(JTree tree, Object value,

            boolean selected, boolean expanded, boolean leaf, int row,

            boolean hasFocus) {

        String stringValue = tree.convertValueToText(value, selected, expanded,

                leaf, row, hasFocus);

        setEnabled(tree.isEnabled());

        check.setSelected(((CheckBoxTreeNode) value).isSelect());

        label.setFont(tree.getFont());

        label.setText(stringValue);

        label.setSelected(selected);

        label.setFocus(hasFocus);

        if (leaf)

            label.setIcon(UIManager.getIcon("Tree.leafIcon"));

        else if (expanded)

            label.setIcon(UIManager.getIcon("Tree.openIcon"));

        else

            label.setIcon(UIManager.getIcon("Tree.closedIcon"));

        return this;

    }

    @Override

    public void doLayout() {

        Dimension dCheck = check.getPreferredSize();

        Dimension dLabel = label.getPreferredSize();

        int yCheck = 0;

        int yLabel = 0;

        if (dCheck.height < dLabel.height)

            yCheck = (dLabel.height - dCheck.height) / 2;

        else

            yLabel = (dCheck.height - dLabel.height) / 2;

        check.setLocation(0, yCheck);

        check.setBounds(0, yCheck, dCheck.width, dCheck.height);

        label.setLocation(dCheck.width, yLabel);

        label.setBounds(dCheck.width, yLabel, dLabel.width, dLabel.height);

    }

    @Override

    public void setBackground(Color color) {

        if (color instanceof ColorUIResource)

            color = null;

        super.setBackground(color);

    }

}
关于选中了节点以后,label是否出现阴影表示选择,在这里不是重点,这个扩展CheckBoxTreeLabel,会放在git上,现在我们关注的是Jlabel和Combox的结合而成的JPanel。
现在我们还缺少一个选择以后,Combox能够显示选中,所以我们还需要增加增加一个节点选择的监听:
public class CheckBoxTreeNodeListender extends MouseAdapter {

    private ZTreeCheckBox zTreeCheckBox = null;

    public CheckBoxTreeNodeListender(ZTreeCheckBox zTreeCheckBox) {

        this.zTreeCheckBox = zTreeCheckBox;

    }

    // 被选中事件

    @Override

    public void mousePressed(MouseEvent event) {

        if(event.getSource() instanceof ZTreeCheckBox){

            Point p = event.getPoint();

            int row = zTreeCheckBox.getRowForLocation(p.x, p.y);

            TreePath path = zTreeCheckBox.getPathForRow(row);

            if (path != null) {

                CheckBoxTreeNode node = (CheckBoxTreeNode) path

                        .getLastPathComponent();

                if (node != null) {

                    boolean isSelected = !node.isSelect();

                    node.setSelected(isSelected);

                    ((DefaultTreeModel) zTreeCheckBox.getModel()).nodeStructureChanged(node);

                }

            }

        }

//        else{

//            String comm = ((JButton)event.getSource()).getActionCommand();

//        }

//

    }

}
最后我们得到是这个样子的:
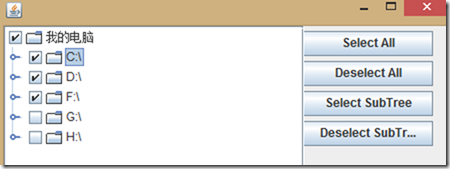
左边的按钮,表示的选择的操作:
① 全部的选中
② 全部的不选中
③ 选择一个子树
④ 去除某一个子树
一种实现的思路,是在选择的事件分为四类,然后实现对应的逻辑,也就是对每一个节点的选择做出操作。在CheckBoxTreeNodeListender 的监听响应中添加:
// 被选中事件

    @Override

    public void mousePressed(MouseEvent event) {

        Point p = event.getPoint();

        int row = zTreeCheckBox.getRowForLocation(p.x, p.y);

        TreePath path = zTreeCheckBox.getPathForRow(row);

        if(event.getSource() instanceof ZTreeCheckBox){

            if (path != null) {

                CheckBoxTreeNode node = (CheckBoxTreeNode) path

                        .getLastPathComponent();

                if (node != null) {

                    boolean isSelected = !node.isSelect();

                    node.setSelected(isSelected);

                    ((DefaultTreeModel) zTreeCheckBox.getModel()).nodeStructureChanged(node);

                }

            }

        }

        else{

            String comm = ((JButton)event.getSource()).getActionCommand();

            if("SelectAll".equals(comm)){

                CheckBoxTreeNode node = (CheckBoxTreeNode) path.getLastPathComponent();

                selectAllNode(node,true);

                ((DefaultTreeModel) zTreeCheckBox.getModel()).nodeStructureChanged(node);

            }else if("DeselectAll".equals(comm)){

                CheckBoxTreeNode node = (CheckBoxTreeNode) path.getLastPathComponent();

                selectAllNode(node,false);

                ((DefaultTreeModel) zTreeCheckBox.getModel()).nodeStructureChanged(node);

            }

        }

//

    }

    private void selectAllNode(CheckBoxTreeNode node,boolean select) {

        if (node != null) {

            node.setSelected(select);

            if(node.getChildCount() > 0 ){

                for (int i = 0; i < node.getChildCount(); i++) {

                    CheckBoxTreeNode child = (CheckBoxTreeNode) node.getChildAt(i);

                    selectAllNode(child,select);

                }

            }

        }

    }
类似的实现,即可满足条件,封装性不是很好,有时间在进行重构,抽成一个借口,和对应的实现。
下一篇我们的实现成这样:
改变树节点的图片,变得好看一点。
jtree(选择框)的更多相关文章
- java、easyui-combotree树形下拉选择框
最近一直在研究这个树形的下拉选择框,感觉非常的有用,现在整理下来供大家使用: 首先数据库的表架构设计和三级菜单联动的表结构是一样,(父子关系) 1.下面我们用hibernate建一下对应的额实体类: ...
- Notes: select选择框
HTML选择框通过select标签创建,该元素是HTMLSelectElement的实例,拥有以下属性和方法: selectedIndex:选中项的索引 options:选择框的所有选项 add:向选 ...
- AngularJS Select(选择框)
AngularJS 可以使用数组或对象创建一个下拉列表选项. 使用 ng-option 创建选择框 在 AngularJS 中我们可以使用 ng-option 指令来创建一个下拉列表,列表项通过对象和 ...
- FancySelect – 更好用的 jQuery 下拉选择框插件
FancySelect 这款插件是 Web 开发中下拉框功能的一个更好的选择.FancySelect 使用方便,只要绑定页面上的任何 Select 元素,并调用就 .fancySelect() 就可以 ...
- 【代码笔记】iOS-时间选择框
一, 效果图. 二,工程图. 三,代码. RootViewController.h #import <UIKit/UIKit.h> @interface RootViewControlle ...
- 【代码笔记】iOS-点击出现选择框
一,效果图. 二,工程图. 三,代码. RootViewController.h #import <UIKit/UIKit.h> @interface RootViewController ...
- 【代码笔记】iOS-单项选择框
一,效果图. 二,工程图. 三,代码. RootViewController.h #import <UIKit/UIKit.h> @interface RootViewController ...
- Java——文件选择框:JFileChooser
import java.awt.BorderLayout; import java.awt.Container; import java.awt.event.ActionEvent; import j ...
- Asp.net点击按钮弹出文件夹选择框的实现(网页)
本文地址:http://www.cnblogs.com/PiaoMiaoGongZi/p/4092112.html 在Asp.net网站实际的开发中,比如:需要实现点击一个类似于FileUpload的 ...
- HTML、CSS小知识--兼容IE的下拉选择框select
HTML <div class="s_h_ie"> <select id="Select1" disabled="disabled& ...
随机推荐
- 如何右键新建HTML
直接转载的,原文作者写的很详细:http://blog.csdn.net/ruanjiayou/article/details/51284864 14年在qq日志里写过 2014-10-25 htt ...
- java socket报文通信(一) socket的建立
TCP是Transfer Control Protocol的 简称,是一种面向连接的保证可靠传输的协议.通过TCP协议传输,得到的是一个顺序的无差错的数据流.发送方和接收方的成对的两个socket之间 ...
- java Date获取 年月日时分秒
1 2 3 4 5 6 7 8 9 10 11 12 13 14 15 16 17 18 19 20 21 22 23 24 25 26 27 28 29 30 31 32 33 34 35 36 3 ...
- CSU1659: Graph Center(最短路)
Description The center of a graph is the set of all vertices of minimum eccentricity, that is, the s ...
- [Angular 2] Interpolation: check object exists
In Angular2, sometime we use @Output to pass data to parent component, then parent may pass the data ...
- [Redux] React Todo List Example (Adding a Todo)
Learn how to create a React todo list application using the reducers we wrote before. /** * A reduce ...
- php实现文件夹下的文件读取功能
<?php //这里实现 某个文件下的全部图片,并列出来! header("Content-type:text/html;charset=utf8"); $handle= ...
- Java基础知识强化41:StringBuffer类之StringBuffer的反转功能
1. StringBuffer 的反转功能: public StringBuffer reverse(): 2. 案例演示: package cn.itcast_05; /* * StringBuff ...
- memcached原理全面剖析
memcached会预先分配内存,memcached分配内存方式称之为allocator, 首先,这里有3个概念: 1 slab 2 page 3 chunk 一般来说一个memcahced进程会预先 ...
- IPointCollection,ISegmentCollection和IGeometryCollection
Engine 提供了三个主要的几何图形集合接口用于对几何对象的操作,分别是 IPointCollection,ISegmentCollection 和 IGeometryCollection,这些接口 ...