
Kubernetes 学习笔记-- kafka往couchdb里倒东西
首先吐槽下国内这些论坛的技术精神,不是我崇洋媚外,有些复读机烦不烦啊,别人的东西吃进去吐出来好玩么?
还有一些不懂装懂,这种最可恶,明明自己都不明白自己在写什么,还是往精华区发,简直离谱,知道自己多挣的积分会给新手带来多大的负担么?
这几天的感觉下来,kubernetes感觉并不算是很难的东西,只是因为缺少一个系统性的教程,某些培训班的教程也早已跟不上时代的步伐了,另外技术共享也不能说尽如人意,所以造成了较高的行业壁垒。
所以我就来整理一下吧,如果能帮上后来人的话,那将是莫大的欣慰
首先我们先看couchdb
couchdb的yaml 文件这样写,我已经建好并上传至docker hub了一个开放端口和初始用户密码皆为root的镜像,直接调用就好
tiany7/couchdb_real
然后全套文件这样写:我把容器的5984映射到了主机的30005,对外访问使用30005这个端口
---

# This is a declarative approach to describe a Kubernetes based

# deployment of an application.  Since this is YAML, the indentation

# is very important

apiVersion: apps/v1

kind: Deployment         # We are testing the Deployment resource

metadata:

  name: couch-deployment  # A name must be given to the deployment in the metadata section

spec:                     # This is the specification where we can even put the number of replicas

  replicas: 1             # Say we want to run 3 replicas of nginx

  selector:

    matchLabels:

      app: couch-server-app          # 这个要前后一致,相当于主键索引找到这个service/deployment

  minReadySeconds: 5  # if anything crashes before 5 secs, the deployment is not

                          # considered as ready and available. Default value is 0

  template:               # Specified info needed to run the pod and what runs in the pod

    metadata:

      labels:

        app: couch-server-app        # some label to give to this pod (see the matching label above)

    spec:                 # actual specification

      containers:

      - name: couchdb       # Used by DNS

        image: tiany7/couchdb_real  # this is the image name on hub.docker or if you have one locally. We use an older

                          # and then show how we can upgrade to newer version

        imagePullPolicy: IfNotPresent  # This forces the node to pull the image

        ports:            # Since nginx is a web server, we let it listen on port 80 in the container

        - containerPort: 5984

---

apiVersion: v1

kind: Service

metadata:

  name: couch-server-app

spec:

  type: NodePort   # by using NodePort, the service is published to outside world.

  ports:

    - protocol: TCP     # this is default (so not needed either)

      port: 5984  # the port used by the server inside the pod/container

      nodePort: 30005 # this is what will be externally published

  selector:

    app: couch-server-app

---

apiVersion: v1

kind: Pod

metadata:

  name: couch-service

spec:

  containers:

  - name: couch-service

    image: tiany7/couchdb_real #这个是我自己的镜像,功能之前说过了,大家不介意的话可以直接调用

    imagePullPolicy: IfNotPresent

    ports:

      - containerPort: 5984

        hostPort: 30005

...
然后如果访问端口(curl)出现no host to route的话记得是不是在service那里写了selector,一定记得!
之前记得一定要ufw allow <端口>你需要的端口
然后apply一下
sudo kubectl apply -f couch-deployment.yml
应该就能看到数据库在运行了
打开自己的公共ip:30005/utils/#

这不就看到了么
然后我们来看zookeeper的配置
这个是zookeeper的yaml file,昨天跟着博客园配置了好几版,是错的,这个囊括了service和deployment,我的两台机器public ip是128.114.xx.xx,到时候换成你们的就行
apiVersion: apps/v1

kind: Deployment

metadata:

  name: zookeeper-deploy

spec:

  selector:

    matchLabels:

      app: zookeeper-1

  replicas: 1

  template:

    metadata:

      labels:

        app: zookeeper-1

    spec:

      hostname: zookeeper-1

      nodeSelector: # this shows how you force k8s to schedule the pod on a specified node

        kubernetes.io/hostname: vm2vv-2 #自己的vm节点名称,用kubectl get nodes可以查看23333

      containers:

      - name: zoo1

        image: digitalwonderland/zookeeper

        imagePullPolicy: IfNotPresent

        ports:

        - containerPort: 2181

        env:

        - name: ZOOKEEPER_ID

          value: "1"

        - name: ZOOKEEPER_SERVER_1

          value: zoo1

---

apiVersion: v1

kind: Service

metadata:

  name: zoo1

  labels:

    app: zookeeper-1

spec:

  selector:

    app: zookeeper-1   # used to match the pod(s) that run the actual matinv server

  ports:

    - protocol: TCP     # this is default (so not needed either)

      name: client

      port: 2181  # the port used by the server inside the pod/container

    - protocol: TCP     # this is default (so not needed either)

      name: follower

      port: 2888  # the port used by the server inside the pod/container

    - protocol: TCP     # this is default (so not needed either)

      port: 3888  # the port used by the server inside the pod/container

      name: leader
执行命令
sudo kubectl apply -f zookeeper_setup.yml
然后是kafka的配置,记得,kafka需要zookeeper作为基础建设,所以先等zookeeper跑起来之后才能启动kafka
kafka的yaml配置:
ind: Deployment

apiVersion: apps/v1

metadata:

  name: kafka-broker0

spec:

  replicas: 1

  selector:

    matchLabels:

      app: kafka

      id: "0"

  template:

    metadata:

      labels:

        app: kafka

        id: "0"

    spec:

      containers:

      - name: kafka

        image: wurstmeister/kafka

        ports:

        - containerPort: 9092

        env:

        - name: KAFKA_ADVERTISED_PORT

          value: "30001"

        - name: KAFKA_ADVERTISED_HOST_NAME

          value: 129.114.25.68

        - name: KAFKA_ZOOKEEPER_CONNECT

          value: zookeeper-1:2181

        - name: KAFKA_BROKER_ID

          value: "0"

        - name: KAFKA_CREATE_TOPICS

          value: utilization:1:1#自己topic的名字,记得改啊

---

apiVersion: v1

kind: Service

metadata:

  name: kafka-service

  labels:

    name: kafka

spec:

  ports:

  - port: 9092

    name: kafka-port

    protocol: TCP

    nodePort: 30001

  selector:

    app: kafka

    id: "0"

  type: NodePort
记得我的配置除了公共ip和端口都可以拿去通用
然后执行
sudo kubectl apply -f kafka_setup.yml
这个yml可以自己定义名字和yaml/yml后缀
然后我们执行完之后就能从本地收发信息了

可以看到执行完之后是有一对kafka/zookeeper在running的,另一个是因为我还没有给他配置zookeeper,所以no broker available,replica的时候我应该选1的,no matter
然后我们创建了producer和consumer,用python写得,这里只是简单得producer和consumer,大家看一下就成
这个往第三台机子dump数据的代码已经写好了,是用157结尾的进行dump
producer:
import os   # need this for popen

import time # for sleep

from kafka import KafkaProducer  # producer of events

# We can make this more sophisticated/elegant but for now it is just

# hardcoded to the setup I have on my local VMs

# acquire the producer

# (you will need to change this to your bootstrap server's IP addr)

producer = KafkaProducer (bootstrap_servers="129.114.25.68:30001", acks=1)  # wait for leader to write to log

for i in range (100):

    # get the output of the top command

    process = os.popen ("top -n 1 -b")

    print("here from Yuanhan")

    # read the contents that we wish to send as topic content

    contents = process.read ()

    # send the contents under topic utilizations. Note that it expects

    # the contents in bytes so we convert it to bytes.

    #

    # Note that here I am not serializing the contents into JSON or anything

    # as such but just taking the output as received and sending it as bytes

    # You will need to modify it to send a JSON structure, say something

    # like <timestamp, contents of top>

    #

    producer.send ("utilization", value=bytes (contents, 'ascii'))

    producer.flush ()   # try to empty the sending buffer

    # sleep a second

    time.sleep (1)

# we are done

producer.close ()
然后是consumer
import os   # need this for popen

import time # for sleep

from kafka import KafkaConsumer  # consumer of events

import couchdb

# We can make this more sophisticated/elegant but for now it is just

# hardcoded to the setup I have on my local VMs

# acquire the consumer

# (you will need to change this to your bootstrap server's IP addr)

consumer = KafkaConsumer (bootstrap_servers="129.114.25.68:30001")

# subscribe to topic

consumer.subscribe (topics=["utilization"])

user = "root"

password = "root"

couchserver = couchdb.Server("http://%s:%s@129.114.27.157:30005" % (user, password))

#db = couchserver['mydb']

db = couchserver.create('newDB')

# we keep reading and printing

it = 0

for msg in consumer:

    # what we get is a record. From this record, we are interested in printing

    # the contents of the value field. We are sure that we get only the

    # utilizations topic because that is the only topic we subscribed to.

    # Otherwise we will need to demultiplex the incoming data according to the

    # topic coming in.

    #

    # convert the value field into string (ASCII)

    #

    # Note that I am not showing code to obtain the incoming data as JSON

    # nor am I showing any code to connect to a backend database sink to

    # dump the incoming data. You will have to do that for the assignment.

    doc = {'foo': str(msg.value, 'ascii')}

    db.save(doc)

    if it > 10:

        break

    it += 1

    print(str(msg.value, 'ascii'))

# we are done. As such, we are not going to get here as the above loop

# is a forever loop.

consumer.close ()
好了,之后我们从本地的kafka那里执行
sudo bin/kafka-topics.sh --describe --topic utilization --bootstrap-server 129.114.25.68:30001
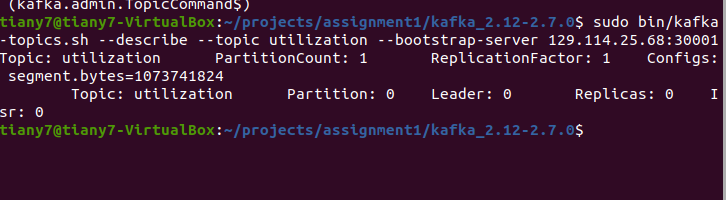
这不就在在这么?
然后在kafka所在pod机器启动consumer.py
当当当当!
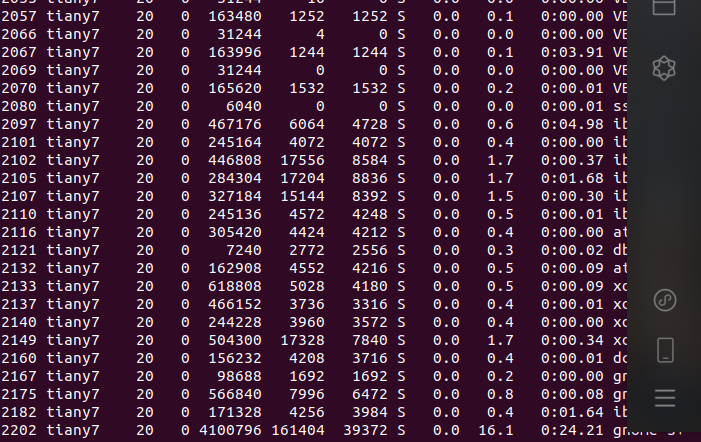
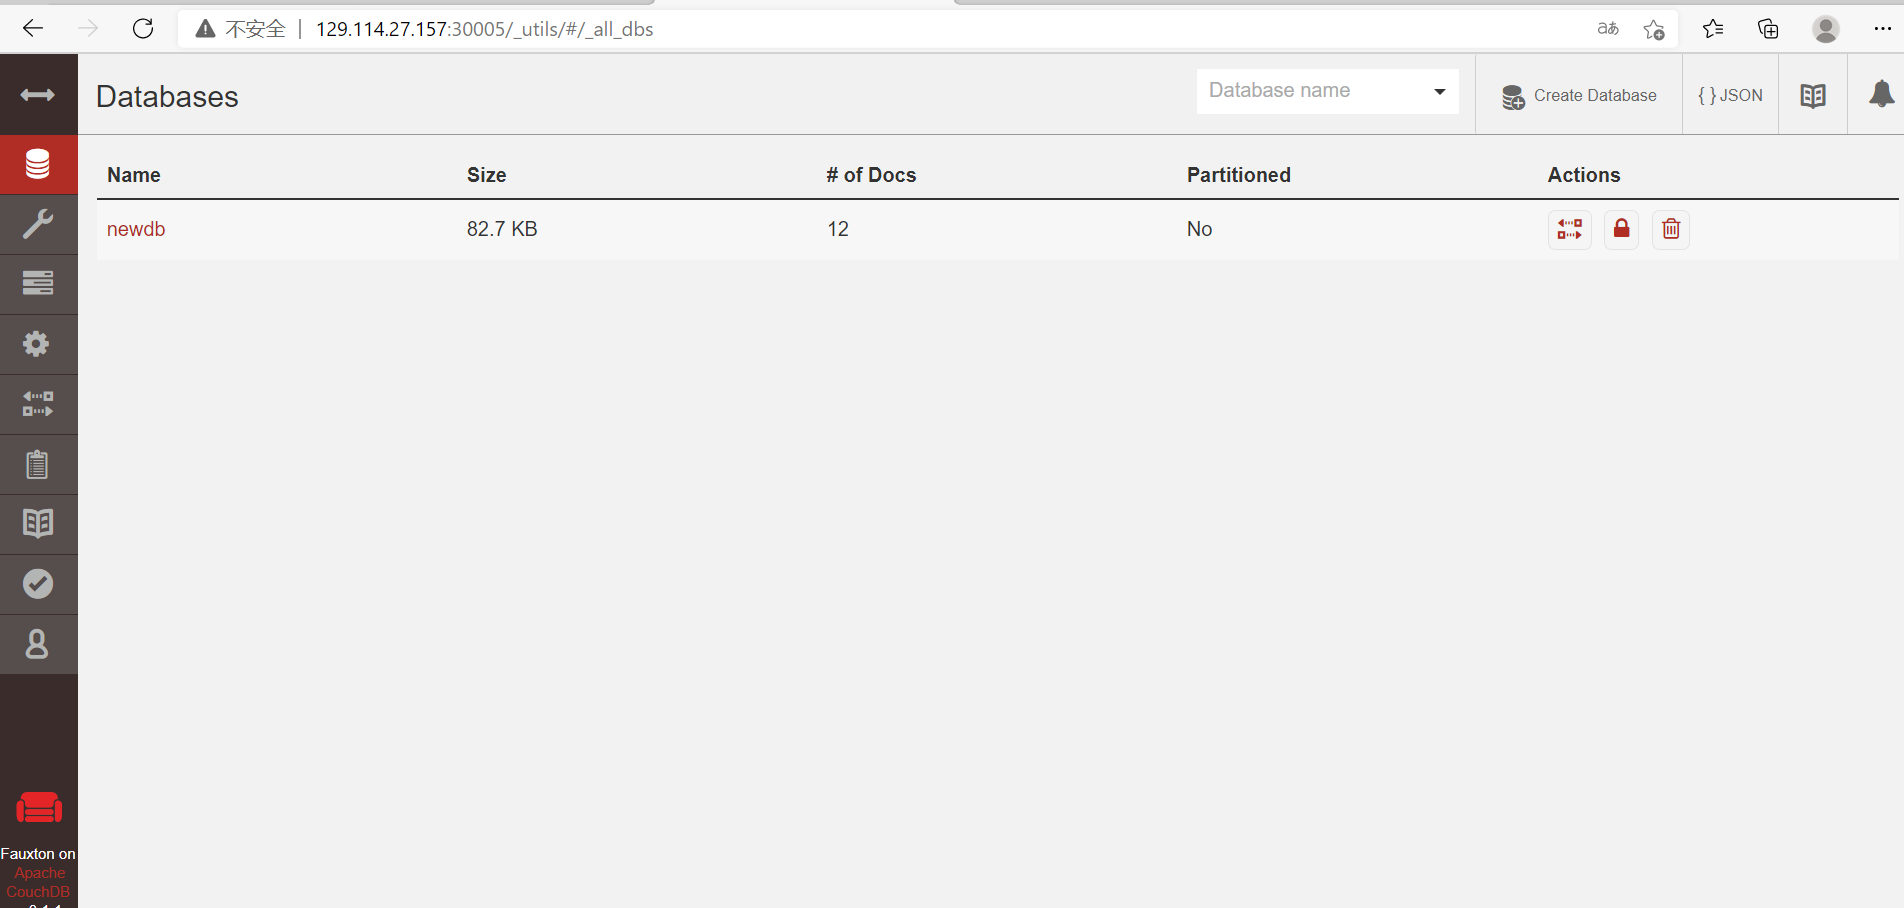
我们可以在数据看见数据了!
这个作业花了两周时间才想明白怎么搞,因为资料极度匮乏,所以自己只能凭借自己的仅有的印象在这xjb摸索,当时想的是,要是这些东西有现成的代码资料可以参考就好了,但很不幸,只有残缺不全的资料,不过最后也算是摸出来了,真的,我感觉在所有知识传播的路上仍然任重道远
自己学会一门知识远没有让这门知识服务于更多的人有价值,再接再厉,我有ansible playbook自动化的版本,可以私信我发你
终于可以搞cf了,我要在退役前上紫!
Kubernetes 学习笔记-- kafka往couchdb里倒东西的更多相关文章
- Kubernetes学习笔记(八):Deployment--声明式的升级应用
概述 本文核心问题是:如何升级应用. 对于Pod的更新有两种策略: 一是删除全部旧Pod之后再创建新Pod.好处是,同一时间只会有一个版本的应用存在:缺点是,应用有一段时间不可用. 二是先创建新Pod ...
- Kubernetes 学习笔记(一):基础概念
个人笔记,仅本人查阅使用,不保证正确. 零.微服务 微服务架构专注于应用解耦合,通过将应用彻底地组件化和服务化,每个微服务只包含一个非常小的功能,比如权限管理.日志收集等等.由这一组微服务组合起来,提 ...
- Kubernetes学习笔记(四):服务
服务介绍 服务是一种为一组相同功能的pod提供单一不变接入点的资源.当服务存在时,他的IP和端口不会改变.客户端通过IP和端口建立连接,这些连接会被路由到任何一个pod上.如此,客户端不需要知道每个单 ...
- Kubernetes学习笔记之认识Kubernetes组件
前言:笔记知识点来源于Kubernetes官方文档说明,链接:https://kubernetes.io/docs/concepts/overview/components/ ,本记录仅仅是学习笔记记 ...
- 深入剖析Kubernetes学习笔记:开篇词(00)
一.关于Kubernetes初学的疑惑 就在这场因"容器"而起的技术变革中,kubernetes项目已经成为容器技术的事实标准,重新定义了基础设置领域对应用编排与管理的种种可能 1 ...
- Kubernetes 学习笔记(二):本地部署一个 kubernetes 集群
前言 前面用到过的 minikube 只是一个单节点的 k8s 集群,这对于学习而言是不够的.我们需要有一个多节点集群,才能用到各种调度/监控功能.而且单节点只能是一个加引号的"集群&quo ...
- Kubernetes学习笔记_尚硅谷
https://www.bilibili.com/video/BV1w4411y7Go?p=1 一.K8s介绍 k8s是一个编排容器的工具,其实也是管理应用的全生命周期的一个工具,从创建应用,应用的部 ...
- kubernetes学习笔记
docker实现了更便捷的单机容器虚拟化的管理, docker的位置处于操作系统层与应用层之间; 相对传统虚拟化(KVM,XEN): docker可以更加灵活的去实现一些应用层功能, 同时对资源的利用 ...
- kubernetes学习笔记之七: Ingress-nginx 部署使用
一.Ingress 简介 在Kubernetes中,服务和Pod的IP地址仅可以在集群网络内部使用,对于集群外的应用是不可见的.为了使外部的应用能够访问集群内的服务,在Kubernetes 目前 提供 ...
随机推荐
- 谁能成为数据储存领域领头羊?永久数据存储--NGK的终极使命!
区块链的目的是永远存储交易网络的历史.NGK技术团队能够永久存储其去中心化账本的副本.这是其日后能进行审计关键.一些著名的团队,如Solana和SKALE,现在正在为此与NGK进行最后的集成,我们预计 ...
- Python爬虫_百度贴吧
# 本爬虫为爬取百度贴吧并存储HTMLimport requests class TiebaSpider: def __init__(self, tieba_name): self.tieba_nam ...
- Differences between Stack and Heap
本文转载自Differences between Stack and Heap Stack vs Heap So far we have seen how to declare basic type ...
- 知道这两个 DOM 属性区别的,头发应该不多了吧?
你可能知道,获取和设置 DOM 元素内部文本可以用这两个属性:Node.textContent 和 Element.innerText. 乍一看,它们似乎做着完全相同的事情,但它们之间有一些微妙但重要 ...
- VMware vSphere 虚拟化平台的安装及使用
首先解释一下这些名词, vSphere是什么? vSphere 是VMware公司发布的一整套产品包,是VMware公司推出的一套服务器虚拟化解决方案,包含VMware ESXi hypervisor ...
- eclipse中lombok注解不生效
现象:eclipse中在对象上使用lombok的@Data,引用get方法时,没有set.get方法. 解决办法: 1.在lombok官网(https://www.projectlombok.org/ ...
- Linux 查看磁盘是否为SSD
第一步,找到磁盘 ll /dev/sd* ll /dev/vd* 第二步,查对应磁盘类型 cat /sys/block/sda/queue/rotational 结果: 返回0:SSD盘 返回1: ...
- MarkDown简单语法回顾
写在前面: 本文是我的第一篇博客文章,希望与大家共同交流.分享我们热爱的技术,努力成为一名优秀的软件工程师! 进入正文 使用MarkDown记笔记已经有些时候了,编辑器是使用的sublime text ...
-
转: 微信已支持发送最大 200MB 的视频了,并且不会被压缩 来自腾讯微信团队的视频消息,目前 iOS 版本的微信已支持发送最大 200MB 的视频与图片了,并且不会被压缩.安卓版本未来一段时间会支 ...
- CCF(压缩编码):动态规划+平行四边形优化
压缩编码 201612-4 一开始看这题还以为是哈夫曼编码的题目,结果是哈夫曼题目的变形. 哈夫曼编码是每次合并任意两堆石子,而这里的题目是合并相邻的两堆石子,而且这里的合并花费是合并两堆石子加上所有 ...