day03-分析SpringBoot底层机制
分析SpringBoot底层机制
Tomcat启动分析,Spring容器初始化,Tomcat如何关联Spring容器?
1.创建SpringBoot环境
(1)创建Maven程序,创建SpringBoot环境
(2)pom.xml导入SpringBoot的父工程和依赖
<!--导入SpringBoot父工程-规定写法-->

<parent>

    <artifactId>spring-boot-starter-parent</artifactId>

    <groupId>org.springframework.boot</groupId>

    <version>2.5.3</version>

</parent>

<dependencies>

    <!--导入web项目场景启动器:会自动导入和web开发相关的所有依赖[jar包]-->

    <dependency>

        <groupId>org.springframework.boot</groupId>

        <artifactId>spring-boot-starter-web</artifactId>

    </dependency>

</dependencies>
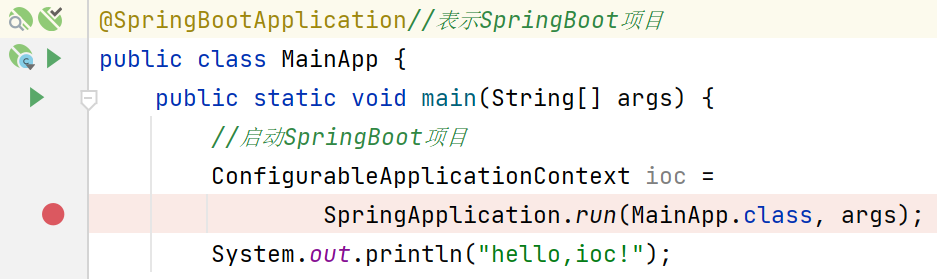
(3)创建主程序MainApp.java
package com.li.springboot;

import org.springframework.boot.SpringApplication;

import org.springframework.boot.autoconfigure.SpringBootApplication;

import org.springframework.context.ConfigurableApplicationContext;

/**

 * @author 李

 * @version 1.0

 */

@SpringBootApplication//表示SpringBoot项目

public class MainApp {

    public static void main(String[] args) {

        //启动SpringBoot项目

        ConfigurableApplicationContext ioc =

                SpringApplication.run(MainApp.class, args);

    }

}
(4)启动项目,我们可以注意到Tomcat也随之启动了。
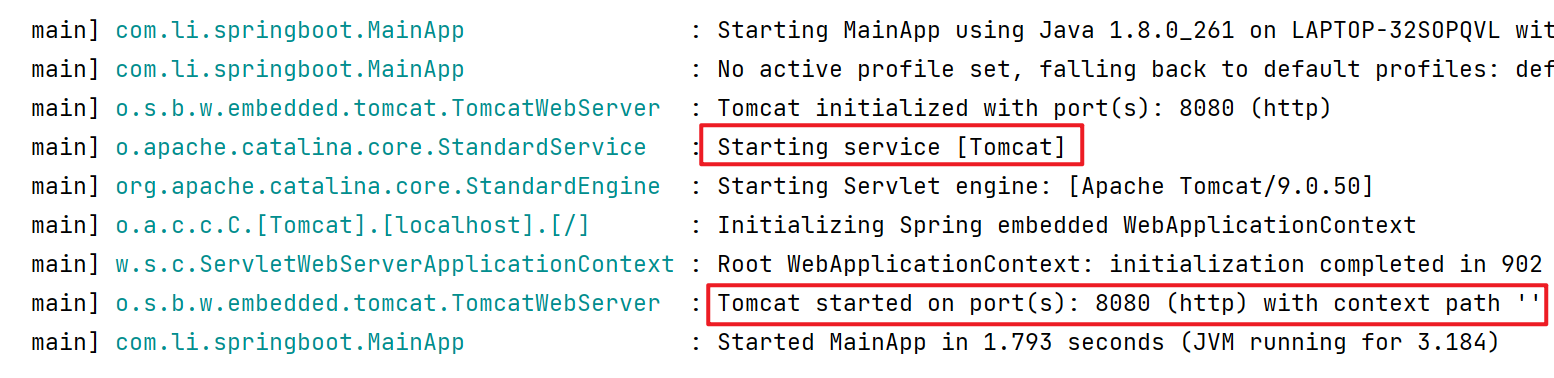
问题一:当我们执行run方法时,为什么会启动我们内置的tomcat?它的底层是如何实现的?
2.Spring容器初始化(@Configuration+@Bean)
我们知道,如果在一个类上添加了注解@Configuration,那么这个类就会变成配置类;配置类中通过@Bean注解,可以将方法中 new 出来的Bean对象注入到容器中,该bean对象的id默认为方法名。
配置类本身也会作为bean注入到容器中


容器初始化的底层机制仍然是我们之前分析的Spring容器的机制(IO/文件扫描+注解+反射+集合+映射)
对比:
- Spring通过@ComponentScan,指定要扫描的包;而SpringBoot默认从主程序所在的包开始扫描,同时也可以指定要扫描的包(scanBasePackages = {"xxx.xx"})。
- Spring通过xml或者注解,指定要注入的bean;SpringBoot通过扫描配置类(对应spring的xml)的@Bean或者注解,指定注入bean
3.SpringBoot怎样启动Tomcat,并能支持访问@Controller?
由前面的例子1中可以看到,当启动SpringBoot时,tomcat也会随之启动。那么问题来了:
- SpringBoot是怎么内嵌Tomcat,并启动Tomcat的?
- 而且底层是怎样让@Controller修饰的控制器也可以被访问的?
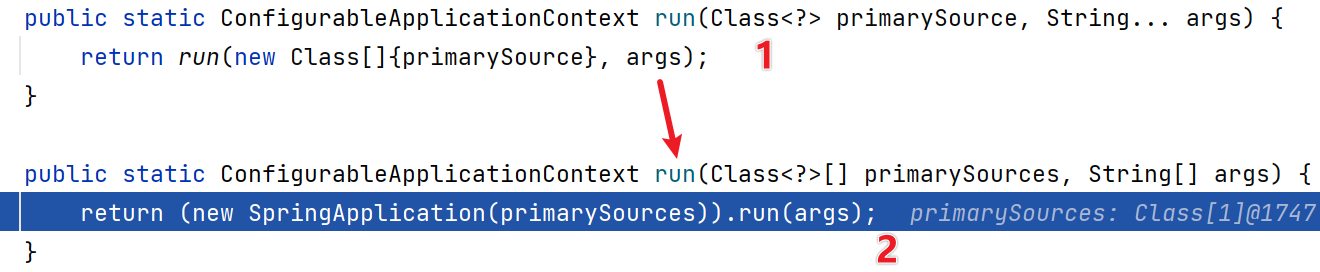
3.1源码分析SpringApplication.run()
SpringApplication.run()方法会完成两个重要任务:
- 创建容器
- 容器的刷新:包括参数的刷新+启动Tomcat
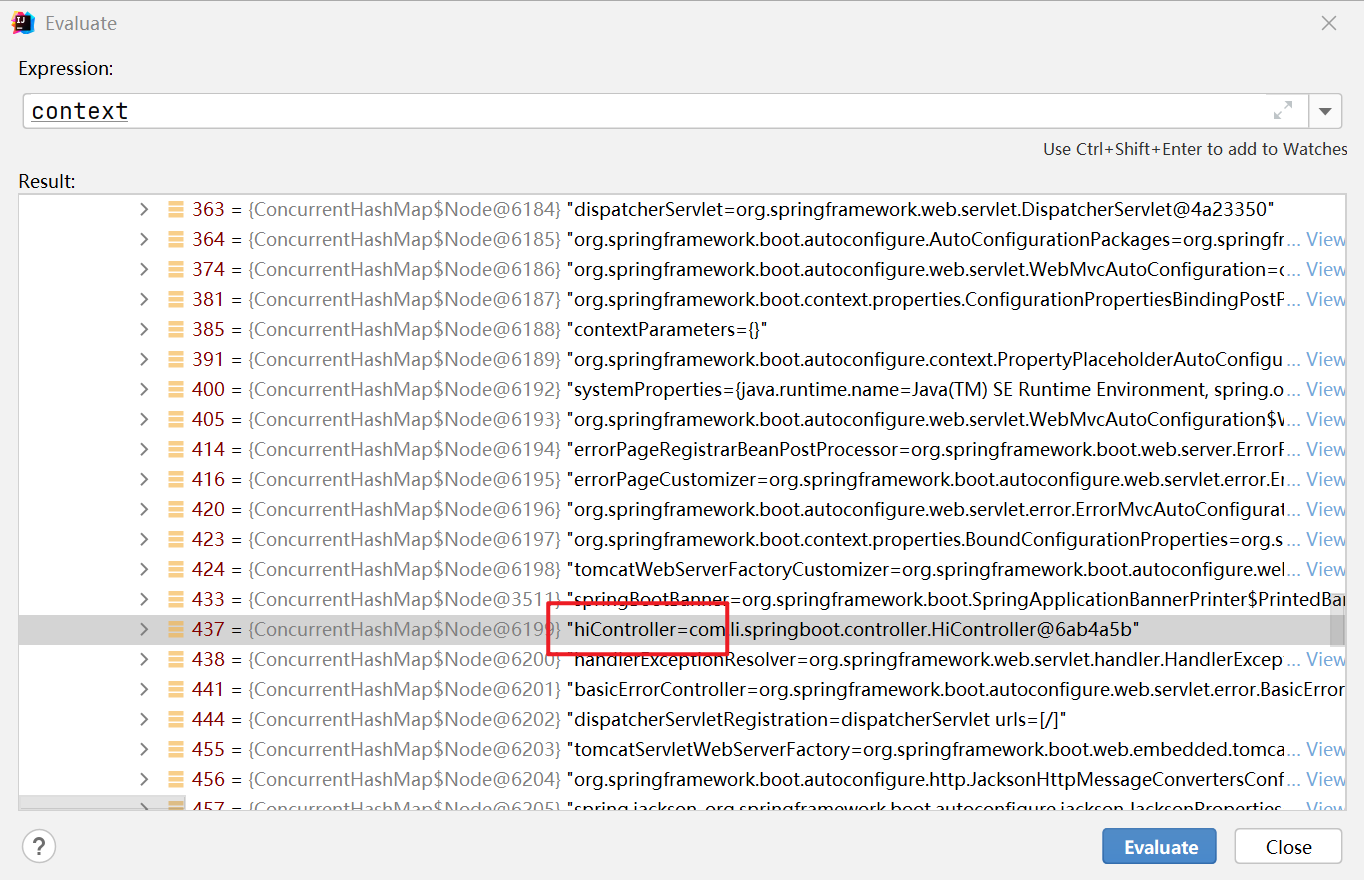
(1)创建一个控制器
package com.li.springboot.controller;

import org.springframework.web.bind.annotation.RequestMapping;

import org.springframework.web.bind.annotation.RestController;

/**

 * @author 李

 * @version 1.0

 * HiController被标注后,作为一个控制器注入容器中

 */

@RestController//相当于@Controller+@ResponseBody

public class HiController {

    @RequestMapping("/hi")

    public String hi() {

        return "hi,HiController";

    }

}
(2)启动主程序MainApp.java,进行debug
(3)首先进入SpringApplication.java的run方法
(4)点击step into,进入如下方法
public ConfigurableApplicationContext run(String... args) {

    ...

    try {

        ...

        context = this.createApplicationContext();//严重分析,创建容器

        context.setApplicationStartup(this.applicationStartup);

        this.prepareContext(bootstrapContext, context, environment, listeners, applicationArguments, printedBanner);

        this.refreshContext(context);//刷新应用上下文,比如初始化默认设置/注入相关bean/启动Tomcat

        this.afterRefresh(context, applicationArguments);

        stopWatch.stop();

        ...

    } catch (Throwable var10) {...}

    ...

}
(5)分别对 **createApplicationContext() **和 refreshContext(context) 方法进行分析:
(5.1)step into 进入 **createApplicationContext() ** 方法中:
//springApplication.java
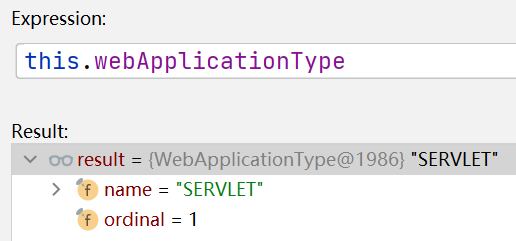
//容器类型很多,会根据你的this.webApplicationType创建对应的容器,默认this.webApplicationType
//的类型为SERVLET,也就是web容器(可以处理servlet)
protected ConfigurableApplicationContext createApplicationContext() {
return this.applicationContextFactory.create(this.webApplicationType);
}
(5.2)点击进入下一层
//接口 ApplicationContextFactory.java

//该方法根据webApplicationType创建不同的容器

ApplicationContextFactory DEFAULT = (webApplicationType) -> {

    try {

        switch(webApplicationType) {

        case SERVLET://默认进入这一分支,返回

                //AnnotationConfigServletWebServerApplicationContext容器

            return new AnnotationConfigServletWebServerApplicationContext();

        case REACTIVE:

            return new AnnotationConfigReactiveWebServerApplicationContext();

        default:

            return new AnnotationConfigApplicationContext();

        }

    } catch (Exception var2) {

        throw new IllegalStateException("Unable create a default ApplicationContext instance, you may need a custom ApplicationContextFactory", var2);

    }

};
总结:createApplicationContext()方法中创建了容器,但是还没有将bean注入到容器中。
(5.3)step into 进入 refreshContext(context) 方法中:
//springApplication.java

private void refreshContext(ConfigurableApplicationContext context) {

    if (this.registerShutdownHook) {

        shutdownHook.registerApplicationContext(context);

    }

    this.refresh(context);//核心,真正执行相关任务

}
(5.4)在this.refresh(context);这一步进入下一层:
//springApplication.java

protected void refresh(ConfigurableApplicationContext applicationContext) {

    applicationContext.refresh();

}
(5.5)继续进入下一层:
protected void refresh(ConfigurableApplicationContext applicationContext) {

    applicationContext.refresh();

}
(5.6)继续进入下一层:
//ServletWebServerApplicationContext.java

public final void refresh() throws BeansException, IllegalStateException {

    try {

        super.refresh();

    } catch (RuntimeException var3) {

        WebServer webServer = this.webServer;

        if (webServer != null) {

            webServer.stop();

        }

        throw var3;

    }

}
(5.7)在super.refresh();这一步进入下一层:
//AbstractApplicationContext.java

@Override

public void refresh() throws BeansException, IllegalStateException {

   synchronized (this.startupShutdownMonitor) {

      StartupStep contextRefresh = this.applicationStartup.start("spring.context.refresh");

     ...

      try {

        ...

         // Initialize other special beans in specific context subclasses.

         //在上下文的子类初始化指定的bean

         onRefresh(); //当父类完成通用的工作后,再重新用动态绑定机制回到子类

        ...

      }

      catch (BeansException ex) {...}

      finally {...}

   }

}
(5.8)在onRefresh();这一步step into,会重新返回上一层:
//ServletWebServerApplicationContext.java

protected void onRefresh() {

    super.onRefresh();

    try {

        this.createWebServer();//创建一个webserver,可以理解成创建我们指定的web服务-Tomcat

    } catch (Throwable var2) {

        throw new ApplicationContextException("Unable to start web server", var2);

    }

}
(5.9)在this.createWebServer();这一步step into:
//ServletWebServerApplicationContext.java

private void createWebServer() {

    WebServer webServer = this.webServer;

    ServletContext servletContext = this.getServletContext();

    if (webServer == null && servletContext == null) {

        StartupStep createWebServer = this.getApplicationStartup().start("spring.boot.webserver.create");

        ServletWebServerFactory factory = this.getWebServerFactory();

        createWebServer.tag("factory", factory.getClass().toString());

        this.webServer = factory.getWebServer(new ServletContextInitializer[]{this.getSelfInitializer()});//使用TomcatServletWebServerFactory创建一个TomcatWebServer

        createWebServer.end();

        this.getBeanFactory().registerSingleton("webServerGracefulShutdown", new WebServerGracefulShutdownLifecycle(this.webServer));

        this.getBeanFactory().registerSingleton("webServerStartStop", new WebServerStartStopLifecycle(this, this.webServer));

    } else if (servletContext != null) {

        try {

            this.getSelfInitializer().onStartup(servletContext);

        } catch (ServletException var5) {

            throw new ApplicationContextException("Cannot initialize servlet context", var5);

        }

    }

    this.initPropertySources();

}
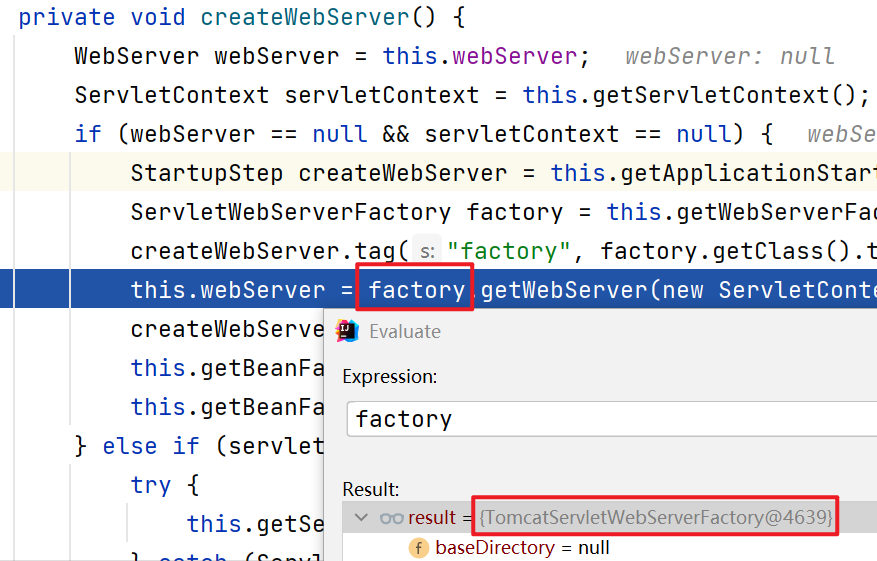
(5.10)在this.webServer = factory.getWebServer(new ServletContextInitializer[]{this.getSelfInitializer()});这一步step into:
//TomcatServletWebServerFactory.java会创建Tomcat,并启动Tomcat

public WebServer getWebServer(ServletContextInitializer... initializers) {

    if (this.disableMBeanRegistry) {

        Registry.disableRegistry();

    }

    Tomcat tomcat = new Tomcat();//创建了Tomcat对象,下面是一系列的初始化任务

    File baseDir = this.baseDirectory != null ? this.baseDirectory : this.createTempDir("tomcat");

    tomcat.setBaseDir(baseDir.getAbsolutePath());

    Connector connector = new Connector(this.protocol);

    connector.setThrowOnFailure(true);

    tomcat.getService().addConnector(connector);

    this.customizeConnector(connector);

    tomcat.setConnector(connector);

    tomcat.getHost().setAutoDeploy(false);

    this.configureEngine(tomcat.getEngine());

    Iterator var5 = this.additionalTomcatConnectors.iterator();

    while(var5.hasNext()) {

        Connector additionalConnector = (Connector)var5.next();

        tomcat.getService().addConnector(additionalConnector);

    }

    this.prepareContext(tomcat.getHost(), initializers);

    return this.getTomcatWebServer(tomcat);

}
(5.11)在return this.getTomcatWebServer(tomcat);这一步step into:
//TomcatServletWebServerFactory.java

//这里做了端口校验,创建了TomcatWebServer

protected TomcatWebServer getTomcatWebServer(Tomcat tomcat) {

    return new TomcatWebServer(tomcat, this.getPort() >= 0, this.getShutdown());

}
(5.12)继续step into进入下一层
//TomcatServletWebServerFactory.java

public TomcatWebServer(Tomcat tomcat, boolean autoStart, Shutdown shutdown) {

    this.monitor = new Object();

    this.serviceConnectors = new HashMap();

    Assert.notNull(tomcat, "Tomcat Server must not be null");

    this.tomcat = tomcat;

    this.autoStart = autoStart;

    this.gracefulShutdown = shutdown == Shutdown.GRACEFUL ? new GracefulShutdown(tomcat) : null;

    this.initialize();//进行初始化,并启动tomcat

}
(5.13)this.initialize();继续step into:
//TomcatServletWebServerFactory.java

private void initialize() throws WebServerException {

    logger.info("Tomcat initialized with port(s): " + this.getPortsDescription(false));

    synchronized(this.monitor) {

        try {

            this.addInstanceIdToEngineName();

            Context context = this.findContext();

            context.addLifecycleListener((event) -> {

                if (context.equals(event.getSource()) && "start".equals(event.getType())) {

                    this.removeServiceConnectors();

                }

            });

            this.tomcat.start();//启动Tomcat!

            this.rethrowDeferredStartupExceptions();

            try {

                ContextBindings.bindClassLoader(context, context.getNamingToken(), this.getClass().getClassLoader());

            } catch (NamingException var5) {

            }

            this.startDaemonAwaitThread();

        } catch (Exception var6) {

            this.stopSilently();

            this.destroySilently();

            throw new WebServerException("Unable to start embedded Tomcat", var6);

        }

    }

}
(6)一路返回上层,然后终于执行完refreshContext(context)方法,此时context为已经注入了bean
day03-分析SpringBoot底层机制的更多相关文章
- 深入springboot原理——一步步分析springboot启动机制(starter机制)
前言 使用过springboot的同学应该已经知道,springboot通过默认配置了很多框架的使用方式帮我们大大简化了项目初始搭建以及开发过程.本文的目的就是一步步分析springboot的启动过程 ...
- SpringBoot原理—分析SpringBoot启动机制(starter机制)
一:前言使用过springboot的同学应该已经知道,springboot通过默认配置了很多框架的使用方式帮我们大大简化了项目初始搭建以及开发过程.本文的目的就是一步步分析springboot的启动过 ...
- 五大理由分析Springboot 2.0为什么选择HikariCP
五大理由分析Springboot 2.0为什么选择HikariCP 2018-05-04 工匠小猪猪 占小狼的博客 本文非原创,是工匠小猪猪的技术世界搜集了一些HikariCP相关的资料整理给大家的介 ...
- SpringBoot源码篇:深度分析SpringBoot如何省去web.xml
一.前言 从本博文开始,正式开启Spring及SpringBoot源码分析之旅.这可能是一个漫长的过程,因为本人之前阅读源码都是很片面的,对Spring源码没有一个系统的认识.从本文开始我会持续更新, ...
- day12-实现Spring底层机制-02
实现Spring底层机制-02 3.实现任务阶段1 3.1知识拓展-类加载器 Java的类加载器有三种: Bootstrap类加载器 ----- 对应路径 jre/lib Ext类加载器 ----- ...
- day13-实现Spring底层机制-03
实现Spring底层机制-03 7.实现任务阶段5 7.1分析 阶段5目标:bean后置处理器的实现 7.2代码实现 新增: 1.创建 InitializingBean 接口,实现该接口的 Bean ...
- day05-SpringMVC底层机制简单实现-01
SpringMVC底层机制简单实现-01 主要完成:核心分发控制器+Controller和Service注入容器+对象自动装配+控制器方法获取参数+视图解析+返回JSON格式数据 1.搭建开发环境 创 ...
- day07-SpringMVC底层机制简单实现-03
SpringMVC底层机制简单实现-03 https://github.com/liyuelian/springmvc-demo.git 7.任务6-完成控制器方法获取参数-@RequestParam ...
- day08-SpringMVC底层机制简单实现-04
SpringMVC底层机制简单实现-04 https://github.com/liyuelian/springmvc-demo.git 8.任务7-完成简单视图解析 功能说明:通过目标方法返回的 S ...
- 【Zookeeper】源码分析之Watcher机制(二)
一.前言 前面已经分析了Watcher机制中的第一部分,即在org.apache.zookeeper下的相关类,接着来分析org.apache.zookeeper.server下的WatchManag ...
随机推荐
- 苹果iOS的应用移除主屏幕及恢复找回
昨天刷到一个苹果iOS系统更换微信图标的,然后就添加了一个,发现那个记录通知数字问题,想恢复回来,所以就有了此文. https://www.cnblogs.com/lzhdim/p/17909867. ...
- CentOS7.6离线升级docker20
本周研发反馈系统升级失败,是因为docker版本太低,需要升级docker20.由于安装系统的服务器没有联网,所以无法在线升级.所以我找了一台联网的CentOS7.6的服务器,下载了docker20和 ...
- [JVM] JVM的类加载机制
JVM的类加载 首先我们来看下Java虚拟机的类加载过程: 如上图. 当JVM需要用到某个类的时候,虚拟机会加载它的 .class 文件.加载了相关的字节码信息之后,会常见对应的 Class 对象,这 ...
- axios.delete传参,400错误
我在使用axios.delete进行传参的时候,发现会报400错误 后端代码(C#) 前端代码 这样的参数请求会报400错误 后端就一个参数,前端发一个id为什么接受不到呢? 在网上找了半天,终于明白 ...
- MyBatis Interceptor
MyBatis的拦截器可以用于在以下对象及方法中拦截修改: Executor (update, query, flushStatements, commit, rollback, getTransac ...
- 【Unity3D】UGUI之Text
1 Text 简介 UGUI概述 中介绍了Canvas 渲染模式.RectTransform 组件.锚点(Anchor)等,本文将介绍 UGUI 中的 Text 控件. 在 Hierarchy ...
- Widget模式
Widget模式 Widget模式是指借用Web Widget思想将页面分解成组件,针对部件开发,最终组合成完整的页面,Web Widget指的是一块可以在任意页面中执行的代码块,Widget模式不属 ...
- 多线程系列(四) -volatile关键字使用详解
一.简介 在上篇文章中,我们介绍到在多线程环境下,如果编程不当,可能会出现程序运行结果混乱的问题. 出现这个原因主要是,JMM 中主内存和线程工作内存的数据不一致,以及多个线程执行时无序,共同导致的结 ...
- Vue+SpringBoot+ElementUI实战学生管理系统-8.班级管理模块
1.章节介绍 前一篇介绍了专业管理模块,这一篇编写班级管理模块,需要的朋友可以拿去自己定制.:) 2.获取源码 源码是捐赠方式获取,详细请QQ联系我 :)! 3.实现效果 班级列表 修改班级 4.模块 ...
- 使用Java线程同步工具类CountDownLatch
java.util.concurrent.CountDownLatch是Java并发并发编程中的线程同步工具类,基于AQS(java.util.concurrent.locks.AbstractQue ...