
[Kaggle] dogs-vs-cats之制作数据集[1]
Step 0:导入必要的库
import tensorflow as tfimport os
Step 1:获取图片文件名以及对应的标签
首先是读取给定路径下所有图片的名称以及对应的标签。os.listdir(file_dir)可以列出file_dir路径下所有文件名;str.split(sep='.')将字符串str以点(.)分割。
# you need to change this to your data directory

train_dir = 'E:\\data\\Dog_Cat\\train\\'#Windows

#train_dir = '/home/kevin/tensorflow/cats_vs_dogs/data/train/'#linux

#获取给定路径下图片名及其对应的标签

def get_files(file_dir):

    '''

    Args:

        file_dir: file directory

    Returns:

        list of images and labels

    '''

    images=[]

    labels=[]

    for file in os.listdir(file_dir):

        name = file.split(sep='.')

        if name[0]=='cat':

            images.append(file_dir + file)

            labels.append(0)

        else:

            images.append(file_dir + file)

            labels.append(1)

    return images, labels
step3:分批次读取图片
由于图片数量太多,如果一次性将全部图片读入内存的话,可能会造成内存不够用的情况,因此需要分批次地将图片读入内存中。我们可以利用tensorflow的tf.train.slice_input_producer函数,利用队列的思想实现。
def get_batch(image, label, image_W, image_H, batch_size, capacity):

    '''

    Args:

        image: list type

        label: list type

        image_W: image width

        image_H: image height

        batch_size: batch size

        capacity: the maximum elements in queue

    Returns:

        image_batch: 4D tensor [batch_size, width, height, 3], dtype=tf.float32

        label_batch: 1D tensor [batch_size], dtype=tf.int32

    '''

    #将python的list数据类型转换为tensorflow的数据类型

    #image = tf.cast(image, tf.string)

    #label = tf.cast(label, tf.int32)

    image = tf.convert_to_tensor(image, dtype=tf.string)

    label = tf.convert_to_tensor(label, dtype=tf.int32)

    # make an input queue  生成一个队列,shuffle=True即将图片打乱放入队列中

    input_queue = tf.train.slice_input_producer([image, label],shuffle=True)

    label = input_queue[1] #获取label对应的队列

    image_contents = tf.read_file(input_queue[0])#读取图片

    image = tf.image.decode_jpeg(image_contents, channels=3)#解码jpg格式图片

    ######################################

    # data argumentation should go to here

    ######################################

    #图片resize

    image = tf.image.resize_image_with_crop_or_pad(image, image_W, image_H)

    # if you want to test the generated batches of images, you might want to comment the following line.

    # 如果想看到正常的图片,请注释掉111行(标准化)和 126行(image_batch = tf.cast(image_batch, tf.float32))

    # 训练时不要注释掉!

    #数据标准化

    image = tf.image.per_image_standardization(image)

    #Creates batches of tensors in tensors.

    image_batch, label_batch = tf.train.batch([image, label],

                                                batch_size= batch_size,

                                                num_threads= 2, #线程数设置

                                                capacity = capacity) #队列中最多能容纳的元素

    #you can also use shuffle_batch

#    image_batch, label_batch = tf.train.shuffle_batch([image,label],

#                                                      batch_size=BATCH_SIZE,

#                                                      num_threads=64,

#                                                      capacity=CAPACITY,

#                                                      min_after_dequeue=CAPACITY-1)

    image_batch = tf.cast(image_batch, tf.float32)

    return image_batch, label_batch
首先,我们需要先把image和label转换成tensorflow的tensor相关数据类型;其次,我们需要将images和labels放入队列中,需要注意的是要设置shuffle=True将顺序打乱(默认shuffle=True)。然后通过tf.read_file和tf.image.decode_jpeg函数读取图片已经将其进行解码。接下来就是重新调整图片大小(通过crop或者pad的方式实现)和将图像归一化。最后就是利用tf.train.batch读取队列中batch_size个数的图像及其对应的标签。
测试:
接下来就是测试上面写的代码是否正确。
import matplotlib.pyplot as plt

BATCH_SIZE = 4

CAPACITY = 256

#图片resize后的大小

IMG_W = 208

IMG_H = 208

#train_dir = '/home/kevin/tensorflow/cats_vs_dogs/data/train/'

train_dir = 'E:\\data\\Dog_Cat\\train\\'

image_list, label_list = get_files(train_dir)

image_batch, label_batch = get_batch(image_list, label_list, IMG_W, IMG_H, BATCH_SIZE, CAPACITY)

with tf.Session() as sess:#在会话中运行程序

    i = 0

    coord = tf.train.Coordinator()#线程协调者

    threads = tf.train.start_queue_runners(coord=coord)

    try:

        #        Check if stop was requested.

        while not coord.should_stop() and i<1:

            img, label = sess.run([image_batch, label_batch])

            print(img[0,:,:,:])

            # just test one batch

            for j in range(BATCH_SIZE):

                print('label: %d' %label[j])

                plt.imshow(img[j,:,:,:])

                plt.show()

            i+=1

    except tf.errors.OutOfRangeError:#当读取完列队中所有数据时,抛出异常

        print('done!')

    finally:

        #Request that the threads stop.After this is called, calls to should_stop() will return True.

        coord.request_stop()

    coord.join(threads)
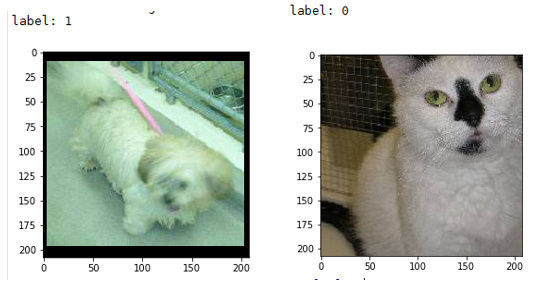
首先是一些参数的设置,然后通过get_files和get_batch建立等下需要运行的Graph。由于读取图片时,涉及到队列已经多线程,因此需要tf.train.Coordinator来产生一个线程协调者,主要作用是协调线程是否终止(This class implements a simple mechanism to coordinate the termination of a set of threads.),更详细的用法可以参考下文的函数介绍和官网的说明。然后调用tf.train.start_queue_runners来启动之前定义好的Graph中所有的线程。
最后的效果:
函数注释:
1)np.hstack:
函数原型:numpy.hstack(tup)
tup可以是python中的元组(tuple)、列表(list),或者numpy中数组(array),函数作用是将tup在水平方向上(按列顺序)合并。
举例:
a=[1,2,3]

b=[4,5,6]

print(np.hstack((a,b)))

输出:[1 2 3 4 5 6 ]
2)transpose()
函数原型:numpy.transpose(a, axes=None)
作用:将输入的array转置,并返回转置后的array
举例:
>>> x = np.arange(4).reshape((2,2))

>>> x

array([[0, 1],

       [2, 3]])

>>> np.transpose(x)

array([[0, 2],

       [1, 3]])
注:
image_list = ["D:\\1.jpg","D:\\2.jpg","D:\\3.jpg"]

label_list = [1,0,1]

temp = np.array([image_list, label_list])

print(temp)

#输出:

#[['D:\\1.jpg' 'D:\\2.jpg' 'D:\\3.jpg']

# ['1' '0' '1']]

temp = temp.transpose()

print(temp)

#输出:

#[['D:\\1.jpg' '1']

# ['D:\\2.jpg' '0']

# ['D:\\3.jpg' '1']]

np.random.shuffle(temp)

print(temp)

#输出:

#[['D:\\2.jpg' '0']

# ['D:\\1.jpg' '1']

# ['D:\\3.jpg' '1']]
3)tf.cast
cast(

    x,

    dtype,

    name=None

)
将x转换为dtype数据类型的张量。
举例:
x = tf.constant([1.8, 2.2], dtype=tf.float32)

tf.cast(x, tf.int32)  # [1, 2], dtype=tf.int32
4)tf.train.slice_input_producer
slice_input_producer(
tensor_list,
num_epochs=None,
shuffle=True,
seed=None,
capacity=32,
shared_name=None,
name=None
)
Produces a slice of each Tensor in tensor_list.
Implemented using a Queue -- a QueueRunner for the Queue is
added to the current Graph's QUEUE_RUNNERcollection.
Args:
- tensor_list: A list of Tensor objects. Every Tensor in tensor_list must
have the same size in the first dimension. - num_epochs: An integer (optional). If specified, slice_input_producer produces
each slice num_epochs times before generating an OutOfRange error.
If not specified, slice_input_producer can cycle through the
slices an unlimited number of times. - shuffle: Boolean. If true, the integers are randomly shuffled within each
epoch. - seed: An integer (optional). Seed used if shuffle == True.
- capacity: An integer. Sets the queue capacity.
- shared_name: (optional). If set, this queue will be shared under the given name
across multiple sessions. - name: A name for the operations (optional).
Returns:
A list of tensors, one for each element of tensor_list. If the tensor
in tensor_list has shape [N, a, b, .., z], then the
corresponding output tensor will have shape [a, b, ..., z].
Raises:
- ValueError: if slice_input_producer produces nothing from tensor_list.
简单说来,就是生成一个队列,该队列的容量为capacity。
5)tf.read_file
作用:读取输入文件的内容并输出
6)tf.image.decode_jpeg
作用:将JPEG格式编码的图片解码成uint8数据类型的tensor。
7)tf.image.resize_image_with_crop_or_pad
resize_image_with_crop_or_pad(

    image,

    target_height,

    target_width

)
将图片大小调整为target_height和target_width大小。若原图像比较大,则以中心点为裁剪。若原图像比较小,则在短边补零,使得大小为target_height和target_width。
8)tf.image.per_image_standardization
线性尺度变化,使得原图像具有零均值,单位范数( zero mean and unit norm)。
也就是计算(x - mean) / adjusted_stddev,其中mean是图像中所有像素的平均值,adjusted_stddev = max(stddev, 1.0/sqrt(image.NumElements()))。
adjusted_stddev是图像中所有像素的标准差,max作用为防止stddev的值为0。
9)tf.train.batch
batch(

    tensors,

    batch_size,

    num_threads=1,

    capacity=32,

    enqueue_many=False,

    shapes=None,

    dynamic_pad=False,

    allow_smaller_final_batch=False,

    shared_name=None,

    name=None

)
作用:Creates batches of tensors in tensors.即从输入的tensors获取batch_size大小的数据。
该函数是利用队列实现的。因此在使用的时候需要使用QueueRunner启动队列。
10)tf.train.Coordinator()
作用:线程协调者
任意一个线程可以调用coord.request_stop()来使所有线程停止。为了达到这一目的,每个线程必须定期检查coord.should_stop()。只要coord.request_stop()一被调用,那么coord.should_stop()马上返回True。
因此,一个典型的 thread running with a coordinator如下:
while not coord.should_stop():

  ...do some work...
11)tf.train.start_queue_runners
作用:启动graph中所有的队列。
说明:
代码来自:https://github.com/kevin28520/My-TensorFlow-tutorials,略有修改
函数作用主要参考tensorflow官网。https://www.tensorflow.org/versions/master/api_docs/
本文中修改后的代码可以在这里下载:https://github.com/hjl240/dog_vs_cat
[Kaggle] dogs-vs-cats之制作数据集[1]的更多相关文章
- 从零开始制作数据集所需要的所有python脚本
最近一直在做图片数据集,积累了很多心得.我把我所使用的python脚本全部拿出来,当然这些脚本大部分网上都有,只不过比较分散. 我已经把所有代码上传到github上,觉得写的好的话,请给我一个star ...
- pytorch 读数据接口 制作数据集 data.dataset
[吐槽] 啊,代码,你这个大猪蹄子 自己写了cifar10的数据接口,跟官方接口load的数据一样, 沾沾自喜,以为自己会写数据接口了 几天之后,突然想,自己的代码为啥有点慢呢,这数据集不大啊 用了官 ...
- pytorch人脸识别——自己制作数据集
这是一篇面向新手的博文:因为本人也是新手,记录一下自己在做这个项目遇到的大大小小的坑. 按照下面的例子写就好了 import torch as t from torch.utils import da ...
- [Machine Learning] 国外程序员整理的机器学习资源大全
本文汇编了一些机器学习领域的框架.库以及软件(按编程语言排序). 1. C++ 1.1 计算机视觉 CCV —基于C语言/提供缓存/核心的机器视觉库,新颖的机器视觉库 OpenCV—它提供C++, C ...
- Machine and Deep Learning with Python
Machine and Deep Learning with Python Education Tutorials and courses Supervised learning superstiti ...
- 迁移学习——使用Tensorflow和VGG16预训模型进行预测
使用Tensorflow和VGG16预训模型进行预测 from:https://zhuanlan.zhihu.com/p/28997549 fast.ai的入门教程中使用了kaggle: dogs ...
- Kaggle系列1:手把手教你用tensorflow建立卷积神经网络实现猫狗图像分类
去年研一的时候想做kaggle上的一道题目:猫狗分类,但是苦于对卷积神经网络一直没有很好的认识,现在把这篇文章的内容补上去.(部分代码参考网上的,我改变了卷积神经网络的网络结构,其实主要部分我加了一层 ...
- [Kaggle] dogs-vs-cats之模型训练
上一步建立好模型之后,现在就可以训练模型了. 主要代码如下: import sys #将当期路径加入系统path中 sys.path.append("E:\\CODE\\Anaconda\\ ...
- caffe 图片数据的转换成lmdb和数据集均值(转)
转自网站: http://blog.csdn.net/muyiyushan/article/details/70578077 1.准备数据 使用dog/cat数据集,在训练项目根目录下分别建立trai ...
随机推荐
- Linux使用ssh公钥实现免批量分发管理服务器
ssh 无密码登录要使用公钥与私钥.linux下可以用用ssh-keygen生成公钥/私钥对,下面我以CentOS为例. 管理机器外网IP10.0.0.61(内网172.16.1.61) 服务器外网1 ...
- SpringBoot中MongoDB注解概念及使用
spring-data-mongodb主要有以下注解 @Id 主键,不可重复,自带索引,可以在定义的列名上标注,需要自己生成并维护不重复的约束.如果自己不设置@Id主键,mongo会自动生成一个唯一主 ...
- npm scripts 使用指南
转载自:http://www.ruanyifeng.com/blog/2016/10/npm_scripts.html Node 开发离不开 npm,而脚本功能是 npm 最强大.最常用的功能之一. ...
- 模拟select选中option的效果
大致情况如下:网页上有一个表单,表单中有一个select类型的控件,我要选择option后,表单相对应的input部分会option自动填充选中数据. 我想要的是:实现一个网页上的效果,在这个页面被打 ...
- 【Python】 hash值计算 hashlib & hmac
hashlib & hmac *不是很清楚能不能把这种hash值取样算法称之为加密,但是似乎好像也是这么说的哈(非科班出身的野路子就是没这种基本知识的) ■ 基本用法 hashlib支持MD5 ...
- iOS scrollView中嵌套多个tabeleView处理方案
项目中经常会有这样的需求,scrollView有个头部,当scrollView滚动的时候头部也跟着滚动,同时头部还有一个tab会锁定在某个位置,scrollView中可以放很多不同的view,这些vi ...
- docker 学习之一:docker 安装
核心概念1. 镜像是一个只读的模板类似于安装系统用到的那个iso文件我们通过镜像来完成各种应用的部署. 2. docker容器镜像类似于操作系统而容器类似于虚拟机本身.它可以被启动.开始.停止.删除等 ...
- 转载:解决微信OAuth2.0网页授权回调域名只能设置一个的问题
项目地址:https://github.com/HADB/GetWeixinCode 说明:微信项目很多,但是回调域名有限,经常使用,做个笔记. 解决微信OAuth2.0网页授权只能设置一个回调域名的 ...
- oracle帐号scott被锁定如何解锁
具体操作步骤如下: C:> sqlplus 请输入用户名:sys 输入口令:sys as sysdba //注意:在口令这里输入 的密码后面必须要跟上 as sysdba 才可以. ...
- 2018年3月份的PTA(一)
写程序证明p++等价于(p)++还是等价于(p++)? 由程序说明p++等价于(p)++,因为(p++)在程序中是没有地址的,而输出中p++和(p)++的地址不同是由于在线C语言开发环境地址是动态的 ...