UITableView简述
原帖:http://blog.csdn.net/totogo2010/article/details/7642908
Table View简单描述:
在iPhone和其他iOS的很多程序中都会看到Table View的出现,除了一般的表格资料展示之外,设置的属性资料往往也用到Table View,Table View主要分为以下两种:

- Plain:这是普通的列表风格
- Grouped :这是分块风格。
 :
:
1、新建项目
- #import <UIKit/UIKit.h>
- @interface ViewController : UIViewController<UITableViewDelegate, UITableViewDataSource>
- @property (strong, nonatomic) NSArray *list;
- @end
5、打开.m文件,添加:
- @synthesize list = _list;

这是发现有两个警告,提示未完成的实现,这提示的是UITableViewDelegate, UITableViewDataSource这个两个头文件里的协议的方法未实现。待会我们去实现它。
- - (void)viewDidLoad
- {
- [super viewDidLoad];
- // Do any additional setup after loading the view, typically from a nib.
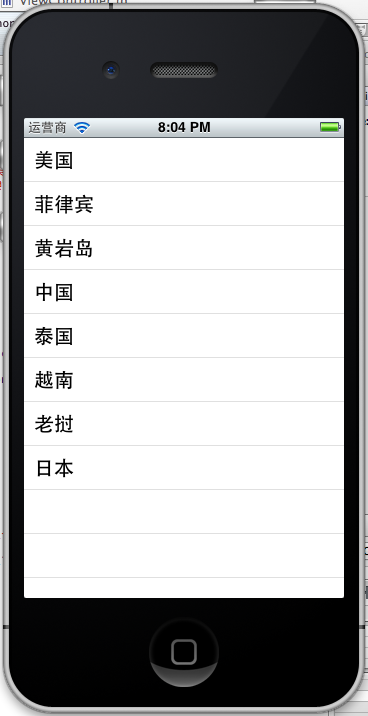
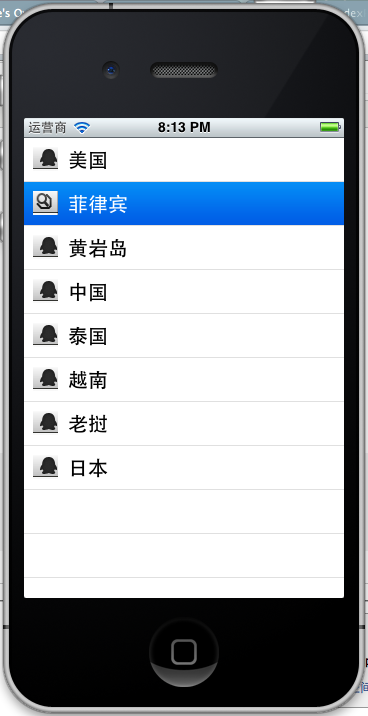
- NSArray *array = [[NSArray alloc] initWithObjects:@"美国", @"菲律宾",
- @"黄岩岛", @"中国", @"泰国", @"越南", @"老挝",
- @"日本" , nil];
- self.list = array;
- }
- - (void)viewDidUnload
- {
- [super viewDidUnload];
- // Release any retained subviews of the main view.
- self.list = nil;
- }
7、生成row
- - (UITableViewCell *)tableView:(UITableView *)tableView
- cellForRowAtIndexPath:(NSIndexPath *)indexPath {
- static NSString *TableSampleIdentifier = @"TableSampleIdentifier";
- UITableViewCell *cell = [tableView dequeueReusableCellWithIdentifier:
- TableSampleIdentifier];
- if (cell == nil) {
- cell = [[UITableViewCell alloc]
- initWithStyle:UITableViewCellStyleDefault
- reuseIdentifier:TableSampleIdentifier];
- }
- NSUInteger row = [indexPath row];
- cell.textLabel.text = [self.list objectAtIndex:row];
- return cell;
- }
UITableViewCell *cell = [tableView dequeueReusableCellWithIdentifier: TableSampleIdentifier];
这个语句根据标识符TableSampleIdentifier寻找当前可以重用的UITableViewCell。当某行滑出当前可见区域后,我们重用它所对应的UITableViewCell对象,那么就可以节省内存和资源。
注意参数(NSIndexPath *)indexPath,它将行号row和部分号section合并了,通过[indexPath row];获取行号。之后给cell设置其文本:
cell.textLabel.text = [self.list objectAtIndex: row];
8、现在一个简单的TableView就弄好看,运行下看效果
 、、
、、- NSUInteger row = [indexPath row];
- cell.textLabel.text = [self.list objectAtIndex:row];
- UIImage *image = [UIImage imageNamed:@"qq"];
- cell.imageView.image = image;
- UIImage *highLighedImage = [UIImage imageNamed:@"youdao"];
- cell.imageView.highlightedImage = highLighedImage;
- return cell;
效果如下:
UITableViewCellStyleDefault
UITableViewCellStyleSubtle
UITableViewCellStyleValue1
UITableViewCellStyleValue2
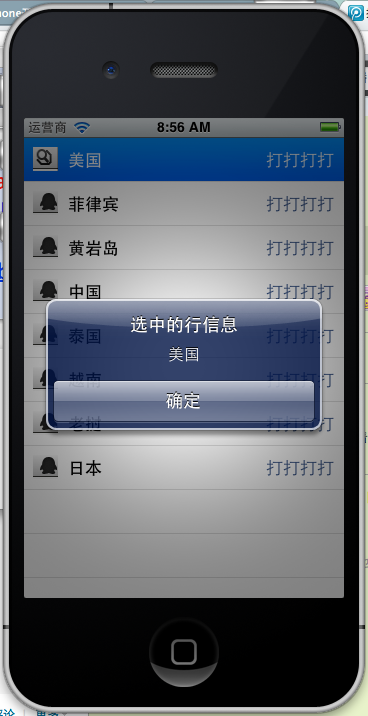
cell.detailTextLabel.text =@"打打打打";
return cell;

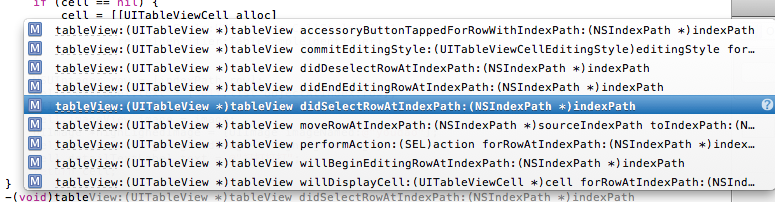
-(void)tableView:(UITableView *)tableView didSelectRowAtIndexPath:(NSIndexPath *)indexPath
选中是做个提示,提示选中了那个信息,代码实现如下:
- -(void)tableView:(UITableView *)tableView didSelectRowAtIndexPath:(NSIndexPath *)indexPath{
- NSString *rowString = [self.list objectAtIndex:[indexPath row]];
- UIAlertView * alter = [[UIAlertView alloc] initWithTitle:@"选中的行信息" message:rowString delegate:self cancelButtonTitle:@"确定" otherButtonTitles:nil, nil];
- [alter show];
- }
效果:
UITableView简述的更多相关文章
- 给iOS开发新手送点福利,简述UITableView的属性和用法
UITableView UITableView内置了两种样式:UITableViewStylePlain,UITableViewStyleGrouped <UITableViewDataSo ...
- iOS UITableView 与 UITableViewController
很多应用都会在界面中使用某种列表控件:用户可以选中.删除或重新排列列表中的项目.这些控件其实都是UITableView 对象,可以用来显示一组对象,例如,用户地址薄中的一组人名.项目地址. UITab ...
- UITableView(二)
#import "ViewController.h" @interface ViewController () @end @implementation ViewControlle ...
- 简述 OAuth 2.0 的运作流程
本文将以用户使用 github 登录网站留言为例,简述 OAuth 2.0 的运作流程. 假如我有一个网站,你是我网站上的访客,看了文章想留言表示「朕已阅」,留言时发现有这个网站的帐号才能够留言,此时 ...
- JavaScript单线程和浏览器事件循环简述
JavaScript单线程 在上篇博客<Promise的前世今生和妙用技巧>的开篇中,我们曾简述了JavaScript的单线程机制和浏览器的事件模型.应很多网友的回复,在这篇文章中将继续展 ...
- iOS: 在UIViewController 中添加Static UITableView
如果你直接在 UIViewController 中加入一个 UITableView 并将其 Content 属性设置为 Static Cells,此时 Xcode 会报错: Static table ...
- iOS 编辑UITableView(根据iOS编程编写)
上个项目我们完成了 JXHomepwner 简单的应用展示,项目地址.本节我们需要在上节项目基础上,增加一些响应用户操作.包括添加,删除和移动表格. 编辑模式 UITableView 有一个名为 e ...
- Design Patterns Simplified - Part 3 (Simple Factory)【设计模式简述--第三部分(简单工厂)】
原文链接:http://www.c-sharpcorner.com/UploadFile/19b1bd/design-patterns-simplified-part3-factory/ Design ...
- 使用Autolayout实现UITableView的Cell动态布局和高度动态改变
本文翻译自:stackoverflow 有人在stackoverflow上问了一个问题: 1 如何在UITableViewCell中使用Autolayout来实现Cell的内容和子视图自动计算行高,并 ...
随机推荐
- spring注解没起作用
本文为博主原创,未经允许,不得转载: 今天在写一个功能的时候,用的是springMVC的注解,当整个的功能写完在调试的时候, 从浏览器请求一直请求不到,仔细检查代码的时候也没检查出逻辑的问题,关键的问 ...
- Ubuntu 14.04 python3.6 安装
参考 how-do-i-install-python-3-6-using-apt-get Ubuntu 14.04 python3.6 安装 sudo add-apt-repository ppa:j ...
- hdu 6020 MG loves apple 恶心模拟
题目链接:点击传送 MG loves apple Time Limit: 3000/1500 MS (Java/Others) Memory Limit: 262144/262144 K (Ja ...
- 转载:理解RESTful架构
http://www.ruanyifeng.com/blog/2011/09/restful.html 越来越多的人开始意识到,网站即软件,而且是一种新型的软件. 这种"互联网软件" ...
- 解决Resource doesn't have a corresponding Go package.问题
首先上图 这个报错主要是程序要启动没有入口的原因,package main下边的mian方法才是一个程序的入口.这就要 修改目录结构如下图修改并运行就可以了
- jsonSchema
可参考http://www.cnblogs.com/chenmo-xpw/p/5818773.html 我的理解 jsonSchema最大的用途是去定义和校验json数据,相当于一种json数据的一种 ...
- smarty课程---smarty3的安装和使用
smarty课程---smarty3的安装和使用 一.总结 一句话总结:smarty 是什么,就不多说了,用过php,接触过php的人都对smarty 再熟悉不过了.它是一个很强大的代码分离软件,作为 ...
- CentOS Redhat Linux安装 Oracle Client 的注意点
1) 安装文件要拷贝到本地文件系统执行 2) 虽然不知道 libXmu是什么,但是安装之后,关联包安装了许多,感觉很省心 yum install libXmu.i686 3) 还有找不到的包的话,用 ...
- Python装饰器、生成器、内置函数、json
这周学习了装饰器和生成器,写下博客,记录一下装饰器和生成器相关的内容. 一.装饰器 装饰器,这个器就是函数的意思,连起来,就是装饰函数,装饰器本身也是一个函数,它的作用是用来给其他函数添加新功能,比如 ...
- SPFA 最短路
求单源最短路的SPFA算法的全称是:Shortest Path Faster Algorithm. SPFA算法是西南交通大学段凡丁于1994年发表的. 从名字我们就可以看出,这种算法在 ...