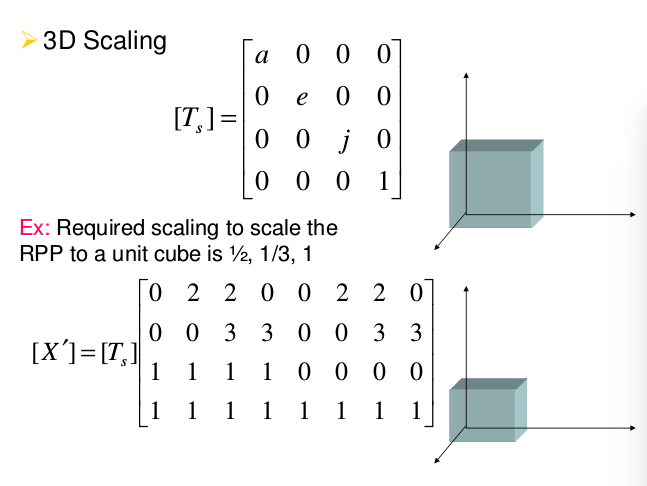
PCL点云变换与移除NaN
对点云的操作可以直接应用变换矩阵,即旋转,平移,尺度,3D的变换就是要使用4*4 的矩阵,例如:


等等模型
在这里直接使用程序开实现一个点云的旋转,新建文件matrix.cpp
#include <iostream> #include <pcl/io/pcd_io.h>
#include <pcl/io/ply_io.h>
#include <pcl/point_cloud.h>
#include <pcl/console/parse.h>
#include <pcl/common/transforms.h>
#include <pcl/visualization/pcl_visualizer.h>
// 命令行的帮助提示
void showHelp(char * program_name)
{
std::cout << std::endl;
std::cout << "Usage: " << program_name << " cloud_filename.[pcd|ply]" << std::endl;
std::cout << "-h: Show this help." << std::endl;
} int main (int argc, char** argv)
{
if (pcl::console::find_switch (argc, argv, "-h") || pcl::console::find_switch (argc, argv, "--help")) {
showHelp (argv[]);
return ;
}
// 读取文件
std::vector<int> filenames;
bool file_is_pcd = false;
filenames = pcl::console::parse_file_extension_argument (argc, argv, ".ply");
if (filenames.size () != ) {
filenames = pcl::console::parse_file_extension_argument (argc, argv, ".pcd");
if (filenames.size () != ) {
showHelp (argv[]);
return -;
} else {
file_is_pcd = true;
}
}
//载入文件
pcl::PointCloud<pcl::PointXYZ>::Ptr source_cloud (new pcl::PointCloud<pcl::PointXYZ> ()); if (file_is_pcd) {
if (pcl::io::loadPCDFile (argv[filenames[]], *source_cloud) < ) {
std::cout << "Error loading point cloud " << argv[filenames[]] << std::endl << std::endl;
showHelp (argv[]);
return -;
}
} else {
if (pcl::io::loadPLYFile (argv[filenames[]], *source_cloud) < ) {
std::cout << "Error loading point cloud " << argv[filenames[]] << std::endl << std::endl;
showHelp (argv[]);
return -;
}
} /* Reminder: how transformation matrices work : |-------> This column is the translation
| 1 0 0 x | \
| 0 1 0 y | }-> The identity 3x3 matrix (no rotation) on the left
| 0 0 1 z | /
| 0 0 0 1 | -> We do not use this line (and it has to stay 0,0,0,1) METHOD #1: Using a Matrix4f
This is the "manual" method, perfect to understand but error prone !
*/
Eigen::Matrix4f transform_1 = Eigen::Matrix4f::Identity(); // Define a rotation matrix 定义旋转的角度 再有角度计算出旋转矩阵
float theta = M_PI/; // The angle of rotation in radians
transform_1 (,) = cos (theta);
transform_1 (,) = -sin(theta);
transform_1 (,) = sin (theta);
transform_1 (,) = cos (theta);
// (row, column) // Define a translation of 2.5 meters on the x axis.
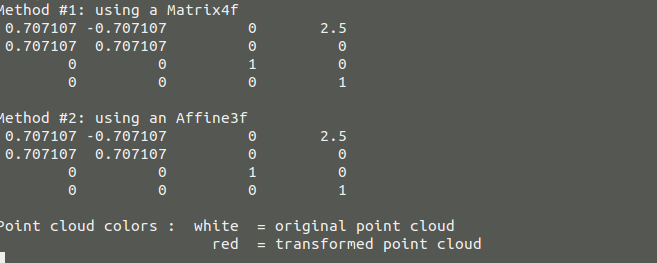
transform_1 (,) = 2.5;//意思就是在第一行第四个元素的值为2.5,也就是在x轴的平移为2.5 // Print the transformation 打印出这个变换矩阵
printf ("Method #1: using a Matrix4f\n");
std::cout << transform_1 << std::endl; /* METHOD #2: Using a Affine3f 第二种方案
This method is easier and less error prone 更简单的方案
*/
Eigen::Affine3f transform_2 = Eigen::Affine3f::Identity(); // Define a translation of 2.5 meters on the x axis.
transform_2.translation() << 2.5, 0.0, 0.0; // The same rotation matrix as before; theta radians arround Z axis
transform_2.rotate (Eigen::AngleAxisf (theta, Eigen::Vector3f::UnitZ())); // Print the transformation
printf ("\nMethod #2: using an Affine3f\n");
std::cout << transform_2.matrix() << std::endl; // Executing the transformation
pcl::PointCloud<pcl::PointXYZ>::Ptr transformed_cloud (new pcl::PointCloud<pcl::PointXYZ> ());
// 你可以使用 transform_1 或者 transform_2;效果都是一样的
pcl::transformPointCloud (*source_cloud, *transformed_cloud, transform_2); // 可视化的
printf( "\nPoint cloud colors : white = original point cloud\n"
" red = transformed point cloud\n");
pcl::visualization::PCLVisualizer viewer ("Matrix transformation example"); // 为点云设置RGB的值
pcl::visualization::PointCloudColorHandlerCustom<pcl::PointXYZ> source_cloud_color_handler (source_cloud, , , );
// We add the point cloud to the viewer and pass the color handler
viewer.addPointCloud (source_cloud, source_cloud_color_handler, "original_cloud"); pcl::visualization::PointCloudColorHandlerCustom<pcl::PointXYZ> transformed_cloud_color_handler (transformed_cloud, , , ); // Red
viewer.addPointCloud (transformed_cloud, transformed_cloud_color_handler, "transformed_cloud"); viewer.addCoordinateSystem (1.0, );
viewer.setBackgroundColor(0.05, 0.05, 0.05, ); //设置背景颜色
viewer.setPointCloudRenderingProperties (pcl::visualization::PCL_VISUALIZER_POINT_SIZE, , "original_cloud");
viewer.setPointCloudRenderingProperties (pcl::visualization::PCL_VISUALIZER_POINT_SIZE, , "transformed_cloud");
//viewer.setPosition(800, 400); // Setting visualiser window position while (!viewer.wasStopped ()) { // Display the visualiser until 'q' key is pressed
viewer.spinOnce ();
} return ;
}
编译后我们随便找一个PCD文件查看效果,也可以该程序的参数,查看不同的参数的结果
命令窗口打印的结果
可视化的结果

(2)移除 NaNs:
从传感器获得的点云可能包含几种测量误差和/或不准确。其中之一是在一些点的坐标中存在NaN(不是数)值,正如你在下面的文件中看到的那样:
# .PCD v0.7 - Point Cloud Data file format

VERSION 0.7

FIELDS x y z rgba

SIZE 4 4 4 4

TYPE F F F U

COUNT 1 1 1 1

WIDTH 640

HEIGHT 480

VIEWPOINT 0 0 0 1 0 0 0

POINTS 307200

DATA ascii

nan nan nan 10135463

nan nan nan 10398635

nan nan nan 10070692

nan nan nan 10268071

...
点云对象的成员函数有称为“is_dense()”,如果所有的点都有效的返回true是为有限值。一个NaNs表明测量传感器距离到该点的距离值是有问题的,可能是因为传感器太近或太远,或者因为表面反射。那么当存在无效点云的NaNs值作为算法的输入的时候,可能会引起很多问题,比如“"Assertion `point_representation_->isValid (point) && "Invalid (NaN, Inf) point coordinates given to radiusSearch!"' failed."”如果发生这样的错误就要移除这些点,那么下面就是为了解决移除无效点的程序
#include <pcl/io/pcd_io.h>

#include <pcl/filters/filter.h>

#include <iostream>

#include <pcl/visualization/cloud_viewer.h>

int main(int argc,char** argv)

{

if(argc !=)

 {

  std::cout <<"\tUsage: "<<argv[] <<"<input cloud> <output cloud>" <<std::endl;

  return  -;

 }

//object for string the point cloud

pcl::PointCloud<pcl::PointXYZRGBA>::Ptr cloud(new pcl::PointCloud<pcl::PointXYZRGBA>);

//read a PCDfile from disk

if(pcl::io::loadPCDFile<pcl::PointXYZRGBA>(argv[],*cloud) !=)

{

 return -;

}

//the mapping tells you to that points of the oldcloud the new ones correspond

//but we  will not use it

std::vector<int> mapping;

pcl::removeNaNFromPointCloud(*cloud, *cloud, mapping);

//pcl::removeNaNFromPointCloud(*cloud, *cloud, mapping);

//save it back

pcl::io::savePCDFileASCII(argv[],*cloud);

pcl::visualization::CloudViewer viewer(argv[]);

         viewer.showCloud(cloud);

        while (!viewer.wasStopped())

    {

        // Do nothing but wait.

    }

}
然后可以显示移除NaNs点后的可视图,

这张点云是我自己用kinect 生成的点云,在没有移除NaNs的时候可以先读取以下,显示他的点云数值在命令窗口,你会发现会有很多的NaNs的无效点,经过
移除这些点之后在read一些打印处的结果就不会存在NaNs的无效点,这样在后期的使用算法的时候就不会出现错误了。

这种方法的问题是它不会保持点云仍然是有序点云。所有的点云都存储一个“宽度”和“高度”变量。在无序点云,总数为宽度相同,而高度设置为1。在有序的点云(像从相机拍摄像传感器如Kinect或Xtion的),宽度和高度都相同的像素的图像分辨率传感器的工作。点云分布在深度图像的行中,每一个点对应一个像素。成员函数”isorganized()”如果高度大于1时返回真。
由于移除NaNs无效点会改变点云的点的数量,它不再能保持组织与原来的宽高比,所以函数将设置高度1。这不是一个大问题,只有少数的PCL的算法工作明确要求是有序的点云(大多这样情况下会使用在优化上),但你必须考虑其中的影响。
暂时就到这里了。。。。。。
微信公众号号可扫描二维码一起共同学习交流

PCL点云变换与移除NaN的更多相关文章
- PCL点云配准(1)
在逆向工程,计算机视觉,文物数字化等领域中,由于点云的不完整,旋转错位,平移错位等,使得要得到的完整的点云就需要对局部点云进行配准,为了得到被测物体的完整数据模型,需要确定一个合适的坐标系,将从各个视 ...
- PCL点云库:ICP算法
ICP(Iterative Closest Point迭代最近点)算法是一种点集对点集配准方法.在VTK.PCL.MRPT.MeshLab等C++库或软件中都有实现,可以参见维基百科中的ICP Alg ...
- PCL点云配准(2)
(1)正态分布变换进行配准(normal Distributions Transform) 介绍关于如何使用正态分布算法来确定两个大型点云之间的刚体变换,正态分布变换算法是一个配准算法,它应用于三维点 ...
- PCL中点云数据格式之间的转化
(1) 关于pcl::PCLPointCloud2::Ptr和pcl::PointCloud<pcl::PointXYZ>两中数据结构的区别 pcl::PointXYZ::PointXYZ ...
- PCL点云库中的坐标系(CoordinateSystem)
博客转载自:https://blog.csdn.net/qq_33624918/article/details/80488590 引言 世上本没有坐标系,用的人多了,便定义了坐标系统用来定位.地理坐标 ...
- Windows下安装PCL点云库
原文链接:http://blog.csdn.net/u012337034/article/details/38270109 简介: 在Windows下安装PCL点云库的方法大概有两种: ...
- Windows 8 64位系统 在VS2010 32位软件上 搭建 PCL点云库 开发环境
Windows 8 64位系统 在VS2010 32位软件上 搭建 PCL点云库 开发环境 下载PCL For windows 软件包 到这个网站下载PCL-All-In-One Installer: ...
- PCL学习之:将超声数据按照PCL点云方式发布出去
前言:基于2D激光雷达的机器人,想让它跑自动导航,众所周知有2个比较明显的缺陷,1,那就是普通的激光雷达无法对玻璃或是镜面物体有反映; 2,机器人避障时只能对某一个平面的物体有反映,超过或者低于这个平 ...
- PCL点云库:对点云进行变换(Using a matrix to transform a point cloud)
点云数据可以用ASCII码的形式存储在PCD文件中(关于该格式的描述可以参考链接:The PCD (Point Cloud Data) file format).为了生成三维点云数据,在excel中用 ...
随机推荐
- unity, Collider2D.bounds的一个坑
Note that this will be an empty bounding box if the collider is disabled or the game object is inact ...
- Subclipse和TortoiseSVN版本不一致导致升到高版本的project后,低版本svn客户端无法使用。
- spring(四) 手动整合web项目(SSH)
清楚了spring的IOC 和 AOP,最后一篇就来整合SSH框架把,记录下来,以后应该会用的到. --WH 一.web项目中如何使用spring? 当tomcat启动时,就应该加载spring的配置 ...
- 【Unity】3.0 第3章 创建和导入3D模型
分类:Unity.C#.VS2015 创建日期:2016-04-02 一.简介 利用Unity内置的基本模型和工具,不需要借助任何其他的三维建模软件,就可以直接创建出各种3D模型,这是这一章我们首先学 ...
- 解决Installation failed with message Failed to finalize session : INSTALL_FAILED_INVALID_APK的问题
Android Studio 运行AVD的时候出现: Installation failed with message Failed to finalize session : INSTALL_FAI ...
- lua -- 点击关闭窗口中的子界面
function UIBagController:initBoxView( ) self.panelBox = tolua.cast(UIHelper:seekWidgetByName(self.ow ...
- C++ STL set和multiset的使用
C++ STL set和multiset的使用 std::set<int> s;那个s这个对象里面存贮的元素是从小到大排序的,(因为用std::less作为比较工具.) 1,set的含义是 ...
- Frick'ing Terrain Mesh!
CDLOD地形的实现方法步骤: 1.实现完全二叉树结构的创建2.实现完全四叉树的视锥裁剪与LOD选择(包括节点的部分选择功能)3.使用forward rendering, 实现已选择四叉树节点的普通渲 ...
- (转)用stunnel给普通http通信加密
转自:https://www.digitalocean.com/community/tutorials/how-to-set-up-an-ssl-tunnel-using-stunnel-on-ubu ...
- 【DIOCP-DEMO说明】所有演示DEMO的简要说明
samples目录下面为自带的DEMO 发现有很多朋友不知道如何开始DIOCP,下面是DEMO的简单说明,希望对大家有用 C#\Simple 用C#写的一个简单的回传测试,服务端开启ECHO服务器 ...