PXE无人值守部署centos7.4操作系统
1、基础环境:
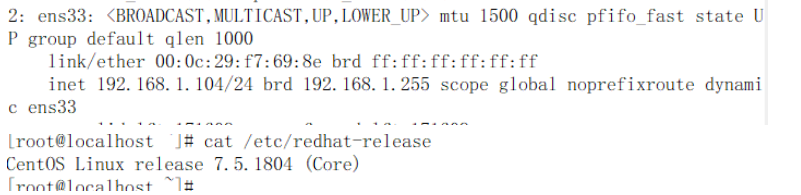
镜像ISO文件名为:CentOS-7-x86_64-DVD-1804.iso
2、安装需要的软件包
yum install dhcp xinetd syslinux httpd tftp-server -y
dhcpd: 动态分配IP
xinetd: 对服务访问进行控制,这里主要是控制tftp
tftp: 从服务器端下载pxelinux.0、default文件
syslinux: 用于网络引导
httpd: 在网络上提供安装源,也就是镜像文件中的内容
3、配置对应的服务
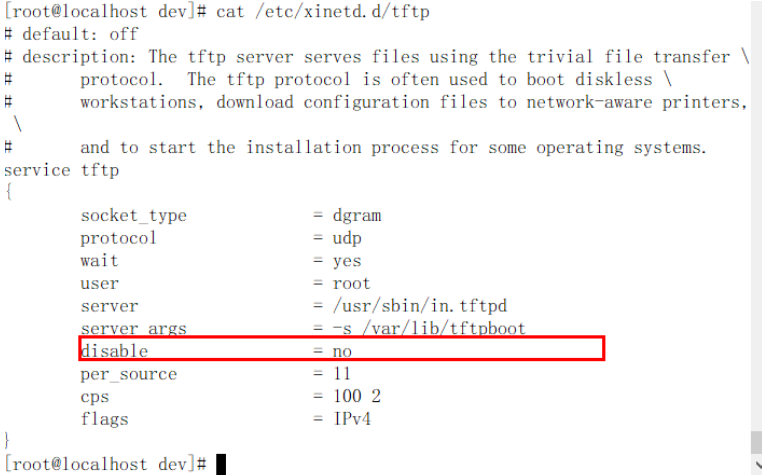
vi /etc/xinetd.d/tftp
配置 dhcp下发地址
ddns-update-style none;
ignore client-updates;
default-lease-time 259200;
max-lease-time 518400;
option domain-name-servers 114.114.114.114; #dns地址
subnet 192.168.1.0 netmask 255.255.255.0 {
range 192.168.1.110 192.168.1.115;
option routers 192.168.1.254; #下发的网关
option subnet-mask 255.255.255.0;
next-server 192.168.1.104; #下发的本机ip
# the configuration file for pxe boot
filename "pxelinux.0";
}
systemctl enable dhcpd && systemctl start dhcpd
systemctl enable xinetd && systemctl start xinetd
systemctl enable tftp && systemctl start tftp
systemctl enable httpd && systemctl start httpd
依次执行以下命令,开放防火墙TCP-80端口及UDP-69端口,注意不要搞错了UDP和TCP。
firewall-cmd –zone=public –add-port=80/tcp –permanent
firewall-cmd –zone=public –add-port=69/udp –permanent
firewall-cmd –reload
firewall-cmd –zone=public –list-ports
也可以直接关闭防火墙
关闭selinux
## 以下配置生效需要系统重启## 
临时关闭selinux: setenforce 0
mkdir /var/www/html/centos7
创建挂载点
mount -t iso9660 -o loop /dev/cdrom /mnt/
cp -rf /mnt/* /var/www/html/centos7/
建议挂载在/mnt 下(通用挂载点)
mkdir /var/lib/tftpboot/centos7
cp /var/www/html/centos7/images/pxeboot/initrd.img /var/lib/tftpboot/centos7/
cp /var/www/html/centos7/images/pxeboot/vmlinuz /var/lib/tftpboot/centos7/
cp /usr/share/syslinux/menu.c32 /var/lib/tftpboot
cp /usr/share/syslinux/pxelinux.0 /var/lib/tftpboot
mkdir /var/lib/tftpboot/pxelinux.cfg
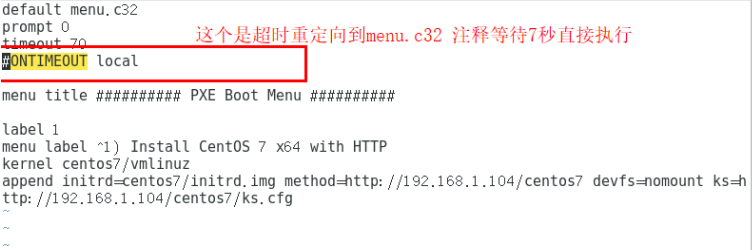
vi /var/lib/tftpboot/pxelinux.cfg/default
4、创建Kickstart文件ks.cfg
这个需要安装kickstart执行:yum -y install system-config-kickstart
bash#下运行system-config-kickstart,打开kickstart桌面软件,选择安装步骤。
cat/var/www/html/centos7/ks.cfg
#platform=x86, AMD64, 或 Intel EM64T
#version=DEVEL
# Install OS instead of upgrade
install
# Keyboard layouts
keyboard 'us'
# Root password
rootpw --iscrypted $1$grc2urK7$tqnhPtOUV/SFfQT0DTeko0
# Use network installation
url --url="http://192.168.1.104/centos7/"
# System language
lang zh_CN
# System authorization information
auth --useshadow --passalgo=sha512
# Use text mode install
text
# SELinux configuration
selinux --disabled
# Do not configure the X Window System
skipx
# Firewall configuration
firewall --disabled
# Network information
network --bootproto=dhcp --device=ens33
# Reboot after installation
reboot
# System timezone
timezone Asia/Hong_Kong --isUtc
# System bootloader configuration
bootloader --location=mbr
# Clear the Master Boot Record
zerombr
# Partition clearing information
clearpart --all --initlabel
# Disk partitioning information
clearpart --all --initlabel #清空分区
part /boot --fstype xfs --size 1024 #/boot分区
part swap --size 1024 #swap分区
part / --fstype xfs --size 1 --grow #根分区
firstboot --disable
%packages
@compat-libraries
@core
@debugging
@development
@fonts
@gnome-apps
@gnome-desktop
@graphics
@ha
@input-methods
@internet-applications
@load-balancer
@mainframe-access
@mariadb-client
@network-tools
@office-suite
@platform-devel
@remote-system-management
@resilient-storage
@system-admin-tools
@system-management
@web-server
crypto-utils
fence-agents-all
%end
%post
cat >>/etc/yum.repos.d/base.repo<<eof
[base]
name=CentOS-$releasever - Base - 163.com
#mirrorlist=http://mirrorlist.centos.org/?release=$releasever&arch=$basearch&repo=os
baseurl=http://mirrors.163.com/centos/$releasever/os/$basearch/
gpgcheck=1
gpgkey=http://mirrors.163.com/centos/RPM-GPG-KEY-CentOS-7
#released updates
[updates]
name=CentOS-$releasever - Updates - 163.com
#mirrorlist=http://mirrorlist.centos.org/?release=$releasever&arch=$basearch&repo=updates
baseurl=http://mirrors.163.com/centos/$releasever/updates/$basearch/
gpgcheck=1
gpgkey=http://mirrors.163.com/centos/RPM-GPG-KEY-CentOS-7
eof
sed -i "s/ONBOOT.*$/ONBOOT=yes/" /etc/sysconfig/network-scripts/ifcfg-ens33 #设置网卡为启动
sed -i "s/rhgb //" /boot/grub/grub.conf # 设置启动系统时不使用图形进度条方
式
sed -i "s/HOSTNAME=.*$/HOSTNAME=xuexi.longshuai.com/" /etc/sysconfig/network #设置主机名
%end
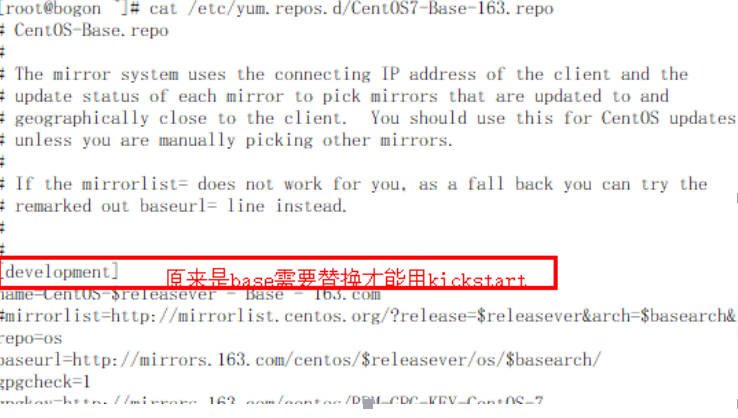
有个小彩蛋,kickstart安装之后默认是起不来软件包选择项的需要修改yum源
PXE无人值守部署centos7.4操作系统的更多相关文章
- pxe+kickstart 无人值守安装CentOS7.1
CentOS6.6下PXE+Kickstart无人值守安装CentOS7.1操作系统 一.简介 1.1 什么是PXE Pxe(Pre-boot Execution Environment,预启动执行 ...
- Vmware部署Linux无人值守安装Centos7系统
Linux - 无人值守安装服务 # 需求分析 - 使用光盘镜像来安装 Linux 系统的方式; 坦白讲, 该方法适用于只安装少量 Linux 系统的情况, 如果生产环境中有数百台服务器都需安装系统, ...
- 第19章 使用PXE+Kickstart部署无人值守安装
章节概述: 本章节将教会您通过PXE+DHCP+TFTP+VSftpd+Kickstart服务程序搭建出无人值守安装系统,从而批量部署客户机系统. 这种系统能够实现自动化运维.避免了重复性劳动,帮助提 ...
- PXE无人值守实现批量化自动安装Linux系统
设想一个场景:假如让你给1000台服务器装系统,你会怎么做?跑去每一台服务器给它安装系统吗?显然不会.. 一.概括 通过网络引导系统的做法可以不必从硬盘.软盘或CD-ROM硬盘,而是完全通过网络来引导 ...
- Linux PXE无人值守网络装机
Linux PXE无人值守网络装机 一.实验环境: 2台Linux系统(RHEL6.5版本),1台作为:PXE远程安装服务器(安装dhcp服务.ftp服务.tftp服务),另1台作为:客户端(未装RH ...
- 在docker中部署centos7镜像
本篇文章参考自: https://www.cnblogs.com/linjj/p/5606911.html https://blog.csdn.net/u012767761/article/detai ...
- .net core 2.2 部署CentOS7(2)给虚拟机安装CentOS7
目录: .net core 2.2 部署CentOS7(1)安装虚拟机 .net core 2.2 部署CentOS7(2)给虚拟机安装CentOS7 .net core 2.2 部署CentOS7( ...
- 利用PXE引导安装centos7
# 利用PXE引导安装centos7 # ###简介### > PXE (Pre-boot Execution Environment,PXE client 在网卡的 ROM 中,当计算机引导时 ...
- PXE自动化部署
PXE 预启动执行环境,基于tftp条件下完成基于网络的自动化部署软件 原理: 网卡利用自身的tftp 请求dhcp 服务器获取ip和一个pxelinux.0的地址 在给定的tftp目录下存有ks的配 ...
随机推荐
- 蓝的成长记——追逐DBA(18):小机上WAS集群故障,由一次更换IP引起
原创作品.出自 "深蓝的blog" 博客,欢迎转载,转载时请务必注明出处.否则追究版权法律责任. 深蓝的blog:http://blog.csdn.net/huangyanlong ...
- 第8章5节《MonkeyRunner源代码剖析》MonkeyRunner启动执行过程-执行測试脚本
MonkeyRunner在准备好AndroidDebugBridge和DeviceMonitor等服务之后,就基本上是攻克了和目标设备通信的问题了,那往下须要做的就是把測试脚本执行起来了. 178 p ...
- 2、java注释、标识符、数据类型、类型转换
一.三种注释:单行注释.多行注释.文档注释(只能在类前或者方法前,@author作者) 二.java使用的编码为unicode码[0-65535] 包含ASCII码,在0-255中 ASCII码( ...
- codeforces248(div1) B Nanami's Digital Board
q次询问,每次询问能够对矩阵某一个值改变(0变1.1变0) 或者是查询子矩阵的最大面积,要求这个这个点在所求子矩阵的边界上,且子矩阵各店中全为1 用up[i][j]表示(i,j)这个点向上能走到的最长 ...
- MySQ学习笔记之十 NULL值处理
这是MySQL一大特殊之处. 概念上.NULL意味着"没有值"或"未知值",且它被看作有点与众不同的值. 为了測试NULL.你不能使用算术比較运算符比如=.&l ...
- hdu_4430,二分
注意处理溢出 #include<iostream> #include<cstdio> #include<cstring> #include<algorithm ...
- 减少XML文件数
在android开发中,做出漂亮的ui的应用,往往有数量庞大的xml文件.比如,我们要给一个Button加上一个selector,如果背景不是图片,就得写三个xml文件,分别是:edit_focuse ...
- Python常用目录操作(Python2)
Python获取当前路径 Python查看指定路径下的文件和文件夹 Python修改当前工作目录(在读取文件等时需要) Python添加import路径(有时候为了import自己写的py文件,且 ...
- 24 款必备的 Linux 桌面应用(2016 版)
作者: Munif Tanjim 译者: LCTT GHLandy | 2016-12-21 08:41 评论: 41 收藏: 13 摘要:Linux 的必备软件有哪些?这将会是一个非常主观的回答 ...
- Zookeeper入门:基本概念、5项配置、启动
起源 最早接触Zookeeper,是在学习Hadoop权威指南这本书的时候,印象中是Hadoop项目的一个子工程. 最近,项目中需要用到"分布式锁". 之前,在 ...