Neo4j沙盒实验申请过程步骤(图文详解)
不多说,直接上干货!
参考博客
http://blog.csdn.net/u012318074/article/details/72793632 (对此表示感谢)
前期博客
我暂时是将Neo4j图数据库安装在Ubuntu14.04下和Ubuntu16.04下。
Ubuntu16.04下Neo4j图数据库官网安装部署步骤(图文详解)(博主推荐)
Ubuntu14.04下Neo4j图数据库官网安装部署步骤(图文详解)(博主推荐)
Neo4j 官方提供的沙盒申请使用过程,内容较为简单,但沙盒里面的内容对于初学者非常有用。
沙盒实验注册
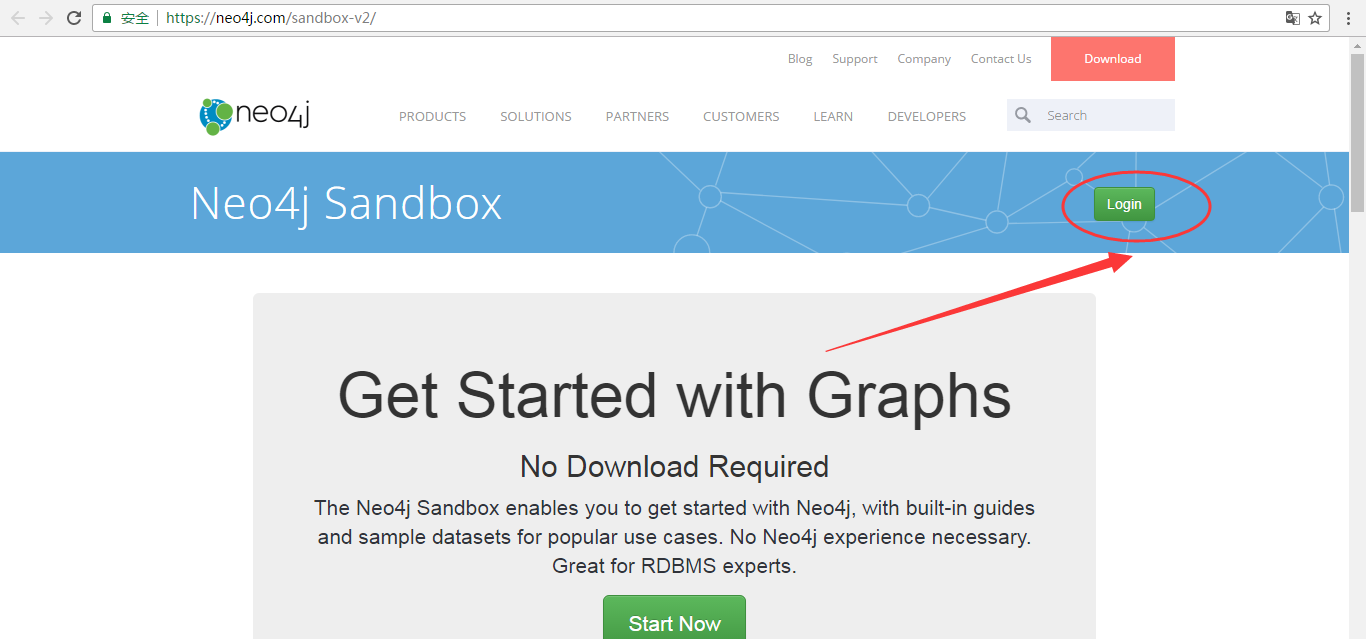
打开 Neo4j 官方沙盒实验页面:https://neo4j.com/sandbox-v2/ 。点击右上角的“Login”。
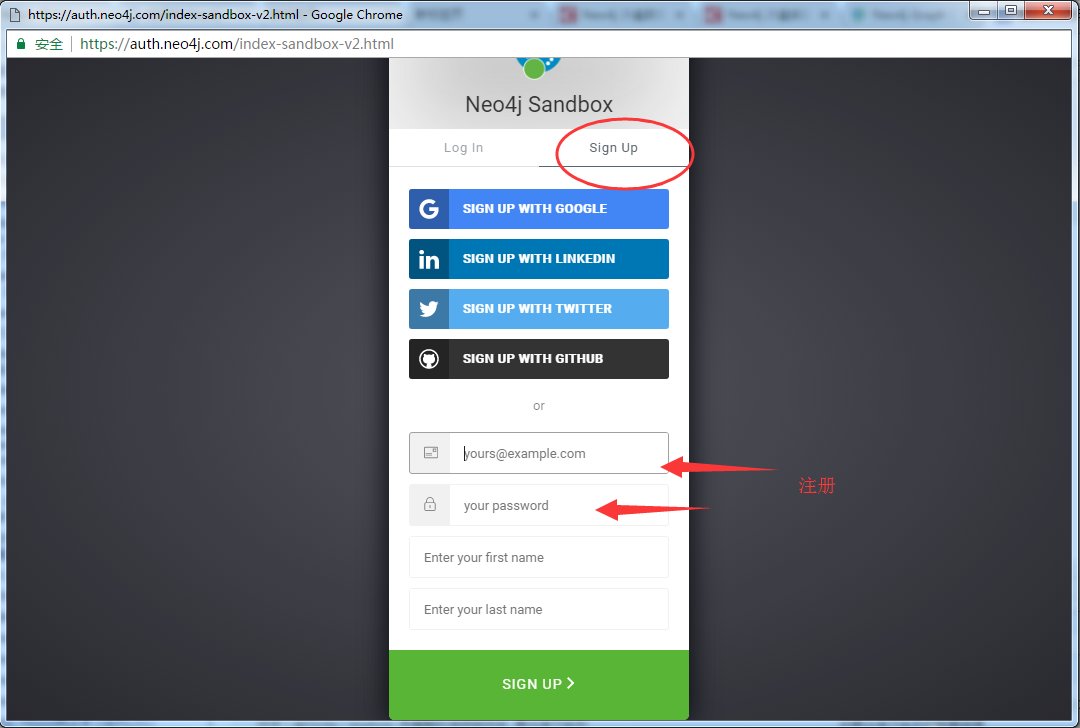
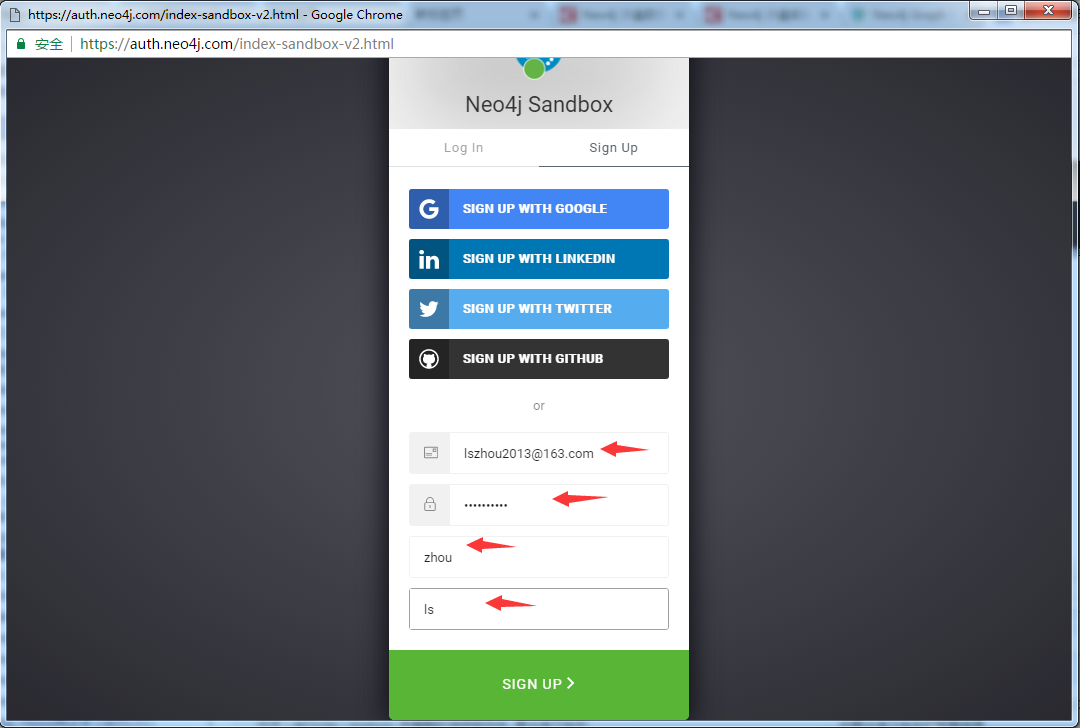
在弹出的界面中输入邮箱和密码进行注册,进入注册邮箱 。
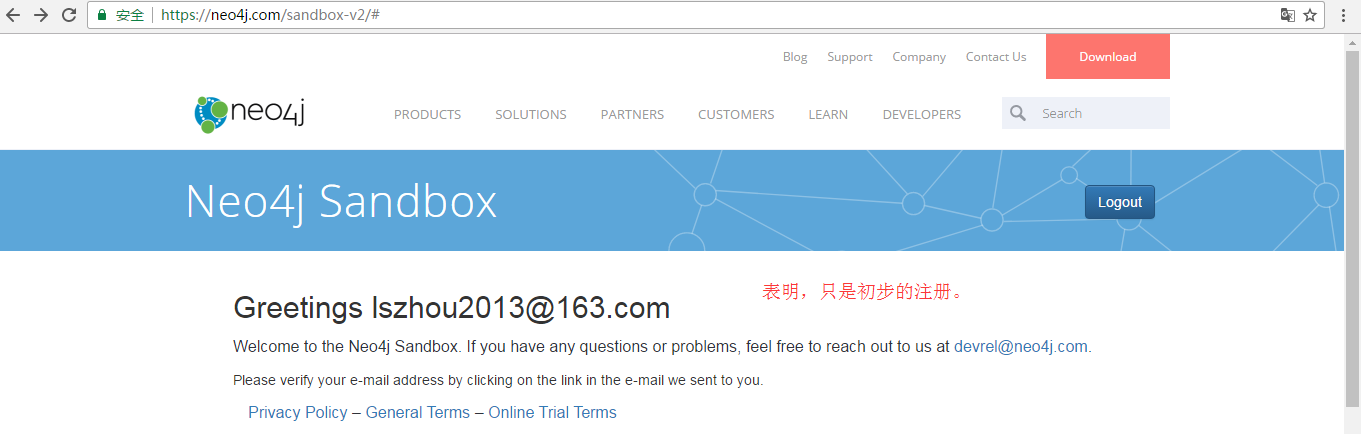
然后,大家到你所注册的邮箱去。

点击
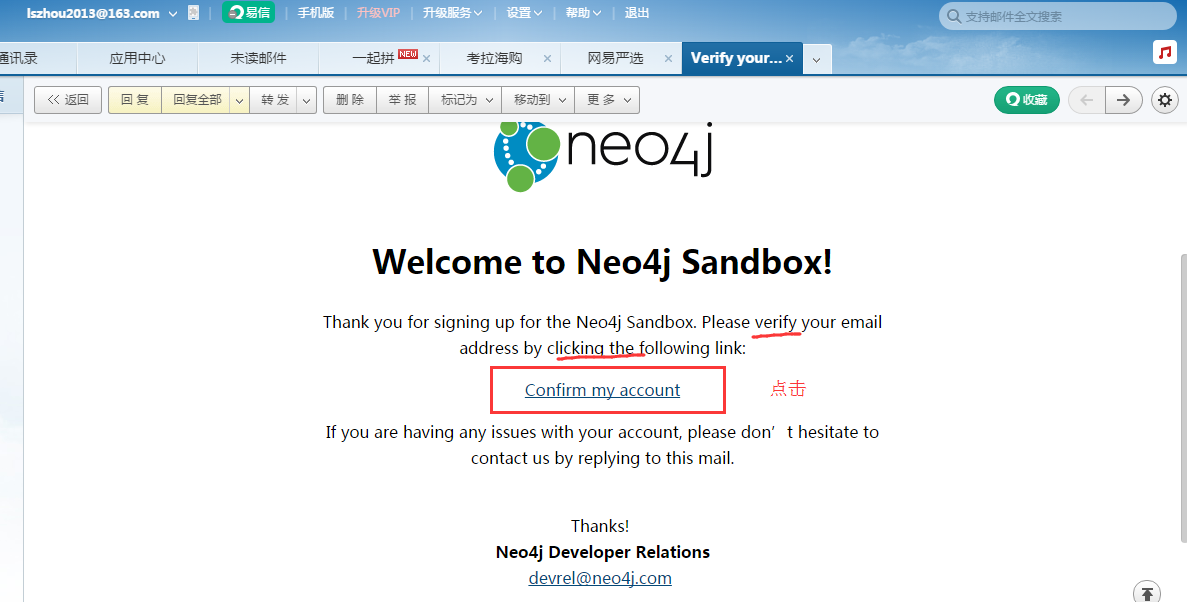

至此,沙盒实验完成注册了。
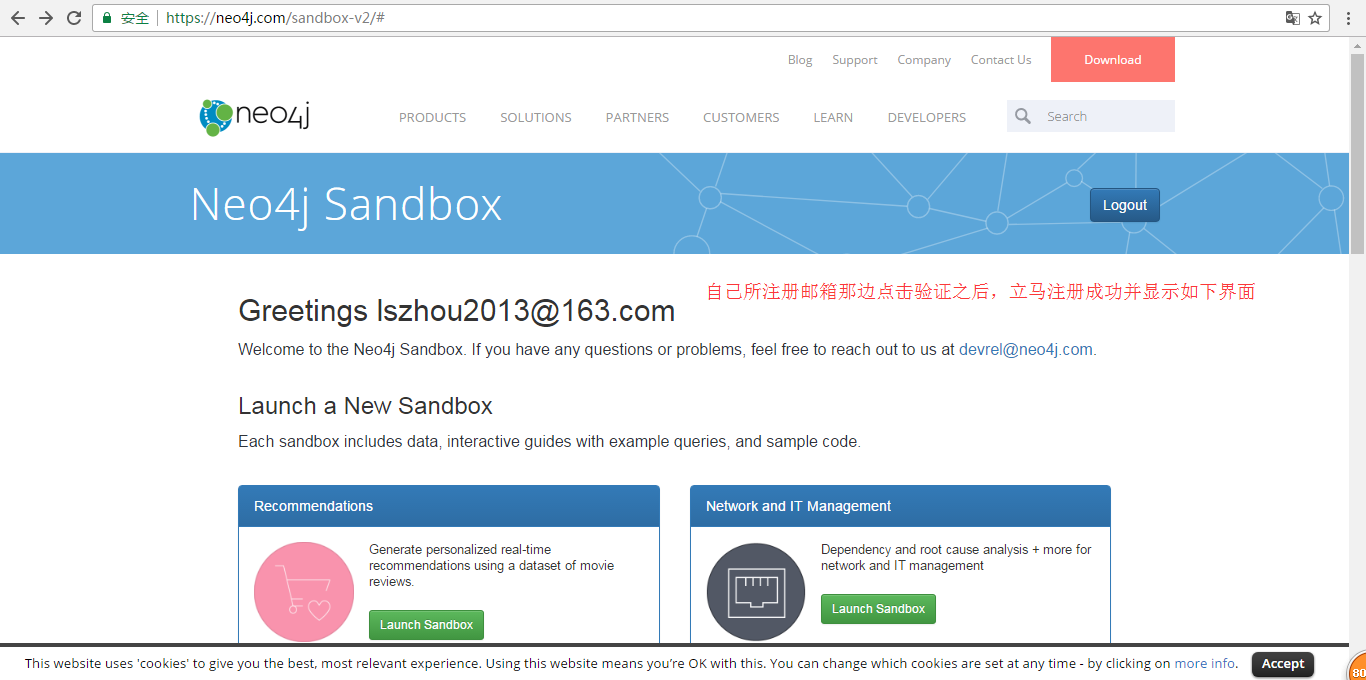
选择沙盒
在页面中选择一个沙盒作为实验 。
可以看到,沙盒实验团队提供了很多个模块供我们选择。对此表示感谢!大家可以有兴趣的,多去尝试。
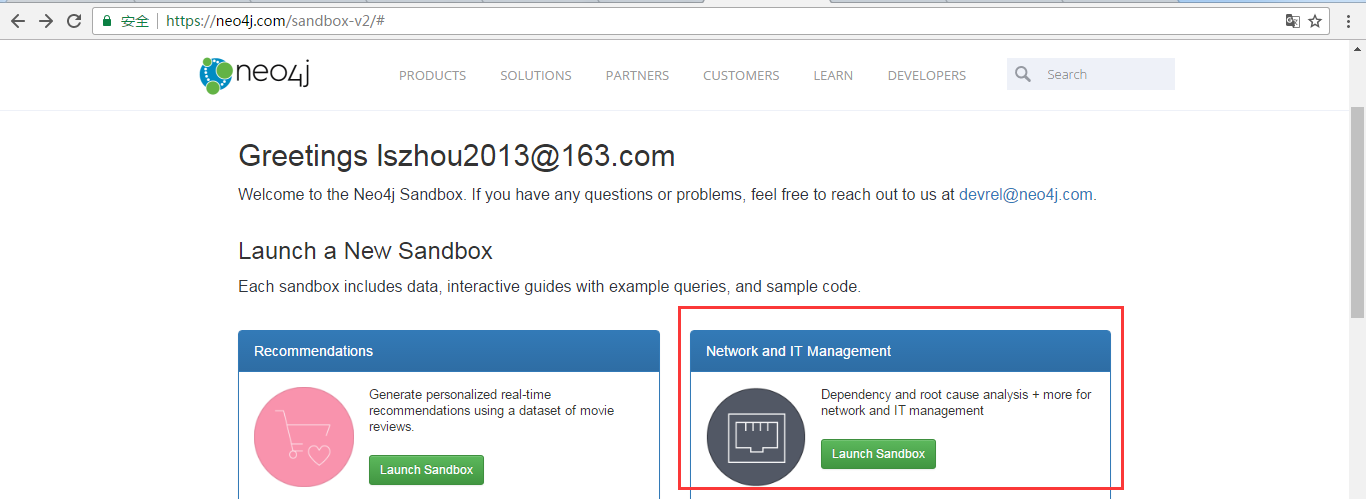
我这里,因为时间有限,仅此先以我需要的是“Network and IT Management”,点击“Launch Sandbox”
过一会儿页面中间会出现“Network and IT Management”的信息 ,同时,页面所罗列给我们的,会少了一个。
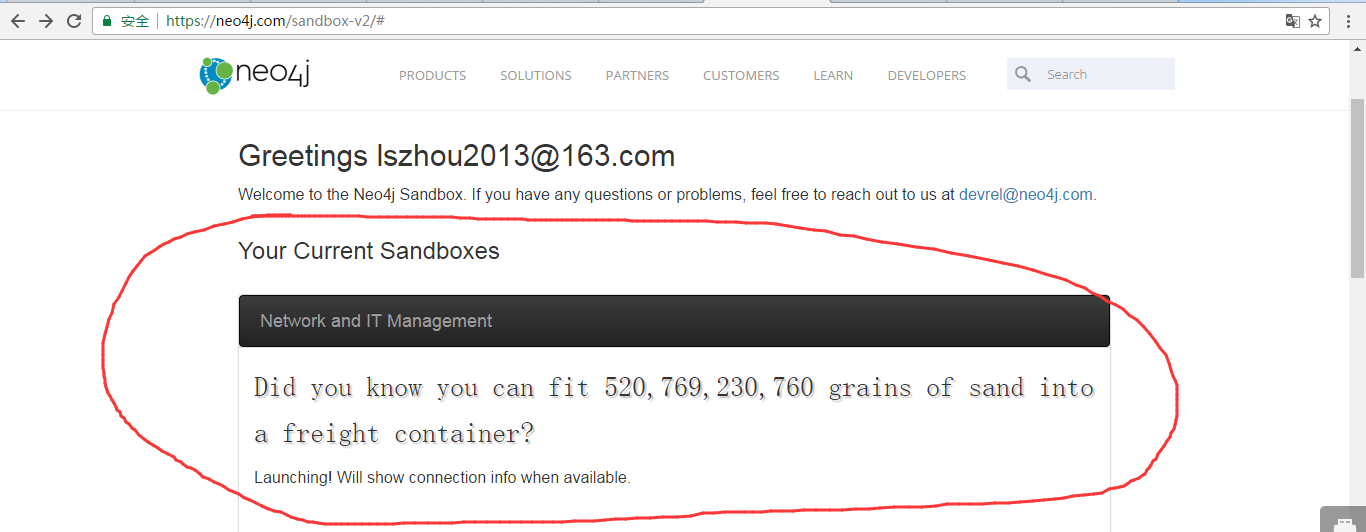

其实,需要一段时间,自动会连接进入。
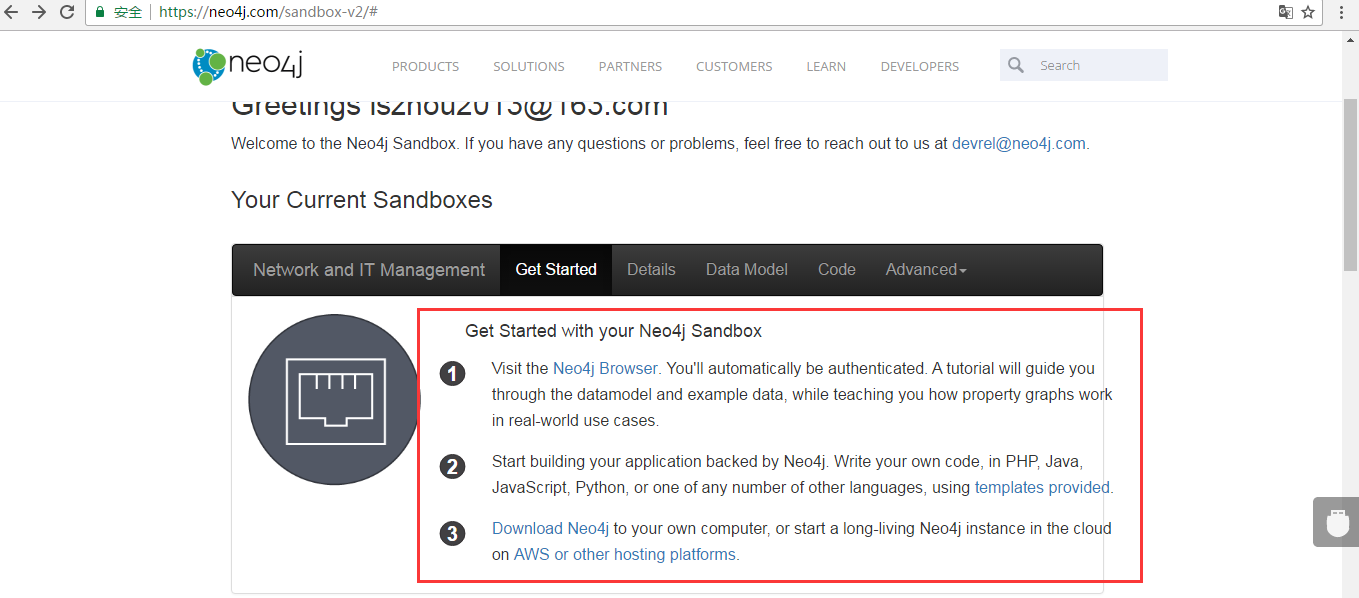
大家,可以尝试点击“Details/Data Model/Code/Advanced”查看相关信息。
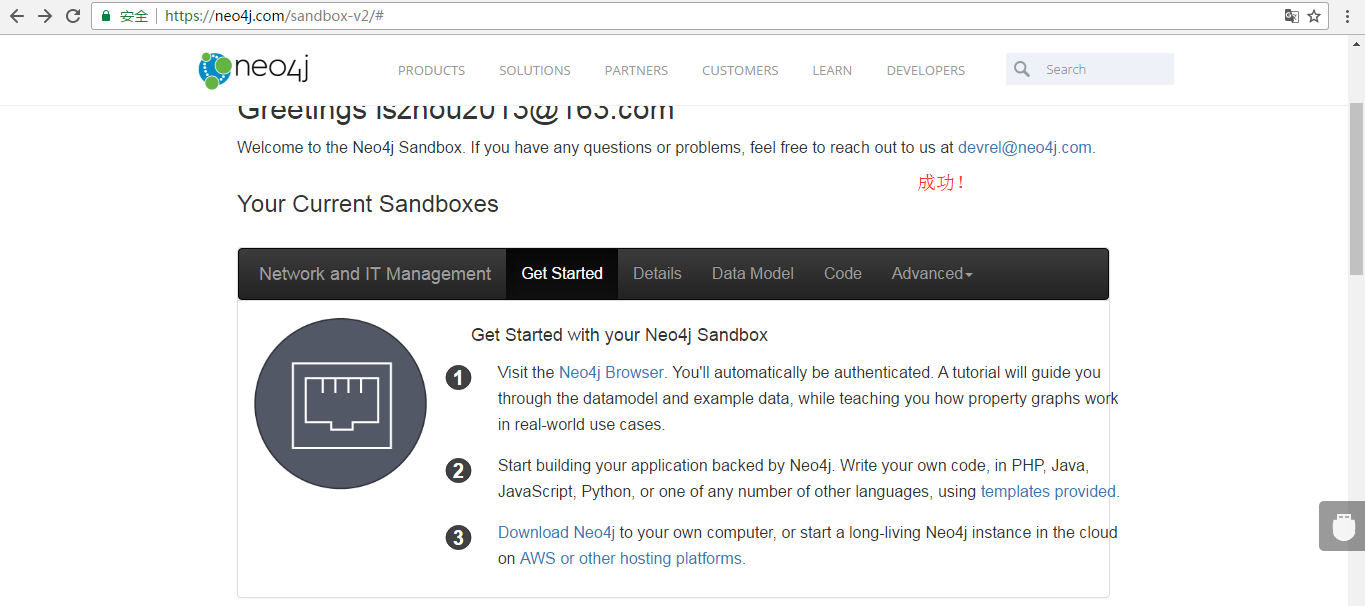
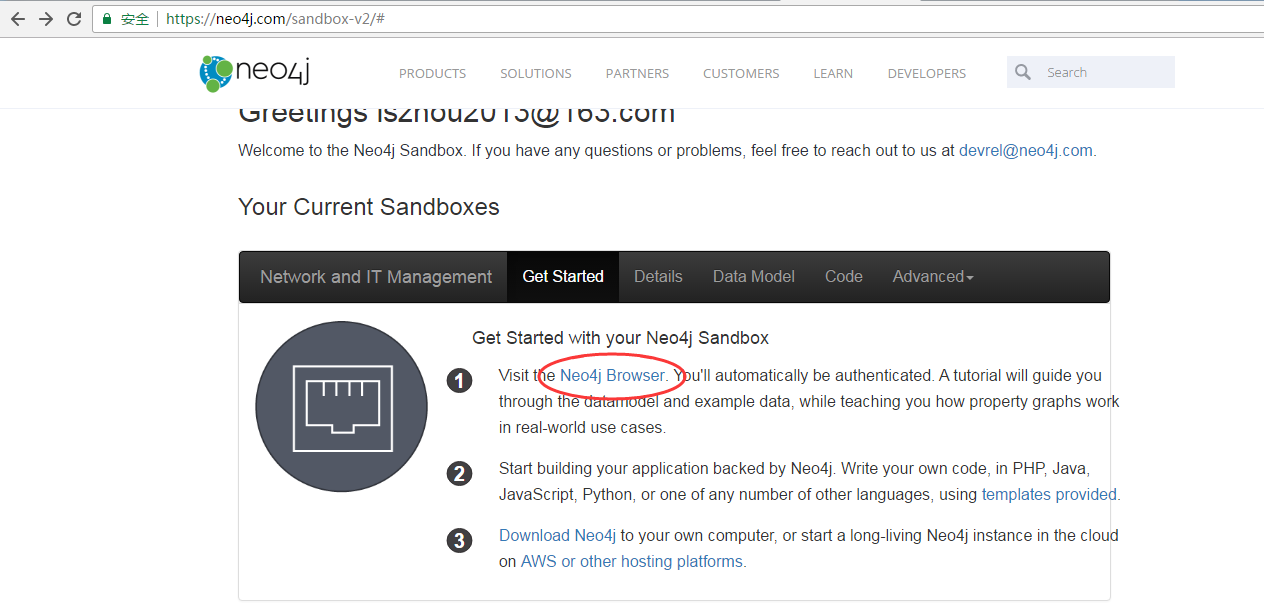
Get Started
Get Started with your Neo4j Sandbox
1、Visit the Neo4j Browser. You'll automatically be authenticated. A tutorial will guide you through the datamodel and example data, while teaching you how property graphs work in real-world use cases.
2、Start building your application backed by Neo4j. Write your own code, in PHP, Java, JavaScript, Python, or one of any number of other languages, using templates provided.
3、Download Neo4j to your own computer, or start a long-living Neo4j instance in the cloud on AWS or other hosting platforms.
Details
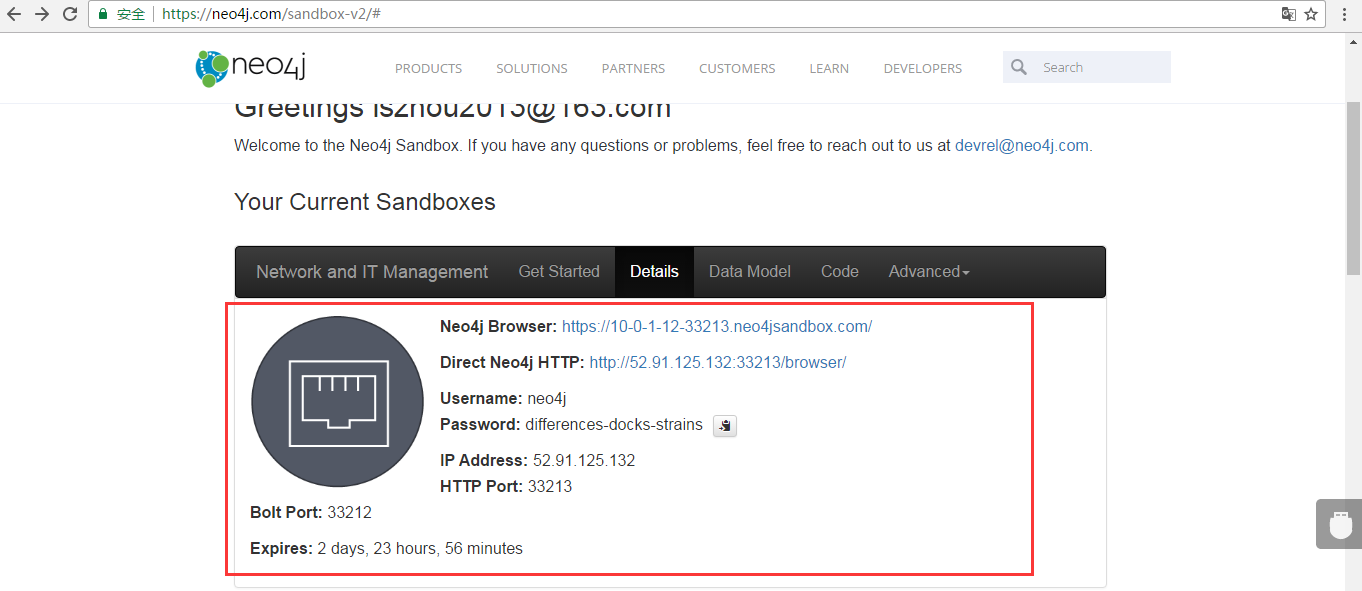
Neo4j Browser: https://10-0-1-12-33213.neo4jsandbox.com/
Direct Neo4j HTTP: http://52.91.125.132:33213/browser/
Username: neo4j
Password: differences-docks-strains
IP Address: 52.91.125.132
HTTP Port: 33213
Data Model
Code
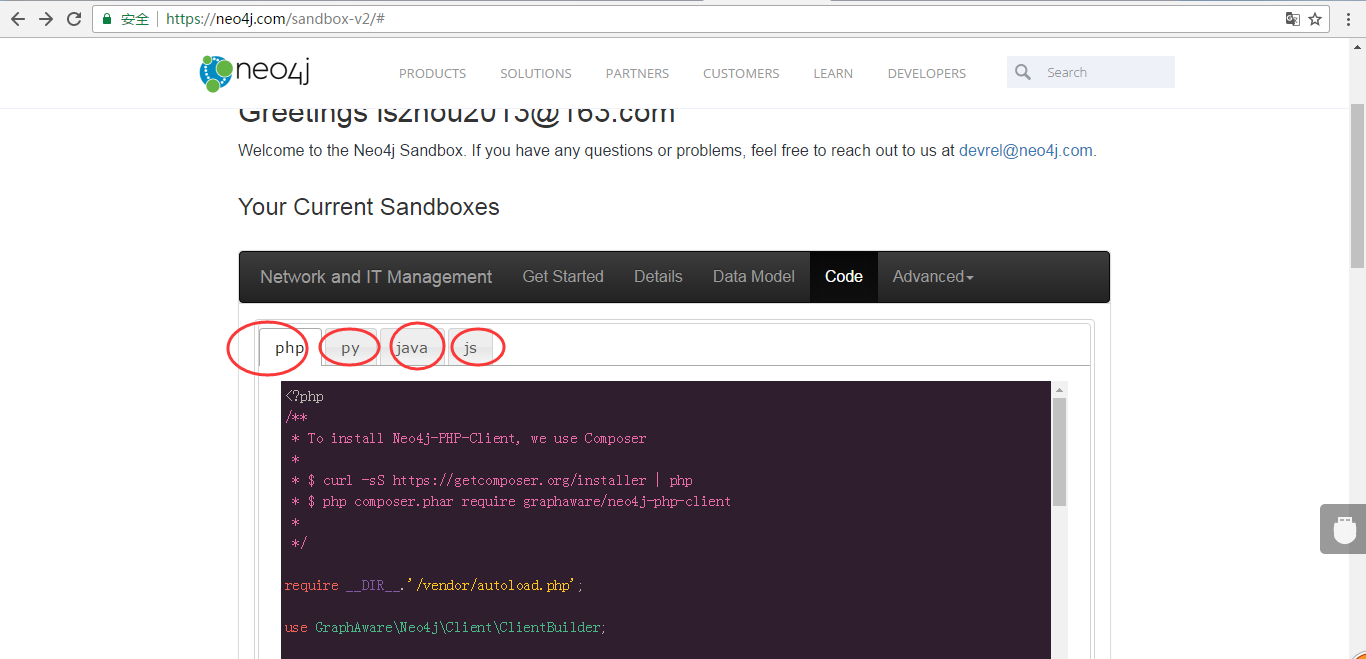
php语言
<?php

/**

 * To install Neo4j-PHP-Client, we use Composer

 *

 * $ curl -sS https://getcomposer.org/installer | php

 * $ php composer.phar require graphaware/neo4j-php-client

 *

 */

require __DIR__.'/vendor/autoload.php';

use GraphAware\Neo4j\Client\ClientBuilder;

// change to your hostname, port, username, password

$neo4j_url = "bolt://neo4j:differences-docks-strains@52.91.125.132:33212";

// setup connection

$client = ClientBuilder::create()

    ->addConnection('default', $neo4j_url)

    ->build();

$cypher_query = <<<EOQ

MATCH (n)

RETURN id(n) AS id

LIMIT

EOQ;

$params = [];

$result = $client->run($cypher_query, $params);

foreach ($result->records() as $record) {

  echo $record->get('id') . PHP_EOL;

}
python语言
# pip install neo4j-driver

from neo4j.v1 import GraphDatabase, basic_auth

driver = GraphDatabase.driver(

    "bolt://52.91.125.132:33212",

    auth=basic_auth("neo4j", "differences-docks-strains"))

session = driver.session()

cypher_query = '''

MATCH (n)

RETURN id(n) AS id

LIMIT

'''

results = session.run(cypher_query,

  parameters={})

for record in results:

  print(record['id'])
java语言
// Download Java Driver: http://search.maven.org/#artifactdetails|org.neo4j.driver|neo4j-java-driver|1.0.0|jar

import org.neo4j.driver.v1.*;

import static org.neo4j.driver.v1.Values.parameters;

import java.util.List;

import static java.util.Arrays.asList;

import static java.util.Collections.singletonMap;

public class BlankSandbox {

    public static void main(String...args) {

        Config noSSL = Config.build().withEncryptionLevel(Config.EncryptionLevel.NONE).toConfig();

        Driver driver = GraphDatabase.driver("bolt://52.91.125.132:33212",AuthTokens.basic("neo4j","differences-docks-strains"),noSSL); // <password>

        try (Session session = driver.session()) {

            String cypherQuery =

                "MATCH (n) " +

                "RETURN id(n) AS id";

            StatementResult result = session.run(cypherQuery, parameters());

            while (result.hasNext()) {

                System.out.println(result.next().get("id"));

            }

        }

    }

}
js语言
// npm install --save neo4j-driver

var neo4j = require('neo4j-driver').v1;

var driver = neo4j.driver('bolt://52.91.125.132:33212', neo4j.auth.basic('neo4j', 'differences-docks-strains'));

var query =

  "MATCH (n) \

   RETURN ID(n) as id \

   LIMIT $limit";

var params = {"limit": };

var session = driver.session();

session.run(query, params)

  .then(function(result) {

    result.records.forEach(function(record) {

        console.log(record.get('id'));

    })

  })

  .catch(function(error) {

    console.log(error);

  });
Advanced

进入 web 界面
这里直接点击“Get Started”中第一项的“Neo4j Browser”进入web界面
需要一段时间,点击你的浏览器下方的accpet。
https://10-0-1-12-33218.neo4jsandbox.com/browser/

第一次数据完全加载完成需要一段时间

大家可以多去点点,初步了解认识下


其他的,不多赘述。
Neo4j沙盒实验申请过程步骤(图文详解)的更多相关文章
- 全网最详细的PLSQL Developer + Oracle client的客户端 或者 PLSQL Developer + Oracle server服务端的下载与安装过程(图文详解)
不多说,直接上干货! 环境说明: 本地没有安装Oracle服务端,oracle服务端64位,是远程连接,因此本地配置PLSQL Developer64位. Oracle database使用在本机部署 ...
- 全网最详细的Windows系统里PLSQL Developer 32bit的下载与安装过程(图文详解)
不多说,直接上干货! 注意的是: 本地若没有安装Oracle服务端,Oracle server服务端32位,是远程连接,因此本地配置PLSQL Developer32位. PLSQL Develope ...
- 全网最详细的Windows系统里PLSQL Developer 64bit的下载与安装过程(图文详解)
不多说,直接上干货! ORACLE是数据库,有客户端和服务器: 其,具体下载,可见http://www.oracle.com/technetwork/database/enterprise-editi ...
- 【转】iOS申请发布证书-图文详解
摘要 发布产品到App Store所需证书,2013年5月26日测试 IOS 发布证书 distribution 打包程序 真机调试证书 本文讲述发布证书的申请,申请真机调试证书请参考:http:// ...
- 1、Orcal下载安装步骤图文详解
1.Orcal官方下载地址: https://www.oracle.com/technetwork/cn/database/enterprise-edition/downloads/index.htm ...
- Ubuntu14.04下沙盒数据导入到 Neo4j 数据库(图文详解)
不多说,直接上干货! 参考博客 http://blog.csdn.net/u012318074/article/details/72793914 (表示感谢) 前期博客 Neo4j沙盒实验申请过程 ...
- Ubuntu16.04下沙盒数据导入到 Neo4j 数据库(图文详解)
不多说,直接上干货! 参考博客 http://blog.csdn.net/u012318074/article/details/72793914 (表示感谢) 前期博客 Neo4j沙盒实验申请过 ...
- Ubuntu16.04下Neo4j图数据库官网安装部署步骤(图文详解)(博主推荐)
不多说,直接上干货! 说在前面的话 首先,查看下你的操作系统的版本. root@zhouls-virtual-machine:~# cat /etc/issue Ubuntu LTS \n \l r ...
- Ubuntu14.04下Neo4j图数据库官网安装部署步骤(图文详解)(博主推荐)
不多说,直接上干货! 说在前面的话 首先,查看下你的操作系统的版本. root@zhouls-virtual-machine:~# cat /etc/issue Ubuntu 14.04.4 LTS ...
随机推荐
- 错误:the apk for your currently selected variant(app-release-unsigned.apk)is not signed.Please specity a signing configuration for this variant(release)
1:导入android studio project 时总会出现运行处一个红色叉号,这里可以点击选择叉号上面显示的Edit Configurations 查看右下角的错误警告信息.: 2:记录错误: ...
- android 自定义空间 组合控件中 TextView 不支持drawableLeft属性
android 自定义空间 组合控件中 TextView 不支持drawableLeft属性.会报错Caused by: android.view.InflateException: Binary X ...
- DP:***24种设计模式--转自刘伟
转自于高人的文章:http://blog.csdn.net/lovelion/article/details/17517213 2012年-2013年,Sunny在CSDN技术博客中陆续发表了100多 ...
- Programming Recipes
Recipes是从一本书上看来的,即有诀窍又有食谱的意思.这里想记一些工作中遇到的问题和解决方法,说决窍有点过了,说食谱照单做又不足,所以Recipe这个词两个意思都有混合起来正合适. 1.Windo ...
- RabbitMQ学习之messageconver插件实现(Gson)
RabbitMQ已经实现了Jackson的消息转换(Jackson2JsonMessageConverter),由于考虑到效率,如下使用Gson实现消息转换. 如下消息的转换类的接口MessageCo ...
- img标签过滤加fs模块实现图片文件缓存
方法一:function iCache(selector) { selector.each(function(data) { //msg(data); ! function(data) { var u ...
- JS 100内与7相关的数
var s =""; for(var i=0;i;i++) { if(i%7 == 0 ){ s += i+","; } else if((i-7)%10 == ...
- 找到多个与名为“HOME”的控制器匹配的类型。如果为此请求(“{CONTROLLER}/{ACTION}/{ID}”)提供服务的路由在搜索匹配此请求的控制器时没有指定命名空间,则会发生此情况。如果是这样,请通过调用含有“NAMESPACES”参数的“MAPROUTE”方法的重载来注册此路由。
public static void RegisterRoutes(RouteCollection routes) { routes.IgnoreRoute("{resource}.axd/ ...
- WEBGL学习【十五】利用WEBGL实现三维场景的一般思路总结
实现三维场景载入操作的实现步骤: 主要知识点:着色器,纹理贴图,文件载入 实现思路: 获取canvas,初始化WEBGL上下文信息. 主要是实现WEBGL上下文的获取,设置视的大小,此时gl存储了WE ...
- Problem 3
Problem 3 # Problem_3.py """ The prime factors of 13195 are 5, 7, 13 and 29. What is ...