
spring boot + vue 前后分离实现登录功能(二)
安装 axios 进行路由转发
npm install axios --save-dev 或者 cnpm install axios --save-dev
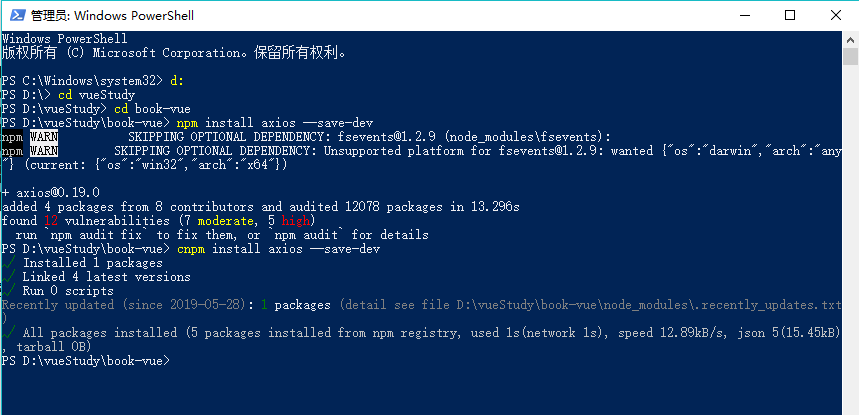
修改 Main.js
新增
var axios = require('axios')
axios.defaults.baseURL = 'http://localhost:8888/api'
//将API方法绑定到全局
Vue.prototype.$axios = axios
import Vue from 'vue'

import VueRouter from 'vue-router'

import router from './router'

var axios = require('axios')

axios.defaults.baseURL = 'http://localhost:8888/api'

//将API方法绑定到全局

Vue.prototype.$axios = axios

// 导入 ElementUI

import ElementUI from 'element-ui'

import 'element-ui/lib/theme-chalk/index.css'

import App from './App'

// 安装路由

Vue.use(VueRouter);

// 安装 ElementUI

Vue.use(ElementUI);

new Vue({

  el: '#app',

  // 启用路由

  router,

  // 启用 ElementUI

  render: h => h(App)

});
修改config/index.js
新增
'/api':{
target:'http://localhost:8888',
changeOrigin:true,
pathRewrite:{
'^/api':''
}
}
'use strict'

// Template version: 1.3.1

// see http://vuejs-templates.github.io/webpack for documentation.

const path = require('path')

module.exports = {

  dev: {

    // Paths

    assetsSubDirectory: 'static',

    assetsPublicPath: '/',

    proxyTable: {

      '/api':{

        target:'http://localhost:8888',

        changeOrigin:true,

        pathRewrite:{

          '^/api':''

        }

      }

    },

    // Various Dev Server settings

    host: 'localhost', // can be overwritten by process.env.HOST

    port: 8080, // can be overwritten by process.env.PORT, if port is in use, a free one will be determined

    autoOpenBrowser: false,

    errorOverlay: true,

    notifyOnErrors: true,

    poll: false, // https://webpack.js.org/configuration/dev-server/#devserver-watchoptions-

    /**

     * Source Maps

     */

    // https://webpack.js.org/configuration/devtool/#development

    devtool: 'cheap-module-eval-source-map',

    // If you have problems debugging vue-files in devtools,

    // set this to false - it *may* help

    // https://vue-loader.vuejs.org/en/options.html#cachebusting

    cacheBusting: true,

    cssSourceMap: true

  },

  build: {

    // Template for index.html

    index: path.resolve(__dirname, '../dist/index.html'),

    // Paths

    assetsRoot: path.resolve(__dirname, '../dist'),

    assetsSubDirectory: 'static',

    assetsPublicPath: '/',

    /**

     * Source Maps

     */

    productionSourceMap: true,

    // https://webpack.js.org/configuration/devtool/#production

    devtool: '#source-map',

    // Gzip off by default as many popular static hosts such as

    // Surge or Netlify already gzip all static assets for you.

    // Before setting to `true`, make sure to:

    // npm install --save-dev compression-webpack-plugin

    productionGzip: false,

    productionGzipExtensions: ['js', 'css'],

    // Run the build command with an extra argument to

    // View the bundle analyzer report after build finishes:

    // `npm run build --report`

    // Set to `true` or `false` to always turn it on or off

    bundleAnalyzerReport: process.env.npm_config_report

  }

}
修改Login.vue
<template >

  <div :style ="note" >

    <el-form ref="loginForm" :model="form" :rules="rules" label-width="80px" class="login-box">

      <h3 class="login-title">欢迎登录</h3>

      <el-form-item label="账号" prop="username">

        <el-input type="text" placeholder="请输入账号" v-model="form.username"/>

      </el-form-item>

      <el-form-item label="密码" prop="password">

        <el-input type="password" placeholder="请输入密码" v-model="form.password"/>

      </el-form-item>

      <el-form-item>

        <el-button type="primary" v-on:click="onSubmit('loginForm')">登录</el-button>

      </el-form-item>

    </el-form>

    <el-dialog

      title="温馨提示"

      :visible.sync="dialogWarnVisible"

      width="30%"

      :before-close="handleClose">

      <span >请输入账号和密码</span>

      <span slot="footer" class="dialog-footer">

        <el-button type="primary" @click="dialogWarnVisible = false">确 定</el-button>

      </span>

    </el-dialog>

    <el-dialog

      title="温馨提示"

      :visible.sync="dialogErrorVisible"

      width="30%"

      :before-close="handleClose">

      <span v-text="error"></span>

      <span slot="footer" class="dialog-footer">

        <el-button type="primary" @click="dialogErrorVisible = false">确 定</el-button>

      </span>

    </el-dialog>

  </div>

</template>

<script>

  export default {

    name: "Login",

    data() {

      return {

        note: {

          backgroundImage: "url(" + require("../assets/background.jpg") + ") ",

          backgroundPosition: "center center",

          backgroundRepeat: "no-repeat",

          backgroundSize: "cover" ,

        },

        form: {

          username: '',

          password: ''

        },

        // 表单验证,需要在 el-form-item 元素中增加 prop 属性

        rules: {

          username: [

            {required: true, message: '账号不可为空', trigger: 'blur'}

          ],

          password: [

            {required: true, message: '密码不可为空', trigger: 'blur'}

          ]

        },

        // 对话框显示和隐藏

        dialogWarnVisible: false,

        dialogErrorVisible: false

      }

    },

    methods: {

      onSubmit(formName) {

        // 为表单绑定验证功能

        this.$refs[formName].validate((valid) => {

          if (valid) {

            // 使用 vue-router 路由到指定页面,该方式称之为编程式导航

            //this.$router.push("/main");

            this.$axios.post(

              '/login',

              {

                username:this.form.username,

                password:this.form.password

            })

            .then(resultResponse => {

              this.resultResponse = JSON.stringify(resultResponse.data)

              //成功后执行 带着用户名跳转到Main页面

              if(resultResponse.data.code === 200) {

                this.$router.replace({

                  name:'Main',

                  params:{

                    username :resultResponse.data.object.username

                  }

                  })

              }else if(resultResponse.data.code === 400) {

                 this.dialogErrorVisible = true;

                 this.error = resultResponse.data.msg;

              }

            })

            .catch(failResponse => {})

          } else {

            this.dialogWarnVisible = true;

            return false;

          }

        });

      }

    }

  }

</script>

<style lang="scss" scoped>

  .login-box {

    border: 1px solid #DCDFE6;

    width: 350px;

    margin: 180px auto;

    padding: 35px 35px 15px 35px;

    border-radius: 5px;

    -webkit-border-radius: 5px;

    -moz-border-radius: 5px;

    box-shadow: 0 0 25px #909399;

  }

  .login-title {

    text-align: center;

    margin: 0 auto 40px auto;

    color: #303133;

  }

</style>
修改Main.vue
将admin 改成{{$route.params.username}}
<span> {{$route.params.username}}</span>
spring boot + vue 前后分离实现登录功能(二)的更多相关文章
- spring boot + vue 前后分离实现登录功能(三)
Spring boot 后台 github 地址 SpringBoot-book-vue-demo 使用tk.mytabis 简化mybatis 开发 使用 durid 连接池 连接Mysql pom ...
- spring boot + vue 前后分离实现登录功能(一)
使用webpack 打包初始化项目 vue init webpack book-vue 进入工程目录 cd hello-vue 安装 vue-router npm install vue-router ...
- 喜大普奔,两个开源的 Spring Boot + Vue 前后端分离项目可以在线体验了
折腾了一周的域名备案昨天终于搞定了. 松哥第一时间想到赶紧把微人事和 V 部落部署上去,我知道很多小伙伴已经等不及了. 1. 也曾经上过线 其实这两个项目当时刚做好的时候,我就把它们部署到服务器上了, ...
- 两个开源的 Spring Boot + Vue 前后端分离项目
折腾了一周的域名备案昨天终于搞定了. 松哥第一时间想到赶紧把微人事和 V 部落部署上去,我知道很多小伙伴已经等不及了. 1. 也曾经上过线 其实这两个项目当时刚做好的时候,我就把它们部署到服务器上了, ...
- 一个实际的案例介绍Spring Boot + Vue 前后端分离
介绍 最近在工作中做个新项目,后端选用Spring Boot,前端选用Vue技术.众所周知现在开发都是前后端分离,本文就将介绍一种前后端分离方式. 常规的开发方式 采用Spring Boot 开发项目 ...
- 前后端分离,我怎么就选择了 Spring Boot + Vue 技术栈?
前两天又有小伙伴私信松哥,问题还是职业规划,Java 技术栈路线这种,实际上对于这一类问题我经常不太敢回答,每个人的情况都不太一样,而小伙伴也很少详细介绍自己的情况,大都是一两句话就把问题抛出来了,啥 ...
- spring boot+vue实现H5聊天室客服功能
spring boot+vue实现H5聊天室客服功能 h5效果图 vue效果图 功能实现 spring boot + webSocket 实现 官方地址 https://docs.spring.io/ ...
- Spring Boot +Vue 项目实战笔记(三):数据库的引入
这一篇的主要内容是引入数据库并实现通过数据库验证用户名与密码. 一.引入数据库 之前说过数据库的采用是 MySQL,算是比较主流的选择,从性能和体量等方面都比较优秀,当然也有一些弊端,但数据库不是我们 ...
- Spring Boot + Vue 跨域请求问题
使用Spring Boot + Vue 做前后端分离项目搭建,实现登录时,出现跨域请求 Access to XMLHttpRequest at 'http://localhost/open/login ...
随机推荐
- python简单页面爬虫入门 BeautifulSoup实现
本文可快速搭建爬虫环境,并实现简单页面解析 1.安装 python 下载地址:https://www.python.org/downloads/ 选择对应版本,常用版本有2.7.3.4 安装后,将安装 ...
- 关于ubuntu软件图标的问题
原因是这样的,有一次我更新我的IDEA之后,程序图标就不见了. 怎么说呢,就是以下显示的这样. 在Frequent中显示正常, 在All中却没有!!! 是的,它就是在一边有一边没有... 奇了怪了. ...
- JAVA 使用原生jdbc批量添加,表被锁住问题
今天用jdbc批量添加数据的时候遇到了一个问题,当数据添加成功过后,再想对该表进行操作发现表被锁住了,检查了下代码发现事务提交了呀!!!!!!!!!!!! 去网上查了大半天的资料才发现问题,在conn ...
- 查看安装的centos的操作系统版本
cat /etc/redhat-release CentOS Linux release 7.6.1810 (Core)
- HDU_2717_Catch That Cow
很短的 BFS 队列 HDU_2717_Catch That Cow #include<iostream> #include<algorithm> #include<cs ...
- vulkan load store and memoryless
https://www.jendrikillner.com/article_database/ https://community.arm.com/developer/tools-software/g ...
- Python Django 版本对应表
- Vue项目中v-bind动态绑定src路径不成功
问题: 在做Vue项目的时候,由于项目需求,需要动态绑定img的src时,突然发现如果说是直接请求后台接口的图片地址就能显示, 但是直接动态绑定img的src的图片的相对路径或者是绝对路径的时候,图片 ...
- 原生JS实现简易随机点名功能
定时器的工作原理,这里将用引用How JavaScript Timers Work中的例子来解释定时器的工作原理,该图为一个简单版的原理图.· 上图中,左侧数字代表时间,单位毫秒:左侧文字代表某一个操 ...
- 013——C# chart控件时间作为X轴(附教程)
(一)参考文献:C#之Chart控件系列教程——一 (二)下载地址:https://download.csdn.net/download/xiaoguoge11/11838944 (三)视频教程:ht ...