IdentityServer4入门一
这几天学习IdentityServer4,感觉内容有点乱,也可能自己水平有限吧。但为了巩固学习的内容,也打算自己理一下思路。
首先IdentityServer解决什么问题?
下图是我们的一个程序的组织形式
详情可以看看官网的描述:https://identityserver4.readthedocs.io/en/latest/intro/big_picture.html
我的理解是:IdentityServer就是解决多点登录及API授权、WEB授权的问题
第一个例子
我们将重现官网上的第一个范例来学习相关概念,但与官网的不同,我打算一开始就将服务端从一个MVC网站开始。官网的第一个范例:https://identityserver4.readthedocs.io/en/latest/quickstarts/1_client_credentials.html
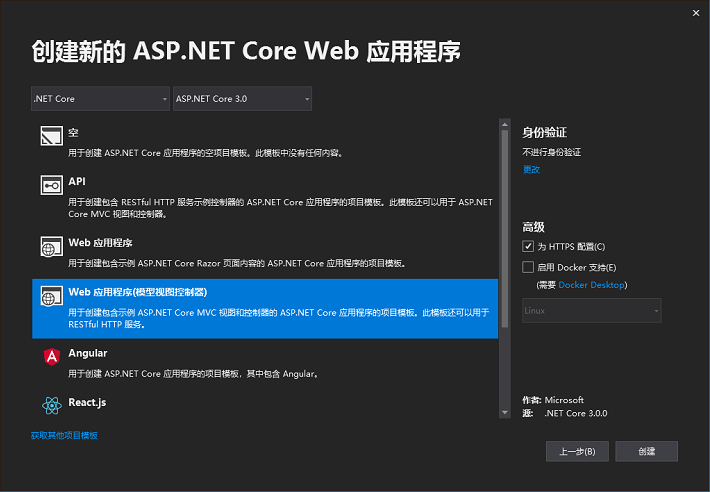
下面截图和代码来自VS.NET2019+asp.net core 3.0
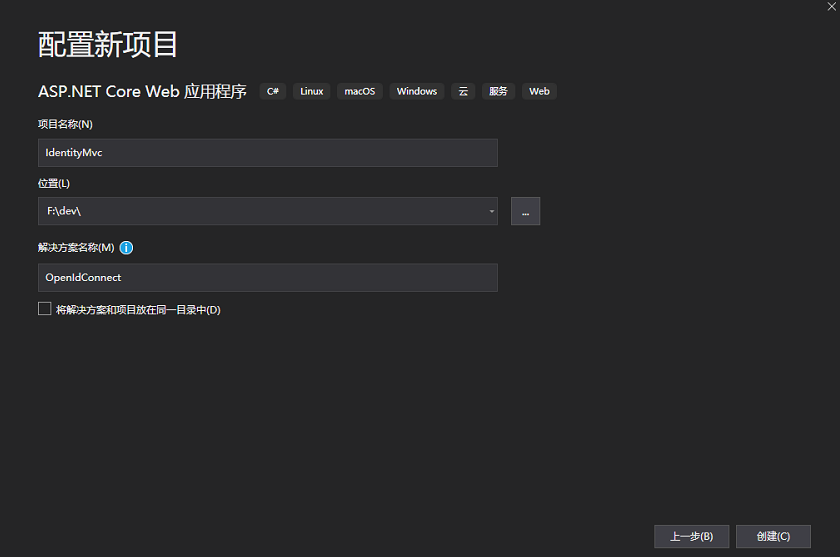
新建服务端
新增asp.net core Web应用程序,项目名称IdentityMvc。因为还要后面加上测试的客户端,所以解决方案我使用了另外的一个名称OpenIdConnect
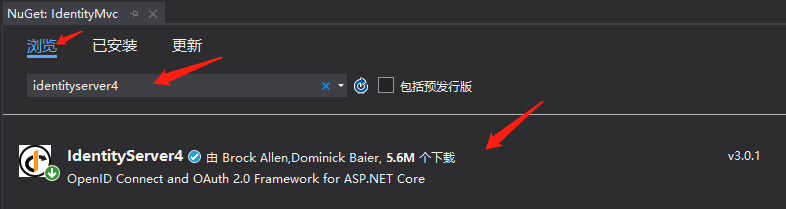
利用nuget添加(安装)引用
IdentityServer4
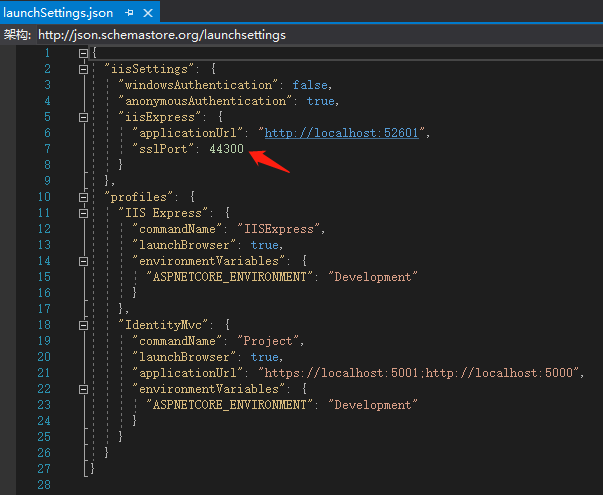
将端口修改一下,授权服务的端口我们使用44300。打开Properties\launchSettings.json文件
新增Config.cs文件
using IdentityServer4.Models;

using System.Collections.Generic;

namespace IdentityMvc

{

    public static class Config

    {

        public static IEnumerable<IdentityResource> GetIdentityResources()

        {

            return new IdentityResource[]

            {

                new IdentityResources.OpenId()

            };

        }

        public static IEnumerable<ApiResource> GetApis()

        {

            return new List<ApiResource>

            {

                new ApiResource("api1", "My API")

            };

        }

        public static IEnumerable<Client> GetClients()

        {

            return new List<Client>

            {

                new Client

                {

                    ClientId = "client",

                    // no interactive user, use the clientid/secret for authentication

                    AllowedGrantTypes = GrantTypes.ClientCredentials,

                    // secret for authentication

                    ClientSecrets =

                    {

                        new Secret("secret".Sha256())

                    },

                    // scopes that client has access to

                    AllowedScopes = { "api1" }

                }

            };

        }

    }

}
修改startup.cs文件
在ConfigureServices(IServiceCollection services)文件添加以下代码
var builder = services.AddIdentityServer()

                .AddInMemoryIdentityResources(Config.GetIdentityResources())

                .AddInMemoryApiResources(Config.GetApiResources())

                .AddInMemoryClients(Config.GetClients());
在Configure(IApplicationBuilder app, IWebHostEnvironment env)方法,添加app.UseIdentityServer();
public void Configure(IApplicationBuilder app, IWebHostEnvironment env)

{

    if (env.IsDevelopment())

    {

        app.UseDeveloperExceptionPage();

    }

    else

    {

        app.UseExceptionHandler("/Home/Error");

        // The default HSTS value is 30 days. You may want to change thi

        app.UseHsts();

    }

    app.UseIdentityServer();//添加这一句

    app.UseHttpsRedirection();

    app.UseStaticFiles();

    //...省略下方代码
至此,保护API的服务端就做好了。我们可以点击调试运行,IDE会打开IE并访问home页。home页一般能正常打开,但如何测试授权服务是否正常呢,可以在地址栏添加.well-known/openid-configuration,应能看到类似的内容
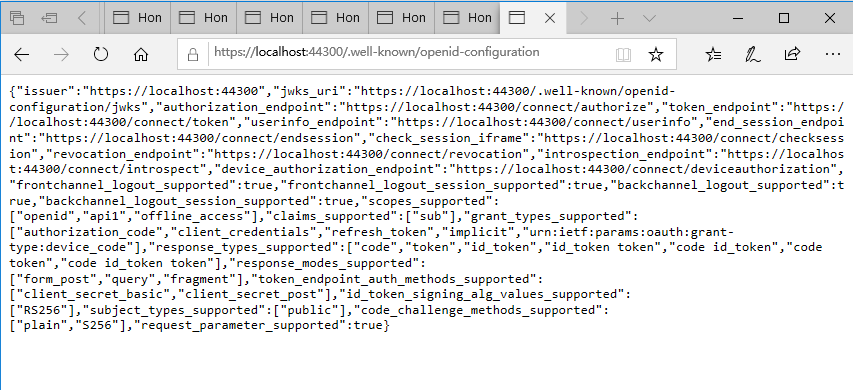
上图的地址的端口可能会有所不同。如果openid-configuration页面看到是空白的话,估计我们少加入了app.UseIdentityServer()方法。
好了,授权服务端就这样的了。接着就是需要一个API的服务程序,和一个调用API的客户端。
IdentityServer4入门一的更多相关文章
- IdentityServer4入门二
在 IdentityServer4入门一 我们准备好了一个认证的服务端,这里做一个需要保护的API服务 首先,向解决方案新增一个项目.我们同样使用入门一的方式新增一个asp.net core Web程 ...
- IdentityServer4入门三:授权模式
在入门一.入门二我们实现了一个完整的API保护的过程.需要保护的API只需在其Controler上应用[Authorize]特性,来显式指定受保护的资源.而我们实现的这个例子,所应用的模式叫“Clie ...
- Asp.net Core IdentityServer4 入门教程(一):概念解析
目录 1.IdentityServer4 是什么 2.什么是OpenID和OAuth 2.0协议 3.IdentityServer4 可以用来做什么 其他 1.IdentityServer4 是什么 ...
- IdentityServer4入门五:错误处理
在访问ClientMvc的保护页面时,会跳转到IdentityMvc页面,这时会出现类似下图的错误界面,让人无从入手. 如果你尝试按文字所说的内容去处理.你发现项目已正确设置.其实上面的内容是固定的, ...
- IdentityServer4入门四:应用Implicit模式保护网站(下)
为认证服务端增加数据库支持 我计划使用一个名为Admin的表,放在一个已有的数据库里.所以我需要定义Admin类和在配置里预先加上数据库连接 新增类:Admin.cs public class Adm ...
- IdentityServer4入门四:应用Implicit模式保护网站(上)
我们先新增一个网站,名为“ClientMvc",也是asp.net core Web应用程序(模型视图控制器) 使用nuget安装以下引用 Microsoft.AspNetCore.Auth ...
- IdentityServer4 中文文档 -16- (快速入门)使用 EntityFramework Core 存储配置数据
IdentityServer4 中文文档 -16- (快速入门)使用 EntityFramework Core 存储配置数据 原文:http://docs.identityserver.io/en/r ...
- IdentityServer4 中文文档 -15- (快速入门)添加 JavaScript 客户端
IdentityServer4 中文文档 -15- (快速入门)添加 JavaScript 客户端 原文:http://docs.identityserver.io/en/release/quicks ...
- IdentityServer4 中文文档 -14- (快速入门)使用 ASP.NET Core Identity
IdentityServer4 中文文档 -14- (快速入门)使用 ASP.NET Core Identity 原文:http://docs.identityserver.io/en/release ...
随机推荐
- JAVA文件IO总结
文件流的操作有两种:字节流.字符流 字节流:FileInputStream,FileInputStream 字符流:InputStreamReader,OutputStreamReader 这两种流对 ...
- 把zTree前的展开收起图标改为三角形,且只有在点击三角形图标时才展开子节点解决方案
<!DOCTYPE html> <html> <head> <meta charset="utf-8" /> <meta ht ...
- 关于Vue中,在方法中使用(操作)子组件获取到的数据
已知,子组件通过props获取父组件传过来的数据,而这个数据是无法在created.mounted生命周期中使用的,只能在beforeUpdated或者updated获取到: 但是如果我们要使用这个数 ...
- [书籍翻译] 《JavaScript并发编程》第四章 使用Generators实现惰性计算
本文是我翻译<JavaScript Concurrency>书籍的第四章 使用Generators实现惰性计算,该书主要以Promises.Generator.Web workers等技术 ...
- centos7安装google浏览器
1. 配置yum源 在目录 /etc/yum.repos.d/ 下新建文件 google-chrome.repo cd /ect/yum.repos.d/ vim google-chrome.repo ...
- openssh升级
转载:(感谢作者) centos7 升级openssh到openssh-8.0p1版本 https://www.cnblogs.com/nmap/p/10779658.html centos 7 op ...
- C语言对齐、补齐
加快CPU读取数据的速度 aligned(n) 让所作用的结构成员对齐在n字节自然边界上.如果结构中有成员的长度大于n,则按照最大成员的长度来对齐 struct s { char c; int i; ...
- SmartEvent with kbmMW #1
前言 前面的文章,我写了有关SmartBinding框架方面的内容.SmartBinding的目的是将数据容器绑定到一起,通常情况下,数据容器可以是显示数据或与数据交互的控件(Edit,ListVie ...
- 使用SQLAlchemy,以及问题处理
https://www.liaoxuefeng.com/wiki/001374738125095c955c1e6d8bb493182103fac9270762a000/0014021031294178 ...
- Aop动态代理和cglib
一般我们使用Aop对象时,常用动态代理模式,即是采用映射一个相同的类在此基础上进行前置后置操作. 动态代理多是采用原类实现父类接口,然后动态代理一个和原类相同的双胞胎兄弟类来实现映射. 父类 publ ...