
老生常谈系列之Aop--Spring Aop源码解析(二)
老生常谈系列之Aop--Spring Aop源码解析(二)
前言
上一篇文章老生常谈系列之Aop--Spring Aop源码解析(一)已经介绍完Spring Aop获取advice切面增强方法的逻辑,那这篇会介绍Spring Aop是怎么根据上面获取的advice生产动态代理的,并且会介绍advice是怎么执行的,例如怎么确保@Before的逻辑在@After前面执行。
源码分析
以下代码分析基于Spring版本5.2.x,另外部分地方我摘抄保留了英文注释,希望看官可以用心体会。
我们回到AbstractAutoProxyCreator#wrapIfNecessary()方法里,上面的部分已经分析完成,下面从Object proxy = createProxy(bean.getClass(), beanName, specificInterceptors, new SingletonTargetSource(bean))开始。
	protected Object wrapIfNecessary(Object bean, String beanName, Object cacheKey) {

		// 省略部分逻辑...

		// Create proxy if we have advice.

		// 如果存在增强方法则创建代理

		Object[] specificInterceptors = getAdvicesAndAdvisorsForBean(bean.getClass(), beanName, null);

		// 如果获取到了增强,则需要针对增强创建代理

		if (specificInterceptors != DO_NOT_PROXY) {

			this.advisedBeans.put(cacheKey, Boolean.TRUE);

			// 创建代理

			Object proxy = createProxy(

					bean.getClass(), beanName, specificInterceptors, new SingletonTargetSource(bean));

			this.proxyTypes.put(cacheKey, proxy.getClass());

			return proxy;

		}

		this.advisedBeans.put(cacheKey, Boolean.FALSE);

		return bean;

	}
跟进createProxy()方法,对于代理类的创建及处理, Spring 委托给了 ProxyFactory去处理,而在此函数中主要是对 ProxyFactory的初始化操作,进而对真正的创建代理做准备。
	protected Object createProxy(Class<?> beanClass, @Nullable String beanName,

			@Nullable Object[] specificInterceptors, TargetSource targetSource) {

		if (this.beanFactory instanceof ConfigurableListableBeanFactory) {

			AutoProxyUtils.exposeTargetClass((ConfigurableListableBeanFactory) this.beanFactory, beanName, beanClass);

		}

		ProxyFactory proxyFactory = new ProxyFactory();

		// 获取当前类中的相关属性

		proxyFactory.copyFrom(this);

		// 决定对于给定的 bean 是否应该使用 targetClass 而不是它的接口代理,

		// 检查 proxyTargetClass 设置以及 preserveTargetClass 属性

		if (!proxyFactory.isProxyTargetClass()) {

			if (shouldProxyTargetClass(beanClass, beanName)) {

				proxyFactory.setProxyTargetClass(true);

			}

			else {

				// 添加代理接口

				evaluateProxyInterfaces(beanClass, proxyFactory);

			}

		}

		Advisor[] advisors = buildAdvisors(beanName, specificInterceptors);

		// 加入增强器

		proxyFactory.addAdvisors(advisors);

		// 设置要代理的类

		proxyFactory.setTargetSource(targetSource);

		// 定制代理

		customizeProxyFactory(proxyFactory);

		// 用来控制代理工厂被配置之后,是否还允许修改通知

		// 缺省值为 false 即在代理被配置之后, 不允许修改代理的配置

		proxyFactory.setFrozen(this.freezeProxy);

		if (advisorsPreFiltered()) {

			proxyFactory.setPreFiltered(true);

		}

		return proxyFactory.getProxy(getProxyClassLoader());

	}
可以上到上面的准备工作包括了以下几步:
- 获取当前类中的属性。
- 添加代理接口 。
- 封装 Advisor 并加入到 ProxyFactory 中。
- 设置要代理的类。
- 当然在 Spring 中还为子类提供了定制的函数 customizeProxyFactory,子类可以在此函数中进行对 ProxyFactory的进一步封装。
- 设置frozen和preFiltered
- 进行获取代理操作。
其中,封装 Advisor 并加入到 ProxyFactory 中以及创建代理是两个相对繁琐的过程,可以通过ProxyFactory提供的 addAdvisor 方法直接将增强器置人代理创建工厂中,但是将拦截器封装为增强器还是需要一定的逻辑的。ProxyFactory类提供了非常好的一个抽象操作,addAdvisor 和getProxy()两个方法完成了我们所有的创建代理,里面隐藏了非常多的细节操作,那下面的分析会从准备工作的几步开始,分析每一步的代码做了什么。
1.获取当前类中的属性
这段逻辑只是简单的一句,入参为本身this,跟进copyFrom()方法。
proxyFactory.copyFrom(this);
可以看到只是简单的赋值操作,入参类型为ProxyConfig,由于AbstractAutoProxyCreator间接实现了ProxyConfig接口,这里只是把AbstractAutoProxyCreator里的几个属性赋值到接下来要使用的ProxyFactory 中。
	public void copyFrom(ProxyConfig other) {

		Assert.notNull(other, "Other ProxyConfig object must not be null");

		this.proxyTargetClass = other.proxyTargetClass;

		this.optimize = other.optimize;

		this.exposeProxy = other.exposeProxy;

		this.frozen = other.frozen;

		this.opaque = other.opaque;

	}
2.添加代理接口
添加属性完成后,接下来是根据proxyTargetClass属性设置ProxyFactory的proxyTargetClass属性和添加代理接口。这是个啥属性呢?没印象?那说明前面的文章根本没看。proxyTargetClass 定义是否强制使用CGLIB代理,默认是false,不使用。所以如果开了强制使用CGLIB的话,这段逻辑会被跳过,不会进行代理接口的添加。
		if (!proxyFactory.isProxyTargetClass()) {

                        // 是否基于类代理 preserveTargetClass = true 则是基于类代理

			if (shouldProxyTargetClass(beanClass, beanName)) {

				proxyFactory.setProxyTargetClass(true);

			}

			else {

				// 添加代理接口

				evaluateProxyInterfaces(beanClass, proxyFactory);

			}

		}
如果proxyTargetClass = false的话,会进入这段逻辑。简单看一下shouldProxyTargetClass()代码,这里摘取了方法上的注解,可以品味一下。
	/**

	 * Determine whether the given bean should be proxied with its target class rather than its interfaces.

	 * <p>Checks the {@link AutoProxyUtils#PRESERVE_TARGET_CLASS_ATTRIBUTE "preserveTargetClass" attribute}

	 * of the corresponding bean definition.

	 * @param beanClass the class of the bean

	 * @param beanName the name of the bean

	 * @return whether the given bean should be proxied with its target class

	 * @see AutoProxyUtils#shouldProxyTargetClass

	 */

	protected boolean shouldProxyTargetClass(Class<?> beanClass, @Nullable String beanName) {

		return (this.beanFactory instanceof ConfigurableListableBeanFactory &&

				AutoProxyUtils.shouldProxyTargetClass((ConfigurableListableBeanFactory) this.beanFactory, beanName));

	}

## AutoProxyUtils#shouldProxyTargetClass

	public static boolean shouldProxyTargetClass(

			ConfigurableListableBeanFactory beanFactory, @Nullable String beanName) {

		if (beanName != null && beanFactory.containsBeanDefinition(beanName)) {

			BeanDefinition bd = beanFactory.getBeanDefinition(beanName);

			return Boolean.TRUE.equals(bd.getAttribute(PRESERVE_TARGET_CLASS_ATTRIBUTE));

		}

		return false;

	}
首先会通过shouldProxyTargetClass()判断是否基于类代理,这个方法是通过判断preserveTargetClass属性是否为true。如果是,则设置proxyTargetClass = true,看到这菊花一紧。preserveTargetClass的字面意思是保留目标类,摘取属性上的描述如下:
	/**

	 * Bean definition attribute that may indicate whether a given bean is supposed

	 * to be proxied with its target class (in case of it getting proxied in the first

	 * place). The value is {@code Boolean.TRUE} or {@code Boolean.FALSE}.

	 * <p>Proxy factories can set this attribute if they built a target class proxy

	 * for a specific bean, and want to enforce that bean can always be cast

	 * to its target class (even if AOP advices get applied through auto-proxying).

	 * @see #shouldProxyTargetClass

	 */

	public static final String PRESERVE_TARGET_CLASS_ATTRIBUTE =

			Conventions.getQualifiedAttributeName(AutoProxyUtils.class, "preserveTargetClass");
翻译一下:这是BeanDefinition定义的属性,它可以指示给定的 bean 是否应该与其目标类一起代理(以防它首先被代理)。该值为Boolean.TRUE 或 Boolean.FALSE。如果代理工厂为特定 bean 构建了目标类代理,并且希望强制该 bean 始终可以转换为其目标类(即使 AOP 建议通过自动代理应用),则可以设置此属性。
这一段翻译看完,应该就比较明了了。这是有特殊的要求希望代理类可以强制转换为目标类,可以设置这个属性。
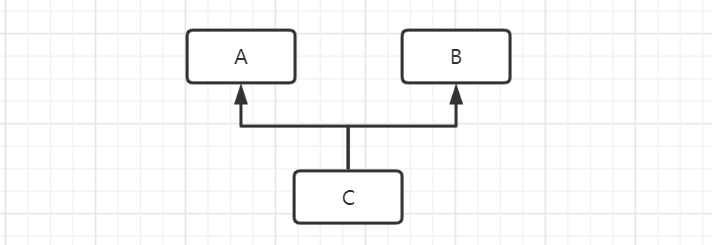
举个例子如下,如果A和B是接口,C是实现类,那么走自动代理的时候会走JDK动态代理,代理会实现A、B接口,如果想把这个代理强制转换成C类型,可能会报错。这时候可以设置preserveTargetClass = true,直接代理目标类,这时候再转换,就不会出错。当然这是我猜测的原因,因为很少有人提及这个属性,我只是参考源码注释和实现给出的原因,错了轻拍。
以前只知道proxyTargetClass能够设置是否强制进行类代理,而不知道preserveTargetClass也能设置强制进行类代理。可能是由于这是BeanDefinition的属性,这是比注解上的属性更底层的属性,所以露面的机会少点。可能Spring不希望大部分人直接使用,但是如果要用,还是可以设置,相当于留了个后门。
如果没有设置preserveTargetClass,那么就进入evaluateProxyInterfaces(beanClass, proxyFactory)方法,添加代理接口。
	/**

	 * Check the interfaces on the given bean class and apply them to the {@link ProxyFactory},

	 * if appropriate.

	 * <p>Calls {@link #isConfigurationCallbackInterface} and {@link #isInternalLanguageInterface}

	 * to filter for reasonable proxy interfaces, falling back to a target-class proxy otherwise.

	 * @param beanClass the class of the bean

	 * @param proxyFactory the ProxyFactory for the bean

	 */

	protected void evaluateProxyInterfaces(Class<?> beanClass, ProxyFactory proxyFactory) {

		Class<?>[] targetInterfaces = ClassUtils.getAllInterfacesForClass(beanClass, getProxyClassLoader());

                // 是否存在符合条件的接口

		boolean hasReasonableProxyInterface = false;

		for (Class<?> ifc : targetInterfaces) {

			if (!isConfigurationCallbackInterface(ifc) && !isInternalLanguageInterface(ifc) &&

					ifc.getMethods().length > 0) {

				hasReasonableProxyInterface = true;

				break;

			}

		}

		if (hasReasonableProxyInterface) {

			// Must allow for introductions; can't just set interfaces to the target's interfaces only.

                        // 加入接口,同时要允许introductions也能加入接口,不能仅仅设置当前类的接口,introductions类型的接口什么时候加入,下面第三点会说到

			for (Class<?> ifc : targetInterfaces) {

				proxyFactory.addInterface(ifc);

			}

		}

		else {

			proxyFactory.setProxyTargetClass(true);

		}

	}
这段逻辑也简单明了,获取beanClass的所有接口,判断这些接口是否值得代理。如果有hasReasonableProxyInterface = true,就通过proxyFactory.addInterface(ifc)加入到this.interfaces里,随后通过adviceChanged()刷新缓存。
3.封装 Advisor 并加入到 ProxyFactory 中
封装Advisor
设置完相关属性后,这里才进入正题,开始封装Advisor ,并加入到ProxyFactory 中。
	/**

	 * Determine the advisors for the given bean, including the specific interceptors

	 * as well as the common interceptor, all adapted to the Advisor interface.

	 * @param beanName the name of the bean

	 * @param specificInterceptors the set of interceptors that is

	 * specific to this bean (may be empty, but not null)

	 * @return the list of Advisors for the given bean

	 */

	protected Advisor[] buildAdvisors(@Nullable String beanName, @Nullable Object[] specificInterceptors) {

		// Handle prototypes correctly...

		// 解析通用的拦截器interceptorNames,interceptorNames是通过setInterceptorNames()设置的

		Advisor[] commonInterceptors = resolveInterceptorNames();

		List<Object> allInterceptors = new ArrayList<>();

		if (specificInterceptors != null) {

			// 加入指定的拦截器

			allInterceptors.addAll(Arrays.asList(specificInterceptors));

                        // 如果有通用拦截器,加入通用的拦截器,通常情况下commonInterceptors.length=0

			if (commonInterceptors.length > 0) {

                                // 如果是先应用通用拦截器,则加到前面,否则加到后面

				if (this.applyCommonInterceptorsFirst) {

					allInterceptors.addAll(0, Arrays.asList(commonInterceptors));

				}

				else {

					allInterceptors.addAll(Arrays.asList(commonInterceptors));

				}

			}

		}

		// 省略日志...

		Advisor[] advisors = new Advisor[allInterceptors.size()];

		for (int i = 0; i < allInterceptors.size(); i++) {

			// 对拦截然进行封装转化为 Advisor

			advisors[i] = this.advisorAdapterRegistry.wrap(allInterceptors.get(i));

		}

		return advisors;

	}
这段代码的逻辑主要分为两部分:
- 将获取到的通用拦截器
commonInterceptors和方法传入的specificInterceptors加入到allInterceptors里 - 对
allInterceptors进行封装,返回advisors
首先看第一部分,跟进resolveInterceptorNames()方法。
	/**

	 * Resolves the specified interceptor names to Advisor objects.

	 * @see #setInterceptorNames

	 */

	private Advisor[] resolveInterceptorNames() {

		BeanFactory bf = this.beanFactory;

		ConfigurableBeanFactory cbf = (bf instanceof ConfigurableBeanFactory ? (ConfigurableBeanFactory) bf : null);

		List<Advisor> advisors = new ArrayList<>();

		for (String beanName : this.interceptorNames) {

			if (cbf == null || !cbf.isCurrentlyInCreation(beanName)) {

				Assert.state(bf != null, "BeanFactory required for resolving interceptor names");

				Object next = bf.getBean(beanName);

				advisors.add(this.advisorAdapterRegistry.wrap(next));

			}

		}

		return advisors.toArray(new Advisor[0]);

	}
主要是对interceptorNames属性进行遍历,根据beanName到容器中获取这个bean,然后封装成advisors返回。
那这个interceptorNames是个啥呢?这就是通用拦截器的名字,默认是空。可以通过调用setInterceptorNames()方法设置,搜索了一下Spring里调用这个方法的地方,发现没有,所以这个地方默认就是空的,可以是看做Spring留了个扩展点。
	/** Default is no common interceptors. */

	private String[] interceptorNames = new String[0];

	/**

	 * Set the common interceptors. These must be bean names in the current factory.

	 * They can be of any advice or advisor type Spring supports.

	 * <p>If this property isn't set, there will be zero common interceptors.

	 * This is perfectly valid, if "specific" interceptors such as matching

	 * Advisors are all we want.

	 */

	public void setInterceptorNames(String... interceptorNames) {

		this.interceptorNames = interceptorNames;

	}
处理完了通用拦截器部分,接下来直接把specificInterceptors加入到allInterceptors里。通常情况下,可以认为allInterceptors的内容就是传进来的specificInterceptors。
到这里处理完了第一部分获取allInterceptors,接下来是第二部分对allInterceptors进行封装,返回advisors。
advisors[i] = this.advisorAdapterRegistry.wrap(allInterceptors.get(i));
这一部分委托给了DefaultAdvisorAdapterRegistry#wrap()去实现,直接跟进代码,这里比较简单,只是简单封装为Advisor。
	public Advisor wrap(Object adviceObject) throws UnknownAdviceTypeException {

		// 如果要封装的对象本身就是 Advisor类型的,那么无须再做过多处理

		if (adviceObject instanceof Advisor) {

			return (Advisor) adviceObject;

		}

		// 因为此封装方法只对 Advisor 与 Advice 两种类型的数据有效, 如果不是将不能封装

		if (!(adviceObject instanceof Advice)) {

			throw new UnknownAdviceTypeException(adviceObject);

		}

		Advice advice = (Advice) adviceObject;

		if (advice instanceof MethodInterceptor) {

			// So well-known it doesn't even need an adapter.

			// 如果是 MethodInterceptor 类型则使用 DefaultPointcutAdvisor 封装

			return new DefaultPointcutAdvisor(advice);

		}

		// 如果存在 Advisor 的适配器那么也同样需要进行封装

		for (AdvisorAdapter adapter : this.adapters) {

			// Check that it is supported.

			if (adapter.supportsAdvice(advice)) {

				return new DefaultPointcutAdvisor(advice);

			}

		}

		throw new UnknownAdviceTypeException(advice);

	}
到这里已经把所有的拦截器转换成统一的Advisor,下面就准备设置进ProxyFactory 里。
将Advisor加入ProxyFactory
一行代码,跟进addAdvisors()
proxyFactory.addAdvisors(advisors);
可以看到也是简单的赋值操作,把入参的advisors赋值到this.advisors,注意这里有个特殊操作validateIntroductionAdvisor(),这是用来处理IntroductionAdvisor类型的Advisor,核心操作就是校验IntroductionAdvisor的接口,如果符合,那就加入到this.interfaces里,这跟上面添加代理接口evaluateProxyInterfaces(beanClass, proxyFactory)逻辑是类似的。最后会更新this.advisorArray和this.methodCache,这两个缓存主要用于内部操作,节省时间。
	/**

	 * Add all of the given advisors to this proxy configuration.

	 * @param advisors the advisors to register

	 */

	public void addAdvisors(Advisor... advisors) {

		addAdvisors(Arrays.asList(advisors));

	}

	/**

	 * Add all of the given advisors to this proxy configuration.

	 * @param advisors the advisors to register

	 */

	public void addAdvisors(Collection<Advisor> advisors) {

		if (isFrozen()) {

			throw new AopConfigException("Cannot add advisor: Configuration is frozen.");

		}

		if (!CollectionUtils.isEmpty(advisors)) {

			for (Advisor advisor : advisors) {

				if (advisor instanceof IntroductionAdvisor) {

					validateIntroductionAdvisor((IntroductionAdvisor) advisor);

				}

				Assert.notNull(advisor, "Advisor must not be null");

				this.advisors.add(advisor);

			}

                        // 更新this.advisorArray

			updateAdvisorArray();

                        // 更新this.methodCache

			adviceChanged();

		}

	}
4.设置要代理的类
这一步也比较简单,把传入的targetSource设置到proxyFactory中,如果为空,则将targetSource设为EMPTY_TARGET_SOURCE。EMPTY_TARGET_SOURCE是一个特殊的TargetSource它是在没有目标类或者只有advisors或者interfaces的时候使用。
	public void setTargetSource(@Nullable TargetSource targetSource) {

		this.targetSource = (targetSource != null ? targetSource : EMPTY_TARGET_SOURCE);

	}
5.定制的函数 customizeProxyFactory
目前是个空实现,交由子类实现,提供了自定义扩展的点。
customizeProxyFactory(proxyFactory);
AbstractAutoProxyCreator中的实现为空。
	/**

	 * Subclasses may choose to implement this: for example,

	 * to change the interfaces exposed.

	 * <p>The default implementation is empty.

	 * @param proxyFactory a ProxyFactory that is already configured with

	 * TargetSource and interfaces and will be used to create the proxy

	 * immediately after this method returns

	 */

	protected void customizeProxyFactory(ProxyFactory proxyFactory) {

	}
6.设置frozen和preFiltered
这里的代码也比较简单
		// 用来控制代理工厂被配置之后,是否还允许修改通知

		// 缺省值为 false 即在代理被配置之后, 不允许修改代理的配置 )

		proxyFactory.setFrozen(this.freezeProxy);

		// 是否已经被预过滤,如果是预过滤,可以不执行Pointcut持有的ClassFilter

		if (advisorsPreFiltered()) {

			proxyFactory.setPreFiltered(true);

		}
frozen用来冻结advice的修改。这里主要是用来作为内部一些性能的优化,摘取描述如下:
	/**

	 * Set whether this config should be frozen.

	 * <p>When a config is frozen, no advice changes can be made. This is

	 * useful for optimization, and useful when we don't want callers to

	 * be able to manipulate configuration after casting to Advised.

	 */

	public void setFrozen(boolean frozen) {

		this.frozen = frozen;

	}
preFiltered可能相对难理解一点, 设置当前AOP配置信息是否已被超前过滤过了,如果是的话,可以不执行Pointcut持有的ClassFilter 。
	/**

	 * Set whether this proxy configuration is pre-filtered so that it only

	 * contains applicable advisors (matching this proxy's target class).

	 * <p>Default is "false". Set this to "true" if the advisors have been

	 * pre-filtered already, meaning that the ClassFilter check can be skipped

	 * when building the actual advisor chain for proxy invocations.

	 * @see org.springframework.aop.ClassFilter

	 */

	void setPreFiltered(boolean preFiltered);
7.进行获取代理操作
获取JDK动态代理或CGLIB代理
完成了上面的步骤之后,开始进入了本文章的重头戏,创建代理。
进入getProxy()方法,这里就会根据上面设置的属性生成代理对象,生成的对象会因为添加或删除interfaces和interceptors而不同。
	/**

	 * Create a new proxy according to the settings in this factory.

	 * <p>Can be called repeatedly. Effect will vary if we've added

	 * or removed interfaces. Can add and remove interceptors.

	 * <p>Uses the given class loader (if necessary for proxy creation).

	 * @param classLoader the class loader to create the proxy with

	 * (or {@code null} for the low-level proxy facility's default)

	 * @return the proxy object

	 */

	public Object getProxy(@Nullable ClassLoader classLoader) {

		/**

		 * 首先获取AopProxy对象,主要有两个实现JdkDynamicAopProxy和ObjenesisCglibAopProxy

		 * 分别用于jdk和Cglib动态代理生成,其getProxy()方法用于获取具体的代理类对象

		 */

		return createAopProxy().getProxy(classLoader);

	}
跟进createAopProxy(),如果this.active=false,首先调用activate()激活所有的AdvisedSupportListener,然后通过getAopProxyFactory()获取一个aopProxyFactory,再调用createAopProxy(this)获取AopProxy。
	protected final synchronized AopProxy createAopProxy() {

		if (!this.active) {

			activate();

		}

		return getAopProxyFactory().createAopProxy(this);

	}
getAopProxyFactory()用于获取aopProxyFactory,aopProxyFactory会在new ProxyFactory()的时候创建this.aopProxyFactory = new DefaultAopProxyFactory(),逻辑比较简单,这里不再分析。接下来看createAopProxy(this)。
	public AopProxy createAopProxy(AdvisedSupport config) throws AopConfigException {

		if (config.isOptimize() || config.isProxyTargetClass() || hasNoUserSuppliedProxyInterfaces(config)) {

			Class<?> targetClass = config.getTargetClass();

			if (targetClass == null) {

				throw new AopConfigException("TargetSource cannot determine target class: " +

						"Either an interface or a target is required for proxy creation.");

			}

			/**

			 * 如果要代理的类本身就是接口

			 * 或者它已经是个jdk的代理类(Proxy的子类,所有的jdk代理类都是此类的子类)

			 * 也会用jdk动态代理

			 */

			if (targetClass.isInterface() || Proxy.isProxyClass(targetClass)) {

				return new JdkDynamicAopProxy(config);

			}

                        // 返回一个CglibAopProxy

			return new ObjenesisCglibAopProxy(config);

		}

		else {

			//如果有接口,就会跑到这个分支

			return new JdkDynamicAopProxy(config);

		}

	}
可以跟着注释看一下,这里决定了是使用JDK动态代理还是CGLIB代理。
JdkDynamicAopProxy实现
接下来就以JdkDynamicAopProxy为例,分析一下真正生成动态代理的getProxy()逻辑。
直接看代码
	public Object getProxy(@Nullable ClassLoader classLoader) {

		if (logger.isTraceEnabled()) {

			logger.trace("Creating JDK dynamic proxy: " + this.advised.getTargetSource());

		}

		//获取完整的代理接口

		Class<?>[] proxiedInterfaces = AopProxyUtils.completeProxiedInterfaces(this.advised, true);

                // 查找是否存在equals()和hashCode()方法

		findDefinedEqualsAndHashCodeMethods(proxiedInterfaces);

                // 调用JDK动态代理的API生成代理

		return Proxy.newProxyInstance(classLoader, proxiedInterfaces, this);

	}
这里的逻辑也简单明了,先获取最终的完整的代理接口,查找是否存在equals()和hashCode()方法,最后调用Proxy.newProxyInstance()生成动态代理。
先来看获取完整代理接口的方法AopProxyUtils.completeProxiedInterfaces(this.advised, true)。这个方法先获取了指定的代理接口,然后获取SpringProxy、Advised和DecoratingProxy三个接口,最后返回proxiedInterfaces。
	static Class<?>[] completeProxiedInterfaces(AdvisedSupport advised, boolean decoratingProxy) {

		Class<?>[] specifiedInterfaces = advised.getProxiedInterfaces();

		if (specifiedInterfaces.length == 0) {

			// No user-specified interfaces: check whether target class is an interface.

                        // 没有指定的代理接口,检查target class 是不是接口或者是不是Proxy的子类

			Class<?> targetClass = advised.getTargetClass();

			if (targetClass != null) {

				if (targetClass.isInterface()) {

					advised.setInterfaces(targetClass);

				}

				else if (Proxy.isProxyClass(targetClass)) {

					advised.setInterfaces(targetClass.getInterfaces());

				}

				specifiedInterfaces = advised.getProxiedInterfaces();

			}

		}

                // 判断是否加入这几个接口

		boolean addSpringProxy = !advised.isInterfaceProxied(SpringProxy.class);

		boolean addAdvised = !advised.isOpaque() && !advised.isInterfaceProxied(Advised.class);

		boolean addDecoratingProxy = (decoratingProxy && !advised.isInterfaceProxied(DecoratingProxy.class));

		int nonUserIfcCount = 0;

		if (addSpringProxy) {

			nonUserIfcCount++;

		}

		if (addAdvised) {

			nonUserIfcCount++;

		}

		if (addDecoratingProxy) {

			nonUserIfcCount++;

		}

		Class<?>[] proxiedInterfaces = new Class<?>[specifiedInterfaces.length + nonUserIfcCount];

		System.arraycopy(specifiedInterfaces, 0, proxiedInterfaces, 0, specifiedInterfaces.length);

		int index = specifiedInterfaces.length;

		if (addSpringProxy) {

			proxiedInterfaces[index] = SpringProxy.class;

			index++;

		}

		if (addAdvised) {

			proxiedInterfaces[index] = Advised.class;

			index++;

		}

		if (addDecoratingProxy) {

			proxiedInterfaces[index] = DecoratingProxy.class;

		}

		return proxiedInterfaces;

	}
findDefinedEqualsAndHashCodeMethods(proxiedInterfaces)比较简单,这里不贴代码了。
Proxy.newProxyInstance(),这里把代码贴出来,但是不做分析,详细原理看老生常谈系列之Aop--JDK动态代理的底层实现原理。
    @CallerSensitive

    public static Object newProxyInstance(ClassLoader loader,

                                          Class<?>[] interfaces,

                                          InvocationHandler h)

        throws IllegalArgumentException

    {

        Objects.requireNonNull(h);

        final Class<?>[] intfs = interfaces.clone();

        final SecurityManager sm = System.getSecurityManager();

        if (sm != null) {

            checkProxyAccess(Reflection.getCallerClass(), loader, intfs);

        }

        /*

         * Look up or generate the designated proxy class.

         */

        Class<?> cl = getProxyClass0(loader, intfs);

        /*

         * Invoke its constructor with the designated invocation handler.

         */

        try {

            if (sm != null) {

                checkNewProxyPermission(Reflection.getCallerClass(), cl);

            }

            final Constructor<?> cons = cl.getConstructor(constructorParams);

            final InvocationHandler ih = h;

            if (!Modifier.isPublic(cl.getModifiers())) {

                AccessController.doPrivileged(new PrivilegedAction<Void>() {

                    public Void run() {

                        cons.setAccessible(true);

                        return null;

                    }

                });

            }

            return cons.newInstance(new Object[]{h});

        } catch (IllegalAccessException|InstantiationException e) {

            throw new InternalError(e.toString(), e);

        } catch (InvocationTargetException e) {

            Throwable t = e.getCause();

            if (t instanceof RuntimeException) {

                throw (RuntimeException) t;

            } else {

                throw new InternalError(t.toString(), t);

            }

        } catch (NoSuchMethodException e) {

            throw new InternalError(e.toString(), e);

        }

    }
CglibAopProxy实现
直接来看getProxy()方法,会比JDK动态代理的复杂一奈奈。
	public Object getProxy(@Nullable ClassLoader classLoader) {

		if (logger.isTraceEnabled()) {

			logger.trace("Creating CGLIB proxy: " + this.advised.getTargetSource());

		}

		try {

			Class<?> rootClass = this.advised.getTargetClass();

			Assert.state(rootClass != null, "Target class must be available for creating a CGLIB proxy");

			Class<?> proxySuperClass = rootClass;

                        // 先获取rootClass,如果rootClass的name包含$$,继续获取它的父类,随后获取rootClass父类的接口,加入advised

			if (rootClass.getName().contains(ClassUtils.CGLIB_CLASS_SEPARATOR)) {

				proxySuperClass = rootClass.getSuperclass();

				Class<?>[] additionalInterfaces = rootClass.getInterfaces();

				for (Class<?> additionalInterface : additionalInterfaces) {

					this.advised.addInterface(additionalInterface);

				}

			}

			// Validate the class, writing log messages as necessary.

                        // 校验class

			validateClassIfNecessary(proxySuperClass, classLoader);

			// Configure CGLIB Enhancer...

                        // 使用Enhancer增强

			Enhancer enhancer = createEnhancer();

			if (classLoader != null) {

				enhancer.setClassLoader(classLoader);

				if (classLoader instanceof SmartClassLoader &&

						((SmartClassLoader) classLoader).isClassReloadable(proxySuperClass)) {

					enhancer.setUseCache(false);

				}

			}

			enhancer.setSuperclass(proxySuperClass);

			enhancer.setInterfaces(AopProxyUtils.completeProxiedInterfaces(this.advised));

			enhancer.setNamingPolicy(SpringNamingPolicy.INSTANCE);

			enhancer.setStrategy(new ClassLoaderAwareGeneratorStrategy(classLoader));

			// 重点关注:设置拦截器

			Callback[] callbacks = getCallbacks(rootClass);

			Class<?>[] types = new Class<?>[callbacks.length];

			for (int x = 0; x < types.length; x++) {

				types[x] = callbacks[x].getClass();

			}

			// fixedInterceptorMap only populated at this point, after getCallbacks call above

                        // 重点关注:设置CallbackFilter

			enhancer.setCallbackFilter(new ProxyCallbackFilter(

					this.advised.getConfigurationOnlyCopy(), this.fixedInterceptorMap, this.fixedInterceptorOffset));

			enhancer.setCallbackTypes(types);

			// Generate the proxy class and create a proxy instance.

                        // 生成代理

			return createProxyClassAndInstance(enhancer, callbacks);

		}

		// 省略异常捕获

	}
我们看重点方法,主要有getCallbacks()和createProxyClassAndInstance(enhancer, callbacks)。
来看一下getCallbacks()代码,方法虽长,但是很常规。就是获取主要的Callback,然后根据isStatic和isFrozen进行优化,优化的方法很简单,就是获取rootClass的所有方法rootClass.getMethods(),然后加入到最后要返回的callbacks里。
	private Callback[] getCallbacks(Class<?> rootClass) throws Exception {

		// Parameters used for optimization choices...

		// 对于 expose-proxy 属性的处理

		boolean exposeProxy = this.advised.isExposeProxy();

		boolean isFrozen = this.advised.isFrozen();

		boolean isStatic = this.advised.getTargetSource().isStatic();

                // 这一部分为获取Callback

		// Choose an "aop" interceptor (used for AOP calls).

		// 将拦截器封装在 DynamicAdvisedInterceptor中

		Callback aopInterceptor = new DynamicAdvisedInterceptor(this.advised);

		// Choose a "straight to target" interceptor. (used for calls that are

		// unadvised but can return this). May be required to expose the proxy.

		Callback targetInterceptor;

		if (exposeProxy) {

			targetInterceptor = (isStatic ?

					new StaticUnadvisedExposedInterceptor(this.advised.getTargetSource().getTarget()) :

					new DynamicUnadvisedExposedInterceptor(this.advised.getTargetSource()));

		}

		else {

			targetInterceptor = (isStatic ?

					new StaticUnadvisedInterceptor(this.advised.getTargetSource().getTarget()) :

					new DynamicUnadvisedInterceptor(this.advised.getTargetSource()));

		}

		// Choose a "direct to target" dispatcher (used for

		// unadvised calls to static targets that cannot return this).

		Callback targetDispatcher = (isStatic ?

				new StaticDispatcher(this.advised.getTargetSource().getTarget()) : new SerializableNoOp());

		Callback[] mainCallbacks = new Callback[] {

				// 将拦截器链加入 Callback中

				aopInterceptor,  // for normal advice

				targetInterceptor,  // invoke target without considering advice, if optimized

				new SerializableNoOp(),  // no override for methods mapped to this

				targetDispatcher, this.advisedDispatcher,

				new EqualsInterceptor(this.advised),

				new HashCodeInterceptor(this.advised)

		};

                // 这一部分为优化

		Callback[] callbacks;

		// If the target is a static one and the advice chain is frozen,

		// then we can make some optimizations by sending the AOP calls

		// direct to the target using the fixed chain for that method.

		if (isStatic && isFrozen) {

			Method[] methods = rootClass.getMethods();

			Callback[] fixedCallbacks = new Callback[methods.length];

			this.fixedInterceptorMap = new HashMap<>(methods.length);

			// TODO: small memory optimization here (can skip creation for methods with no advice)

			for (int x = 0; x < methods.length; x++) {

				Method method = methods[x];

				List<Object> chain = this.advised.getInterceptorsAndDynamicInterceptionAdvice(method, rootClass);

				fixedCallbacks[x] = new FixedChainStaticTargetInterceptor(

						chain, this.advised.getTargetSource().getTarget(), this.advised.getTargetClass());

				this.fixedInterceptorMap.put(method, x);

			}

			// Now copy both the callbacks from mainCallbacks

			// and fixedCallbacks into the callbacks array.

			callbacks = new Callback[mainCallbacks.length + fixedCallbacks.length];

			System.arraycopy(mainCallbacks, 0, callbacks, 0, mainCallbacks.length);

			System.arraycopy(fixedCallbacks, 0, callbacks, mainCallbacks.length, fixedCallbacks.length);

			this.fixedInterceptorOffset = mainCallbacks.length;

		}

		else {

			callbacks = mainCallbacks;

		}

		return callbacks;

	}
获取了Callbacks,接下来就是调用createProxyClassAndInstance(enhancer, callbacks)生成代理了。
	protected Object createProxyClassAndInstance(Enhancer enhancer, Callback[] callbacks) {

		enhancer.setInterceptDuringConstruction(false);

		enhancer.setCallbacks(callbacks);

		return (this.constructorArgs != null && this.constructorArgTypes != null ?

				enhancer.create(this.constructorArgTypes, this.constructorArgs) :

				enhancer.create());

	}
到这里已经可以通过enhancer.create()生成一个动态代理,这一块讲得比较简单,Spring Aop对Enhancer的配置基本被略过,Enhancer的原理如同JDK动态代理的原理一样,也都略过。主要是限于篇幅,再写下去就会非常冗长。具体原理可以看补充文章老生常谈系列之Aop--CGLIB动态代理的底层实现原理。
拦截器的执行顺序
切面增强方法获取到了,代理也生成了,那么在执行的时候,是怎么保证顺序的呢?@Before如何保证在@After前执行,从始至终我们看到,Spring Aop没有对切面进行任何的分类或许排序去保证执行顺序,那么这个顺序怎么保证呢?
其实这个由拦截器本身的实现来完成了。在方法执行的时候,如果有多个切面方法,那么这些会被组装成一个拦截链去执行。看到这里是不是更迷惑了,一个拦截链,又没有顺序,执行过去不就全乱了吗?其实不是的,我们来看一下代码的实现,这里摘取MethodBeforeAdviceInterceptor和AspectJAfterAdvice的invoke()方法实现就一目了然了。
MethodBeforeAdviceInterceptor#invoke()代码
	@Override

	public Object invoke(MethodInvocation mi) throws Throwable {

                // 先执行切面增强方法

		this.advice.before(mi.getMethod(), mi.getArguments(), mi.getThis());

                // 再执行下一个

		return mi.proceed();

	}
AspectJAfterAdvice#invoke()代码
	@Override

	public Object invoke(MethodInvocation mi) throws Throwable {

		try {

                        // 直接执行下一个,处理完成返回后再执行切面增强方法

			return mi.proceed();

		}

		finally {

                        // 后执行切面增强方法

			invokeAdviceMethod(getJoinPointMatch(), null, null);

		}

	}
看到这里应该已经明白为啥顺序能保证了,Spring Aop这里是比较巧妙地利用了方法的执行位置来完成这个顺序的保证,简单明了,还不需要对增强方法进行排序分类执行。
总结
这一篇主要分析了Spring Aop生成动态代理的准备工作,以及JDK动态代理和CGLIB动态代理的过程。当然这里只是简单的跟着注释走马观花看了一下Spring Aop生成动态代理的逻辑,还是比较简单的。至此,Spring Aop部分的逻辑已经走完,接下来的原理就是JDK动态代理和CGLIB动态代理的生成原理。这一部分涉及的就是JVM的反射和字节码修改等操作,欲知后事如何,且听下回分解。
如果有人看到这里,那在这里老话重提。与君共勉,路漫漫其修远兮,吾将上下而求索。
老生常谈系列之Aop--Spring Aop源码解析(二)的更多相关文章
- Spring系列(三):Spring IoC源码解析
一.Spring容器类继承图 二.容器前期准备 IoC源码解析入口: /** * @desc: ioc原理解析 启动 * @author: toby * @date: 2019/7/22 22:20 ...
- Spring Boot系列(四):Spring Boot源码解析
一.自动装配原理 之前博文已经讲过,@SpringBootApplication继承了@EnableAutoConfiguration,该注解导入了AutoConfigurationImport Se ...
- Spring IoC源码解析之getBean
一.实例化所有的非懒加载的单实例Bean 从org.springframework.context.support.AbstractApplicationContext#refresh方法开发,进入到 ...
- spring事务源码解析
前言 在spring jdbcTemplate 事务,各种诡异,包你醍醐灌顶!最后遗留了一个问题:spring是怎么样保证事务一致性的? 当然,spring事务内容挺多的,如果都要讲的话要花很长时间, ...
- Spring IoC源码解析之invokeBeanFactoryPostProcessors
一.Bean工厂的后置处理器 Bean工厂的后置处理器:BeanFactoryPostProcessor(触发时机:bean定义注册之后bean实例化之前)和BeanDefinitionRegistr ...
- Feign 系列(04)Contract 源码解析
Feign 系列(04)Contract 源码解析 [TOC] Spring Cloud 系列目录(https://www.cnblogs.com/binarylei/p/11563952.html# ...
- Spring Security源码解析一:UsernamePasswordAuthenticationFilter之登录流程
一.前言 spring security安全框架作为spring系列组件中的一个,被广泛的运用在各项目中,那么spring security在程序中的工作流程是个什么样的呢,它是如何进行一系列的鉴权和 ...
- Java 集合系列 09 HashMap详细介绍(源码解析)和使用示例
java 集合系列目录: Java 集合系列 01 总体框架 Java 集合系列 02 Collection架构 Java 集合系列 03 ArrayList详细介绍(源码解析)和使用示例 Java ...
- Java 集合系列 10 Hashtable详细介绍(源码解析)和使用示例
java 集合系列目录: Java 集合系列 01 总体框架 Java 集合系列 02 Collection架构 Java 集合系列 03 ArrayList详细介绍(源码解析)和使用示例 Java ...
- Java 集合系列 06 Stack详细介绍(源码解析)和使用示例
java 集合系列目录: Java 集合系列 01 总体框架 Java 集合系列 02 Collection架构 Java 集合系列 03 ArrayList详细介绍(源码解析)和使用示例 Java ...
随机推荐
- Java 中堆和栈有什么区别?
JVM 中堆和栈属于不同的内存区域,使用目的也不同.栈常用于保存方法帧和局 部变量,而对象总是在堆上分配.栈通常都比堆小,也不会在多个线程之间共享, 而堆被整个 JVM 的所有线程共享.
- Mybatis 开发 dao 的方法
1.分析SqlSession使用范围 1.1.SqlSessionFactoryBuilder 通过 SqlSessionFactoryBuilder 创建会话工厂 SqlSessionFactory ...
- Thoughtworks Technology Radar #26 技术雷达26期
Thoughtworks Technology Radar #26 Techniques Adopt Four key metrics Google Cloud's DevOps Research a ...
- elf,基于flexbox的响应式CSS框架
官网地址:http://jrainlau.github.io/elf/项目地址:https://github.com/jrainlau/elf 介绍 取名为"精灵"的elf,是一个 ...
- PC端免费高效的同声翻译
疫情期间上网课,对于英语听力较差或者需要观看英文视频,但实际上并没有双语字幕的这种情况下需要找一个实时的翻译工具.虽然说手机上此类软件比较多,但电脑上没有特别合适的应用可以做为一个免费实时翻译.哪怕是 ...
- java中为什么接口中的属性和方法都默认为public?
4)为什么接口中的属性和方法都默认为public?Sun公司当初为什么要把java的接口设计发明成这样? [新手可忽略不影响继续学习]答:如上所述,马克-to-win:既然接口强于抽象类能胜任作为和外 ...
- java中接口到底是干什么的,怎么用,深入剖析
6.总结性深一层次综合剖析接口概念[新手可忽略不影响继续学习] 通过以上的学习, 我们知道,所有定义在接口中的常量都默认为public.static和final.所有定义在接口中的方法默认为publi ...
- Mybatis实现批量删除数据
Mybatis实现批量删除操作 学习内容: 1. 使用 2. 代码实现 2.1 UserMapper.java 接口 2.2 UserMapper.xml 总结: 学习内容: 1. 使用 这里通过动态 ...
- 自定义API(Jar包)的创建与使用(简单实现案例)
@ 目录 学习内容 1. 自定义工具类 2. 导出jar 3. 加载Jar包 4. 调用自定义的API方法 总结 学习内容 1. 自定义工具类 新建一个java项目,然后创建包和工具类StringUt ...
- openlayers离线瓦片地图开发
近期业务繁忙...待更新