[WPF系列]-基础系列 Property Trigger, DataTrigger & EventTrigger
So far, we worked with styles by setting a static value for a specific property. However, using triggers, you can change the value of a given property, once a certain condition changes. Triggers come in multiple flavors: Property triggers, event triggers and data triggers. They allow you to do stuff that would normally be done in code-behind completely in markup instead, which is all a part of the ongoing process of separating style and code.
Property trigger
The most common trigger is the property trigger, which in markup is simply defined with a <Trigger> element. It watches a specific property on the owner control and when that property has a value that matches the specified value, properties can change. In theory this might sound a bit complicated, but it's actually quite simple once we turn theory into an example:
<Window x:Class="WpfTutorialSamples.Styles.StyleTriggersSample"
        xmlns="http://schemas.microsoft.com/winfx/2006/xaml/presentation"
        xmlns:x="http://schemas.microsoft.com/winfx/2006/xaml"
        Title="StyleTriggersSample" Height="100" Width="300">
    <Grid>
        <TextBlock Text="Hello, styled world!" FontSize="28" HorizontalAlignment="Center" VerticalAlignment="Center">
            <TextBlock.Style>
                <Style TargetType="TextBlock">
                    <Setter Property="Foreground" Value="Blue"></Setter>
                    <Style.Triggers>
                        <Trigger Property="IsMouseOver" Value="True">
                            <Setter Property="Foreground" Value="Red" />
                            <Setter Property="TextDecorations" Value="Underline" />
                        </Trigger>
                    </Style.Triggers>
                </Style>
            </TextBlock.Style>
        </TextBlock>
    </Grid>
</Window>
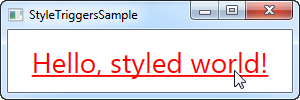
In this style, we set the Foreground property to blue, to make it look like a hyperlink. We then add a trigger, which listens to theIsMouseOver property - once this property changes to True, we apply two setters: We change the Foreground to red and then we make it underlined. This is a great example on how easy it is to use triggers to apply design changes, completely without any code-behind code.
We define a local style for this specific TextBlock, but as shown in the previous articles, the style could have been globally defined as well, if we wanted it to apply to all TextBlock controls in the application.
Data triggers
Data triggers, represented by the <DataTrigger> element, are used for properties that are not necessarily dependency properties. They work by creating a binding to a regular property, which is then monitored for changes. This also opens up for binding your trigger to a property on a different control. For instance, consider the following example:
<Window x:Class="WpfTutorialSamples.Styles.StyleDataTriggerSample"
        xmlns="http://schemas.microsoft.com/winfx/2006/xaml/presentation"
        xmlns:x="http://schemas.microsoft.com/winfx/2006/xaml"
        Title="StyleDataTriggerSample" Height="200" Width="200">
    <StackPanel HorizontalAlignment="Center" VerticalAlignment="Center">
        <CheckBox Name="cbSample" Content="Hello, world?" />
        <TextBlock HorizontalAlignment="Center" Margin="0,20,0,0" FontSize="48">
            <TextBlock.Style>
                <Style TargetType="TextBlock">
                    <Setter Property="Text" Value="No" />
                    <Setter Property="Foreground" Value="Red" />
                    <Style.Triggers>
                        <DataTrigger Binding="{Binding ElementName=cbSample, Path=IsChecked}" Value="True">
                            <Setter Property="Text" Value="Yes!" />
                            <Setter Property="Foreground" Value="Green" />
                        </DataTrigger>
                    </Style.Triggers>
                </Style>
            </TextBlock.Style>
        </TextBlock>
    </StackPanel>
</Window>
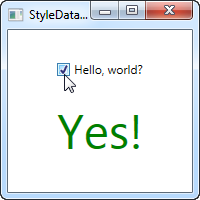
In this example, we have a CheckBox and a TextBlock. Using a DataTrigger, we bind the TextBlock to the IsCheckedproperty of the CheckBox. We then supply a default style, where the text is "No" and the foreground color is red, and then, using a DataTrigger, we supply a style for when the IsChecked property of the CheckBox is changed to True, in which case we make it green with a text saying "Yes!" (as seen on the screenshot).
Event triggers
Event triggers, represented by the <EventTrigger> element, are mostly used to trigger an animation, in response to an event being called. We haven't discussed animations yet, but to demonstrate how an event trigger works, we'll use them anyway. Have a look on the chapter about animations for more details. Here's the example:
<Window x:Class="WpfTutorialSamples.Styles.StyleEventTriggerSample"
        xmlns="http://schemas.microsoft.com/winfx/2006/xaml/presentation"
        xmlns:x="http://schemas.microsoft.com/winfx/2006/xaml"
        Title="StyleEventTriggerSample" Height="100" Width="300">
    <Grid>
        <TextBlock Name="lblStyled" Text="Hello, styled world!" FontSize="18" HorizontalAlignment="Center" VerticalAlignment="Center">
            <TextBlock.Style>
                <Style TargetType="TextBlock">
                    <Style.Triggers>
                        <EventTrigger RoutedEvent="MouseEnter">
                            <EventTrigger.Actions>
                                <BeginStoryboard>
                                    <Storyboard>
                                        <DoubleAnimation Duration="0:0:0.300" Storyboard.TargetProperty="FontSize" To="28" />
                                    </Storyboard>
                                </BeginStoryboard>
                            </EventTrigger.Actions>
                        </EventTrigger>
                        <EventTrigger RoutedEvent="MouseLeave">
                            <EventTrigger.Actions>
                                <BeginStoryboard>
                                    <Storyboard>
                                        <DoubleAnimation Duration="0:0:0.800" Storyboard.TargetProperty="FontSize" To="18" />
                                    </Storyboard>
                                </BeginStoryboard>
                            </EventTrigger.Actions>
                        </EventTrigger>
                    </Style.Triggers>
                </Style>
            </TextBlock.Style>
        </TextBlock>
    </Grid>
</Window>
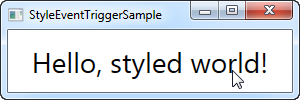
The markup might look a bit overwhelming, but if you run this sample and look at the result, you'll see that we've actually accomplished a pretty cool animation, going both ways, in ~20 lines of XAML. As you can see, I use an EventTrigger to subscribe to two events: MouseEnter and MouseLeave. When the mouse enters, I make a smooth and animated transition to a FontSize of 28 pixels in 300 milliseconds. When the mouse leaves, I change the FontSize back to 18 pixels but I do it a bit slower, just because it looks kind of cool.
Summary
WPF styles make it easy to get a consistent look, and with triggers, this look becomes dynamic. Styles are great in your application, but they're even better when used in control templates etc. You can read more about that elsewhere in this tutorial.
In the next article, we'll look at multi triggers, which allow us to apply styles based on multiple properties.
引用自 Trigger, DataTrigger & EventTrigger
参考
WPF MultiTrigger and MultiDataTrigger
[WPF系列]-基础系列 Property Trigger, DataTrigger & EventTrigger的更多相关文章
- [WPF系列]-基础系列 TabControl应用
引言 Tabcontrol控件也是我们在项目中经常用到的一个控件,用它将相关的信息组织在一起分类显示. 简介 ========================================= ...
- WPF入门教程系列一——基础
一. 前言 最近在学习WPF,学习WPF首先上的是微软的MSDN,然后再搜索了一下网络有关WPF的学习资料.为了温故而知新把学习过程记录下来,以备后查.这篇主要讲WPF的开发基础,介绍了如何使用V ...
- WPF入门教程系列(二) 深入剖析WPF Binding的使用方法
WPF入门教程系列(二) 深入剖析WPF Binding的使用方法 同一个对象(特指System.Windows.DependencyObject的子类)的同一种属性(特指DependencyProp ...
- WPF入门教程系列(一) 创建你的第一个WPF项目
WPF入门教程系列(一) 创建你的第一个WPF项目 WPF基础知识 快速学习绝不是从零学起的,良好的基础是快速入手的关键,下面先为大家摞列以下自己总结的学习WPF的几点基础知识: 1) C#基础语法知 ...
- C#基础系列——Attribute特性使用
前言:上篇 C#基础系列——反射笔记 总结了下反射得基础用法,这章我们来看看C#的另一个基础技术——特性. 1.什么是特性:就博主的理解,特性就是在类的类名称.属性.方法等上面加一个标记,使这些类.属 ...
- WPF入门教程系列二——Application介绍
一.Application介绍 WPF和WinForm 很相似, WPF与WinForm一样有一个 Application对象来进行一些全局的行为和操作,并且每个 Domain (应用程序域)中仅且只 ...
- C#基础系列:实现自己的ORM(反射以及Attribute在ORM中的应用)
反射以及Attribute在ORM中的应用 一. 反射什么是反射?简单点吧,反射就是在运行时动态获取对象信息的方法,比如运行时知道对象有哪些属性,方法,委托等等等等.反射有什么用呢?反射不但让你在运行 ...
- SpringBoot基础系列-SpringCache使用
原创文章,转载请标注出处:<SpringBoot基础系列-SpringCache使用> 一.概述 SpringCache本身是一个缓存体系的抽象实现,并没有具体的缓存能力,要使用Sprin ...
- SpringBoot基础系列-SpringBoot配置
原创作品,可以转载,但是请标注出处地址:https://www.cnblogs.com/V1haoge/p/9990680.html SpringBoot基础系列-SpringBoot配置 概述 属性 ...
随机推荐
- 7.9 数据注解特性--ForeignKey
外键特性,可以应用到类的属性中.Code-First默认的约定,对外键属性来说,假定外键属性的名称和主键属性是匹配的. 我们看一下,下面的代码: using System; using System. ...
- 【原创】Kafka console consumer源代码分析(二)
我们继续讨论console consumer的实现原理,本篇着重探讨ZookeeperConsumerConnector的使用,即后续所有的内容都由下面这条语句而起: val connector = ...
- Z.ExtensionMethods 一个强大的开源扩展库
今天有意的在博客园里面搜索了一下 Z.ExtensionMethods 这个扩展类库,确发现只搜到跟这个真正相关的才两篇博文而已,我都点进去看了一下,也都只是提到而已,没有专门介绍,才引起我写这篇文档 ...
- WinServer远程部署系统(RDSystem)
系统简介 RemoteDeploySystem是一套BS结构的远程部署管理系统(简称RDSystem),可以通过浏览器上传web站点和windows服务的更新包到RDSystem服务器,然后对多个服务 ...
- sqlserver2008存储过程(比较两个日期大小和获取当前月最大天数的存储过程)
下面简单介绍sqlserver2008两个常用的存储过程 1.比较两个日期大小的存储过程 2.获取当前月份的最大天数的存储过程 1.创建比较两个日期大小的存储过程 1)创建比较两个日期大小的存储过程 ...
- 如何在window下查看文件的md5
软件的话可以用Hash 不用软件,可以用window自带的命令行,首先在一个目录下按住Shift点击鼠标右键,调出CMD界面(或者直接win+R,cmd),命令行如下: certutil -hashf ...
- 使用KMP算法判断是否为旋转词
假设有两个字符串A.B,要判断它们是否为旋转词,只需构造一个"A+A"字符串,再与B比较,若B为A的旋转词,则使用KMP算法是可以得到结果的 代码如下: import java.u ...
- hadoop基本命令
1,hadoop job -list 列出Jobtracer上所有的作业 2,hadoop job -kill 任务 杀掉hadoop正在运行的任务 3,hadoop fs ...
- 像素与rem转换
// rem尺寸转换函数开始(function (doc, win) { var docEl = doc.documentElement, resizeEvt = 'orienta ...
- Linux0.11内核--内存管理之1.初始化
[版权所有,转载请注明出处.出处:http://www.cnblogs.com/joey-hua/p/5597705.html ] Linux内核因为使用了内存分页机制,所以相对来说好理解些.因为内存 ...