
nginx详解、反向代理、负载均衡和LNMP架构
资源池
nginx官方网站:http://nginx.org/
nginx官方文档:http://nginx.org/en/docs/
本章资源: 点击这里 资源提取码:u2jv
1、nginx简介
- Nginx (engine x) 是俄罗斯人编写的十分轻量级的、高性能的HTTP和反向代理web服务器,同时也提供了IMAP/POP3/SMTP服务;
- nginx的特点是占有内存少,并发能力强,nginx 以 epoll and kqueue 作为开发模型,并发能力确实在同类型的网页服务器中表现较好;
- nginx 作为负载均衡服务器,支持 7 层负载均衡。
- nginx 应用异步IO:遇到IO就切换
2、nginx对比apache
| nginx | apache |
|---|---|
| 轻量级服务器 | 重量级服务器 |
| 适合处理静态页面 | 适合处理动态页面 |
| 处理高并发能力比较好 高并发占用资源少 |
稳定性非常好、技术成熟 |
3、nginx下载
第一步:配置网络yum源
╭─root@localhost.localdomain ~

╰─➤  vim /etc/yum.repos.d/local.repo

...

[local]

name=local

enabled=1

gpgcheck=0

baseurl=file:///mnt

[epel]

name=epel

enabled=1

gpgcheck=0

baseurl=https://mirrors.aliyun.com/epel/7Server/x86_64

...

╭─root@localhost.localdomain ~

╰─➤  mount /dev/cdrom /mnt      #挂载cd

mount: /dev/sr0 is write-protected, mounting read-only

╭─root@localhost.localdomain ~

╰─➤  yum repolist     #查看
第二步:下载nginx
╭─root@localhost.localdomain ~

╰─➤  yum install nginx -y
第三步:启动nginx
╭─root@localhost.localdomain ~

╰─➤  systemctl start nginx
第四步:防火墙放行80端口
╭─root@localhost.localdomain ~

╰─➤  iptables -I INPUT -p tcp --dport 80 -j ACCEPT
第五步:浏览器访问
4、nginx主配置文件简介
╭─root@localhost.localdomain /etc/nginx

╰─➤  cat nginx.conf

# For more information on configuration, see:

#   * Official English Documentation: http://nginx.org/en/docs/

#   * Official Russian Documentation: http://nginx.org/ru/docs/

user nginx;    #运行nginx服务的属主

worker_processes auto;   #进程数与内核数相同

error_log /var/log/nginx/error.log;    #指定错误日志

pid /run/nginx.pid;   #进程id

# Load dynamic modules. See /usr/share/nginx/README.dynamic.

include /usr/share/nginx/modules/*.conf;    #加载的模块

events {

    worker_connections 1024;     #一个进程可以接受多少用户请求

}

http {     # http下定义了网站的信息

    log_format  main  '$remote_addr - $remote_user [$time_local] "$request" '

                      '$status $body_bytes_sent "$http_referer" '

                      '"$http_user_agent" "$http_x_forwarded_for"';

          #log_format定义了日志的格式

    access_log  /var/log/nginx/access.log  main;

          #access_log定义访问网站的日志记录

    sendfile            on;

    tcp_nopush          on;

    tcp_nodelay         on;

    keepalive_timeout   65;

    types_hash_max_size 2048;   #文件传输的规则

    include             /etc/nginx/mime.types;

    default_type        application/octet-stream;

    # Load modular configuration files from the /etc/nginx/conf.d directory.

    # See http://nginx.org/en/docs/ngx_core_module.html#include

    # for more information.

    include /etc/nginx/conf.d/*.conf;   #指定配置文件

    server{   #定义一个新的网站虚拟主机

         listen  80;    #监听端口

         root /var/www/html;    #指定网站根目录

         index  index.html;   #指定网站首页文件

        }

    server {

        listen       80 default_server;

        listen       [::]:80 default_server;

        server_name  _;

        root         /usr/share/nginx/html;

        # Load configuration files for the default server block.

        include /etc/nginx/default.d/*.conf;

        location / {    #定义访问规则

        }

        error_page 404 /404.html;   #指定错误文件

            location = /40x.html {

        root  /var/www/html      #可以指定错误文件目录

        }

        error_page 500 502 503 504 /50x.html;

            location = /50x.html {

        }

    }

# Settings for a TLS enabled server.

# 启用TLS的服务器的设置

#

#    server {

#        listen       443 ssl http2 default_server;

#        listen       [::]:443 ssl http2 default_server;

#        server_name  _;

#        root         /usr/share/nginx/html;

#

#        ssl_certificate "/etc/pki/nginx/server.crt";

#        ssl_certificate_key "/etc/pki/nginx/private/server.key";

#        ssl_session_cache shared:SSL:1m;

#        ssl_session_timeout  10m;

#        ssl_ciphers HIGH:!aNULL:!MD5;

#        ssl_prefer_server_ciphers on;

#

#        # Load configuration files for the default server block.

#        include /etc/nginx/default.d/*.conf;

#

#        location / {

#        }

#

#        error_page 404 /404.html;

#            location = /40x.html {

#        }

#

#        error_page 500 502 503 504 /50x.html;

#            location = /50x.html {

#        }

#    }

}
5、nginx反向代理
nginx反向代理讲解
location  (匹配规则)+[匹配内容] {

	proxy_pass url;

	}
1、匹配规则有五种(优先等级由高到低)
 =       # = 表示精确匹配,只有完全匹配上才能生效

 ^~      #一般匹配一个目录

 ~        #区分大小写的正则匹配

 ~*      #不区分大小写正则匹配

 /        #通用匹配
2、完全代理与不完全代理
假设:[匹配内容] =admin

url=http://192.168.64.4;

不完全代理:

	如果不加斜杆上面location表示的含义是请求http://192.168.64.4/admin

      客户端admin文件或者目录必须存在!

      [匹配内容] 会自动填补到查找地址的后面.

url=http://192.168.64.4/;

完全代理:

	如果加斜杆上面location表示的含义是请求http://192.168.64.4/

       客户端admin文件或者目录不需要存在!

       [匹配内容] 不会自动填补到查找地址的后面.
动静分离实验
第一步:布置环境
192.168.80.3 --->主服务器
192.168.80.4 --->静态节点 (apache)
192.168.80.5 --->动态节点 (apache)
第二步:在主服务器部署nginx并配置动静分离规则
╭─root@localhost.localdomain /etc/nginx

╰─➤  vim /etc/nginx/nginx.conf

...

# Load configuration files for the default server block.

        include /etc/nginx/default.d/*.conf;

        location ~ html$ {

        proxy_pass http://192.168.80.4;   #分号结束

        }

        location ~ php$ {

        proxy_pass http://192.168.80.5;

        }

...

╭─root@localhost.localdomain /etc/nginx

╰─➤  nginx -t

nginx: the configuration file /etc/nginx/nginx.conf syntax is ok

nginx: configuration file /etc/nginx/nginx.conf test is successful

╭─root@localhost.localdomain /etc/nginx

╰─➤  systemctl restart nginx
第三步:配置静态服务器
╭─root@localhost.localdomain /etc/yum.repos.d

╰─➤  yum install httpd -y

╭─root@localhost.localdomain /etc/yum.repos.d

╰─➤  echo "i am html" >> /var/www/html/index.html

╭─root@localhost.localdomain /etc/yum.repos.d

╰─➤  systemctl restart httpd.service
第四步:配置动态服务器
╭─root@localhost.localdomain /etc/yum.repos.d

╰─➤  yum install httpd  php -y

╭─root@localhost.localdomain /etc/yum.repos.d

╰─➤  vim /etc/httpd/conf/httpd.conf

...

<IfModule dir_module>

    DirectoryIndex index.php  index.html

</IfModule>

...

╭─root@localhost.localdomain /etc/yum.repos.d

╰─➤  systemctl restart httpd.service

╭─root@localhost.localdomain /etc/yum.repos.d

╰─➤  vim /var/www/html/index.php

...

<?php

phpinfo();

?>

...
第五步:浏览器访问主服务器

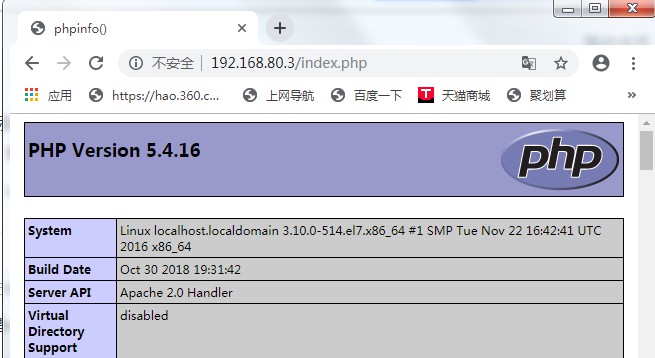
6、负载均衡
weight :权重
max_fails:最大失败次数
fail_timeout:失败等待时间
eg:max_fails=2 fail_timeout=2
表示:请求2s没有回复记1次失败;2次失败将该服务器提出该upstream组;
第一步:修改配置文件
╭─root@localhost.localdomain /usr/share/nginx/html

╰─➤  vim /etc/nginx/nginx.conf

...

    include /etc/nginx/conf.d/*.conf;

    upstream du1 {

        server 192.168.80.4 weight=5 max_fails=2 fail_timeout=2;

        server 192.168.80.5 weight=2 max_fails=2 fail_timeout=2;

        }

    server {

        listen       80 default_server;

        listen       [::]:80 default_server;

        server_name  _;

        root         /usr/share/nginx/html;

        # Load configuration files for the default server block.

        include /etc/nginx/default.d/*.conf;

        location /  {

        proxy_pass http://du1;

        }

...
第二步:检测语法并重启
╭─root@localhost.localdomain /usr/share/nginx/html

╰─➤  nginx -t

nginx: the configuration file /etc/nginx/nginx.conf syntax is ok

nginx: configuration file /etc/nginx/nginx.conf test is successful

╭─root@localhost.localdomain /usr/share/nginx/html

╰─➤  systemctl restart nginx.service
第三步:监控access日志
192.168.80.4
╭─root@localhost.localdomain /etc/httpd/logs

╰─➤  echo '' > /etc/httpd/logs/access_log

╭─root@localhost.localdomain /etc/httpd/logs

╰─➤  cat /etc/httpd/logs/access_log

╭─root@localhost.localdomain /etc/httpd/logs

╰─➤  tail -f /etc/httpd/logs/access_log
192.168.80.5
╭─root@localhost.localdomain /var/www/html

╰─➤  echo '' > /etc/httpd/logs/access_log

╭─root@localhost.localdomain /var/www/html

╰─➤  tail -f /etc/httpd/logs/access_log
第四步、浏览器访问
192.168.80.4
╭─root@localhost.localdomain /etc/httpd/logs

╰─➤  tail -f /etc/httpd/logs/access_log

192.168.80.3 - - [29/May/2019:18:40:58 +0800] "GET / HTTP/1.0" 304 - "-" "Mozilla/5.0 (Windows NT 6.1; Win64; x64) AppleWebKit/537.36 (KHTML, like Gecko) Chrome/74.0.3729.169 Safari/537.36"

192.168.80.3 - - [29/May/2019:18:41:03 +0800] "GET / HTTP/1.0" 200 10 "-" "Mozilla/5.0 (Windows NT 6.1; Win64; x64) AppleWebKit/537.36 (KHTML, like Gecko) Chrome/74.0.3729.169 Safari/537.36"

192.168.80.3 - - [29/May/2019:18:41:03 +0800] "GET / HTTP/1.0" 304 - "-" "Mozilla/5.0 (Windows NT 6.1; Win64; x64) AppleWebKit/537.36 (KHTML, like Gecko) Chrome/74.0.3729.169 Safari/537.36"

192.168.80.3 - - [29/May/2019:18:41:03 +0800] "GET / HTTP/1.0" 304 - "-" "Mozilla/5.0 (Windows NT 6.1; Win64; x64) AppleWebKit/537.36 (KHTML, like Gecko) Chrome/74.0.3729.169 Safari/537.36"

192.168.80.3 - - [29/May/2019:18:41:04 +0800] "GET / HTTP/1.0" 200 10 "-" "Mozilla/5.0 (Windows NT 6.1; Win64; x64) AppleWebKit/537.36 (KHTML, like Gecko) Chrome/74.0.3729.169 Safari/537.36"

192.168.80.3 - - [29/May/2019:18:41:04 +0800] "GET / HTTP/1.0" 304 - "-" "Mozilla/5.0 (Windows NT 6.1; Win64; x64) AppleWebKit/537.36 (KHTML, like Gecko) Chrome/74.0.3729.169 Safari/537.36"

192.168.80.3 - - [29/May/2019:18:41:04 +0800] "GET / HTTP/1.0" 200 10 "-" "Mozilla/5.0 (Windows NT 6.1; Win64; x64) AppleWebKit/537.36 (KHTML, like Gecko) Chrome/74.0.3729.169 Safari/537.36"

192.168.80.3 - - [29/May/2019:18:41:04 +0800] "GET / HTTP/1.0" 304 - "-" "Mozilla/5.0 (Windows NT 6.1; Win64; x64) AppleWebKit/537.36 (KHTML, like Gecko) Chrome/74.0.3729.169 Safari/537.36"

192.168.80.3 - - [29/May/2019:18:41:05 +0800] "GET / HTTP/1.0" 304 - "-" "Mozilla/5.0 (Windows NT 6.1; Win64; x64) AppleWebKit/537.36 (KHTML, like Gecko) Chrome/74.0.3729.169 Safari/537.36"

192.168.80.3 - - [29/May/2019:18:41:05 +0800] "GET / HTTP/1.0" 200 10 "-" "Mozilla/5.0 (Windows NT 6.1; Win64; x64) AppleWebKit/537.36 (KHTML, like Gecko) Chrome/74.0.3729.169 Safari/537.36"

192.168.80.3 - - [29/May/2019:18:41:05 +0800] "GET / HTTP/1.0" 304 - "-" "Mozilla/5.0 (Windows NT 6.1; Win64; x64) AppleWebKit/537.36 (KHTML, like Gecko) Chrome/74.0.3729.169 Safari/537.36"

192.168.80.3 - - [29/May/2019:18:41:06 +0800] "GET / HTTP/1.0" 200 10 "-" "Mozilla/5.0 (Windows NT 6.1; Win64; x64) AppleWebKit/537.36 (KHTML, like Gecko) Chrome/74.0.3729.169 Safari/537.36"

192.168.80.3 - - [29/May/2019:18:41:06 +0800] "GET / HTTP/1.0" 304 - "-" "Mozilla/5.0 (Windows NT 6.1; Win64; x64) AppleWebKit/537.36 (KHTML, like Gecko) Chrome/74.0.3729.169 Safari/537.36"
192.168.80.5
╭─root@localhost.localdomain /var/www/html

╰─➤  tail -f /etc/httpd/logs/access_log

192.168.80.3 - - [29/May/2019:18:40:59 +0800] "GET / HTTP/1.0" 200 16 "-" "Mozilla/5.0 (Windows NT 6.1; Win64; x64) AppleWebKit/537.36 (KHTML, like Gecko) Chrome/74.0.3729.169 Safari/537.36"

192.168.80.3 - - [29/May/2019:18:41:03 +0800] "GET / HTTP/1.0" 200 16 "-" "Mozilla/5.0 (Windows NT 6.1; Win64; x64) AppleWebKit/537.36 (KHTML, like Gecko) Chrome/74.0.3729.169 Safari/537.36"

192.168.80.3 - - [29/May/2019:18:41:04 +0800] "GET / HTTP/1.0" 200 16 "-" "Mozilla/5.0 (Windows NT 6.1; Win64; x64) AppleWebKit/537.36 (KHTML, like Gecko) Chrome/74.0.3729.169 Safari/537.36"

192.168.80.3 - - [29/May/2019:18:41:05 +0800] "GET / HTTP/1.0" 200 16 "-" "Mozilla/5.0 (Windows NT 6.1; Win64; x64) AppleWebKit/537.36 (KHTML, like Gecko) Chrome/74.0.3729.169 Safari/537.36"

192.168.80.3 - - [29/May/2019:18:41:05 +0800] "GET / HTTP/1.0" 200 16 "-" "Mozilla/5.0 (Windows NT 6.1; Win64; x64) AppleWebKit/537.36 (KHTML, like Gecko) Chrome/74.0.3729.169 Safari/537.36"
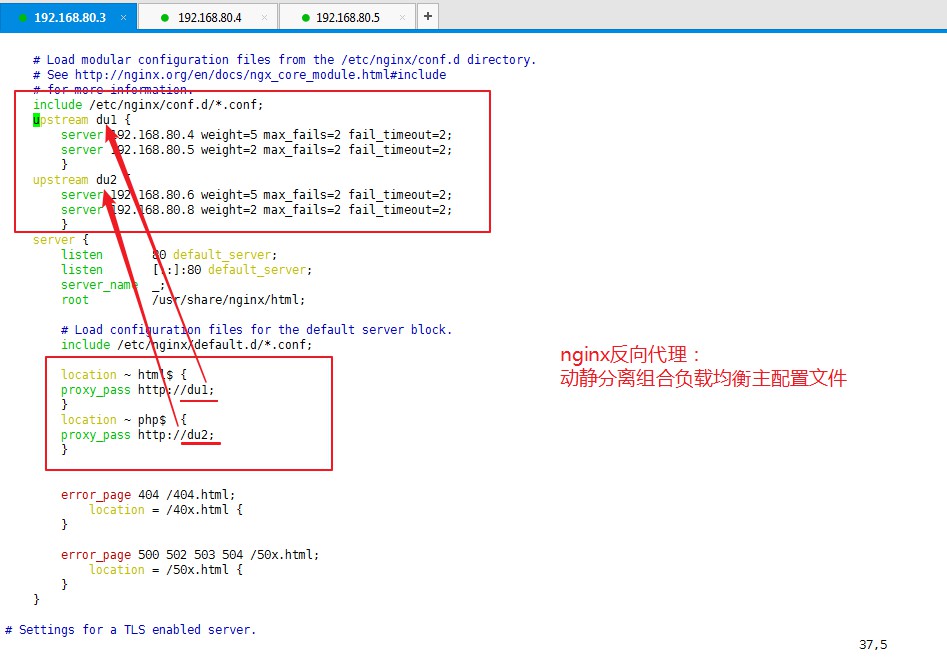
7、拓展:负载均衡组合动静分离
8、LNMP架构上线动态网站(实验)
第一步:下载相关软件
╭─root@localhost.localdomain ~

╰─➤  yum install nginx php php-mysql mariadb-server php-fpm -y
第二步:编辑php匹配规则
╭─root@localhost.localdomain ~

╰─➤  vim /etc/nginx/nginx.conf

...

    include /etc/nginx/conf.d/*.conf;

    server {

        listen       80 default_server;

        listen       [::]:80 default_server;

        server_name  _;

        root         /usr/share/nginx/html;

        index  index.php  index.html;

        # Load configuration files for the default server block.

        include /etc/nginx/default.d/*.conf;

        location / {

        }

        location ~ php$ {

         include fastcgi.conf;

         fastcgi_pass 127.0.0.1:9000;

         }

...

╭─root@localhost.localdomain ~

╰─➤  nginx -t

nginx: the configuration file /etc/nginx/nginx.conf syntax is ok

nginx: configuration file /etc/nginx/nginx.conf test is successful

╭─root@localhost.localdomain ~

╰─➤  systemctl restart nginx.service
第三步:启动php-fpm
╭─root@localhost.localdomain ~

╰─➤  systemctl restart php-fpm
第四步:启动数据库
╭─root@localhost.localdomain ~

╰─➤  systemctl restart mariadb
第五步:创建数据库添加用户
╭─root@localhost.localdomain ~

╰─➤  mysql -u root

Welcome to the MariaDB monitor.  Commands end with ; or \g.

Your MariaDB connection id is 2

Server version: 5.5.60-MariaDB MariaDB Server

Copyright (c) 2000, 2018, Oracle, MariaDB Corporation Ab and others.

Type 'help;' or '\h' for help. Type '\c' to clear the current input statement.

MariaDB [(none)]> create database du;

Query OK, 1 row affected (0.00 sec)

MariaDB [(none)]> grant all on *.* to du@'localhost' identified by '123';

Query OK, 0 rows affected (0.00 sec)

MariaDB [(none)]> exit

Bye
第六步:上传wordpress安装包至nginx网站根目录下/usr/share/nginx/html 并解压
- 注意:wordpress安装包本章开头资源池中寻找
╭─root@localhost.localdomain ~

╰─➤  cd /usr/share/nginx/html

╭─root@localhost.localdomain /usr/share/nginx/html

╰─➤  yum install unzip lrzsz -y

╭─root@localhost.localdomain /usr/share/nginx/html

╰─➤  rz

╭─root@localhost.localdomain /usr/share/nginx/html

╰─➤  unzip wordpress-3.3.1-zh_CN.zip

╭─root@localhost.localdomain /usr/share/nginx/html

╰─➤  cp ./wordpress/* . -a

╭─root@localhost.localdomain /usr/share/nginx/html

╰─➤  cp wp-config-sample.php wp-config.php -a

╭─root@localhost.localdomain /usr/share/nginx/html

╰─➤  vim wp-config.php

...

/** WordPress 数据库的名称 */

define('DB_NAME', 'du');

/** MySQL 数据库用户名 */

define('DB_USER', 'du');

/** MySQL 数据库密码 */

define('DB_PASSWORD', '123');

/** MySQL 主机 */

define('DB_HOST', 'localhost');

...
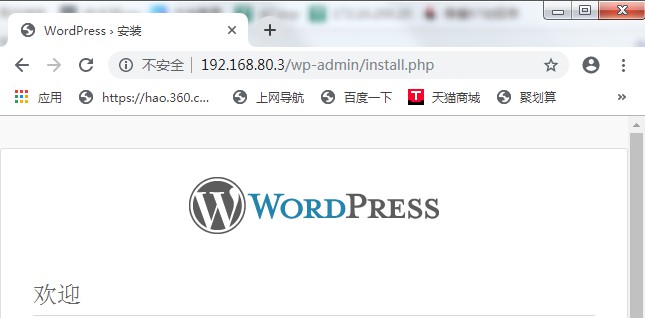
第七步:浏览器访问

nginx详解、反向代理、负载均衡和LNMP架构的更多相关文章
- nginx详解反向代理,负载均衡,LNMP架构上线动态网站
1.nginx介绍 nginx.org Nginx是俄罗斯人编写的十分轻量级的HTTP服务器,Nginx,它的发音为“engine X”,是一个高性能的HTTP和反向代理服务器,同时也是一个IMAP/ ...
- nginx 详解反向代理负载均衡
什么是反向代理负载均衡 使用代理服务器可以将请求转发给内部的Web服务器,使用这种加速模式显然可以提升静态网页的访问速度.因此也可以考虑使用这种技术,让代理服务器将请求 均匀转发给多台内部Web服务器 ...
- Nginx特性验证-反向代理/负载均衡/页面缓存/URL重定向
原文发表于cu:2016-08-25 参考文档: Nginx 反向代理.负载均衡.页面缓存.URL重写等:http://freeloda.blog.51cto.com/2033581/1288553 ...
- nginx详解反向代理、负载均衡、LNMP架构上线动态网站(week4_day1_part1)-技术流ken
nginx介绍 Nginx是俄罗斯人编写的十分轻量级的HTTP服务器,Nginx,它的发音为“engine X”,是一个高性能的HTTP和反向代理服务器,同时也是一个IMAP/POP3/SMTP 代理 ...
- nginx详解反向代理、负载均衡、LNMP架构上线动态网站
简介 Nginx是俄罗斯人编写的十分轻量级的HTTP服务器,Nginx,它的发音为“engine X”,是一个高性能的HTTP和反向代理服务器,同时也是一个IMAP/POP3/SMTP 代理服务器.N ...
- nginx实现http反向代理+负载均衡
原理 反向代理:反向代理(reverse proxy)方式是指以代理来接受internet上的连接请求,然后将请求转发给内部网络上的服务器,并将从服务器上得到的结果返回给internet上请求连接的客 ...
- nginx 虚拟主机+反向代理+负载均衡
nginx是一款免费.开源的http服务器,它是由俄罗斯程序设计师开发的,官方测试,nginx能支撑5万的并发量,主要功能有虚拟主机.反向代理和负载均衡等. nginx配置 # 全局块 ... # e ...
- 项目实战2.2—nginx 反向代理负载均衡、动静分离和缓存的实现
实验一:实现反向代理负载均衡且动静分离 1.环境准备: 机器名称 IP配置 服务角色 备注 nginx VIP:172.17.11.11 反向代理服务器 开启代理功能 设置监控,调度 rs01 RIP ...
- 项目实战2.1—nginx 反向代理负载均衡、动静分离和缓存的实现
总项目流程图,详见 http://www.cnblogs.com/along21/p/8000812.html 实验一:实现反向代理负载均衡且动静分离 1.环境准备: 机器名称 IP配置 服务角色 备 ...
- 项目实战02:nginx 反向代理负载均衡、动静分离和缓存的实现
目录 实验一:实现反向代理负载均衡且动静分离 1.环境准备: 2.下载编译安装tengine 3.设置代理服务器的配置文件 4.启动tengine服务 5.开启后端的web服务 6.测试 实验二:ng ...
随机推荐
- Eclipse导入外部jar包的步骤
(1)首先在项目的跟目录下先建一个名字为lib的文件夹,通常外部导入的jar包都放在这个文件夹下面. (2)将需要用到的jar包复制到lib文件夹下面. (3)在项目中导入jar包 右键项目,选择Bu ...
- css3 知识点积累
-moz- 兼容火狐浏览器-webkit- 兼容chrome 和safari1.角度 transform:rotate(30dge) 水平线与div 第四象限30度 transform: ...
- Jetbrains系列产品重置试用方法
0x0. 项目背景 Jetbrains家的产品有一个很良心的地方,他会允许你试用30天(这个数字写死在代码里了)以评估是否你真的需要为它而付费.但很多时候会出现一种情况:IDE并不能按照我们实际的试用 ...
- 【MyBatis】MyBatis 动态 SQL
MyBatis 动态SQL if 可以根据实体类的不同取值,使用不同的 SQL 语句来进行查询. 使用动态 SQL 最常见情景是根据条件包含 where 子句的一部分. 持久层 DAO 接口: pub ...
- 剑指offer-56数组中数字出现的次数
题目 一个整型数组 nums 里除两个数字之外,其他数字都出现了两次.请写程序找出这两个只出现一次的数字.要求时间复杂度是O(n),空间复杂度是O(1). 输入:nums = [4,1,4,6] 输出 ...
- appium元素识别方式实战
github代码:: https://github.com/w550856163/App_Demo.git tag: V1.1 Appium Inspector定位工具界面介绍: Selecte ...
- 洛谷P3275 [SCOI2011]糖果(差分约束)
题目描述 幼儿园里有 $N$ 个小朋友,$lxhgww $老师现在想要给这些小朋友们分配糖果,要求每个小朋友都要分到糖果.但是小朋友们也有嫉妒心,总是会提出一些要求,比如小明不希望小红分到的糖果比他的 ...
- 使用idea插件识别log文件的相关设置
最近要读一些spring boot项目产生的log文件,众所周知,idea拥有强大的插件系统.当我打开log文件时,idea自动帮我推荐了ideolog这个插件. 但是当我安装好之后发现系统并不能完全 ...
- Docker下梦织CMS的部署
摘要:Docker的广泛应用相对于传统的虚拟机而言提高了资源的利用率,推广后docker的影响不容忽视,在启动速度.硬盘.内存.运行密度.性能.隔离性和迁移性方面都有很大的提高.本次实训我们在cent ...
- Ice系列--基于IceGrid的部署方案
前言 前一篇文章介绍了IceGrid的简单应用.这篇文章来介绍一下它的高端玩法-如何将模板,复制组,知名对象应用于部署方案及其作用. 基于模板的部署方案 之前介绍了xml格式的配置文件通过各种描述符如 ...