vue脚手架使用swiper /引入js文件/引入css文件
vue引入swiper vue使用swiper vue脚手架使用swiper /引入js文件/引入css文件
欢迎加入前端交流群来获取视频资料以及前端学习资料:
----------------------------------------------------------
转载文章请注明出处!
----------------------------------------------------------
如果只是要使用轮播效果的话可以参考下一些vue组件;比如这篇文章
--------2019.7.9------------------
请参考swiper官方插件:https://github.com/surmon-china/vue-awesome-swiper
--------2019.7.9------------------
方法一:( 请先使用这种方法;更新于2018-05-14)
下载swiper:
npm install swiper --save-dev
swiper4.0使用入口:http://www.swiper.com.cn/usage/index.html;
html:
<div class="swiper-container">

    <div class="swiper-wrapper">

        <div class="swiper-slide">Slide </div>

        <div class="swiper-slide">Slide </div>

        <div class="swiper-slide">Slide </div>

    </div>

    <!-- 如果需要分页器 -->

    <div class="swiper-pagination"></div>

    <!-- 如果需要导航按钮 -->

    <div class="swiper-button-prev"></div>

    <div class="swiper-button-next"></div>

    <!-- 如果需要滚动条 -->

    <div class="swiper-scrollbar"></div>

</div>
在需要使用swiper的组件里引入swiper,swiper的初始化放在mounted里(可以把官网例子的启动 var mySwiper = 删掉);
js:
<script>

import Swiper from 'swiper';

export default {

  name: 'HelloWorld',

  data () {

    return {

      msg: 'Welcome to Your Vue.js App'

    }

  },

  mounted(){

     new Swiper ('.swiper-container', {

    loop: true,

    // 如果需要分页器

    pagination: '.swiper-pagination',

    // 如果需要前进后退按钮

    nextButton: '.swiper-button-next',

    prevButton: '.swiper-button-prev',

    // 如果需要滚动条

    scrollbar: '.swiper-scrollbar',

  })

  }

}

</script>
css:
在main.js里引入css
import 'swiper/dist/css/swiper.css';
然后我们在用到swiper的组件里写点样式
<style scoped>

 .swiper-container {

        width: 500px;

        height: 300px;

        margin: 20px auto;

    }

</style>
-----------------------------------我是分割线-----------------------------------------------------------
方法二:(以下是2017年10月写的)
1.安装vue-cli
参考地址:https://github.com/vuejs/vue-cli
如果不使用严格语法需要在后三项打no;(加了挺头疼的,老是报错,但是对自己的代码规范性也是有很大的帮助的)
2.swiper下载示例代码
参考地址:http://www.swiper.com.cn/usage/index.html
一:单个组件使用:
3.在刚下载好的vue-cli里的helloworld.vue进行代码编写。
3.1html部分:
<template>
<div class="hello">
<div class="swiper-container">
<div class="swiper-wrapper">
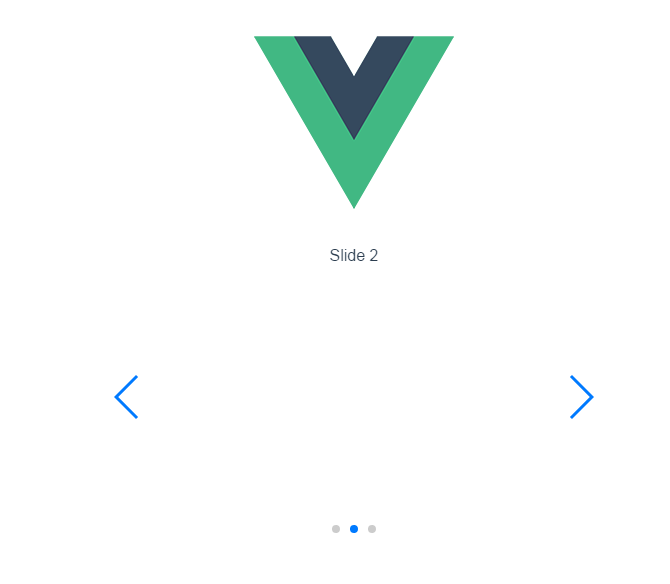
<div class="swiper-slide">Slide 1</div>
<div class="swiper-slide">Slide 2</div>
<div class="swiper-slide">Slide 3</div>
</div>
<!-- 如果需要分页器 -->
<div class="swiper-pagination"></div> <!-- 如果需要导航按钮 -->
<div class="swiper-button-prev"></div>
<div class="swiper-button-next"></div> <!-- 如果需要滚动条 -->
<div class="swiper-scrollbar"></div>
</div>
</div>
</template>
3.2 js部分:
这里使用import引入swiper.js文件;
swiper的启动放在mounted里执行;
<script>

import'../assets/js/swiper.min.js'

export default {

  name: 'HelloWorld',

  data () {

    return {

      msg: 'Welcome to Your Vue.js App'

    }

  },

  mounted(){

     var mySwiper = new Swiper ('.swiper-container', {

    loop: true,

    // 如果需要分页器

    pagination: '.swiper-pagination',

    // 如果需要前进后退按钮

    nextButton: '.swiper-button-next',

    prevButton: '.swiper-button-prev',

    // 如果需要滚动条

    scrollbar: '.swiper-scrollbar',

  })

  }

}

</script>
3.3css部分:
 <style scoped>

 @import'../assets/css/swiper.min.css';

     body {

         margin: 0;

         padding: 0;

     }

     .swiper-container {

         width: 500px;

         height: 300px;

         margin: 20px auto;

     }

     </style>
4.看似大工告成,这时候会报错:
Uncaught TypeError: Cannot assign to read only property 'exports' of object '#<Object>'
这个错误查文档说是:
在webpack打包的时候,可以在js文件中混用require和export。但是不能混用import 以及module.exports。
因为webpack 2中不允许混用import和module.exports
我们只需要吧.babelrc文件里的第11行代码插件项"plugins": ["transform-runtime"],中的transform-runtime删掉即可;
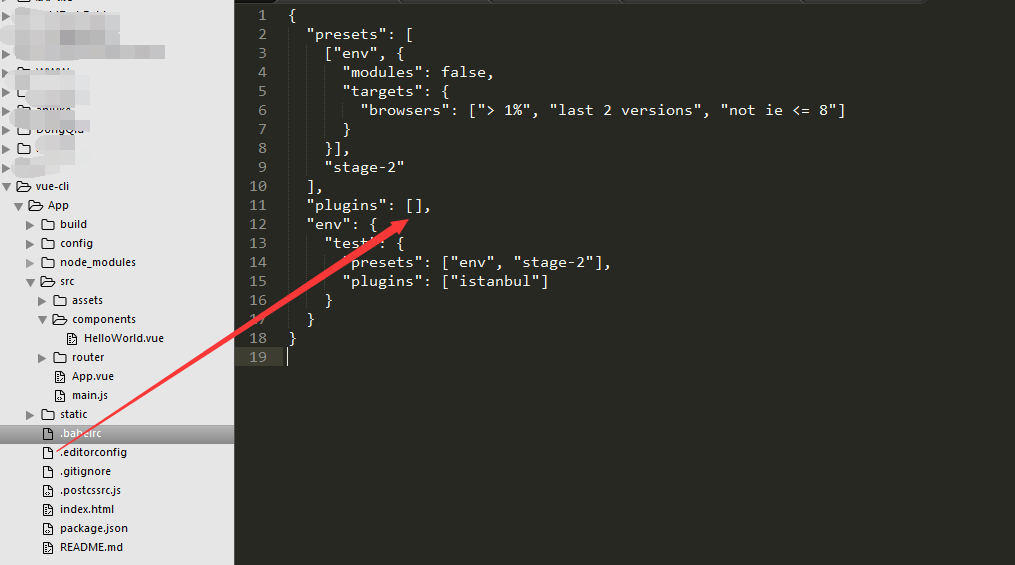
 {

   "presets": [

     ["env", {

       "modules": false,

       "targets": {

         "browsers": ["> 1%", "last 2 versions", "not ie <= 8"]

       }

     }],

     "stage-2"

   ],

   "plugins": [],

   "env": {

     "test": {

       "presets": ["env", "stage-2"],

       "plugins": ["istanbul"]

     }

   }

 }
5.好了问题解决;
二:全局使用:
6.当然也可以全局使用swiper;代码如下;
还是在刚才的helloworld.vue进行代码编写;只是去掉js和css文件的引入!
helloworld.vue代码:
 <template>

   <div class="hello">

     <div class="swiper-container">

     <div class="swiper-wrapper">

         <div class="swiper-slide">Slide 1</div>

         <div class="swiper-slide">Slide 2</div>

         <div class="swiper-slide">Slide 3</div>

     </div>

     <!-- 如果需要分页器 -->

     <div class="swiper-pagination"></div>

     <!-- 如果需要导航按钮 -->

     <div class="swiper-button-prev"></div>

     <div class="swiper-button-next"></div>

     <!-- 如果需要滚动条 -->

     <div class="swiper-scrollbar"></div>

 </div>

   </div>

 </template>

 <script>

 export default {

   name: 'HelloWorld',

   data () {

     return {

       msg: 'Welcome to Your Vue.js App'

     }

   },

   mounted(){

      var mySwiper = new Swiper ('.swiper-container', {

     loop: true,

     // 如果需要分页器

     pagination: '.swiper-pagination',

     // 如果需要前进后退按钮

     nextButton: '.swiper-button-next',

     prevButton: '.swiper-button-prev',

     // 如果需要滚动条

     scrollbar: '.swiper-scrollbar',

   })

   }

 }

 </script>

 <!-- Add "scoped" attribute to limit CSS to this component only -->

 <style scoped>

     body {

         margin: 0;

         padding: 0;

     }

     .swiper-container {

         width: 500px;

         height: 300px;

         margin: 20px auto;

     }

     </style>
main.js文件代码:

常见报错解决:
Uncaught TypeError: Cannot assign to read only property 'exports' of object '#<Object>'
.babelrc文件里的插件项"plugins": ["transform-runtime"],中的transform-runtime删掉即可;
vue脚手架使用swiper /引入js文件/引入css文件的更多相关文章
- vue引入swiper vue使用swiper vue脚手架使用swiper /引入js文件/引入css文件
vue引入swiper vue使用swiper vue脚手架使用swiper /引入js文件/引入css文件 ------------------------------------------- ...
- 关于controller返回的页面js文件和css文件404问题的正式解决
谨用此博客记录一下这条卡了两个星期的bug…… 还是之前的问题,通过get方法,后台@Controller返回页面然后弹窗.但是不知道为什么一直所有js文件和css文件都报404…… (之前的博客记录 ...
- 利用nodeJs来安装less以及编译less文件为css文件
NodeJs 使用nodejs安装less以及编译less文件为css文件 首先下载nodeJs的安装包,按照步骤,安装nodejs. 链接:http://pan.baidu.com/s/1dEsqY ...
- vue.js 独立引用css文件图片路径错误
vue的环境是用vue-cli,写在vue文件的图片引用build之后的路径都没什么问题 但是有的时候我们会有一些公共的css文件单独的放在assets目录下 如下图所示 这里当build后发现写在c ...
- js文件 与 css文件 异步加载
使用lazyload 异步加载css js 文件. 提升页面初始化的速度,减少卡顿时间 , 下面是 使用方法 与 lazyload.js 源码 (中文注释) 调用方法后. 会追加到 head 标签末尾 ...
- grunt压缩多个js文件和css文件
压缩前的工程目录: 1.安装js,css需要的插件 使用npm安装:npm install grunt-contrib-uglify --save-dev -------->安装js压缩插件 ...
- 在HTML页面中加载js文件和css文件的方法
1.在HTML页面加载js文件的方法: function loadScriptFile(filePath){ var script = document.createElement("scr ...
- asp.net后台代码动态添加JS文件和css文件的引用
首先添加命名空间 using System.Web.UI.HtmlControls; 代码动态添加css文件的引用 HtmlGenericControl myCss = new HtmlGeneric ...
- 关于HTML文件、JS文件、CSS文件
把JS和CSS脚本写在html里和写在独立文件里有什么区别? 1. 都写在html里是性能最优的方案. 2. 都写在html里是可维护性最差的方案. 3. 分开写在js.css.html是可维护性最有 ...
随机推荐
- C语言中指针*p[N], (*P)[N],及**p的区别
在C语言编程中指针经常困扰着我们,但是若能灵活运用指针的话,将会使得我们编程变得更加轻松与高效.这里讲下*p[N], (*P)[N],及**p的区别,这也是之前经常困扰我的地方. 这三者的定义分别为: ...
- UICollectionView中Cell左对齐 居中 右对齐 等间距------你想要的,这里都有
支持靠左,居中,靠右,等间距对齐. 靠左等间距.png 居中等间距.png 靠右等间距.png #import <UIKit/UIKit.h> typedef NS_ENUM(NSInte ...
- CCIE-MPLS VPN-实验手册(中卷)
5:MPLS VPN PE CE OSPF 实验1 5.1 实验拓扑 5.2 实验需求 a. R1 R2 R3 组成P-NETWORK,底层协议采用EIGRP b. R1 R2 R3 直连链路启用LD ...
- 关于在git添加远程地址的过程中遇到的问题
问题产生的过程 我根据菜鸟教程的步骤,做了如下操作: 1.打开安装文件夹中的git-bash程序 2.设置username和email 3.添加远程地址 结果如下: 之后通过百度知道要先git ini ...
- 201521123020 《Java程序设计》第4周学习总结
本周学习总结 1.1 尝试使用思维导图总结有关继承的知识点. 1.2 使用常规方法总结其他上课内容. (1)类注释的使用方法是: /** *(要注释的内容) */ (2)学习了Object类,学会了覆 ...
- Python[小甲鱼003小插曲之变量和字符串]
>>>teacher = 3 >>>teacher 3 #在定义了一个变量后可以之间输入整个变量即可访问这个变量. >>> teache ...
- 201521123077 《Java程序设计》第12周学习总结
1. 本周学习总结 1.1 1.1 以你喜欢的方式(思维导图或其他)归纳总结多流与文件相关内容 总的来说主要有三种类 InputStream/OutputStream(字节流操作类的父类) 提供对字节 ...
- vim基础详解
目录: 什么是vim Vim能做什么 如何学习vim 如何用vim打开一个文件 Vim的三种模式 插入模式 命令模式 扩展命令模式 光标移动 在命令模式下 删除,复制,粘贴 扩展命令模式 可视化模式 ...
- 03标准对象-01-Date和JSON
0.写在前面的话 在JS世界中,一切都是对象,区别对象类型使用tyepof,返回一个字符串,如: typeof 123; // 'number' typeof NaN; // 'number' typ ...
- pl/sql developer 连接服务器上的数据库
1, 在本地安装的Oracle中找到目录 oracle\product\11.2.0\dbhome_1\network\admin, 它下面一般有两个文件可以进行编辑tnsnames.ora li ...