用 Identity Server 4 (JWKS 端点和 RS256 算法) 来保护 Python web api
[新添加] 本文对应的源码 (多个flow, clients, 调用python api): https://github.com/solenovex/Identity-Server-4-Python-Hug-Api-Jwks
目前正在使用asp.net core 2.0 (主要是web api)做一个项目, 其中一部分功能需要使用js客户端调用python的pandas, 所以需要建立一个python 的 rest api, 我暂时选用了hug, 官网在这: http://www.hug.rest/.
目前项目使用的是identity server 4, 还有一些web api和js client.
项目的早期后台源码: https://github.com/solenovex/asp.net-core-2.0-web-api-boilerplate
下面开始配置identity server 4, 我使用的是windows.
添加ApiResource:
在 authorization server项目中的配置文件添加红色部分, 这部分就是python hug 的 api:
public static IEnumerable<ApiResource> GetApiResources()

        {

            return new List<ApiResource>

            {

                new ApiResource(SalesApiSettings.ApiName, SalesApiSettings.ApiDisplayName) {

                    UserClaims = { JwtClaimTypes.Name, JwtClaimTypes.PreferredUserName, JwtClaimTypes.Email }

                },

                new ApiResource("purchaseapi", "采购和原料库API") {

                    UserClaims = { JwtClaimTypes.Name, JwtClaimTypes.PreferredUserName, JwtClaimTypes.Email }

                },

                new ApiResource("hugapi", "Hug API") {

                    UserClaims = { JwtClaimTypes.Name, JwtClaimTypes.PreferredUserName, JwtClaimTypes.Email }

                }

            };

        }
修改js Client的配置:
// Sales JavaScript Client

                new Client

                {

                    ClientId = SalesApiSettings.ClientId,

                    ClientName = SalesApiSettings.ClientName,

                    AllowedGrantTypes = GrantTypes.Implicit,

                    AllowAccessTokensViaBrowser = true,

                    AccessTokenLifetime =  * ,

                    AllowOfflineAccess = true,

                    RedirectUris =           { $"{Startup.Configuration["MLH:SalesApi:ClientBase"]}/login-callback", $"{Startup.Configuration["MLH:SalesApi:ClientBase"]}/silent-renew.html" },

                    PostLogoutRedirectUris = { Startup.Configuration["MLH:SalesApi:ClientBase"] },

                    AllowedCorsOrigins =     { Startup.Configuration["MLH:SalesApi:ClientBase"] },

                    AlwaysIncludeUserClaimsInIdToken = true,

                    AllowedScopes =

                    {

                        IdentityServerConstants.StandardScopes.OpenId,

                        IdentityServerConstants.StandardScopes.Profile,

                        IdentityServerConstants.StandardScopes.Email,

                        SalesApiSettings.ApiName,

                        "hugapi"

                    }

                }
修改js客户端的oidc client配置选项:
添加 hugapi, 与authorization server配置对应.
{

        authority: 'http://localhost:5000',

        client_id: 'sales',

        redirect_uri: 'http://localhost:4200/login-callback',

        response_type: 'id_token token',

        scope: 'openid profile salesapi hugapi email',

        post_logout_redirect_uri: 'http://localhost:4200',

        silent_redirect_uri: 'http://localhost:4200/silent-renew.html',

        automaticSilentRenew: true,

        accessTokenExpiringNotificationTime: 4,

        // silentRequestTimeout:10000,

        userStore: new WebStorageStateStore({ store: window.localStorage })

    }
建立Python Hug api
(可选) 安装virtualenv:
pip install virtualenv
然后在某个地方建立一个目录:
mkdir hugapi && cd hugapi
建立虚拟环境:
virtualenv venv
激活虚拟环境:
venv\Scripts\activate
然后大约这样显示:

安装hug:
pip install hug
这时, 参考一下hug的文档. 然后建立一个简单的api. 建立文件main.py:
import hug

@hug.get('/home')

def root():

    return 'Welcome home!'
运行:
hug -f main.py
结果好用:

然后还需要安装这些:
pip install cryptography pyjwt hug_middleware_cors
其中pyjwt是一个可以encode和decode JWT的库, 如果使用RS256算法的话, 还需要安装cryptography.
而hug_middleware_cors是hug的一个跨域访问中间件(因为js客户端和这个api不是在同一个域名下).
添加需要的引用:
import hug

import jwt

import json

import urllib.request

from jwt.algorithms import get_default_algorithms

from hug_middleware_cors import CORSMiddleware
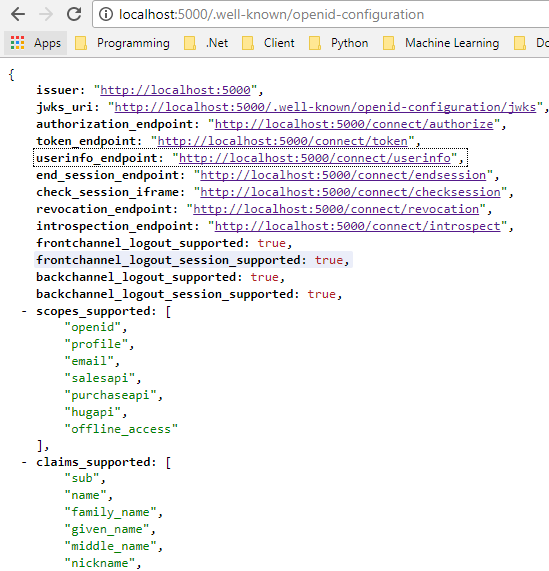
然后正确的做法是通过Authorization Server的discovery endpoint来找到jwks_uri,
identity server 4 的discovery endpoint的地址是:
http://localhost:5000/.well-known/openid-configuration, 里面能找到各种节点和信息:
但我还是直接写死这个jwks_uri吧:
response = urllib.request.urlopen('http://localhost:5000/.well-known/openid-configuration/jwks')

still_json = json.dumps(json.loads(response.read())['keys'][0])
identity server 4的jwks_uri, 里面是public key, 它的结构是这样的:
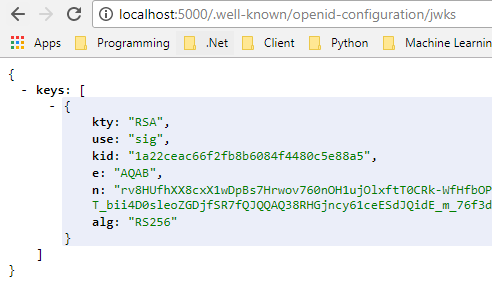
而我使用jwt库, 的参数只能传入一个证书的json, 也可就是keys[0].
所以上面的最后一行代码显得有点.......
如果使用python-jose这个库会更简单一些, 但是在我windows电脑上总是安装失败, 所以还是凑合用pyjwt吧.
然后让hug api使用cors中间件:
api = hug.API(__name__)

api.http.add_middleware(CORSMiddleware(api))
然后是hug的authentication部分:
def token_verify(token):

    token = token.replace('Bearer ', '')

    rsa = get_default_algorithms()['RS256']

    cert = rsa.from_jwk(still_json)

    try:

        result = jwt.decode(token, cert, algorithms=['RS256'], audience='hugapi')

        print(result)

        return result

    except jwt.DecodeError:

        return False

token_key_authentication = hug.authentication.token(token_verify)
通过rsa.from_jwk(json) 就会得到key (certificate), 然后通过jwt.decode方法可以把token进行验证并decode, 算法是RS256, 这个方法要求如果token里面包含了aud, 那么方法就需要要指定audience, 也就是hugapi.
最后修改api 方法, 加上验证:
@hug.get('/home', requires=token_key_authentication)

def root():

    return 'Welcome home!'
最后运行 hug api:
hug -f main.py
端口应该是8000.
运行js客户端,登陆, 并调用这个hug api http://localhost:8000/home:
(我的js客户端是angular5的, 这个没法开源, 公司财产, 不过配置oidc-client还是很简单的, 使用)
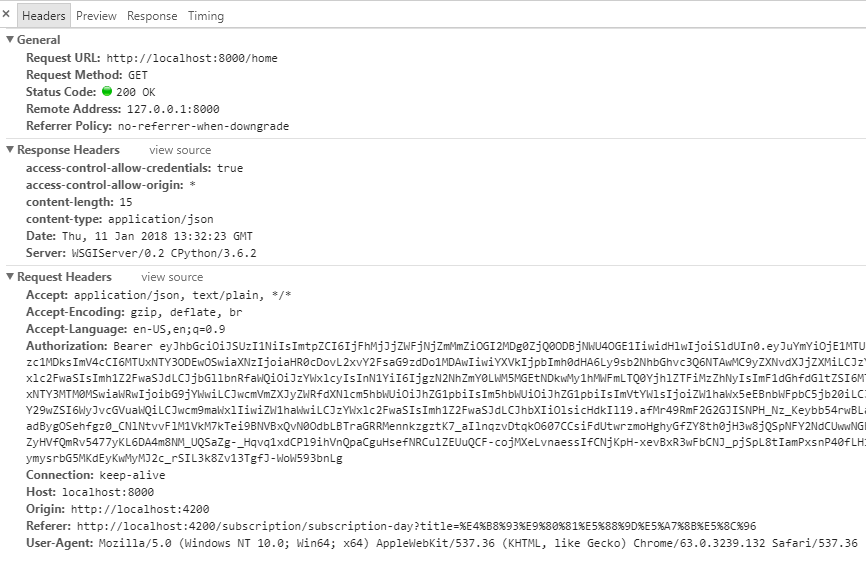
返回200, 内容是:

看一下hug的log:

token被正确验证并解析了. 所以可以进入root方法了.
其他的python api框架, 都是同样的道理.
[新添加] 本文对应的源码 (多个flow, clients, 调用python api): https://github.com/solenovex/Identity-Server-4-Python-Hug-Api-Jwks
可以使用这个例子自行搭建 https://github.com/IdentityServer/IdentityServer4.Samples/tree/release/Quickstarts/7_JavaScriptClient
官方还有一个nodejs api的例子: https://github.com/lyphtec/idsvr4-node-jwks
今日修改后的代码:
import json

import hug

import jwt

import requests

from jwt.algorithms import get_default_algorithms

from hug_middleware_cors import CORSMiddleware

api = hug.API(__name__)

api.http.add_middleware(CORSMiddleware(api))

def token_verify(token):

    access_token = token.replace('Bearer ', '')

    token_header = jwt.get_unverified_header(access_token)

    res = requests.get(

        'http://localhost:5000/.well-known/openid-configuration')

    jwk_uri = res.json()['jwks_uri']

    res = requests.get(jwk_uri)

    jwk_keys = res.json()

    rsa = get_default_algorithms()['RS256']

    key = json.dumps(jwk_keys['keys'][0])

    public_key = rsa.from_jwk(key)

    try:

        result = jwt.decode(access_token, public_key, algorithms=[

                            token_header['alg']], audience='api1')

        return result

    except jwt.DecodeError:

        return False

token_key_authentication = hug.authentication.token(token_verify)

@hug.get('/identity', requires=token_key_authentication)

def root(user: hug.directives.user):

    print(user)

    return user
我的博客即将搬运同步至腾讯云+社区,邀请大家一同入驻:https://cloud.tencent.com/developer/support-plan
用 Identity Server 4 (JWKS 端点和 RS256 算法) 来保护 Python web api的更多相关文章
- Identity Server 4 从入门到落地(四)—— 创建Web Api
前面的部分: Identity Server 4 从入门到落地(一)-- 从IdentityServer4.Admin开始 Identity Server 4 从入门到落地(二)-- 理解授权码模式 ...
- Identity Server 4 从入门到落地(三)—— 创建Web客户端
书接上回,我们已经搭建好了基于Identity Server 4的认证服务和管理应用(如果还没有搭建,参看本系列前两部分,相关代码可以从github下载:https://github.com/zhen ...
- 使用PostMan Canary测试受Identity Server 4保护的Web Api
在<Asp.Net Core: Swagger 与 Identity Server 4>一文中介绍了如何生成受保护的Web Api的Swagger文档,本文介绍使用PostMan Cana ...
- 第17章 社区快速入门和模板 - Identity Server 4 中文文档(v1.0.0)
IdentityServer组织不维护这些示例.IdentityServer组织愉快地链接到社区模板,但不能对模板做出任何保证.请直接与作者联系. 17.1 各种ASP.NET核心安全样本 https ...
- Identity Server 4 从入门到落地(五)—— 使用Ajax访问Web Api
前面的部分: Identity Server 4 从入门到落地(一)-- 从IdentityServer4.Admin开始 Identity Server 4 从入门到落地(二)-- 理解授权码模式 ...
- Identity Server 4 从入门到落地(六)—— 简单的单页面客户端
前面的部分: Identity Server 4 从入门到落地(一)-- 从IdentityServer4.Admin开始 Identity Server 4 从入门到落地(二)-- 理解授权码模式 ...
- Identity Server 4 从入门到落地(七)—— 控制台客户端
前面的部分: Identity Server 4 从入门到落地(一)-- 从IdentityServer4.Admin开始 Identity Server 4 从入门到落地(二)-- 理解授权码模式 ...
- Identity Server 4 从入门到落地(八)—— .Net Framework 客户端
前面的部分: Identity Server 4 从入门到落地(一)-- 从IdentityServer4.Admin开始 Identity Server 4 从入门到落地(二)-- 理解授权码模式 ...
- Identity Server 4 从入门到落地(九)—— 客户端User和Role的解析
前面的部分: Identity Server 4 从入门到落地(一)-- 从IdentityServer4.Admin开始 Identity Server 4 从入门到落地(二)-- 理解授权码模式 ...
随机推荐
- springMVC(1)---获取前段数据
springMVC(1)---获取前段数据 首先说明,如果你学过Struts2,那么在学springMVC就会简单很多,我也不最基础的开始写了,我前篇文章搭建了个ssm框架,算是springmvc入门 ...
- tensorflow 自定义损失函数示例
这个自定义损失函数的背景:(一般回归用的损失函数是MSE, 但要看实际遇到的情况而有所改变) 我们现在想要做一个回归,来预估某个商品的销量,现在我们知道,一件商品的成本是1元,售价是10元. 如果我们 ...
- jmeter入门系列文章二 版本号介绍
转载时请标注源自:http://blog.csdn.net/musen518 jmeter版本号公布频率一般为1年,每年会有一个版本号升级 截止2015年底,最新版本号为2.13,最新最全的更新信息一 ...
- 求前n个素数(C++)
输入一个输n,输出前n个素数. #include<iostream> #include <math.h> using namespace std; class Sushu { ...
- python 创建列表和向列表添加元素方法
今天的学习内容是python中的列表的相关内容. 一.创建列表 1.创建一个普通列表 >>> tabulation1 = ['大圣','天蓬','卷帘'] >>> ...
- ASP.NET Core 使用 Alipay.AopSdk.Core 常见问题解答
1.Alipay.AopSdk.Core.AopException:"您使用的私钥格式错误,请检查RSA私钥配置,charset = UTF-8" 出现这个问题,就是配置不正确.首 ...
- 解决 ASP.NET Core MySql varchar 字符串截取(长度 255)
ASP.NET Core 中使用 MySql,如果字段类型为varchar,不管设置多少长度,插入或更新数据的时候,会自动截断(截取 255 长度的字符). 出现问题的原因,就是使用了MySql.Da ...
- mssql查询过去一段时间数据库中执行过的语句及执行效率
SELECT TOP 1000 ST.text AS '执行的SQL语句', QS.execution_count AS '执行次数', QS.total_elapsed_time AS '耗时', ...
- div元素宽度不定的情况下如何居中显示
最近由于工作的原因碰到一个问题,就是在一个弹窗宽度不定的情况下还能是该弹窗居中显示,思考许久未找到合适办法,于是在网上找到一些办法在此总结记录下来方便以后的学习. 方法一:兼容IE67 <div ...
- IntelliJ IDEA 热部署插件 JRebel 安装激活及使用
JRebel对个人用户免费使用,但是要使用Facebook账号把信息完整填写之后才能获取Lisense,登陆Facebook官网二种方案:①修改本地hosts文件:②使用VPNFQ 以下是二种方案的解 ...