【Android】17.0 UI开发(八)——利用RecyclerView列表控件实现精美的聊天界面
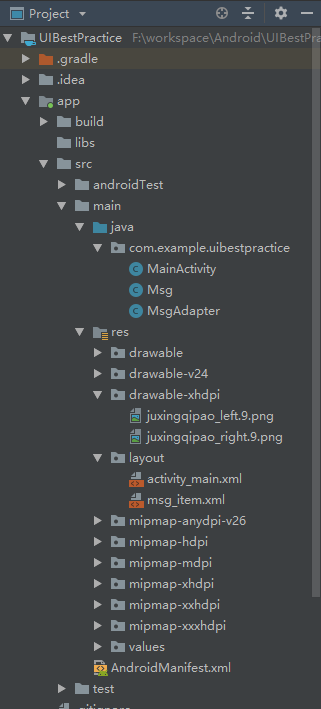
1.0 首先新建一个项目,名叫:UIBestPractice,目录如下:
2.0 这里需要先准备两张图片,放在app\src\main\res\drawable-xhdpi目录下。
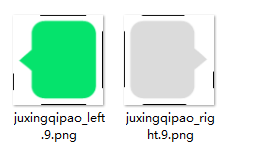
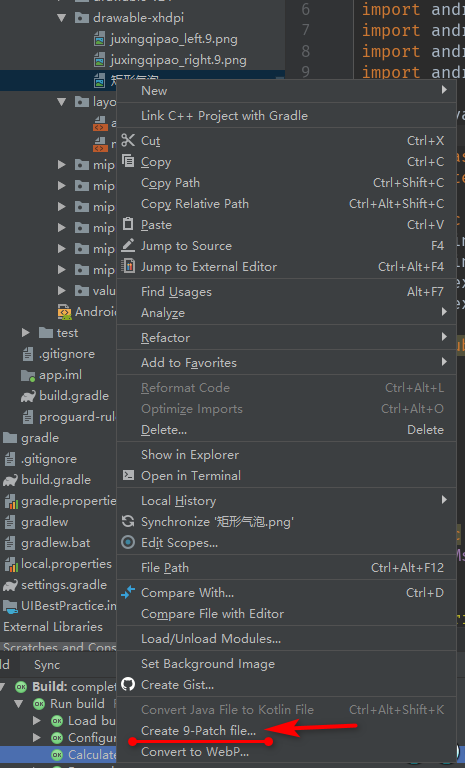
这里图片名称已经制作成为Nine-Patch图片,原本的名字没有“.9”字样。在目录下鼠标选中图片,右击,选择“”即可进入Nine-Patch图片编辑环境,

将可见是如下的画面,鼠标点击就会在边上添加黑色线条,意味着该线条所对应的边是允许变形的,按住shift键再点击,即可取消黑边,而且鼠标只有停在图片的四条边才可以操作,才会出现黑边,鼠标也才会变成成为双箭头图案:
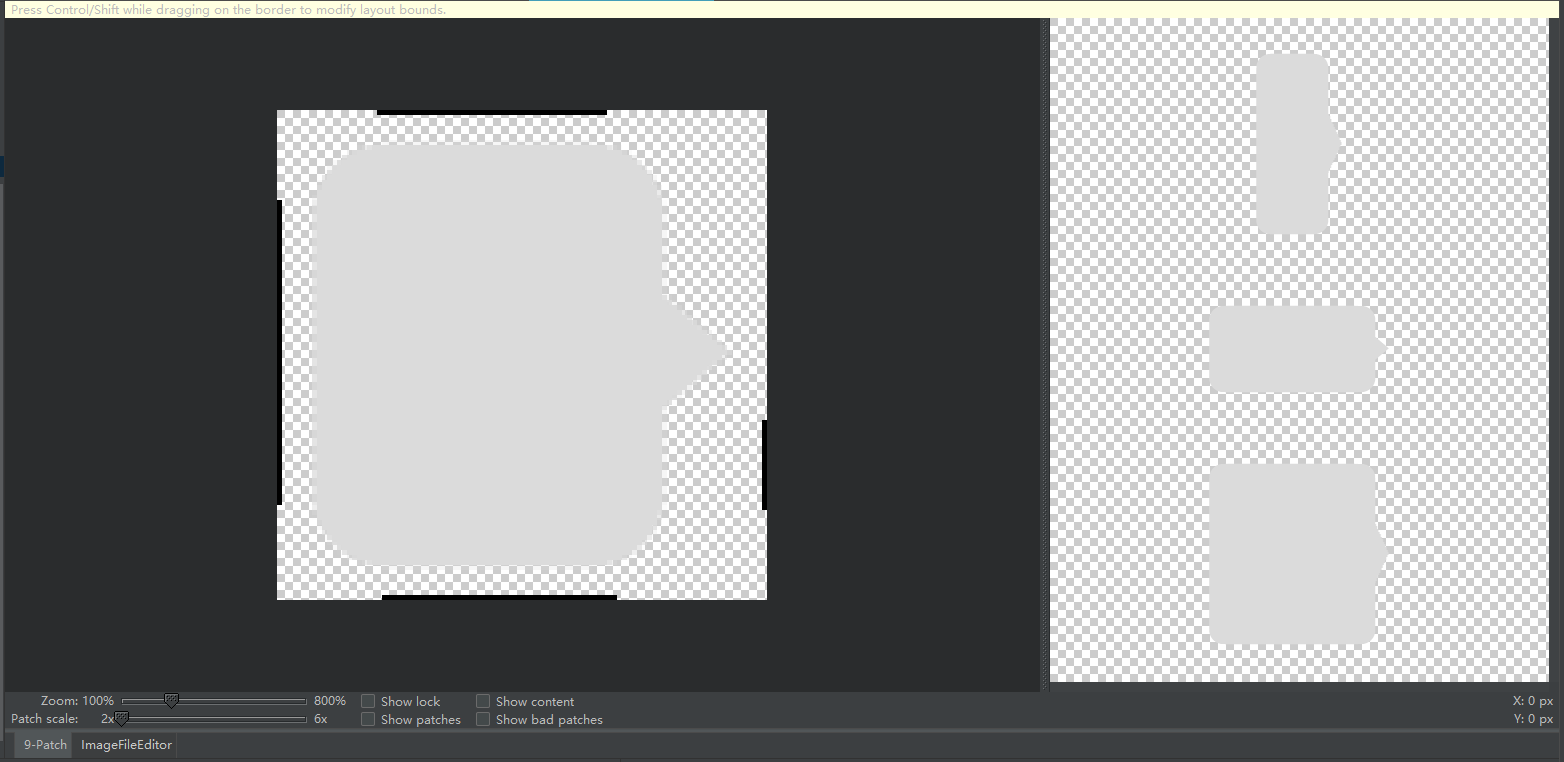
可以看到右侧是拉伸时的形状预览。
保存即可,自动生成相同名字的后缀名为“.9.png”的图片。
3.0 在主活动界面设置布局,activity_main.xml
<?xml version="1.0" encoding="utf-8"?>

<android.support.constraint.ConstraintLayout xmlns:android="http://schemas.android.com/apk/res/android"

    xmlns:app="http://schemas.android.com/apk/res-auto"

    xmlns:tools="http://schemas.android.com/tools"

    android:layout_width="match_parent"

    android:layout_height="match_parent"

    android:background="#ffffff"

    tools:context=".MainActivity">

    <android.support.v7.widget.RecyclerView

        android:id="@+id/msg_recycler_view"

        android:layout_width="match_parent"

        android:layout_height="0dp"

        app:layout_constraintBottom_toTopOf="@+id/linear"

        app:layout_constraintEnd_toEndOf="@+id/linear"

        app:layout_constraintStart_toStartOf="parent"

        app:layout_constraintTop_toTopOf="parent"

        app:layout_constraintVertical_weight="1" />

    <LinearLayout

        android:id="@+id/linear"

        android:layout_width="match_parent"

        android:layout_height="wrap_content"

        app:layout_constraintBottom_toBottomOf="parent"

        app:layout_constraintEnd_toEndOf="parent"

        app:layout_constraintHorizontal_bias="0.0"

        app:layout_constraintStart_toStartOf="parent">

        <EditText

            android:id="@+id/input_text"

            android:layout_width="match_parent"

            android:layout_height="wrap_content"

            android:layout_weight="1"

            android:hint="在这里键入内容"

            android:maxLines="2"

            app:layout_constraintStart_toStartOf="parent"

            app:layout_constraintTop_toTopOf="parent"

            app:layout_constraintLeft_toLeftOf="parent"

            app:layout_constraintRight_toLeftOf="@+id/send"/>

        <Button

            android:id="@+id/send"

            android:layout_width="wrap_content"

            android:layout_height="wrap_content"

            android:baselineAligned="false"

            android:text="发送"

            app:layout_constraintStart_toStartOf="parent"

            app:layout_constraintTop_toTopOf="parent"

            app:layout_constraintRight_toRightOf="parent"

            app:layout_constraintLeft_toRightOf="@+id/input_text"/>

    </LinearLayout>

</android.support.constraint.ConstraintLayout>
效果如下:

4.0 设置聊天适配器Msg.java:
package com.example.uibestpractice;

public class Msg {

    public static final int TYPE_RECEIVED = 0;

    public static final int TYPE_SENT = 1;

    private String content;

    private int type;

//    content 消息的内容

//    type 消息的类型

//    TYPE_RECEIVED 表示这是一条收到的信息

//    TYPE_SENT 表示这是一条发出的信息

    public Msg(String content,int type){

        this.content =content;

        this.type = type;

    }

    public String getContent(){

        return  content;

    }

    public int getType(){

        return type;

    }

}
5.0 MsgAdapter.java
package com.example.uibestpractice;

import android.support.v7.widget.RecyclerView;

import android.view.LayoutInflater;

import android.view.ViewGroup;

import android.widget.LinearLayout;

import android.widget.TextView;

import android.view.View;

import java.util.List;

public class MsgAdapter extends RecyclerView.Adapter<MsgAdapter.ViewHolder> {

    private List<Msg> mMsgList;

    static class ViewHolder extends RecyclerView.ViewHolder {

        LinearLayout leftLayout;

        LinearLayout rightLayout;

        TextView leftMsg;

        TextView rightMsg;

        public ViewHolder(View view) {

            super(view);

            leftLayout = (LinearLayout) view.findViewById(R.id.left_layout);

            rightLayout = (LinearLayout) view.findViewById(R.id.right_layout);

            leftMsg = (TextView) view.findViewById(R.id.left_msg);

            rightMsg = (TextView) view.findViewById(R.id.right_msg);

        }

    }

    public MsgAdapter(List<Msg> msgList){

        mMsgList =msgList;

    }

    @Override

    public ViewHolder onCreateViewHolder(ViewGroup viewGroup, int i) {

        View view = LayoutInflater.from(viewGroup.getContext()).inflate(R.layout.msg_item,viewGroup,false);

        return new ViewHolder(view);

    }

    @Override

    public void onBindViewHolder(ViewHolder viewHolder, int i) {

        Msg msg = mMsgList.get(i);

        if (msg.getType() == Msg.TYPE_RECEIVED){

            //如果是收到的信息,则显示在左边的消息布局,将右边的消息布局隐藏

            viewHolder.leftLayout.setVisibility(View.VISIBLE);

            viewHolder.rightLayout.setVisibility(View.GONE);

            viewHolder.leftMsg.setText(msg.getContent());

        }else if (msg.getType() == Msg.TYPE_SENT){

            //如果是发出的信息,则显示在右边的消息布局,将左边的消息布局隐藏

            viewHolder.leftLayout.setVisibility(View.GONE);

            viewHolder.rightLayout.setVisibility(View.VISIBLE);

            viewHolder.rightMsg.setText(msg.getContent());

        }

    }

    @Override

    public int getItemCount() {

        return mMsgList.size();

    }

}
6.0 针对聊天显示进行布局设置,msg_item.xml
<?xml version="1.0" encoding="utf-8"?>

<android.support.constraint.ConstraintLayout xmlns:android="http://schemas.android.com/apk/res/android"

    xmlns:app="http://schemas.android.com/apk/res-auto"

    xmlns:tools="http://schemas.android.com/tools"

    android:layout_width="match_parent"

    android:layout_height="wrap_content"

    android:padding="10dp">

    <LinearLayout

        android:id="@+id/left_layout"

        android:layout_width="wrap_content"

        android:layout_height="wrap_content"

        android:background="@drawable/juxingqipao_left"

        android:gravity="left"

        app:layout_constraintBottom_toBottomOf="parent"

        app:layout_constraintStart_toStartOf="parent"

        app:layout_constraintTop_toTopOf="parent">

        <TextView

            android:id="@+id/left_msg"

            android:layout_width="wrap_content"

            android:layout_height="wrap_content"

            android:gravity="left" />

    </LinearLayout>

    <LinearLayout

    android:id="@+id/right_layout"

    android:layout_width="wrap_content"

    android:layout_height="wrap_content"

    android:background="@drawable/juxingqipao_right"

    android:gravity="right"

    app:layout_constraintBottom_toBottomOf="parent"

    app:layout_constraintEnd_toEndOf="parent"

    app:layout_constraintTop_toTopOf="parent">

    <TextView

    android:id="@+id/right_msg"

    android:layout_width="wrap_content"

    android:layout_height="wrap_content"

    android:gravity="right" />

    </LinearLayout>

</android.support.constraint.ConstraintLayout>
7.0 主函数 :MainActivity.java
package com.example.uibestpractice;

import android.support.v7.app.AppCompatActivity;

import android.os.Bundle;

import android.support.v7.widget.LinearLayoutManager;

import android.support.v7.widget.RecyclerView;

import android.view.View;

import android.widget.Button;

import android.widget.EditText;

import java.util.ArrayList;

import java.util.List;

public class MainActivity extends AppCompatActivity {

    private List<Msg> msgList = new ArrayList<>();

    private EditText inputText;

    private Button send;

    private RecyclerView msgRecyclerView;

    private MsgAdapter adapter;

    @Override

    protected void onCreate(Bundle savedInstanceState) {

        super.onCreate(savedInstanceState);

        setContentView(R.layout.activity_main);

        initMsgs();//初始化数据

        inputText = (EditText) findViewById(R.id.input_text);

        send = (Button) findViewById(R.id.send);

        msgRecyclerView = (RecyclerView) findViewById(R.id.msg_recycler_view);

        LinearLayoutManager layoutManager = new LinearLayoutManager(this);

        msgRecyclerView.setLayoutManager(layoutManager);

        adapter = new MsgAdapter(msgList);

        msgRecyclerView.setAdapter(adapter);

        send.setOnClickListener(new View.OnClickListener() {

            @Override

            public void onClick(View v) {

                String content = inputText.getText().toString();

                if (!"".equals(content)) {

                    Msg msg = new Msg(content, Msg.TYPE_SENT);

                    msgList.add(msg);

                    adapter.notifyItemInserted(msgList.size() - 1);

                    //当有新消息时,刷新RecyclerView中的显示

                    msgRecyclerView.scrollToPosition(msgList.size() - 1);

                    //将RecyclerView定位到最后一行

                    inputText.setText("");//清空输入框中的内容

                }

            }

        });

    }

    private void initMsgs() {

        Msg msg1 = new Msg("你好,张三", Msg.TYPE_RECEIVED);

        msgList.add(msg1);

        Msg msg2 = new Msg("你好,请问你是?", Msg.TYPE_SENT);

        msgList.add(msg2);

        Msg msg3 = new Msg("我是tuituitui的小仙女一只,很高兴认识你啊!", Msg.TYPE_RECEIVED);

        msgList.add(msg3);

    }

}
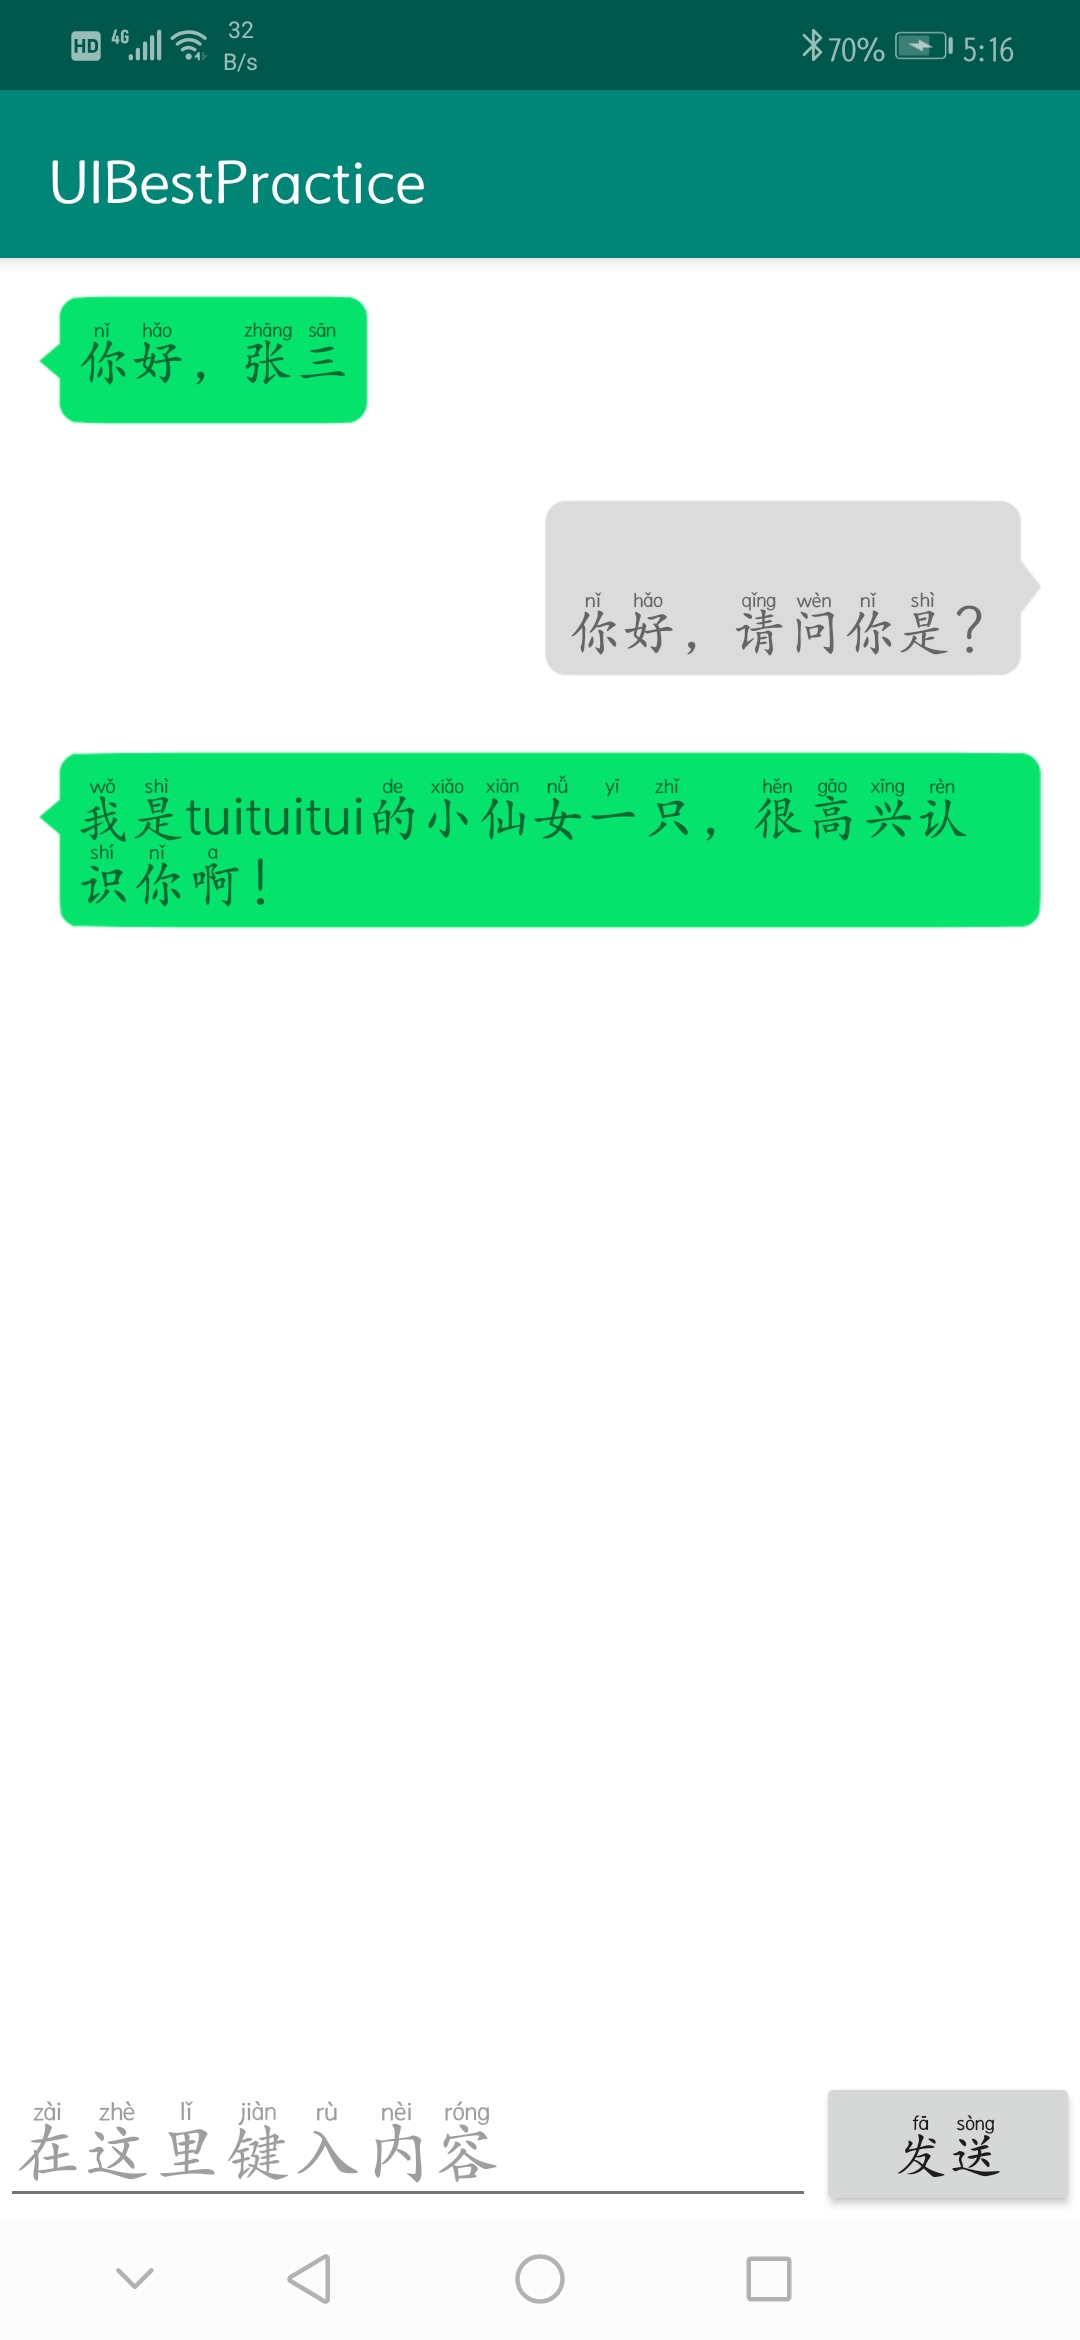
8.0 运行效果(真机)如下:
【Android】17.0 UI开发(八)——利用RecyclerView列表控件实现精美的聊天界面的更多相关文章
- 【Android】15.0 UI开发(六)——列表控件RecyclerView的网格布局排列实现
1.0 列表控件RecyclerView的网格布局排列实现,关键词GridLayoutManager. LinearLayoutManager 实现顺序布局 GridLayoutManager 实现网 ...
- 【Android】14.0 UI开发(五)——列表控件RecyclerView的瀑布布局排列实现
1.0 列表控件RecyclerView的瀑布布局排列实现,关键词StaggeredGridLayoutManager LinearLayoutManager 实现顺序布局 GridLayoutMan ...
- 【Android】16.0 UI开发(七)——列表控件RecyclerView的点击事件实现
1.0 在各布局的基础上,修改ProvinceAdapter.java的代码: package com.example.recyclerviewtest; import android.support ...
- 【Android】11.0 UI开发(二)——列表控件ListView的简单实现1
************************ 转载请注明出处:https://www.cnblogs.com/xiaofu007/p/10342462.html ***************** ...
- 【Android】12.0 UI开发(三)——列表控件ListView的简单实现2
1.0 由于书上内容,已经和实际编程的兼容性已经不太友好,重写了项目,用于进一步学习列表控件ListView. 2.0 新建项目ListViewTest,其中文件目录如下: 3.0 ActivityC ...
- 【Android】13.0 UI开发(四)——列表控件RecyclerView的横向布局排列实现
1.0 新建项目,由于ListView的局限性,RecyclerView是一种很好取代ListView的控件,可以灵活实现多种布局. 2.0 新建项目RecyclerviewTest,目录如下: 3. ...
- 【VS开发】MFC CListCtrl列表控件的消息响应
MFC里的CListCtrl选中一行,消息是哪个.实在想不起来了.找了一篇文章,比较有用: http://www.cnblogs.com/hongfei/archive/2012/12/25/2832 ...
- <Android基础>(三) UI开发 Part 3 RecyclerView
RecyclerView 1)RecyclerView的基本用法 2)横向滚动和瀑布流滚动 3)注册点击事件 3.6 强大的滚动控件 RecyclerView ListView缺点: 1.不使用技巧优 ...
- Android 4.0 新增的显示数据集的桌面控件
setRemoteAdapter (int viewId, Intent intent):该方法可以使用 Intent 更新 RemoteViews 中viewId 对应的组件. 上面方法的 Inte ...
随机推荐
- (RaspBerry Pi) Python GPIO 基本操作
目前打算由潛入深慢慢學習RaspBerry Pi, 所以先由最容易下手的Python進入樹莓派的世界 首先要使用 GPIO 需要利用RPI.GPIO package想當然爾必須先安裝 所以先執行下列命 ...
- Luogu P1951 收费站_NOI导刊2009提高(2)
二分答案+堆优Dijkstra 这个题有些巧妙. 首先,因为要在油量耗完之前跑到终点,所以我们可以用最短路.只要从\(s\)出发到\(t\),它的最短距离大于油量,我们就可以断定它一定走不通,直接输出 ...
- Hibernate查询方式&抓取策略
Hibernate的查询方式 1.OID查询 hibernate根据对象的OID(主键)进行检索 使用get方法 Customer customer=session.get(Customer.clas ...
- 基于iTop4412的FM收音机系统设计(二)
说明:第一版架构为:APP+JNI(NDK)+Driver(linux),优点是开发简单,周期短,也作为自己的毕业设计 现在更新第二版,FM服务完全植入Android系统中,成为系统服务,架构为:AP ...
- [转] 使用HTTPS在Nexus Repository Manager 3.0上搭建私有Docker仓库
FROM: https://www.hifreud.com/2018/06/06/03-nexus-docker-repository-with-ssl/ 搭建方式 搭建SSL的Nexus官方提供两种 ...
- Q64 最小路径和
给定一个包含非负整数的 m x n 网格,请找出一条从左上角到右下角的路径,使得路径上的数字总和为最小. 说明:每次只能向下或者向右移动一步. 示例: 输入: [ [1,3,1], [1,5,1], ...
- C#多线程学习一
一.概述:C#支持多线程并行执行程序,一个线程有他单独的执行路径,能够与其他线程同时执行,一个程序是由一个单线程开始,该单线程由CLR(公共语言运行时)和操作系统创建而成,并具有多线程创建额外线程的功 ...
- ele
vue饿了么app项目实战视频 5-1 1.项目代码规范修改.
- 基于libcurl实现REST风格http/https的get和post
c/c++开发中经常要用到http/https协议,直接使用socket工作量很大,要是使用socket实现https,那更不可思议,开源的c/c++的http客户端框架,libcurl是首选,而且也 ...
- django显示SQL语句
django显示SQL语句 有时候我们使用模型查询数据,但是并不知道具体执行的SQL语句到底对不对.那么可以通过下面的方法打印出具体执行的SQL语句.这样有助于调试: queryset = MyMod ...