ActiveMQ安装及使用
1 安装环境
1、需要jdk
2、安装Linux系统。生产环境都是Linux系统。
2 安装步骤
第一步: 把ActiveMQ 的压缩包上传到Linux系统。
第二步:解压缩。
第三步:关闭防火墙
临时关闭:service iptables stop
写入配置文件,开机也不启动 chkconfig iptables off
第四步:启动activemq服务
使用bin目录下的activemq命令启动:
#  ./activemq start    启动服务

#  ./activemq stop     停止服务

#  ./activemq status   查看服务的状态
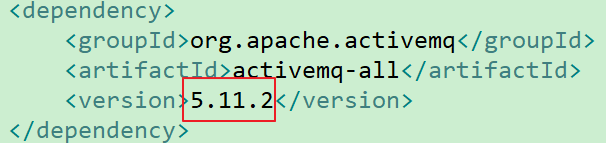
注意:如果ActiveMQ整合spring时,一定不要使用activemq-all-5.12.0.jar包。建议使用5.11.2
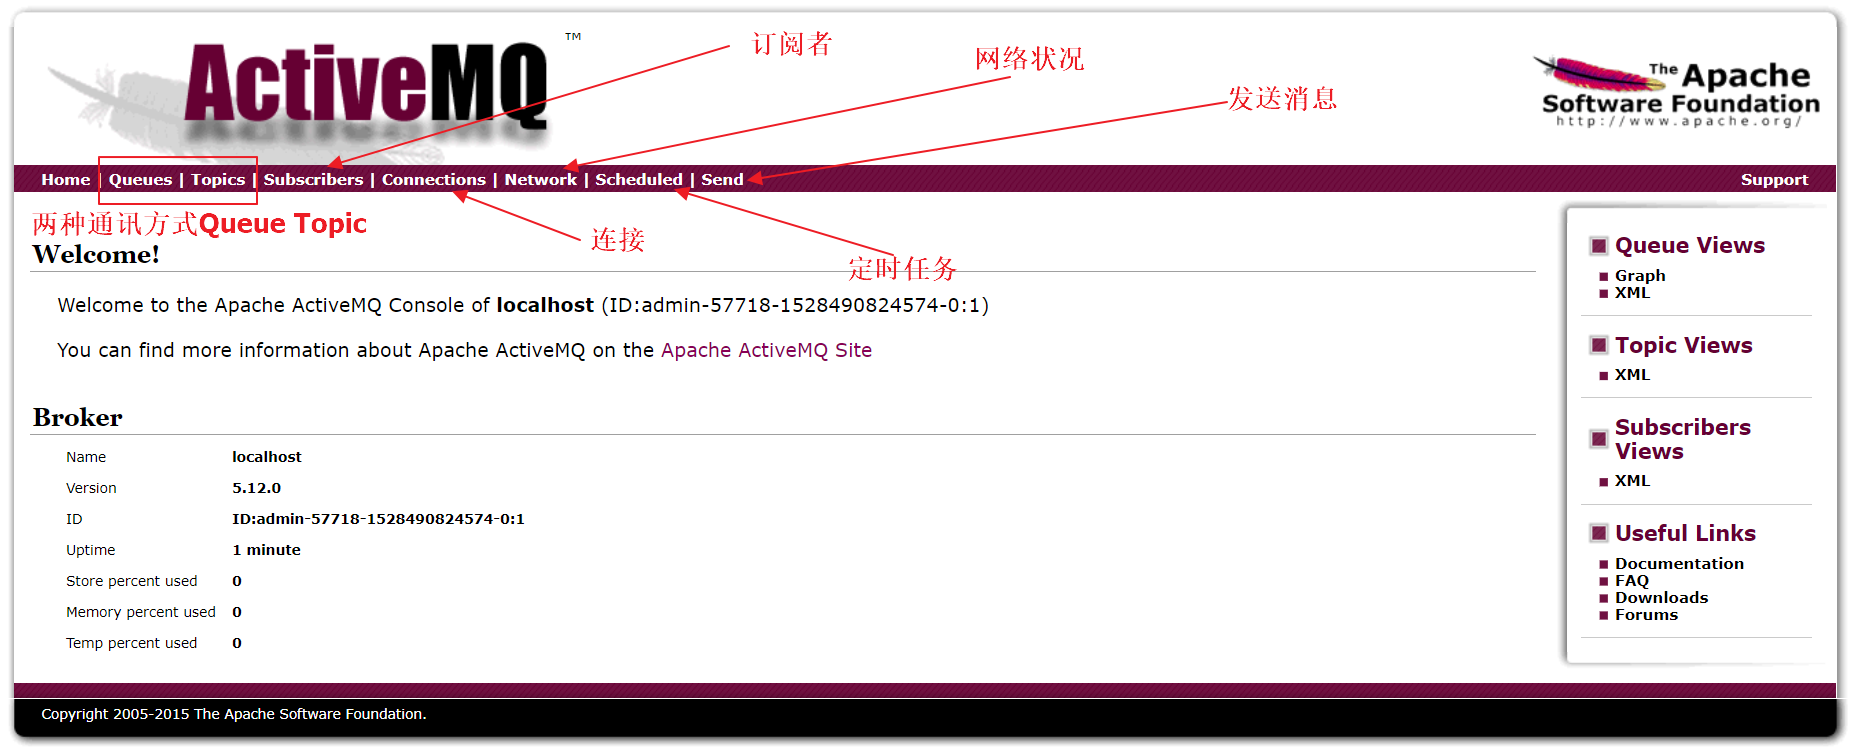
3 管理后台
1 进入管理后台
http://192.168.25.168:8161
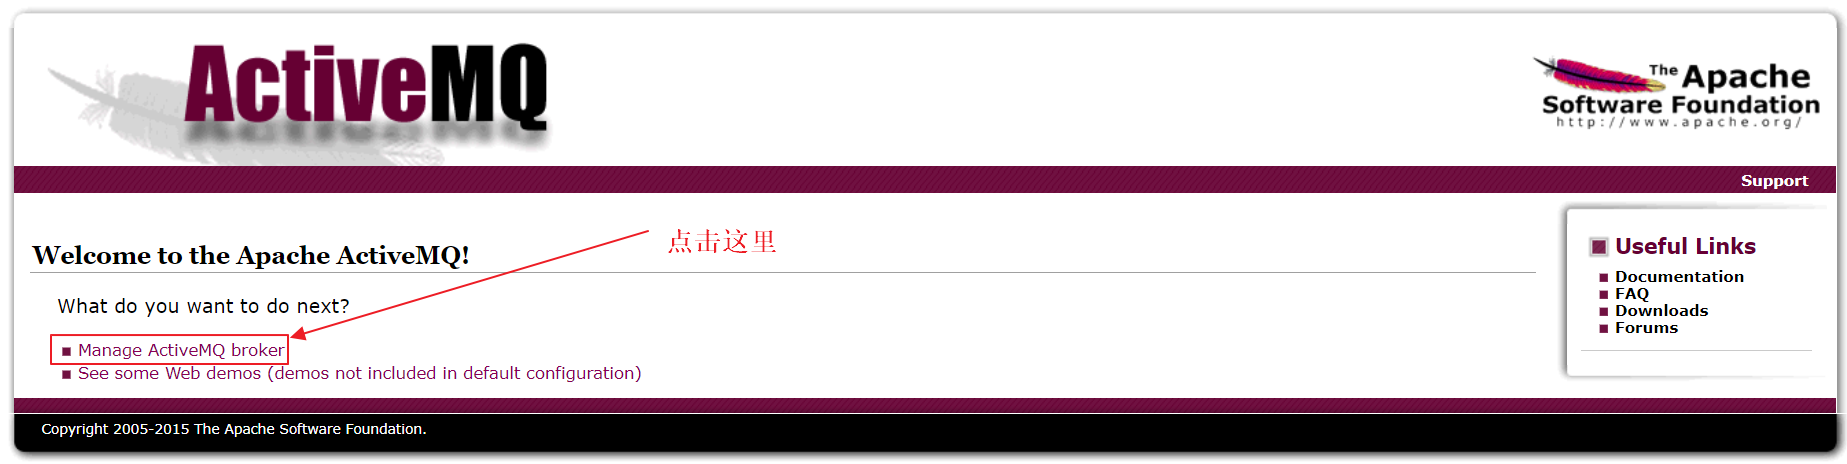

登录进来之后的界面如下:
4 linux activemq 出现无法访问的解决

出现上面错误的原因是因为机器名和ip地址没有对应上。
解决方式:
1.用cat /etc/sysconfig/network 命名查看主机名
# cat /etc/sysconfig/network

2.查看hosts文件
# cat /etc/hosts 查看hosts文件

如果你的机器名(我的是admin)没有在hosts文件里面,就需要将你的机器名加入到hosts的文件里面。
也可以修改你的机器名为hosts文件里面已有的项
3. 修改完成之后重启activemq服务就可以访问了。
5 Queue
1 Producer
生产者:生产消息,发送端。
把jar包添加到工程中。使用5.11.2版本的jar包。
第一步:创建ConnectionFactory对象,需要指定服务端ip及端口号。
第二步:使用ConnectionFactory对象创建一个Connection对象。
第三步:开启连接,调用Connection对象的start方法。
第四步:使用Connection对象创建一个Session对象。
第五步:使用Session对象创建一个Destination对象(topic、queue),此处创建一个Queue对象。
第六步:使用Session对象创建一个Producer对象。
第七步:创建一个Message对象,创建一个TextMessage对象。
第八步:使用Producer对象发送消息。
第九步:关闭资源。
package cn.e3mall.activeMQ;

import javax.jms.Connection;

import javax.jms.ConnectionFactory;

import javax.jms.MessageProducer;

import javax.jms.Queue;

import javax.jms.Session;

import javax.jms.TextMessage;

import org.apache.activemq.ActiveMQConnectionFactory;

import org.junit.Test;

/**

 * 测试activeMQ

 *

 * @title:TestActiveMQ

 * @description:

 * @author jepson

 * @date 2018年6月8日 下午10:50:14

 * @version 1.0

 */

public class TestActiveMQ {

    @Test

    public void testQueueProducer() throws Exception {

        // 第一步:创建ConnectionFactory对象,需要指定服务端ip及端口号。

        // brokerURL服务器的ip及端口号,端口号是61616,web服务的端口号是8161

        String brokerURL="tcp://192.168.25.131:61616";

        ConnectionFactory connectionFactory = new ActiveMQConnectionFactory(brokerURL);

        // 第二步:使用ConnectionFactory对象创建一个Connection对象。

        Connection connection = connectionFactory.createConnection();

        // 第三步:开启连接,调用Connection对象的start方法。

        connection.start();

        // 第四步:使用Connection对象创建一个Session对象。

        /*

         *第一个参数:是否开启事务。

         *如果true开启事务,第二个参数无意义。一般不开启事务。事务的意思就是没有发出去就重发

         *

         *第二个参数:当第一个参数为false时,第二个参数才有意义。

         *表示消息的应答模式。1、自动应答2、手动应答。一般是自动应答。

         */

        Session session = connection.createSession(false, Session.AUTO_ACKNOWLEDGE);

        // 第五步:使用Session对象创建一个Destination对象(topic、queue),此处创建一个Queue对象。

        //参数:队列的名称。

        Queue queue = session.createQueue("test-queue");

        // 第六步:使用Session对象创建一个Producer对象。

        MessageProducer producer = session.createProducer(queue);

        // 第七步:创建一个Message对象,创建一个TextMessage对象。

        TextMessage message = session.createTextMessage("ActiveMQ helloworld,This is my first activemq test");

        // 第八步:使用Producer对象发送消息。

        producer.send(message);

        // 第九步:关闭资源。

        producer.close();

        session.close();

        connection.close();

    }

}
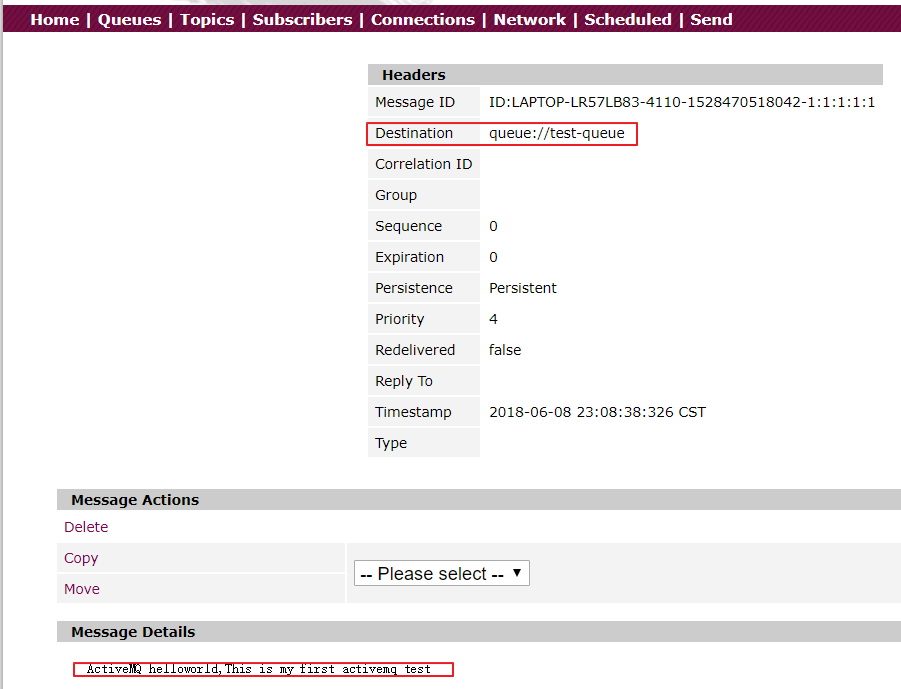
运行测试程序,然后查看web服务端

点击test-queue

2 Consumer
消费者:接收消息。
第一步:创建一个ConnectionFactory对象。
第二步:从ConnectionFactory对象中获得一个Connection对象。
第三步:开启连接。调用Connection对象的start方法。
第四步:使用Connection对象创建一个Session对象。
第五步:使用Session对象创建一个Destination对象。和发送端保持一致queue,并且队列的名称一致。
第六步:使用Session对象创建一个Consumer对象。
第七步:接收消息。
第八步:打印消息。
第九步:关闭资源
@Test
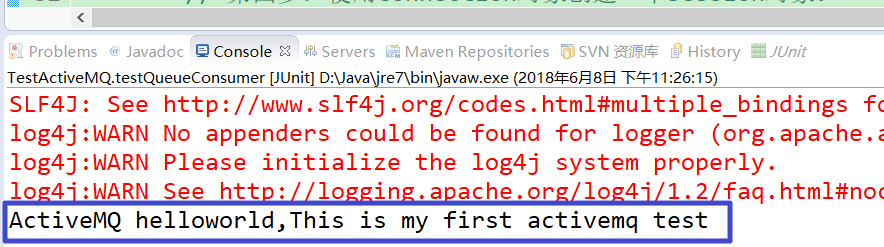
public void testQueueConsumer() throws Exception {
// 第一步:创建一个ConnectionFactory对象连接MQ服务器。
String brokerURL = "tcp://192.168.25.131:61616";
ConnectionFactory connectionFactory = new ActiveMQConnectionFactory(brokerURL); // 第二步:从ConnectionFactory对象中获得一个Connection对象。
Connection connection = connectionFactory.createConnection(); // 第三步:开启连接。调用Connection对象的start方法。
connection.start(); // 第四步:使用Connection对象创建一个Session对象。
Session session = connection.createSession(false, Session.AUTO_ACKNOWLEDGE); // 第五步:使用Session对象创建一个Destination对象。和发送端保持一致queue,并且队列的名称一致。
Queue queue = session.createQueue("test-queue"); // 第六步:使用Session对象创建一个Consumer对象。
MessageConsumer consumer = session.createConsumer(queue); // 第七步:接收消息。
consumer.setMessageListener(new MessageListener() {
@Override
public void onMessage(Message message) {
try {
TextMessage textMessage = (TextMessage) message;
String text =null;
//取消息的内容
text = textMessage.getText();
// 第八步:打印消息。
System.out.println(text);
} catch (JMSException e) {
e.printStackTrace();
}
}
});
//等待键盘输入
System.in.read();
// 第九步:关闭资源
consumer.close();
session.close();
connection.close();
}
运行上面的测试程序,然后可以在控制看到消费者拿到了消息内容
我们再去查看一个web服务端

6 Topic
1 Producer
使用步骤:
第一步:创建ConnectionFactory对象,需要指定服务端ip及端口号。
第二步:使用ConnectionFactory对象创建一个Connection对象。
第三步:开启连接,调用Connection对象的start方法。
第四步:使用Connection对象创建一个Session对象。
第五步:使用Session对象创建一个Destination对象(topic、queue),此处创建一个Topic对象。
第六步:使用Session对象创建一个Producer对象。
第七步:创建一个Message对象,创建一个TextMessage对象。
第八步:使用Producer对象发送消息。
第九步:关闭资源。
@Test

public void testTopicProducer() throws Exception {

    // 第一步:创建ConnectionFactory对象,需要指定服务端ip及端口号。

    // brokerURL服务器的ip及端口号,端口号是61616,web服务的端口号是8161

    String brokerURL="tcp://192.168.25.131:61616";

    ConnectionFactory connectionFactory = new ActiveMQConnectionFactory(brokerURL);

    // 第二步:使用ConnectionFactory对象创建一个Connection对象。

    Connection connection = connectionFactory.createConnection();

    // 第三步:开启连接,调用Connection对象的start方法。

    connection.start();

    // 第四步:使用Connection对象创建一个Session对象。

    /*

     *第一个参数:是否开启事务。

     *如果true开启事务,第二个参数无意义。一般不开启事务。事务的意思就是没有发出去就重发

     *

     *第二个参数:当第一个参数为false时,第二个参数才有意义。

     *表示消息的应答模式。1、自动应答2、手动应答。一般是自动应答。

     */

    Session session = connection.createSession(false, Session.AUTO_ACKNOWLEDGE);

    // 第五步:使用Session对象创建一个Destination对象(topic、queue),此处创建一个Topic对象。

    //参数:队列的名称。

    Topic topic = session.createTopic("test-topic");

    // 第六步:使用Session对象创建一个Producer对象。

    MessageProducer producer = session.createProducer(topic);

    // 第七步:创建一个Message对象,创建一个TextMessage对象。

    /*

     * TextMessage message = new ActiveMQTextMessage(); message.setText(

     * "hello activeMq,this is my first test.");

     */

    TextMessage message = session.createTextMessage("hello activeMq,this is my first test.");

    // 第八步:使用Producer对象发送消息。

    producer.send(message);

    // 第九步:关闭资源。

    producer.close();

    session.close();

    connection.close();

}
2 Consumer
消费者:接收消息。
第一步:创建一个ConnectionFactory对象。
第二步:从ConnectionFactory对象中获得一个Connection对象。
第三步:开启连接。调用Connection对象的start方法。
第四步:使用Connection对象创建一个Session对象。
第五步:使用Session对象创建一个Destination对象。和发送端保持一致topic,并且话题的名称一致。
第六步:使用Session对象创建一个Consumer对象。
第七步:接收消息。
第八步:打印消息。
第九步:关闭资源
@Test
public void testTopicConsumer() throws Exception {
// 第一步:创建一个ConnectionFactory对象连接MQ服务器。
String brokerURL = "tcp://192.168.25.131:61616";
ConnectionFactory connectionFactory = new ActiveMQConnectionFactory(brokerURL); // 第二步:从ConnectionFactory对象中获得一个Connection对象。
Connection connection = connectionFactory.createConnection(); // 第三步:开启连接。调用Connection对象的start方法。
connection.start(); // 第四步:使用Connection对象创建一个Session对象。
Session session = connection.createSession(false, Session.AUTO_ACKNOWLEDGE); // 第五步:使用Session对象创建一个Destination对象。和发送端保持一致topic,并且话题的名称一致。
Topic topic = session.createTopic("test-topic"); // 第六步:使用Session对象创建一个Consumer对象。
MessageConsumer consumer = session.createConsumer(topic); // 第七步:接收消息。
consumer.setMessageListener(new MessageListener() {
@Override
public void onMessage(Message message) {
try {
TextMessage textMessage = (TextMessage) message;
String text =null;
//取消息的内容
text = textMessage.getText();
// 第八步:打印消息。
System.out.println(text);
} catch (JMSException e) {
e.printStackTrace();
}
}
});
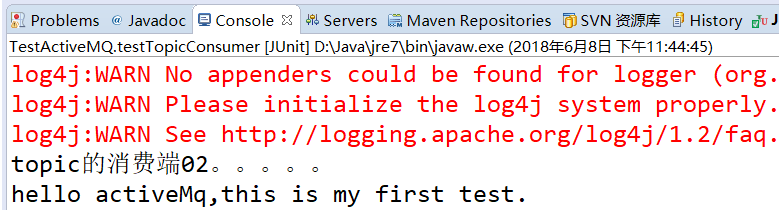
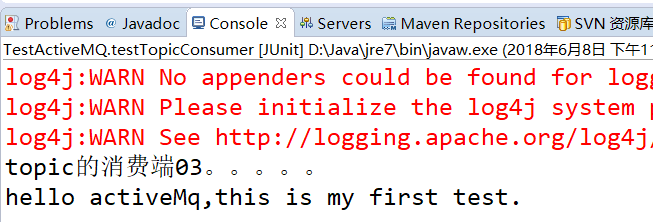
System.out.println("topic的消费端01。。。。。");
//等待键盘输入
System.in.read();
// 第九步:关闭资源
consumer.close();
session.close();
connection.close();
}
3 测试
1 测试一
运行producer生成者

可以看到消息发送了一个,没有发送到任何消费者。消息不会持久化,直接丢失掉了,点击test-topic也看不到发送的消息内容。
2 测试二
运行consumer消费者3次,相当于启动了三个消费者。分别修改输出,用以区分.。
System.out.println("topic的消费端01。。。。。");

System.out.println("topic的消费端02。。。。。");

System.out.println("topic的消费端03。。。。。");
然后运行producer
会发现三个消费者都能够收到消息

然后我们查看一下web服务端

可以看到有3个消费者,发送了2次消息【测试一发送一次,所以总的是两次】,3条消息已出队。
如果我们在运行一次producer,会显示发送了消息3次,6条消息已出队

7 Quene 和 Topic的区别
Quene:点对点,消息会被持久化
Topic:广播,消息不会被持久化
8 activemq和spring的整合
第一步:引入相关的jar包
<!-- ActiveMQ客户端依赖的jar包 -->

<dependency>

    <groupId>org.apache.activemq</groupId>

    <artifactId>activemq-all</artifactId>

</dependency>

<dependency>

    <groupId>org.springframework</groupId>

    <artifactId>spring-jms</artifactId>

</dependency>

<dependency>

    <groupId>org.springframework</groupId>

    <artifactId>spring-context-support</artifactId>

</dependency>
第二步:producer生产者的spring配置文件
<?xml version="1.0" encoding="UTF-8"?>

<beans xmlns="http://www.springframework.org/schema/beans"

       xmlns:context="http://www.springframework.org/schema/context"

       xmlns:p="http://www.springframework.org/schema/p"

       xmlns:aop="http://www.springframework.org/schema/aop"

       xmlns:tx="http://www.springframework.org/schema/tx"

       xmlns:xsi="http://www.w3.org/2001/XMLSchema-instance"

       xsi:schemaLocation="http://www.springframework.org/schema/beans

                           http://www.springframework.org/schema/beans/spring-beans-4.2.xsd

                           http://www.springframework.org/schema/context

                           http://www.springframework.org/schema/context/spring-context-4.2.xsd

                           http://www.springframework.org/schema/aop

                           http://www.springframework.org/schema/aop/spring-aop-4.2.xsd

                           http://www.springframework.org/schema/tx

                           http://www.springframework.org/schema/tx/spring-tx-4.2.xsd

                           http://www.springframework.org/schema/util

                           http://www.springframework.org/schema/util/spring-util-4.2.xsd">

    <!-- 真正可以产生Connection的ConnectionFactory,由对应的 JMS服务厂商提供 -->

    <bean id="targetConnectionFactory" class="org.apache.activemq.ActiveMQConnectionFactory">

        <property name="brokerURL" value="tcp://47.93.53.127:61616" />

    </bean>

    <!-- Spring用于管理真正的ConnectionFactory的ConnectionFactory -->

    <bean id="connectionFactory"

        class="org.springframework.jms.connection.SingleConnectionFactory">

        <!-- 目标ConnectionFactory对应真实的可以产生JMS Connection的ConnectionFactory -->

        <property name="targetConnectionFactory" ref="targetConnectionFactory" />

    </bean>

    <!-- 配置生产者 -->

    <!-- Spring提供的JMS工具类,它可以进行消息发送、接收等 -->

    <bean id="jmsTemplate" class="org.springframework.jms.core.JmsTemplate">

        <!-- 这个connectionFactory对应的是我们定义的Spring提供的那个ConnectionFactory对象 -->

        <property name="connectionFactory" ref="connectionFactory" />

    </bean>

    <!--这个是队列目的地,点对点的 -->

    <bean id="queueDestination" class="org.apache.activemq.command.ActiveMQQueue">

        <constructor-arg>

            <value>spring-queue</value>

        </constructor-arg>

    </bean>

    <!--这个是主题目的地,一对多的 -->

    <bean id="topicDestination" class="org.apache.activemq.command.ActiveMQTopic">

        <constructor-arg value="topic" />

    </bean>

</beans>
第三步:生产者的代码
package cn.e3mall.activeMQ;

import javax.jms.Destination;

import javax.jms.JMSException;

import javax.jms.Message;

import javax.jms.Session;

import javax.jms.TextMessage;

import org.junit.Test;

import org.springframework.context.ApplicationContext;

import org.springframework.context.support.ClassPathXmlApplicationContext;

import org.springframework.jms.core.JmsTemplate;

import org.springframework.jms.core.MessageCreator;

/**

 * 测试spring整合activemq

 * @title:TestSpringActiveMQ

 * @description:

 * @author jepson

 * @date 2018年6月10日 下午5:41:47

 * @version 1.0

 */

public class TestSpringActiveMQ {

    @Test

    public void testSpringActiveMq() throws Exception {

        //初始化spring容器

        ApplicationContext applicationContext = new ClassPathXmlApplicationContext("classpath:spring/applicationContext-activemq.xml");

        //从spring容器中获得JmsTemplate对象

        JmsTemplate jmsTemplate = applicationContext.getBean(JmsTemplate.class);

        //从spring容器中取Destination对象

        Destination destination = (Destination) applicationContext.getBean("queueDestination");

        //使用JmsTemplate对象发送消息。

        jmsTemplate.send(destination, new MessageCreator() {

            @Override

            public Message createMessage(Session session) throws JMSException {

                //创建一个消息对象并返回

                TextMessage textMessage = session.createTextMessage("spring activemq queue message");

                return textMessage;

            }

        });

    }

}
第四步:MessageListener代码实现
package cn.e3mall.search.listener;

import javax.jms.JMSException;

import javax.jms.Message;

import javax.jms.MessageListener;

import javax.jms.TextMessage;

/**

 * 测试消息接收

 * @title:MyMessageListener

 * @description:

 * @author jepson

 * @date 2018年6月10日 下午7:01:04

 * @version 1.0

 */

public class MyMessageListener implements MessageListener{

    @Override

    public void onMessage(Message message) {

        try {

            TextMessage textMessage = (TextMessage) message;

            //取消息内容

            String text = textMessage.getText();

            System.out.println(text);

        } catch (JMSException e) {

            e.printStackTrace();

        }

    }

}
第五步:consumer消费者的spring配置文件
<?xml version="1.0" encoding="UTF-8"?>

<beans xmlns="http://www.springframework.org/schema/beans"

       xmlns:context="http://www.springframework.org/schema/context"

       xmlns:p="http://www.springframework.org/schema/p"

       xmlns:aop="http://www.springframework.org/schema/aop"

       xmlns:tx="http://www.springframework.org/schema/tx"

       xmlns:xsi="http://www.w3.org/2001/XMLSchema-instance"

       xsi:schemaLocation="http://www.springframework.org/schema/beans

                        http://www.springframework.org/schema/beans/spring-beans-4.2.xsd

                        http://www.springframework.org/schema/context

                        http://www.springframework.org/schema/context/spring-context-4.2.xsd

                        http://www.springframework.org/schema/aop

                        http://www.springframework.org/schema/aop/spring-aop-4.2.xsd

                        http://www.springframework.org/schema/tx

                        http://www.springframework.org/schema/tx/spring-tx-4.2.xsd

                        http://www.springframework.org/schema/util

                        http://www.springframework.org/schema/util/spring-util-4.2.xsd">

    <!-- 真正可以产生Connection的ConnectionFactory,由对应的 JMS服务厂商提供 -->

    <bean id="targetConnectionFactory" class="org.apache.activemq.ActiveMQConnectionFactory">

        <property name="brokerURL" value="tcp://47.93.53.127:61616" />

    </bean>

    <!-- Spring用于管理真正的ConnectionFactory的ConnectionFactory -->

    <bean id="connectionFactory"

        class="org.springframework.jms.connection.SingleConnectionFactory">

        <!-- 目标ConnectionFactory对应真实的可以产生JMS Connection的ConnectionFactory -->

        <property name="targetConnectionFactory" ref="targetConnectionFactory" />

    </bean>

    <!-- 配置生产者 -->

    <!-- Spring提供的JMS工具类,它可以进行消息发送、接收等 -->

    <bean id="jmsTemplate" class="org.springframework.jms.core.JmsTemplate">

        <!-- 这个connectionFactory对应的是我们定义的Spring提供的那个ConnectionFactory对象 -->

        <property name="connectionFactory" ref="connectionFactory" />

    </bean>

    <!--这个是队列目的地,点对点的 -->

    <bean id="queueDestination" class="org.apache.activemq.command.ActiveMQQueue">

        <constructor-arg>

            <value>spring-queue</value>

        </constructor-arg>

    </bean>

    <!--这个是主题目的地,一对多的 -->

    <bean id="topicDestination" class="org.apache.activemq.command.ActiveMQTopic">

        <constructor-arg value="topic" />

    </bean>

    <!-- 接收消息 -->

    <!-- 配置监听器 -->

    <bean id="myMessageListener" class="cn.e3mall.search.listener.MyMessageListener" />

    <!-- 消息监听容器 -->

    <bean class="org.springframework.jms.listener.DefaultMessageListenerContainer">

        <property name="connectionFactory" ref="connectionFactory" />

        <property name="destination" ref="queueDestination" />

        <property name="messageListener" ref="myMessageListener" />

    </bean>

</beans>
第六步:测试消费
package cn.e3mall.activemq;

import org.junit.Test;

import org.springframework.context.ApplicationContext;

import org.springframework.context.support.ClassPathXmlApplicationContext;

/**

 *

 * @title:MessageConsumer

 * @description:

 * @author jepson

 * @date 2018年6月10日 下午7:07:29

 * @version 1.0

 */

public class MessageConsumer {

    @Test

    public void testQueueConsumer() throws Exception {

        //初始化spring容器

        ApplicationContext applicationContext = new ClassPathXmlApplicationContext("classpath:spring/applicationContext-activemq.xml");

        //等待

        System.in.read();

    }

}
ActiveMQ安装及使用的更多相关文章
- Java JMS 程序基础 与 ActiveMQ 安装(一)
一 ActiveMQ安装 从Apache官网上下载 ActivieMQ的安装包 apache-activemq-5.9.1-bin.tar.gz, 并拷贝到linux的安装目录解压 # tar -zx ...
- ActiveMQ安装配置及使用 转发 https://www.cnblogs.com/hushaojun/p/6016709.html
ActiveMQ安装配置及使用 ActiveMQ介绍 ActiveMQ 是Apache出品,最流行的,能力强劲的开源消息总线.ActiveMQ 是一个完全支持JMS1.1和J2EE 1.4规范的 JM ...
- ActiveMQ安装配置及使用
ActiveMQ介绍 ActiveMQ 是Apache出品,最流行的,能力强劲的开源消息总线.ActiveMQ 是一个完全支持JMS1.1和J2EE 1.4规范的 JMS Provider实现,尽管J ...
- ActiveMQ安装与入门程序 & JMS的消息结构
1.Activemq安装 直接到官网下载:记住apache的官网是域名反过来,比如我们找activemq就是activemq.apache.org. 最新版本要求最低的JDK是8,所以最好在电脑装多个 ...
- activeMQ 安装及启动异常处理
一.环境: [root@centos_6 ~]# cat /etc/system-release CentOS release 6.5 (Final) [root@centos_6 ~]# uname ...
- Windows下ActiveMq安装与使用
一.activeMq安装与启动 Apache Active MQ的官网 :http://activemq.apache.org/ 下载地址: http://activemq.apache.org/ac ...
- linux下activemq安装与配置activemq-5.15.2
linux下activemq安装与配置 前提 配置好jdk环境 一.下载:apache-activemq-5.15.2-bin.tar.gz https://archive.apache.org/ ...
- springboot之activemq安装与实践
环境:腾讯云centos7 注意:activemq安装插件,可能会报错.本人是主机名的问题,所以修改了主机名. vim /etc/hosts vim /etc/hostname 修改这两个文件,并重启 ...
- 开源消息服务中间件ActiveMQ安装部署
1.下载ActiveMQ 去官方网站下载:http://activemq.apache.org/ 2.运行ActiveMQ 解压缩apache-activemq-5.5.1-bin.zip 启动Act ...
- ActiveMQ此例简单介绍基于docker的activemq安装与集群搭建
ActiveMQ拓展连接 此例简单介绍基于Docker的activemq安装与集群搭建 一 :安装 1.获取activemq镜像 docker pull webcenter/activemq 2.启动 ...
随机推荐
- Bootstrap轮播
实现原理:隐藏所有要显示的元素,然后指定要显示的为block,宽.高自适应. 结构: 容器:最外层为一个div 使用data-ride="carousel" 来指定为轮播插件.并提 ...
- linux网络管理员
1. 查看当前开启的所有网络服务 命令:netstat -a (all)显示所有选项,默认不显示LISTEN相关-t (tcp)仅显示tcp相关选项-u (udp)仅显示udp相关选项-n 拒绝显示别 ...
- 编译语言 vs 解释语言
编译语言 vs 解释语言 阅读: 评论: 作者:Rybby 日期: 来源:rybby.com 一直以为,编译语言的性能绝对比解释语言快,因为就理论而言,解释语言要一边解释(将脚本语言翻译成计算 ...
- [Elixir004]通过环境变量(Environment Variables)来管理config
在elixir的config中我们有时会使用的到一些不想暴露出来的配置项,常用的作法是如Phoenix #config/prod.exs use Mix.Config ... # Finally im ...
- jenkins启动失败,提示Starting Jenkins Jenkins requires Java8 or later, but you are running 1.7.0
# 背景 centos安装jenkins后,先启动jenkins服务,结果报错如下: 但自己明明已经安装了java8的 # 解决方法 既然安装了java8的话,那么证明是jenkins启动的是还是用的 ...
- vim命令以及gcc编译器的常用cmd
Gcc常用命令: -c 仅对源文件进行编译,不链接生成可执行文件.常用于查错和只生成目标文件. -o 经过gcc处理过后的结果保存在-o后面的文件中,可以是多种文件 ...
- vs2008安装mvc3后新建项目报错 -- 类型“System.Web.Mvc.ModelClientValidationRule”同时存在
解决方案: 找到主目录的.csproj文件,用文字编辑器打开你找到它找到 <Reference Include="System.Web.WebPages" /> &l ...
- Stacking方法详解
集成学习方法主要分成三种:bagging,boosting 和 Stacking.这里主要介绍Stacking. stacking严格来说并不是一种算法,而是精美而又复杂的,对模型集成的一种策略. 首 ...
- 关于JNDI技术链接操作数据库-2019.1.10
Java 命名与目录接口(Java Naming and Directory Interface) ==需要使用的包为java.sql&javax.naming包==Mysql 步骤: 1.配 ...
- 教你玩转XSS漏洞
什么是存储性XSS那? 通俗理解就是”xss“语句存在服务器上,可以一直被客户端浏览使用,所有登陆某一个存在”存储性xss“的页面的人,都会中招,可以是管理员,可以是普通的用户,所以他的危害是持续性的 ...