ToggleButton控件,Switch控件
(一)
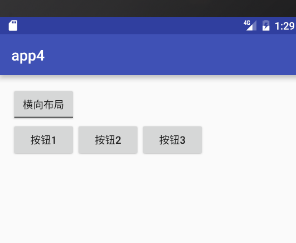
1.效果图

2. activity_main.xml
 <?xml version="1.0" encoding="utf-8"?>

 <LinearLayout xmlns:android="http://schemas.android.com/apk/res/android"

     xmlns:tools="http://schemas.android.com/tools"

     android:layout_width="match_parent"

     android:layout_height="match_parent"

     android:paddingBottom="@dimen/activity_vertical_margin"

     android:paddingLeft="@dimen/activity_horizontal_margin"

     android:paddingRight="@dimen/activity_horizontal_margin"

     android:paddingTop="@dimen/activity_vertical_margin"

     tools:context="com.example.app4.MainActivity"

     android:orientation="vertical">

     <ToggleButton

         android:id="@+id/tb_button"

         android:textOn="纵向布局"

         android:textOff="横向布局"

         android:checked="true"

         android:layout_width="wrap_content"

         android:layout_height="wrap_content" />

     <LinearLayout

         android:id="@+id/ll"

         android:orientation="vertical"

         android:layout_width="wrap_content"

         android:layout_height="wrap_content">

         <Button

             android:text="按钮1"

             android:layout_width="wrap_content"

             android:layout_height="wrap_content" />

         <Button

             android:text="按钮2"

             android:layout_width="wrap_content"

             android:layout_height="wrap_content" />

         <Button

             android:text="按钮3"

             android:layout_width="wrap_content"

             android:layout_height="wrap_content" />

     </LinearLayout>

 </LinearLayout>
3.MainActivity.java
 package com.example.app4;

 import android.support.v7.app.AppCompatActivity;

 import android.os.Bundle;

 import android.widget.CompoundButton;

 import android.widget.LinearLayout;

 import android.widget.ToggleButton;

 public class MainActivity extends AppCompatActivity {

     private ToggleButton toggleButton;

     private LinearLayout linearLayout;

     @Override

     protected void onCreate(Bundle savedInstanceState) {

         super.onCreate(savedInstanceState);

         setContentView(R.layout.activity_main);

         toggleButton = (ToggleButton) findViewById(R.id.tb_button);

         linearLayout = (LinearLayout) findViewById(R.id.ll);

         toggleButton.setOnCheckedChangeListener(new CompoundButton.OnCheckedChangeListener() {

             @Override

             public void onCheckedChanged(CompoundButton buttonView, boolean isChecked) {

                 if (isChecked){

                     //设置纵向布局

                     linearLayout.setOrientation(LinearLayout.VERTICAL);

                     toggleButton.setChecked(true);

                 }else {

                     //设置纵向布局

                     linearLayout.setOrientation(LinearLayout.HORIZONTAL);

                     toggleButton.setChecked(false);

                 }

             }

         });

     }

 }
(二)
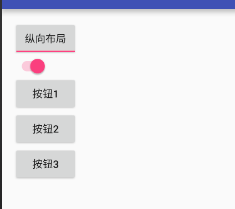
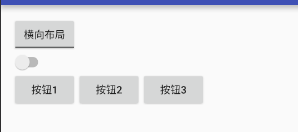
1.效果图
2.activity_main.xml
 <?xml version="1.0" encoding="utf-8"?>

 <LinearLayout xmlns:android="http://schemas.android.com/apk/res/android"

     xmlns:tools="http://schemas.android.com/tools"

     android:layout_width="match_parent"

     android:layout_height="match_parent"

     android:paddingBottom="@dimen/activity_vertical_margin"

     android:paddingLeft="@dimen/activity_horizontal_margin"

     android:paddingRight="@dimen/activity_horizontal_margin"

     android:paddingTop="@dimen/activity_vertical_margin"

     tools:context="com.example.app4.MainActivity"

     android:orientation="vertical">

     <ToggleButton

         android:id="@+id/tb_button"

         android:textOn="纵向布局"

         android:textOff="横向布局"

         android:checked="true"

         android:layout_width="wrap_content"

         android:layout_height="wrap_content" />

     <Switch

         android:id="@+id/sw"

         android:checked="true"

         android:layout_width="wrap_content"

         android:layout_height="wrap_content" />

     <LinearLayout

         android:id="@+id/ll"

         android:orientation="vertical"

         android:layout_width="wrap_content"

         android:layout_height="wrap_content">

         <Button

             android:text="按钮1"

             android:layout_width="wrap_content"

             android:layout_height="wrap_content" />

         <Button

             android:text="按钮2"

             android:layout_width="wrap_content"

             android:layout_height="wrap_content" />

         <Button

             android:text="按钮3"

             android:layout_width="wrap_content"

             android:layout_height="wrap_content" />

     </LinearLayout>

 </LinearLayout>
3.MainActivity.java
 package com.example.app4;

 import android.support.v7.app.AppCompatActivity;

 import android.os.Bundle;

 import android.widget.CompoundButton;

 import android.widget.LinearLayout;

 import android.widget.Switch;

 import android.widget.ToggleButton;

 public class MainActivity extends AppCompatActivity {

     private ToggleButton toggleButton;

     private LinearLayout linearLayout;

     private Switch aSwitch;

     @Override

     protected void onCreate(Bundle savedInstanceState) {

         super.onCreate(savedInstanceState);

         setContentView(R.layout.activity_main);

         toggleButton = (ToggleButton) findViewById(R.id.tb_button);

         linearLayout = (LinearLayout) findViewById(R.id.ll);

         aSwitch = (Switch) findViewById(R.id.sw);

         MyListener myListener = new MyListener();

         toggleButton.setOnCheckedChangeListener(myListener);

         aSwitch.setOnCheckedChangeListener(myListener);

         /*toggleButton.setOnCheckedChangeListener(new CompoundButton.OnCheckedChangeListener() {

             @Override

             public void onCheckedChanged(CompoundButton buttonView, boolean isChecked) {

                 if (isChecked){

                     //设置纵向布局

                     linearLayout.setOrientation(LinearLayout.VERTICAL);

                     toggleButton.setChecked(true);

                 }else {

                     //设置纵向布局

                     linearLayout.setOrientation(LinearLayout.HORIZONTAL);

                     toggleButton.setChecked(false);

                 }

             }

         });*/

     }

     class  MyListener implements CompoundButton.OnCheckedChangeListener{

         @Override

         public void onCheckedChanged(CompoundButton buttonView, boolean isChecked) {

             if (isChecked){

                 //设置纵向布局

                 linearLayout.setOrientation(LinearLayout.VERTICAL);

                 toggleButton.setChecked(true);

                 aSwitch.setChecked(true);

             }else {

                 //设置纵向布局

                 linearLayout.setOrientation(LinearLayout.HORIZONTAL);

                 toggleButton.setChecked(false);

                 aSwitch.setChecked(false);

             }

         }

     }

 }
ToggleButton控件,Switch控件的更多相关文章
- Switch控件详解
Switch控件详解 原生效果 5.x 4.x 布局 <Switch android:id="@+id/setting_switch" android:layout_widt ...
- 在tableviewcell里面嵌入switch控件以及如何获取switch控件数据
主要是通过cell.accessoryView来添加switch控件- (UITableViewCell *)tableView:(UITableView *)tableView cellForRow ...
- ToggleButton开关状态按钮控件
ToggleButton开关状态按钮控件 一.简介 1. 2.ToggleButton类结构 父类是CompoundButton,引包的时候注意下 二.ToggleButton开关状态按钮控件使用方法 ...
- Android Studio中Switch控件有关 textOn 和 textOff 用法
•属性 textOn:控件打开时显示的文字 textOff:控件关闭时显示的文字 showText:设置是否显示开关上的文字(API 21及以上) •用法 <?xml version=" ...
- 【原创】自己动手写控件----XSmartNote控件
一.前面的话 在上一篇博文自己动手写工具----XSmartNote [Beta 3.0]中,用到了若干个自定义控件,其中包含用于显示Note内容的简单的Label扩展控件,用于展示标签内容的labe ...
- WPF进阶技巧和实战03-控件(1-控件及内容控件)
所有控件都继承自System.Windows.Controls.Control类,这个类添加一些基本结构: 设置控件内容对齐方式 (HorizontalContentAlignment,Vertica ...
- winform用户控件、动态创建添加控件、timer控件、控件联动
用户控件: 相当于自定义的一个panel 里面可以放各种其他控件,并可以在后台一下调用整个此自定义控件. 使用方法:在项目上右键.添加.用户控件,之后用户控件的编辑与普通容器控件类似.如果要在后台往窗 ...
- paip.gui控件tabs控件加载内容的原理以及easyui最佳实现
paip.gui控件tabs控件加载内容的原理以及easyui最佳实现 //////////////tabs控件的加载 同form窗体一样,俩个方式 两个方式:一个是url,简单的文本可以使用这个,不 ...
- zw版【转发·台湾nvp系列Delphi例程】Delphi 使用 HALCON库件COM控件数据格式转换
zw版[转发·台湾nvp系列Delphi例程]Delphi 使用 HALCON库件COM控件数据格式转换 Delphi 使用 HALCON库件COM控件数据格式转换,与IHObjectX接口有关 va ...
随机推荐
- Nginx替换过滤文本模块replace-filter-nginx-module
1.安装此模块需要先安装sregex运行库 apt-get update;apt-get install git make gcc -y #Centos改成yum git clone https:// ...
- java web标签
一:国庆结束了,回来上班,结果老大说过两天才出差,所以这两天就用来补自己不太懂的知识或者以前没有熟悉的知识,jsp的标签就是,因为在项目中自己封装了一些标签,但是我自己只是会用,真正的原理性的东西我还 ...
- codeforces B. Okabe and Banana Trees 结论题
题目传送门 这道题 枚举一波y就好了 要求x,y整数 所以y最多1000个 然后算一波答案更新就好了 233 #include<cstdio> #include<cstring> ...
- 【Atcoder】ARC082 E - ConvexScore
[算法]计算几何 [题意]给定平面直角坐标系上的若干个点,任意选点连成凸多边形,凸多边形的价值定义为2^(n-|S|),其中n为凸多边形内部点数(含边界),|S|为顶点数,求总价值.n<=10^ ...
- 【反演复习计划】【bzoj2818】gcd
就是之前的2820的升级版. 把暴力枚举素数改成预处理就随便A了. #include<bits/stdc++.h> #define N 10000005 #define ll long l ...
- js数组高效去重
http://blog.csdn.net/chengxuyuan20100425/article/details/8497277 这个方法的思路是先把数组排序,然后比较相邻的两个值. 排序的时候用的J ...
- 3.资源调度框架yarn
既然要分析yarn,无非是从以下方面分析 (一).yarn产生背景(二).yarn概述(三).yarn架构(四).yarn执行流程(五).yarn环境搭建(六).提交作业到yarn上运行 (一).ya ...
- 【 Linux 网络虚拟化 】Netns
netns 可以创建一个完全隔离的新网络环境,这个环境包括一个独立的网卡空间,路由表,ARP表,ip地址表,iptables等.总之,与网络有关的组件都是独立的. 创建网络空间: # ip netns ...
- Android的简单应用(一)——PreferenceFragment实现应用的设置
今天主要讲解怎么使用PreferenceFragment.PreferenceFragment它与默认的SharedPreferences文件相连接,不需要你再自己写代码去操作SharedPrefer ...
- USACO 2012 Feb Cow Coupons
2590: [Usaco2012 Feb]Cow Coupons Time Limit: 10 Sec Memory Limit: 128 MB Submit: 349 Solved: 181 [Su ...