
aws命令行cli创建VPC网络、公有子网、私有子网、nat网关+EIP
- 在AWS部署海外节点, 图简单使用web控制台创建VPC和k8s集群出错(k8s), 使用cli命令行工具创建成功
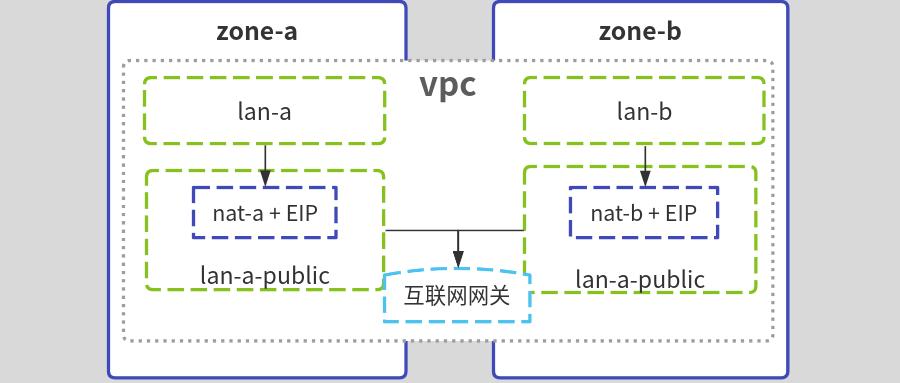
- 本实例为复盘, 记录aws命令行工具cli创建VPC网络, a区和b区分别创建公有子网、私有子网、nat网关+EIP、再创建ssh跳板机作为管理入口
- 建议使用terraform管理云资源
公网出口nat网关创建在公有子网, 如下图:
#安装配置aws cli
#install

cd /tmp

curl -kL "https://awscli.amazonaws.com/awscli-exe-linux-x86_64.zip" -o "awscliv2.zip"

unzip awscliv2.zip

sudo ./aws/install

aws --version

#配置aws key

aws configure

#查看配置

aws configure list
#创建专用网络vpc
#env

Region=ap-southeast-1  #新加坡

vpc_name=test-vpc

vpc_cidr=10.20.0.0/16

aws ec2 create-vpc \

--region $Region \

--cidr-block ${vpc_cidr} \

--tag-specifications "ResourceType=vpc,Tags=[{Key=Name,Value=${vpc_name}}]" \

 |tee /tmp/vpc.log

#get id

VpcId=$(jq -r ".Vpc.VpcId" /tmp/vpc.log)

OwnerId=$(jq -r ".Vpc.OwnerId" /tmp/vpc.log)
#在a区创建私有子网和公有子网
#env

zone_a=ap-southeast-1a

lan_a=subnet-a

lan_a_cidr=10.20.0.0/21

lan_a_public=subnet-a-public

lan_a_public_cidr=10.20.81.0/24

aws ec2 create-subnet \

--region $Region \

--availability-zone ${zone_a} \

--vpc-id ${VpcId} --cidr-block ${lan_a_cidr} \

--tag-specifications "ResourceType=subnet,Tags=[{Key=Name,Value=${lan_a}}]" \

 |tee /tmp/lan1.log

aws ec2 create-subnet \

--region $Region \

--availability-zone ${zone_a} \

--vpc-id ${VpcId} --cidr-block ${lan_a_public_cidr} \

--tag-specifications "ResourceType=subnet,Tags=[{Key=Name,Value=${lan_a_public}}]" \

 |tee /tmp/lan2.log

#get id

lan_a_id=$(jq -r ".Subnet.SubnetId" /tmp/lan1.log)

lan_a_public_id=$(jq -r ".Subnet.SubnetId" /tmp/lan2.log)
#在b区创建私有子网和公有子网
#env

zone_b=ap-southeast-1b

lan_b=subnet-b

lan_b_cidr=10.20.8.0/21

lan_b_public=subnet-b-public

lan_b_public_cidr=10.20.82.0/24

aws ec2 create-subnet \

--region $Region \

--availability-zone ${zone_b} \

--vpc-id ${VpcId} --cidr-block ${lan_b_cidr} \

--tag-specifications "ResourceType=subnet,Tags=[{Key=Name,Value=${lan_a}}]" \

 |tee /tmp/lan3.log

aws ec2 create-subnet \

--region $Region \

--availability-zone ${zone_b} \

--vpc-id ${VpcId} --cidr-block ${lan_b_public_cidr} \

--tag-specifications "ResourceType=subnet,Tags=[{Key=Name,Value=${lan_a_public}}]" \

 |tee /tmp/lan4.log

#get id

lan_b_id=$(jq -r ".Subnet.SubnetId" /tmp/lan2.log)

lan_b_public_id=$(jq -r ".Subnet.SubnetId" /tmp/lan4.log)
#创建互联网网关, 作为公有子网出口
igw_name=${vpc_name}-public-gatway

aws ec2 create-internet-gateway \

--region $Region \

--tag-specifications "ResourceType=internet-gateway,Tags=[{Key=Name,Value=${igw_name}}]" \

 |tee /tmp/igw.log

igw_id=$(jq -r ".InternetGateway.InternetGatewayId" /tmp/igw.log)

#互联网网关,关联到vpc

aws ec2 attach-internet-gateway \

--region $Region \

--vpc-id ${VpcId} \

--internet-gateway-id ${igw_id}

#创建公有子网的路由表

route_name=route-public

aws ec2 create-route-table \

--region $Region \

--vpc-id ${VpcId} \

--tag-specifications "ResourceType=route-table,Tags=[{Key=Name,Value=${route_name}}]" \

 |tee /tmp/route.public.log

#get id

route_public_id=$(jq -r ".RouteTable.RouteTableId" /tmp/route.public.log)

#添加路由规则,流量指向互联网网关

aws ec2 create-route \

--region $Region \

--route-table-id ${route_public_id} \

--destination-cidr-block 0.0.0.0/0 \

--gateway-id ${igw_id}

#路由表与2个公有子网关联

aws ec2 associate-route-table  \

--region $Region \

--route-table-id ${route_public_id} \

--subnet-id "${lan_a_public_id}"

#

aws ec2 associate-route-table  \

--region $Region \

--route-table-id ${route_public_id} \

--subnet-id "${lan_b_public_id}"
#创建2个nat网关+EIP, 分别作为a区和b区私有子网出口
#申请2个弹性IP地址,标记为eip-nat-a,eip-nat-b

aws ec2 allocate-address --region $Region |tee /tmp/eip1.log

eip1_id=$(jq -r ".AllocationId" /tmp/eip1.log)

aws ec2 create-tags --resources ${eip1_id} --tags Key=Name,Value=eip-nat-a

aws ec2 allocate-address --region $Region |tee /tmp/eip2.log

eip2_id=$(jq -r ".AllocationId" /tmp/eip2.log)

aws ec2 create-tags --resources ${eip2_id} --tags Key=Name,Value=eipnat-b

#分别创建a、b区nat网关nat-a,nat-b, 关联eip和公有子网

aws ec2 create-nat-gateway \

--region $Region \

--subnet-id ${lan_a_public_id} \

--allocation-id ${eip1_id} \

--tag-specifications "ResourceType=natgateway,Tags=[{Key=Name,Value=nat-a}]" \

 |tee /tmp/nat1.log

aws ec2 create-nat-gateway \

--region $Region \

--subnet-id ${lan_b_public_id} \

--allocation-id ${eip2_id} \

--tag-specifications "ResourceType=natgateway,Tags=[{Key=Name,Value=nat-b}]" \

 |tee /tmp/nat2.log

nat1_id=$(jq -r ".NatGateway.NatGatewayId" /tmp/nat1.log)

nat2_id=$(jq -r ".NatGateway.NatGatewayId" /tmp/nat2.log)

#创建路由表, 把私有子网和nat网关关联,作为访问公网出口

#创建a区私有子网路由表

route_name=route-a

aws ec2 create-route-table \

--region $Region \

--vpc-id ${VpcId} \

--tag-specifications "ResourceType=route-table,Tags=[{Key=Name,Value=${route_name}}]" \

 |tee /tmp/route.a.log

#get id

route_a_id=$(jq -r ".RouteTable.RouteTableId" /tmp/route.a.log)

#添加路由规则,流量指向nat-a网关

aws ec2 create-route \

--region $Region \

--route-table-id ${route_a_id} \

--destination-cidr-block 0.0.0.0/0 \

--gateway-id ${nat1_id}

#路由表与lan-a子网关联

aws ec2 associate-route-table  \

--region $Region \

--route-table-id ${route_a_id} \

--subnet-id ${lan_a_id}

#创建b区私有子网路由表

route_name=route-b

aws ec2 create-route-table \

--region $Region \

--vpc-id ${VpcId} \

--tag-specifications "ResourceType=route-table,Tags=[{Key=Name,Value=${route_name}}]" \

 |tee /tmp/route.b.log

#get id

route_b_id=$(jq -r ".RouteTable.RouteTableId" /tmp/route.a.log)

#添加路由规则,流量指向nat-a网关

aws ec2 create-route \

--region $Region \

--route-table-id ${route_b_id} \

--destination-cidr-block 0.0.0.0/0 \

--gateway-id ${nat2_id}

#路由表与lan-a子网关联

aws ec2 associate-route-table  \

--region $Region \

--route-table-id ${route_b_id} \

--subnet-id ${lan_b_id}
#公有子网中启动ec2实例测试
#创建一个密钥对

aws ec2 create-key-pair --region $Region \

--key-name MySshKey --query "KeyMaterial" \

--output text > MySshKey.pem

chmod 400 MySshKey.pem

#创建安全组,并容许ssh访问

gname=SSHAccess

aws ec2 create-security-group \

--region $Region --vpc-id ${VpcId} \

--group-name $gname --description "SSH access" \

 |tee /tmp/gid.log

gid=$(jq -r ".GroupId" /tmp/gid.log)

aws ec2 authorize-security-group-ingress \

--group-id $gid --protocol tcp --port 22 --cidr 0.0.0.0/0

#启动ec2

aws ec2 run-instances \

--region $Region --count 1 \

--instance-type t2.micro \

--subnet-id ${lan_a_public_id} \

--security-group-ids $gid \

--key-name MySshKey \

--image-id ami-04ff9e9b51c1f62ca  \

 |tee /tmp/ec2.log

ec2_id=$(jq -r ".Instances[0].InstanceId" /tmp/ec2.log)

#查看ec2启动状态

aws ec2 describe-instances --instance-id ${ec2_id} \

--query "Reservations[*].Instances[*].{State:State.Name,Address:PublicIpAddress}"

#等待实例状态为running,若没公网IP,可以申请EIP后绑定

aws ec2 allocate-address --region $Region |tee /tmp/eip3.log

eip3=$(jq -r ".PublicIp" /tmp/eip2.log)

eip3_id=$(jq -r ".AllocationId" /tmp/eip2.log)

aws ec2 associate-address --instance-id ${ec2_id} --allocation-id ${eip3_id}

#ssh登录

ssh -i MySshKey.pem  ubuntu@${eip3}
#若为测试, 则删除创建的实例
#ec2

aws ec2 terminate-instances --instance-ids ${ec2_id}

#security-group

aws ec2 delete-security-group --group-id $gid

#ssh key

aws ec2 delete-key-pair --region $Region --key-name MySshKey

#解除EIP关联

aws ec2 disassociate-address --association-id ${eip1_id} --region $Region

aws ec2 disassociate-address --association-id ${eip2_id} --region $Region

aws ec2 disassociate-address --association-id ${eip3_id} --region $Region

#删除EIP

aws ec2 release-address --allocation-id ${eip1_id} --region $Region

aws ec2 release-address --allocation-id ${eip2_id} --region $Region

aws ec2 release-address --allocation-id ${eip3_id} --region $Region

#删除子网

aws ec2 delete-subnet --region $Region --subnet-id ${lan_a_id}

aws ec2 delete-subnet --region $Region --subnet-id ${lan_a_public_id}

aws ec2 delete-subnet --region $Region --subnet-id ${lan_b_id}

aws ec2 delete-subnet --region $Region --subnet-id ${lan_b_public_id}

#删除nat网关

aws ec2 delete-nat-gateway --nat-gateway-id ${nat1_id} --region $Region

aws ec2 delete-nat-gateway --nat-gateway-id ${nat2_id} --region $Region

#删除路由表

aws ec2 delete-route-table --region $Region --route-table-id ${route_b_id}

aws ec2 delete-route-table --region $Region --route-table-id ${route_a_id}

#互联网网关与VPC分离

aws ec2 detach-internet-gateway --region $Region --internet-gateway-id ${igw_id} --vpc-id ${VpcId}

#删除互联网网关

aws ec2 delete-internet-gateway --region $Region --internet-gateway-id ${igw_id}

#删除vpc

aws ec2 delete-vpc --region $Region --vpc-id ${VpcId}

#若删除失败, 可到web控制台操作
#参考
aws命令行cli创建VPC网络、公有子网、私有子网、nat网关+EIP的更多相关文章
- NET Core 环境搭建和命令行CLI入门
NET Core 环境搭建和命令行CLI入门 2016年6月27日.NET Core & ASP.NET Core 1.0在Redhat峰会上正式发布,社区里涌现了很多文章,我也计划写个系列文 ...
- NET Core 环境搭建和命令行CLI入门[转]
NET Core 环境搭建和命令行CLI入门 时间:2016-07-06 01:48:19 阅读:258 评论:0 收藏:0 [点我收藏+] 标签: N ...
- 创建vpc网络
vpc相关功能点: 模块 功能点 描述 备注 VPC 创建vpc网络 创建vpc网络,指定vpc网络名称 修改vpc网络 修改vpc网络名称 删除vpc网络 删除vpc网络 vpc相关命令 ...
- 如何在Linux命令行中创建以及展示演示稿
导读 你在准备一场演讲的时候,脑海可能会先被图文并茂.形象华丽的演示图稿所占据.诚然,没有人会否认一份生动形象的演讲稿所带来的积极作用.然而,并非所有的演讲都需要TED Talk的质量.更多时候,演讲 ...
- windows cmd命令行下创建文件和文件夹
在window下无法通过 右键=>新建 命令来创建以点开头的文件和文件夹 比如 .log ,会提示必须输入文件名. 可以通过命令行来创建 新建文件夹 mkdir .vs 新建文件 type NU ...
- go如何编写命令行(cli)程序
创建一个命令行程序 问题 如何使用golang创建可以在命令行当中传递参数的程序?go如何带参数执行程序? 比如我们期望使用hello -version来查看hello程序的版本号码.或者输入hell ...
- .NET Core系列 : 1、.NET Core 环境搭建和命令行CLI入门
2016年6月27日.NET Core & ASP.NET Core 1.0在Redhat峰会上正式发布,社区里涌现了很多文章,我也计划写个系列文章,原因是.NET Core的入门门槛相当高, ...
- 【转】使用命令行方式创建和启动android模拟器
原文网址:http://blog.csdn.net/tiandinilv/article/details/8953001 1.Android模拟器介绍 Android中提供了一个模拟器来模拟ARM核的 ...
- ASP.NET Core:CMD命令行+记事本 创建Console程序和Web Application
今天看了Scott关于ASP.NET Core的介绍视频,发现用命令行一步一步新建项目.添加Package.Restore.Build.Run 执行的实现方式,更让容易让我们了解.NET Core的运 ...
- 使用Maven命令行快速创建项目骨架(archetype)
> mvn archetype:generate 接下来就会输出一些列带索引变化的archetype项可供我们选择,然后提示我们选择一个编号,可以直接回车选择默认的编号(392),然后就跟着 ...
随机推荐
- Nuxt.js 应用中的 app:rendered 钩子详解
title: Nuxt.js 应用中的 app:rendered 钩子详解 date: 2024/10/2 updated: 2024/10/2 author: cmdragon excerpt: 摘 ...
- thinkphp在原字段上面进行加减操作
经常有需要对某个数据表的计数字段进行加减操作,我们来看下在ThinkPHP中的具体使用办法. 最简单的,使用下面方法对score自加,第二个参数也可以不要,默认加1: M('User')-> ...
- USB ncm虚拟网卡
NCM介绍 1 功能 USB NCM,属于USB-IF定义的CDC(Communication Device Class)下的一个子类:Network Control Model,用于Host和Dev ...
- Android Qcom USB Driver学习(七)
最近遇到了USB 插拔后,系统重启的问题,抓取串口log发现如下问题,log中查看trace分析就是空指针造成的panic Unable to handle kernel read from unre ...
- 将python文件编译成exe文件
第一种方法:我们只会生成一个exe文件,因为所有的库文件他都会包含在这个exe文件中 1.安装:pyinstaller pip install pyinstaller 2.使用如下命令编译 pyins ...
- .NET 实现的交互式 OA 系统
前言 近期,我们在后台收到了粉丝们的留言,需要一个高效办公自动化(OA)系统.为了回应大家的期待,今天我们推荐一款既灵活又强大的 OA 系统解决方案,帮助提升日常办公效率和团队协作水平. 在日常工作中 ...
- 关于 apt 的一些命令
apt update 用于 更新 包索引,包列表 apt install -y open-vm-tools-desktop fuse 安装 vm-tools 工具
- 从浏览器输入url到回车发生了什么
1. 域名解析,即把域名解析成以为唯一的ip ps:ip是每个网站的对应的一个key,域名是为了语义化,方便使用而设计的 : ps:第一次域名解析需要花费较长的时间,所以一般第一次解析就会把DNS解析 ...
- KubeSphere 在 vsleem 的落地实践
作者:方忠,苏州威视通智能科技有限公司技术经理,开源技术爱好者,长期活跃于 dromara 开源社区并参与贡献. 公司介绍 公司简介 苏州威视通智能科技有限公司,是一家全球领先的全景 AI 平台提供商 ...
- 布局(LinearLayout,RelativeLayout,FrameLayout,TableLayout,GridLayout,ConstraintLayout)
LinearLayout layout_gravity:组件在父容器里的对齐方式 gravity:组件包含的所有子元素的对齐方式 layout_weight:在原有基础上分配剩余空间,一般把layou ...